Creating a visually appealing announcement bar in Webflow is incredibly easy. However, the real challenge comes when you want it to be intelligent. Natively, Webflow doesn't offer a way to hide an element after a user has seen it several times, leading to persistent announcements that overwhelm visitors and lose their effectiveness.
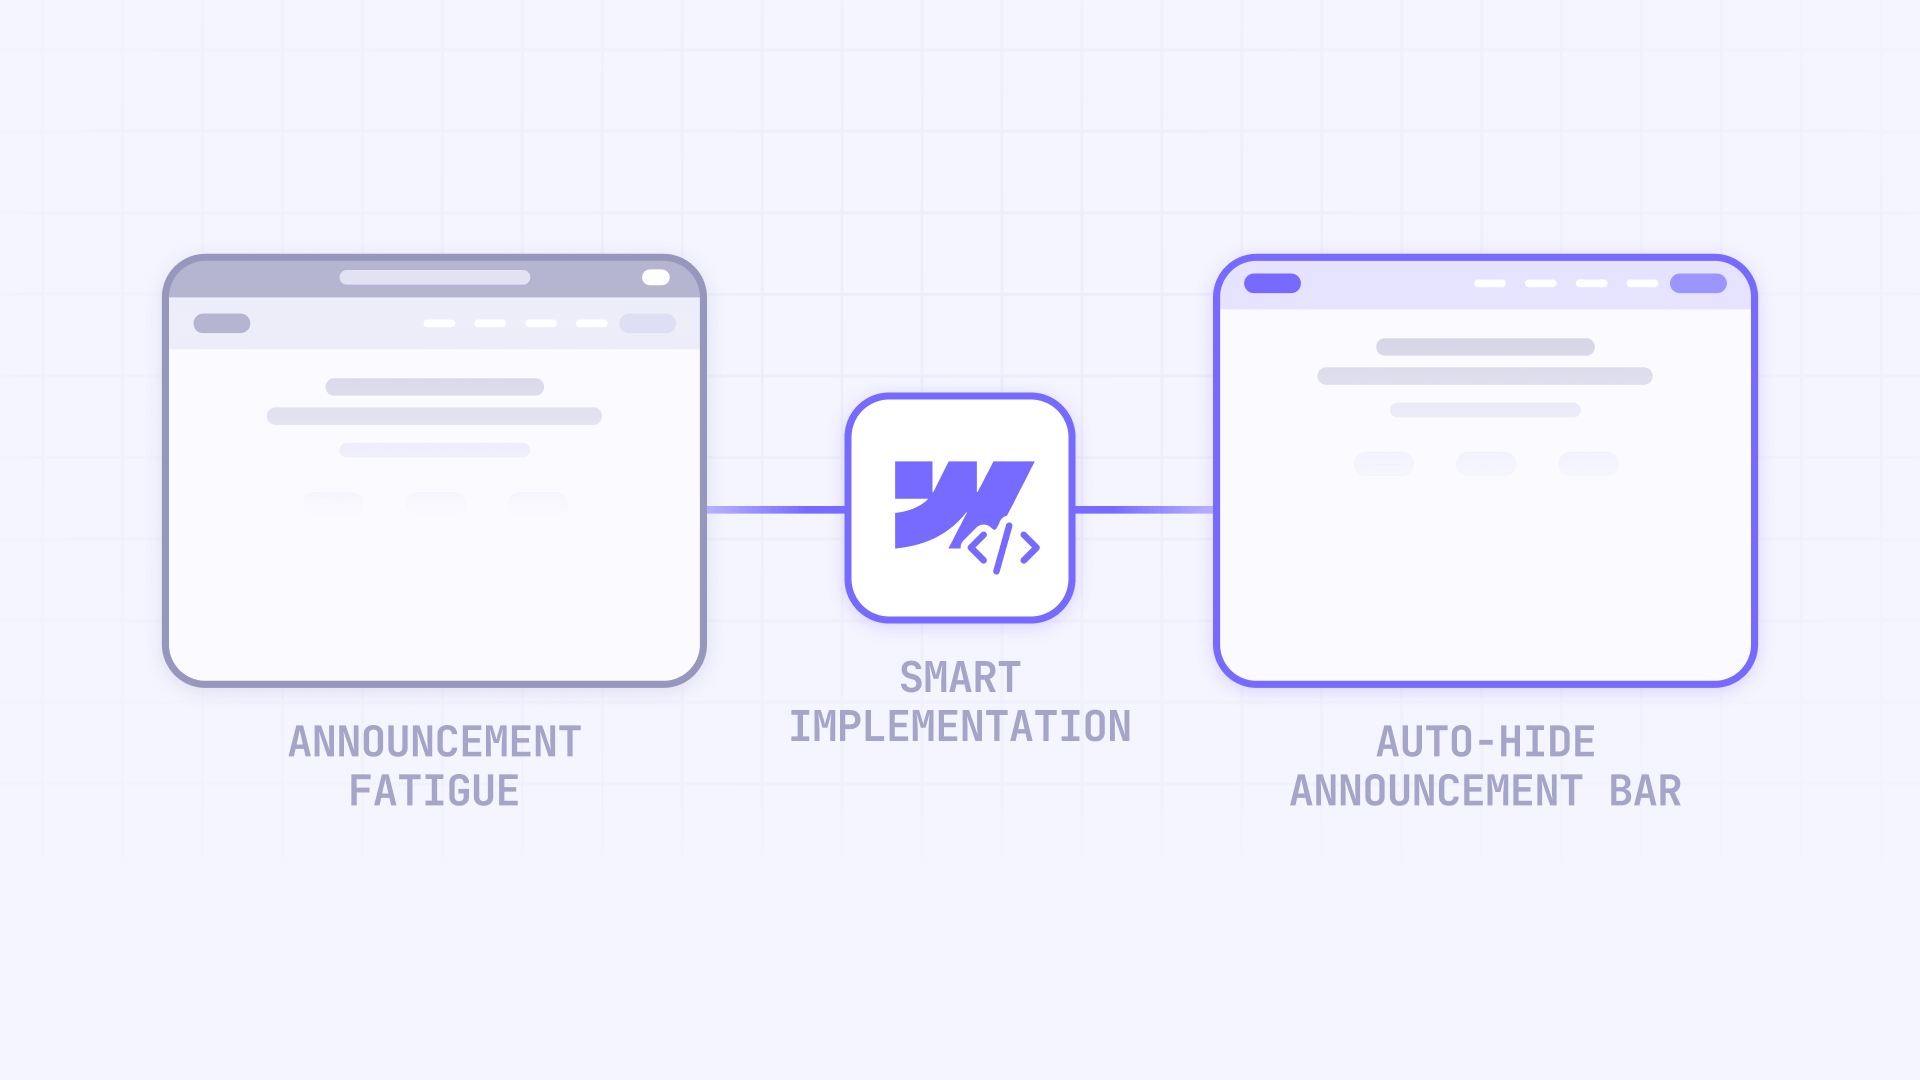
The major challenge with announcement bars is that users quickly develop "banner blindness," ignoring messages they see over and over again. But don't worry, the solution is simpler than you think. This tutorial will show you how to implement a smart announcement bar in Webflow with a ready-to-copy script. You'll have it working in 5 minutes or less, improving user experience while maintaining your message visibility.
Why auto-hide announcement bars are essential for Webflow sites
Implementing intelligent viewing logic for your announcement bars isn't a luxury, it's a necessity for maintaining a premium user experience. Here are the direct benefits for your Webflow site.
Reduction in notification fatigue: Users disengage after 2-3 exposures to the same message. Limiting views to a predefined maximum respects user attention and maintains your announcement's effectiveness.
Improved returning visitor experience: Frequent visitors are your audience's foundation. Preventing them from seeing the same message repeatedly reduces frustration and improves your site's professional perception.
Complete user control: Including a "Don't show again" option builds immediate trust. Users value the ability to permanently dismiss announcements that aren't relevant to them.
Smart cross-session persistence: Thanks to localStorage, user preferences and view counts persist even after they close their browser, creating a coherent and personalized experience with each visit.
Understanding the method: Custom attributes and localStorage in Webflow
This solution combines three key technologies in a simple yet powerful way.
- Custom Attributes: These are like "tags" you add to your elements in Webflow. You tell the code: "This div is my announcement bar" (brix-announcement="component") and "this button closes it" (brix-announcement="close"). This keeps your design clean without relying on classes or custom code.
- Script: This is the "brain" of the operation. It loads on your page, looks for those tags, and executes the rules. It's responsible for counting visits and deciding whether to show or hide the bar.
- localStorage API: Think of it as a small "sticky note" in the user's browser. The script uses this note to track how many times the bar has been viewed. Since the note stays stuck in the browser, the count persists between visits.
This method is effective because it respects user preferences while ensuring your important messages are seen at least once.
Implementing the announcement bar in Webflow
The process is divided into three simple steps: install the script once and then configure your elements visually in Webflow's Designer.
Step 1: Adding the script to your Webflow project
First, we need to give your project the "instructions" for how to handle announcement bar attributes.
1 - In your Webflow project, go to Project Settings.
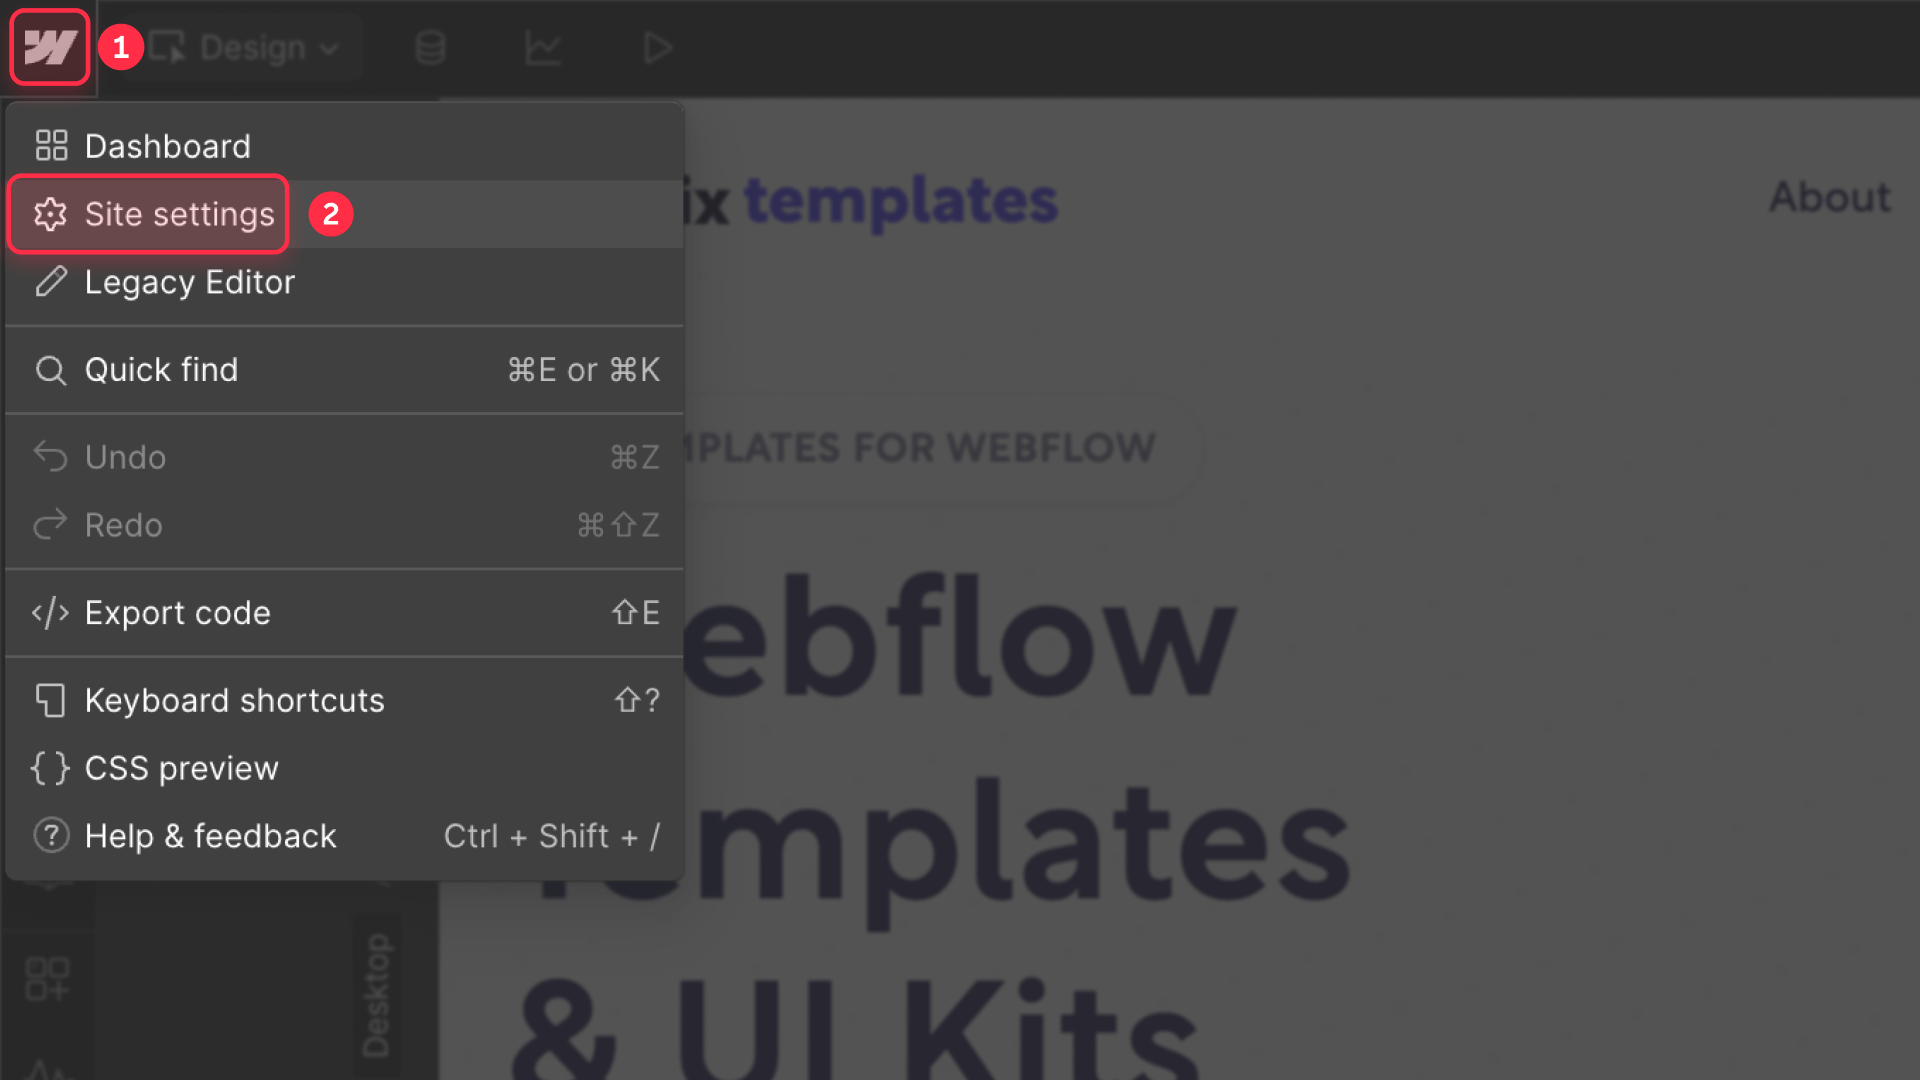
2 - Select the Custom Code tab.
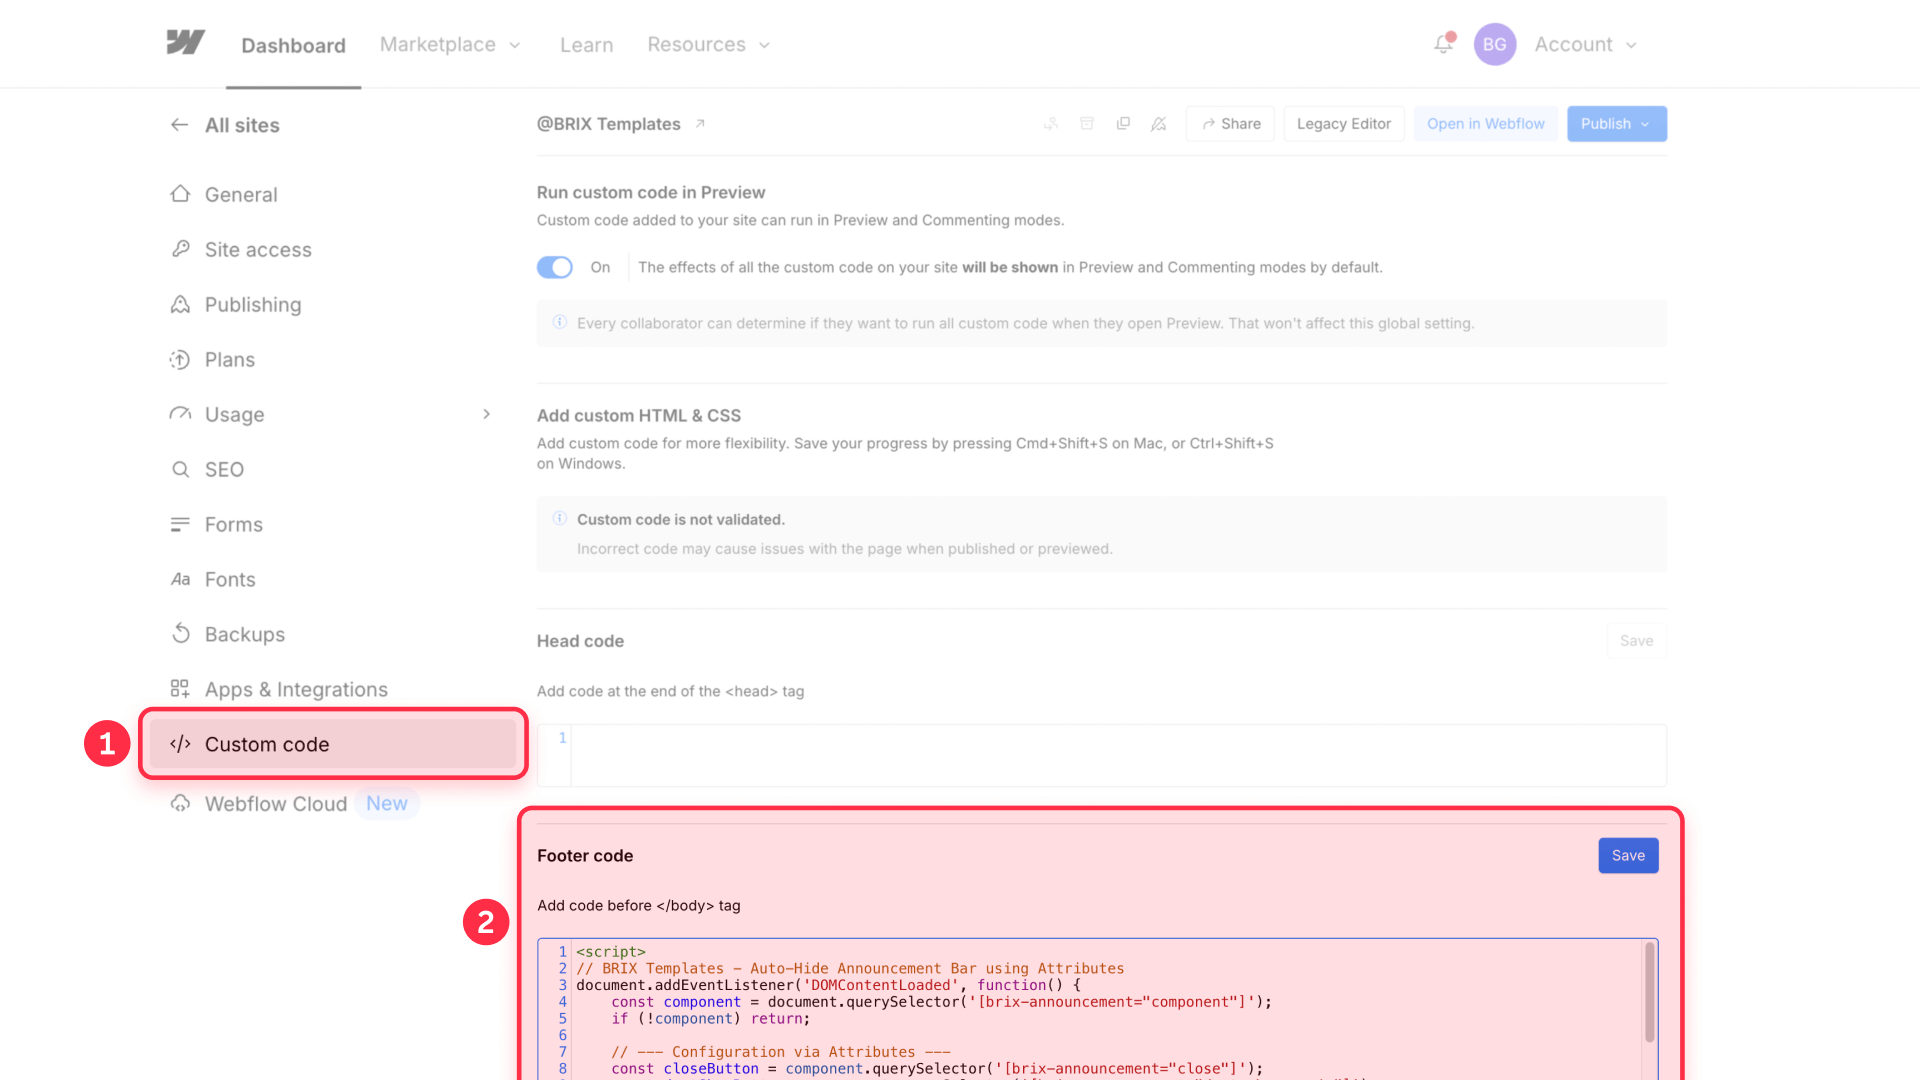
3 - Paste the following script in the Footer Code area (also known as Before </body> tag).
<script>
// BRIX Templates - Auto-Hide Announcement Bar using Attributes (Enhanced Version - Fixed)
document.addEventListener('DOMContentLoaded', function() {
    const component = document.querySelector('[brix-announcement="component"]');
    if (!component) {
        console.warn('BRIX Announcement: No component found with attribute [brix-announcement="component"]');

        // Crear herramientas de debug incluso sin componente
        window.AnnouncementDebug = {
            status: function() {
                console.error('❌ No announcement component found on page');
                console.log('Add [brix-announcement="component"] attribute to your announcement bar');
                return { error: 'No component found' };
            }
        };
        return;
    }

    // --- Configuration via Attributes ---
    const closeButton = component.querySelector('[brix-announcement="close"]');
    const dontShowButton = component.querySelector('[brix-announcement="dont-show-again"]');
    const maxViews = parseInt(component.getAttribute('brix-announcement-max-views'), 10) || 3;
    const version = component.getAttribute('brix-announcement-version') || 'v1';

    // Get original display style for better restoration
    const originalDisplay = window.getComputedStyle(component).display === 'none' ? 'block' : window.getComputedStyle(component).display;

    // --- localStorage Keys ---
    const keys = {
        views: `brix_announcement_views_${version}`,
        hidden: `brix_announcement_hidden_${version}`,
        lastShown: `brix_announcement_last_shown_${version}`
    };

    // --- Utility Functions ---
    function showComponent() {
        component.style.display = originalDisplay;
        component.setAttribute('aria-hidden', 'false');
        // Smooth fade-in animation
        component.style.opacity = '0';
        component.style.transition = 'opacity 0.3s ease-in-out';
        setTimeout(() => {
            component.style.opacity = '1';
        }, 10);
    }

    function hideComponent(permanent = false) {
        // Smooth fade-out animation
        component.style.transition = 'opacity 0.3s ease-in-out';
        component.style.opacity = '0';

        setTimeout(() => {
            component.style.display = 'none';
            component.setAttribute('aria-hidden', 'true');
        }, 300);

        if (permanent) {
            localStorage.setItem(keys.hidden, 'true');
            console.log('BRIX Announcement: Permanently hidden by user');
        }
    }

    function incrementViewCount() {
        const currentViews = parseInt(localStorage.getItem(keys.views), 10) || 0;
        const newViewCount = currentViews + 1;
        localStorage.setItem(keys.views, newViewCount);
        localStorage.setItem(keys.lastShown, new Date().toISOString());
        return newViewCount;
    }

    // --- CREAR DEBUGGING TOOLS ANTES DE CUALQUIER RETURN ---
    window.AnnouncementDebug = {
        reset: function() {
            try {
                localStorage.removeItem(keys.views);
                localStorage.removeItem(keys.hidden);
                localStorage.removeItem(keys.lastShown);
                console.log(`✅ BRIX Announcement (version: ${version}) has been reset.`);
                window.location.reload();
            } catch (error) {
                console.error('Error resetting announcement:', error);
            }
        },

        status: function() {
            const status = {
                version: version,
                isPermanentlyHidden: localStorage.getItem(keys.hidden) === 'true',
                currentViews: parseInt(localStorage.getItem(keys.views), 10) || 0,
                maxViews: maxViews,
                lastShown: localStorage.getItem(keys.lastShown) || 'Never',
                isCurrentlyVisible: component.style.display !== 'none',
                elementFound: !!component,
                closeButtonFound: !!closeButton,
                dontShowButtonFound: !!dontShowButton
            };

            console.table(status);
            return status;
        },

        show: function() {
            // Primero quitar el estado de oculto permanente si existe
            localStorage.removeItem(keys.hidden);
            showComponent();
            console.log('✅ BRIX Announcement: Manually shown');
        },

        hide: function(permanent = false) {
            hideComponent(permanent);
            console.log(`✅ BRIX Announcement: Manually hidden${permanent ? ' (permanent)' : ''}`);
        },

        setViews: function(count) {
            if (typeof count !== 'number' || count < 0) {
                console.error('Please provide a valid number >= 0');
                return;
            }
            localStorage.setItem(keys.views, count.toString());
            console.log(`✅ View count set to: ${count}`);
            window.location.reload();
        },

        simulate: function(views) {
            console.log(`🎭 Simulating ${views} views...`);
            this.setViews(views);
        },

        forceShow: function() {
            // Forzar mostrar removiendo todas las restricciones
            localStorage.removeItem(keys.hidden);
            localStorage.removeItem(keys.views);
            console.log('🔧 Forcing announcement to show on next reload...');
            window.location.reload();
        }
    };

    // --- Main Logic ---
    try {
        const isPermanentlyHidden = localStorage.getItem(keys.hidden) === 'true';

        if (isPermanentlyHidden) {
            console.log('BRIX Announcement: Hidden permanently by user preference');
            console.log('💡 Use AnnouncementDebug.reset() or AnnouncementDebug.forceShow() to show again');
            return; // AnnouncementDebug ya está creado arriba
        }

        const currentViews = parseInt(localStorage.getItem(keys.views), 10) || 0;

        if (currentViews < maxViews) {
            showComponent();
            const newViewCount = incrementViewCount();
            console.log(`BRIX Announcement: Shown (${newViewCount}/${maxViews} views)`);

            // Auto-hide after max views reached
            if (newViewCount >= maxViews) {
                console.log('BRIX Announcement: Max views reached, will auto-hide on next visit');
            }
        } else {
            console.log(`BRIX Announcement: Max views (${maxViews}) reached, staying hidden`);
        }

    } catch (error) {
        console.error('BRIX Announcement: localStorage error, showing announcement as fallback', error);
        showComponent();
    }

    // --- Event Listeners ---
    if (closeButton) {
        closeButton.addEventListener('click', (e) => {
            e.preventDefault();
            hideComponent(false);
            console.log('BRIX Announcement: Closed temporarily by user');
        });

        // Add keyboard support
        closeButton.addEventListener('keydown', (e) => {
            if (e.key === 'Enter' || e.key === ' ') {
                e.preventDefault();
                hideComponent(false);
            }
        });
    } else {
        console.warn('BRIX Announcement: No close button found with [brix-announcement="close"]');
    }

    if (dontShowButton) {
        dontShowButton.addEventListener('click', (e) => {
            e.preventDefault();
            hideComponent(true);
        });

        // Add keyboard support
        dontShowButton.addEventListener('keydown', (e) => {
            if (e.key === 'Enter' || e.key === ' ') {
                e.preventDefault();
                hideComponent(true);
            }
        });
    } else {
        console.warn('BRIX Announcement: No "don\'t show again" button found with [brix-announcement="dont-show-again"]');
    }

    // Show helpful info in console
    console.log('🎉 BRIX Auto-Hide Announcement Bar loaded successfully!');
    console.log('💡 Use AnnouncementDebug.status() to see current state');
    console.log('🔄 Use AnnouncementDebug.reset() to reset as new visitor');
});
</script>
Step 2: Configuring your announcement bar with attributes in Webflow
With the script installed, now you just need to tell Webflow which elements should be controlled.
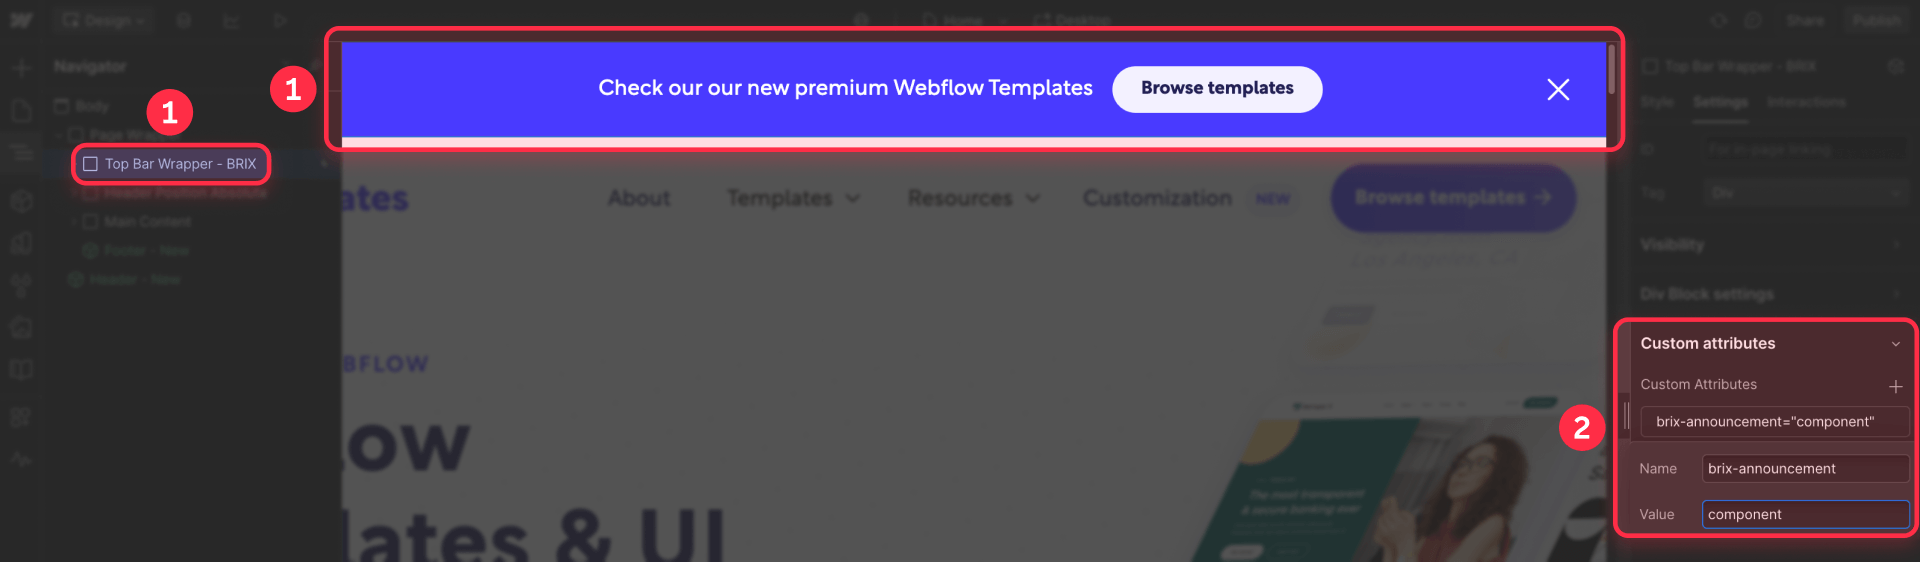
1 - Select your announcement bar.
2 - Go to the Settings Panel and in Custom Attributes, add:
- Name: brix-announcement
- Value: component
3 - Now, select your close button (it can be a text, an icon, or a button).
4 - In the same Custom Attributes panel, add this attribute:
- Name: brix-announcement
- Value: close
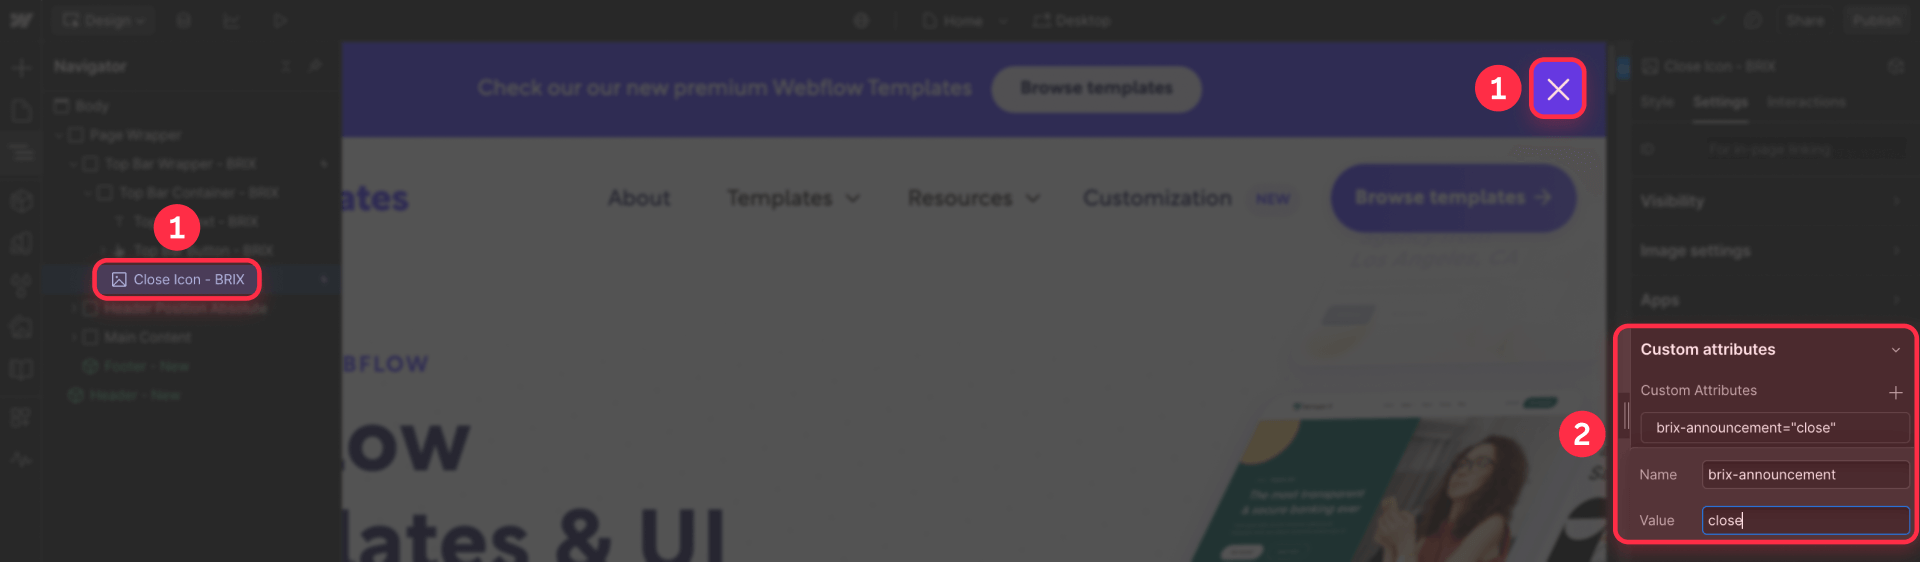
With this button, users will be able to close the announcement bar and not see it again, even if they have not completed the max views you will set up later.
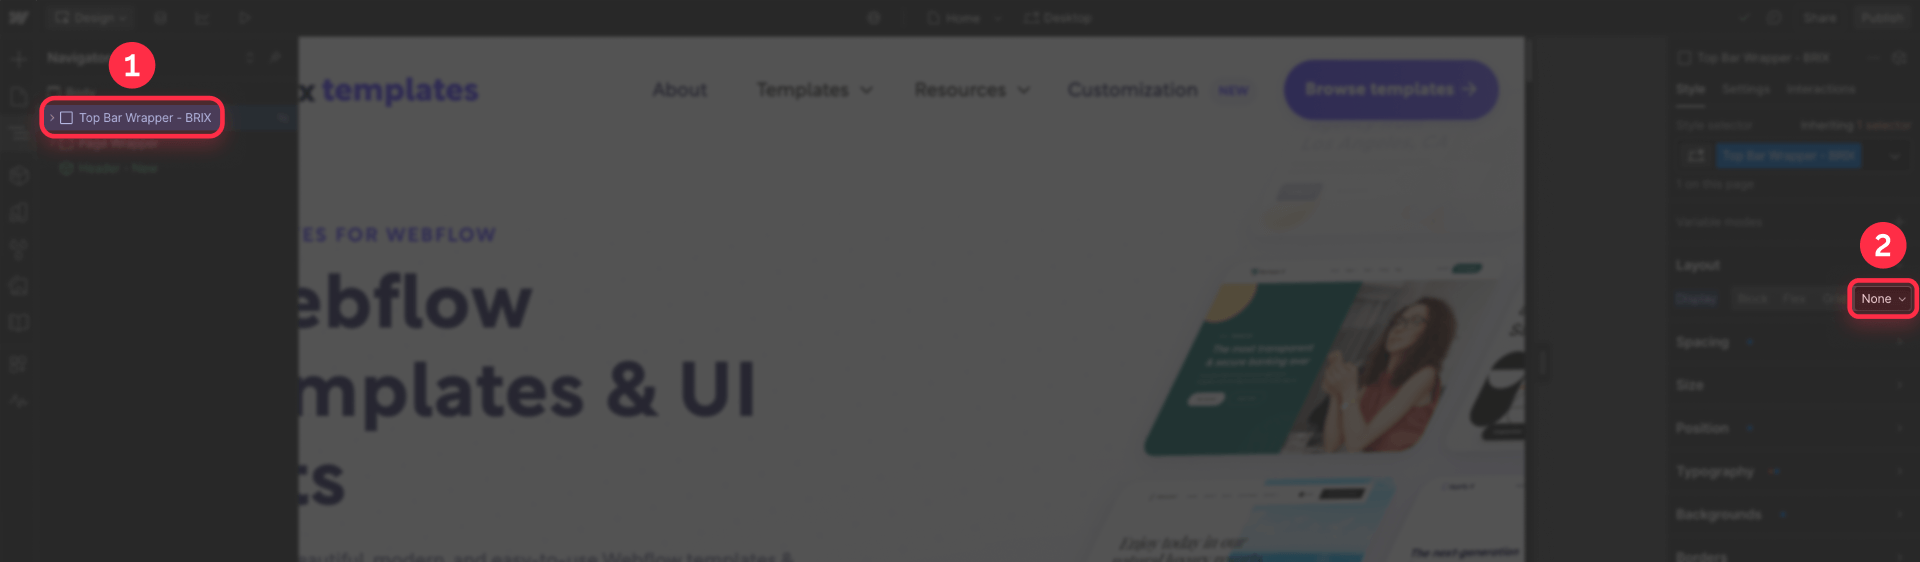
Important: Make sure your announcement bar has its display set to None by default in the Style Panel. This prevents the banner from briefly appearing before the script hides it, which is known as "flash of unstyled content".
Step 3: Customizing and verifying your implementation in Webflow
You can change the script's behavior without touching the code. Simply add these optional attributes to the same element where you currently have brix-announcement="component":
Change the maximum number of views:
- Name: brix-announcement-max-views
- Value: 5 (or any number you want)
Set version for campaigns (critical for new promotions):
- Name: brix-announcement-version
- Value: v2 (change to v3, v4, etc., for each new campaign)
The version attribute is fundamental: when you launch a new offer, you need all users to see it again. Changing the version resets the counters for everyone.
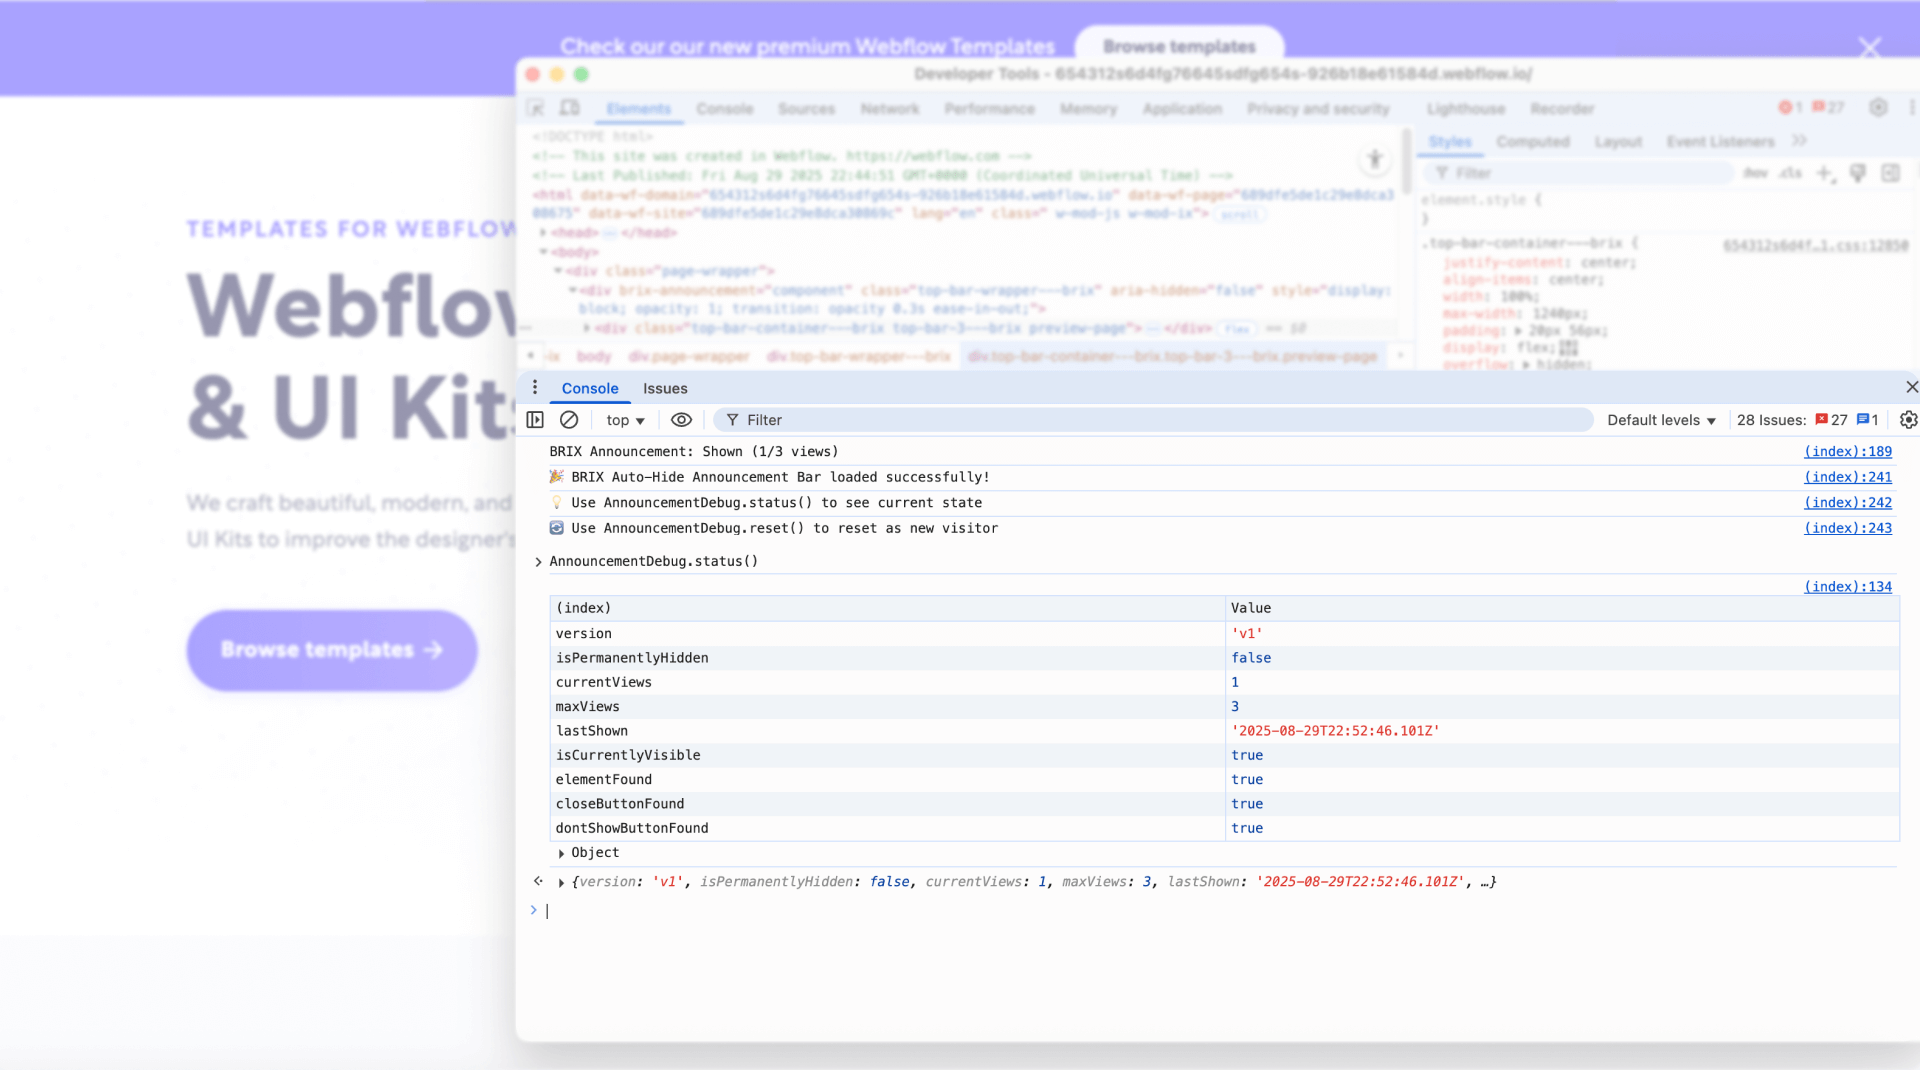
To verify everything works, publish your site (at least to the staging domain) and confirm that the bar appears and hides according to the rules.
Troubleshooting common issues in Webflow
- The announcement bar doesn't appear: Make sure the script is in Footer Code. Verify that the attribute brix-announcement="component" is applied to the main container and that its display is set to None by default.
- The close button doesn't work: Check that the attribute brix-announcement="close" is applied directly to the clickable element (whether it's an icon, text, image, or button), and not to a div that contains it.
- The counter doesn't reset for a new campaign: For a global reset, make sure you've changed the value of the brix-announcement-version attribute to a new one (e.g., from v1 to v2).
Frequently asked questions about announcement bars in Webflow
What's the best way to add a notification bar in Webflow?
The best way depends on your customization needs. You can speed up the process using a free Webflow notification bar template or cloneable, or build it from scratch with a Div Block for total control. The key to a professional implementation is not just the design, but the viewing logic. That's why best practice is to combine your Webflow design with a control script, like the one in this tutorial, to avoid user fatigue and offer a smarter, more respectful experience.
How do I make a Webflow banner reappear for a new promotion?
The most robust solution is to use a versioning system. You can simply update an attribute on your element. With the method in this article, you just need to change the brix-announcement-version attribute value from v1 to v2. This tells the script to ignore previous tracking and show the announcement bar to all users again, ensuring your new promotion gets maximum visibility.
How can I show a banner only to new visitors in Webflow?
You can use the same script from this tutorial to control a welcome banner. Simply apply the brix-announcement="component" attribute to your banner's main container. If you want it to appear a specific number of times, use the brix-announcement-max-views attribute. If you only want it to appear once, set the max-views value to 1. This ensures returning users aren't repeatedly interrupted.
How do I make the Webflow announcement bar push content down?
To prevent your announcement bar from overlapping page content (like the navbar), you need to change its positioning in the Style Panel. Instead of using position: fixed or position: absolute, configure the bar with position: sticky and top: 0px. This way, the bar remains fixed at the top of the viewport but occupies its own space in the document flow, naturally "pushing" the rest of the content down.
Can I use multiple announcement bars with different settings in Webflow?
Yes, you can implement multiple announcement bars with independent tracking by using different version attributes for each one. For example, a promotional banner could use brix-announcement-version="promo-v1" while a cookie notice uses brix-announcement-version="cookie-v1". Each bar maintains its own view count and settings, allowing you to run multiple targeted campaigns simultaneously.
What happens if users have JavaScript disabled in their browser?
If JavaScript is disabled, the announcement bar won't appear since its default display is set to None. This is actually beneficial as it prevents showing a bar that can't be dismissed properly. For critical announcements that must be visible regardless of JavaScript, you could use a different approach with CSS-only visibility, though you'd lose the intelligent tracking capabilities.
How do I track analytics for announcement bar interactions in Webflow?
You can enhance the script to send events to Google Analytics or other tracking platforms when users view or dismiss the bar. Add event listeners within the script that fire tracking calls when the bar displays or when the close button is clicked. This provides valuable data about engagement rates and user behavior with your announcements.
Conclusion
Using an attribute-based approach for features like auto-hide announcement bars gives you complete flexibility without compromising your Webflow design system. By separating function (controlled by attributes) from style (controlled by classes), you keep your project clean, scalable, and efficient.
At BRIX Templates, we create Webflow solutions that prioritize end-user experience. If you need help implementing advanced features while keeping your Webflow site optimized, send us an email.


Join readers commenting on this post!