
Form validation is crucial for avoiding spam or unwanted form submissions on your website. While Webflow provides basic form functionality, there are scenarios where you need more advanced validation capabilities, such as:
- Blocking submissions from specific countries (e.g., limiting service availability to US and Canada only)
- Preventing spam by filtering out submissions containing specific keywords (e.g., blocking known spam phrases or competitor names)
- Setting up domain-specific email restrictions (e.g., blocking free email providers for B2B forms)
Implementation overview
We will guide you on how to easily implement a form validation system on Webflow that supports as many validations as you need, all at a local browser level, ensuring there are no security or privacy compliance issues. The validation system works through the following sequential process:
- User input monitoring: The system continuously monitors form fields for user input, checking each character entered against predefined validation rules. This ensures real-time feedback without waiting for form submission.
- Validation processing: When input is detected, the system compares it against a list of blocked words or phrases. This process runs instantly, ensuring smooth user experience while maintaining strict validation standards.
- Response generation: Based on the validation results, the system either enables form submission and hides error messages, or disables the submit button and displays clear error messages, helping them understand exactly what needs to be corrected.
Step-by-step implementation of validators in Webflow forms
1. Setting up form elements
First, we need to add specific IDs to our form elements. Each element plays a crucial role in the validation process:
Open your form in the Webflow Designer
For each field you want to validate:
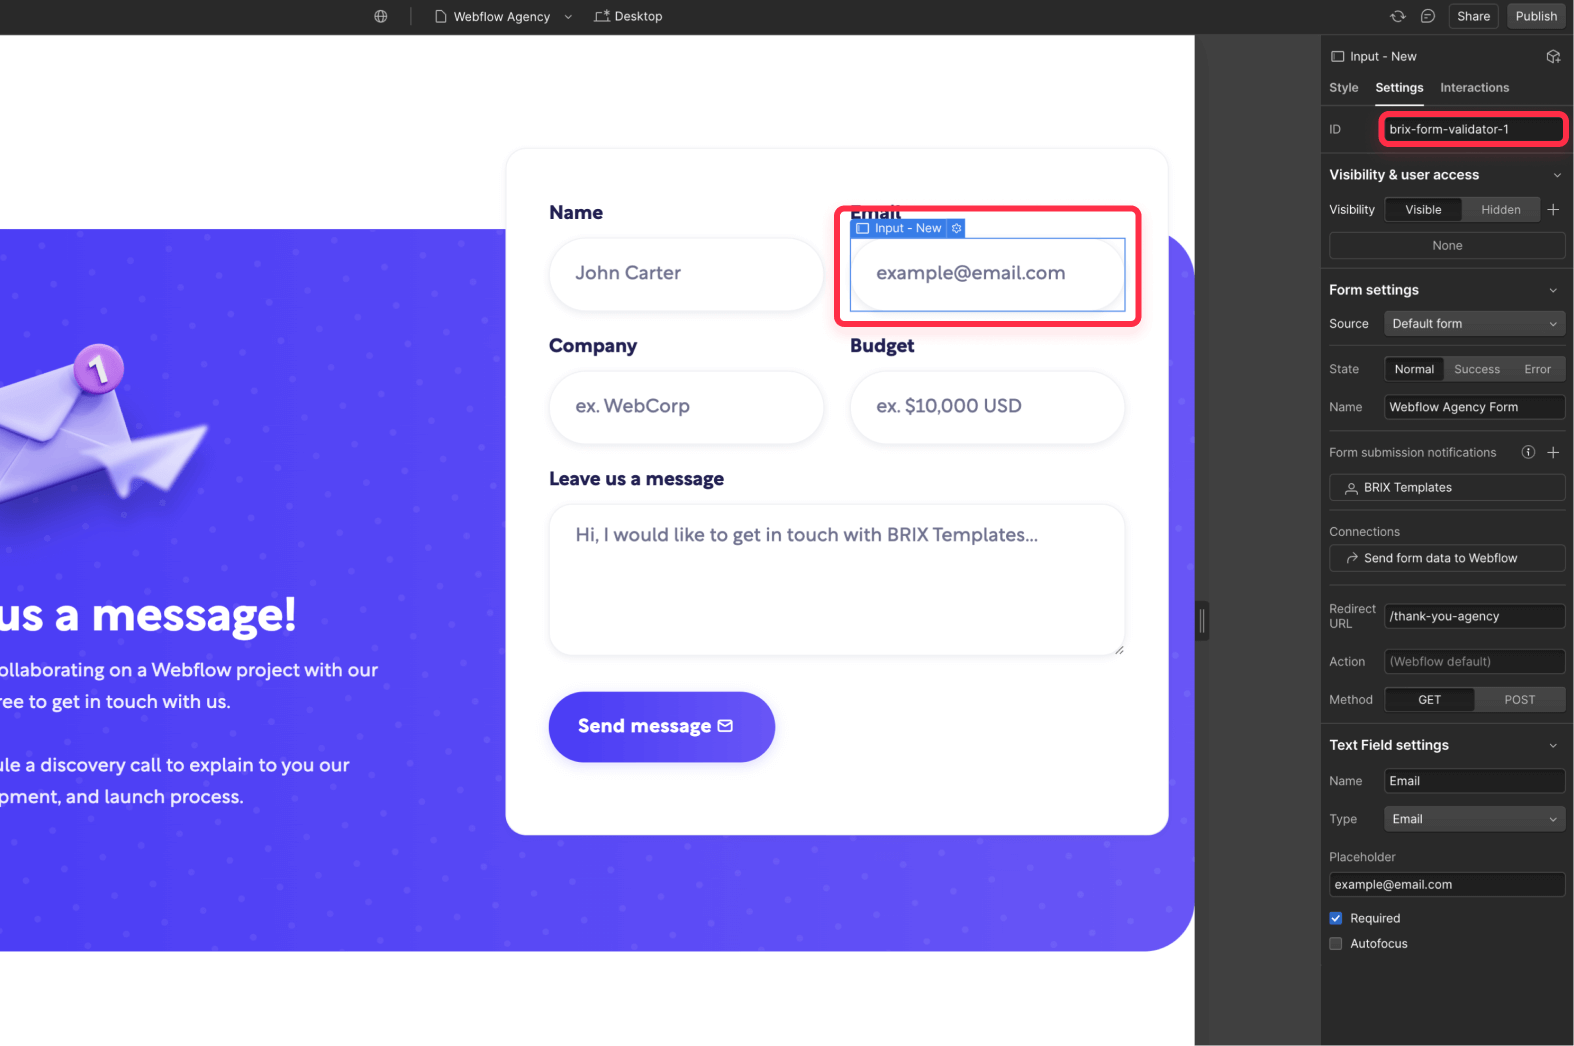
- Select the input field that needs validation (this could be any form input where you want to check for blocked words)
- In the right sidebar's Settings panel, add the ID brix-form-validator-1 (for your first validator)
- This ID connects the input field to its specific validation rules
- For additional validators, use incrementing numbers (e.g., brix-form-validator-2, brix-form-validator-3)
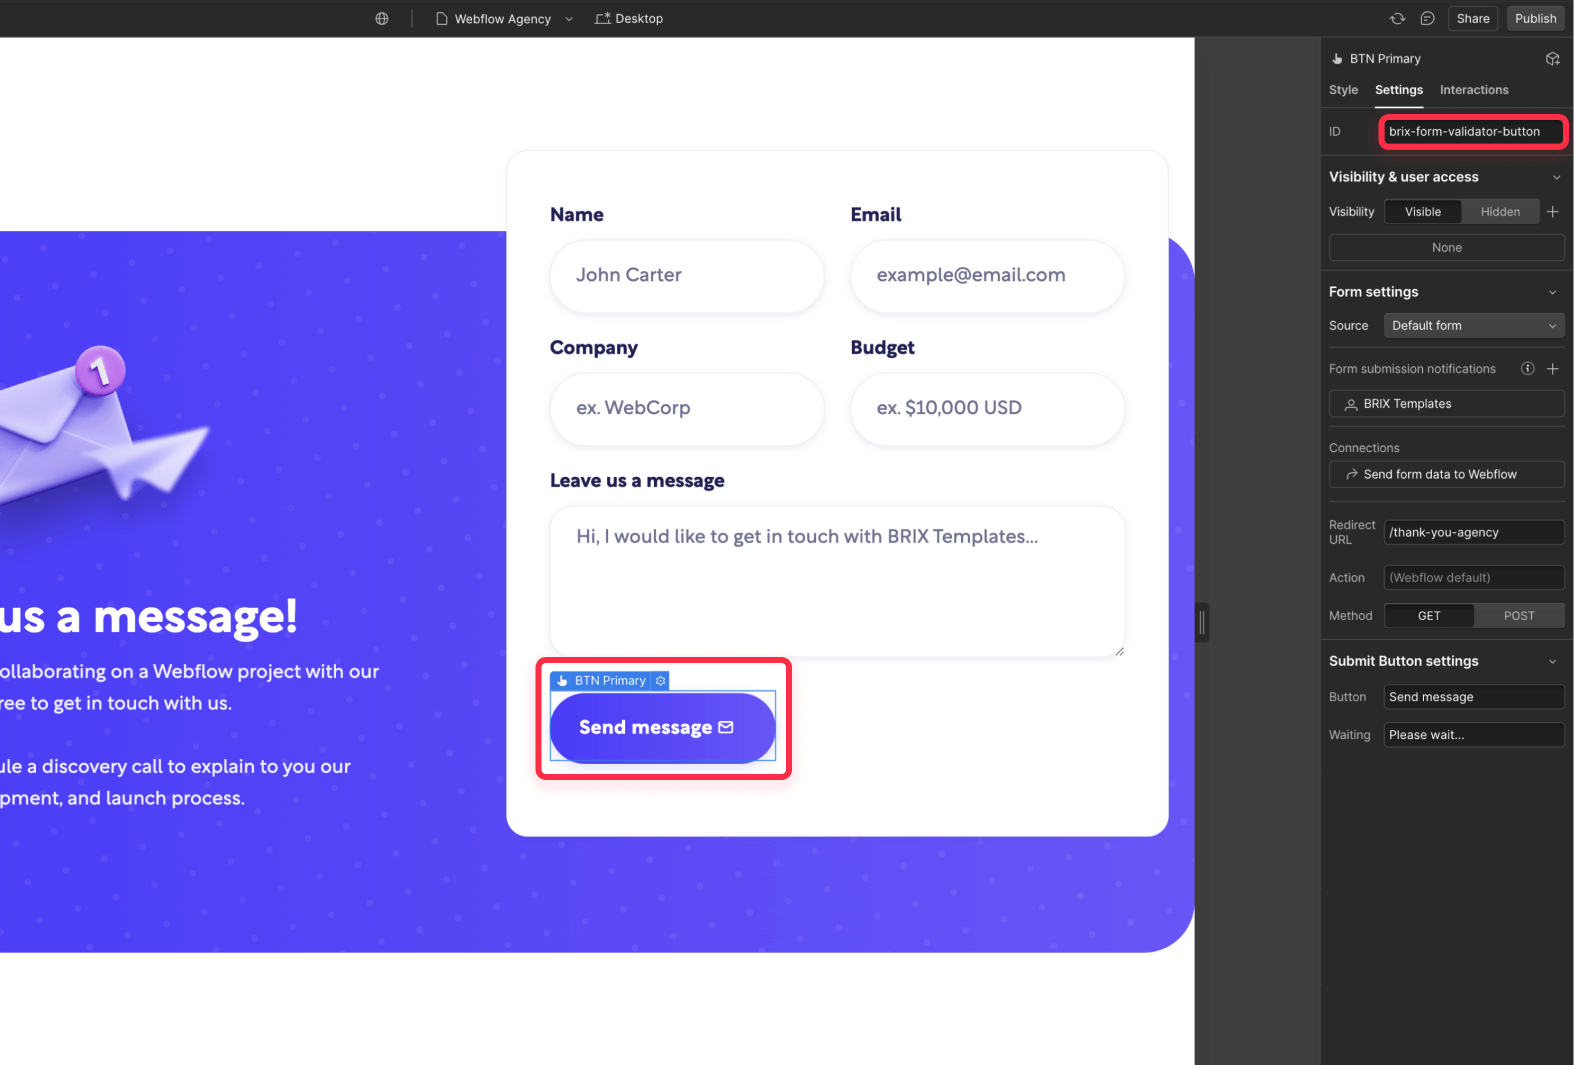
Select your form's submit button:
- In the right sidebar's Settings panel, add the ID brix-form-validator-button
- This ID allows the validation script to enable/disable form submission based on validation results
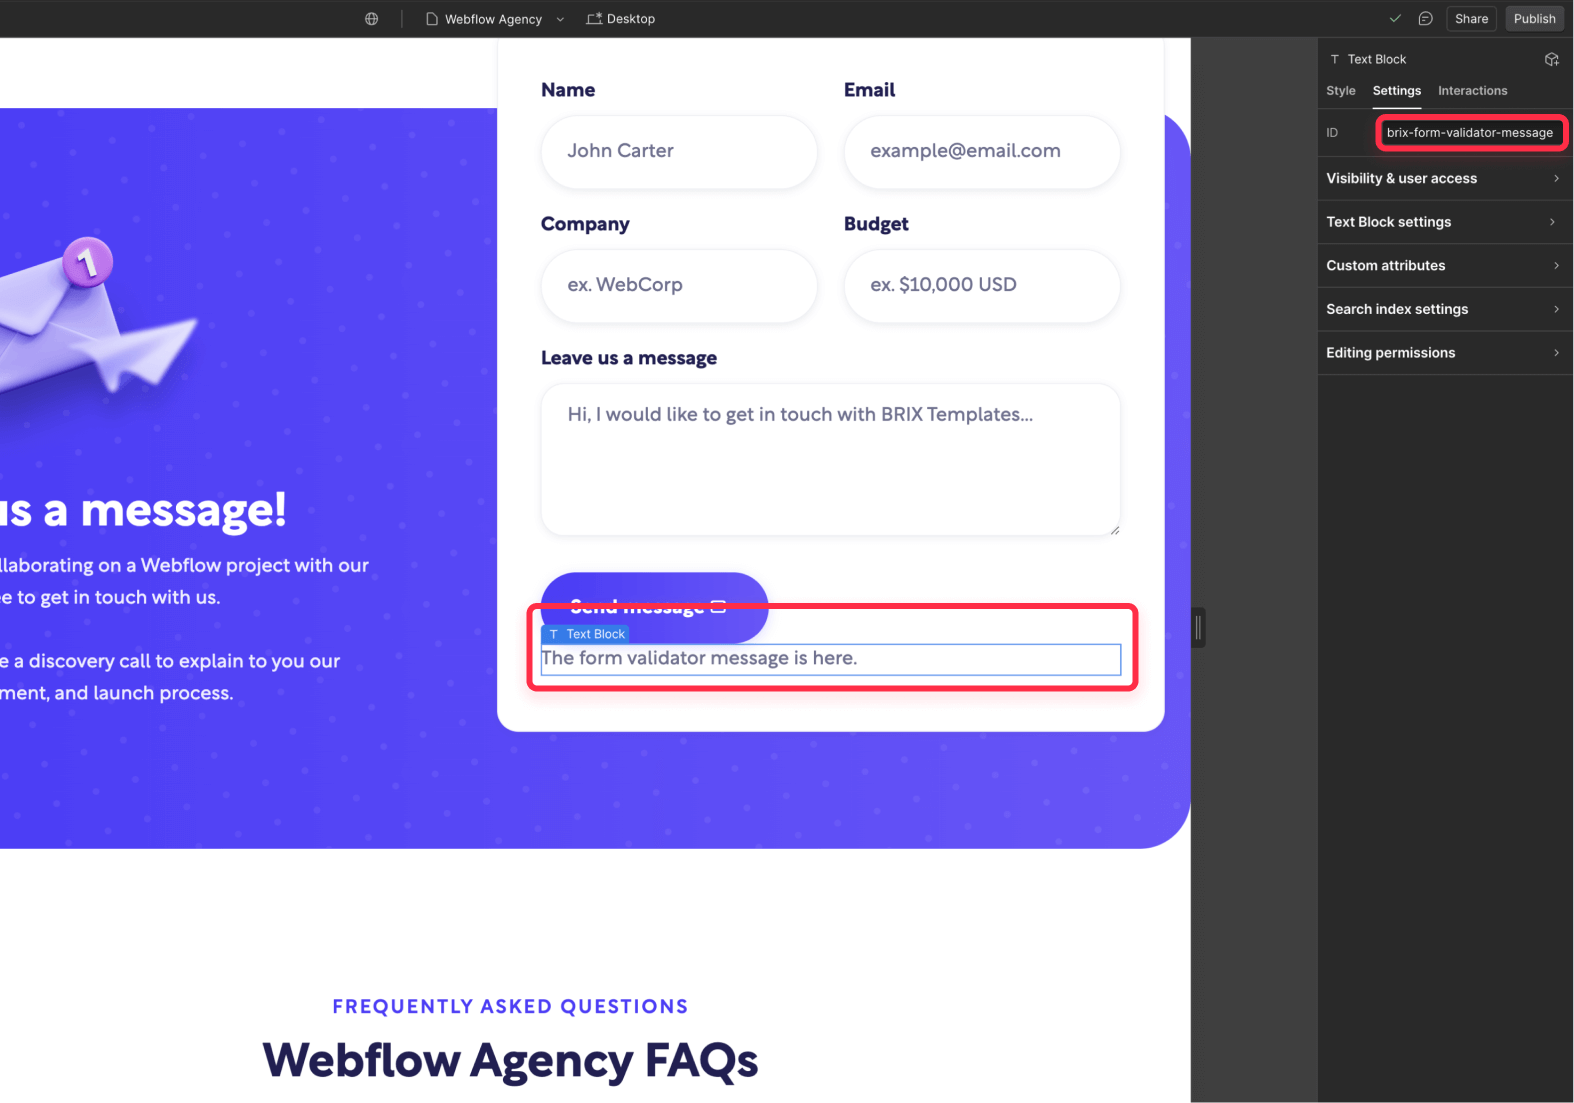
Add a new Text element below your button:
- This element will display error messages when validation fails
- In the right sidebar's Settings panel, add the ID brix-form-validator-message
- In the right sidebar's Style panel, set the Display property to "None" - this ensures the message is hidden by default
- The validation script will handle showing and hiding this message as needed
2. Adding the CSS classes
Add these classes to your Webflow styles. These classes control the visual feedback for users:
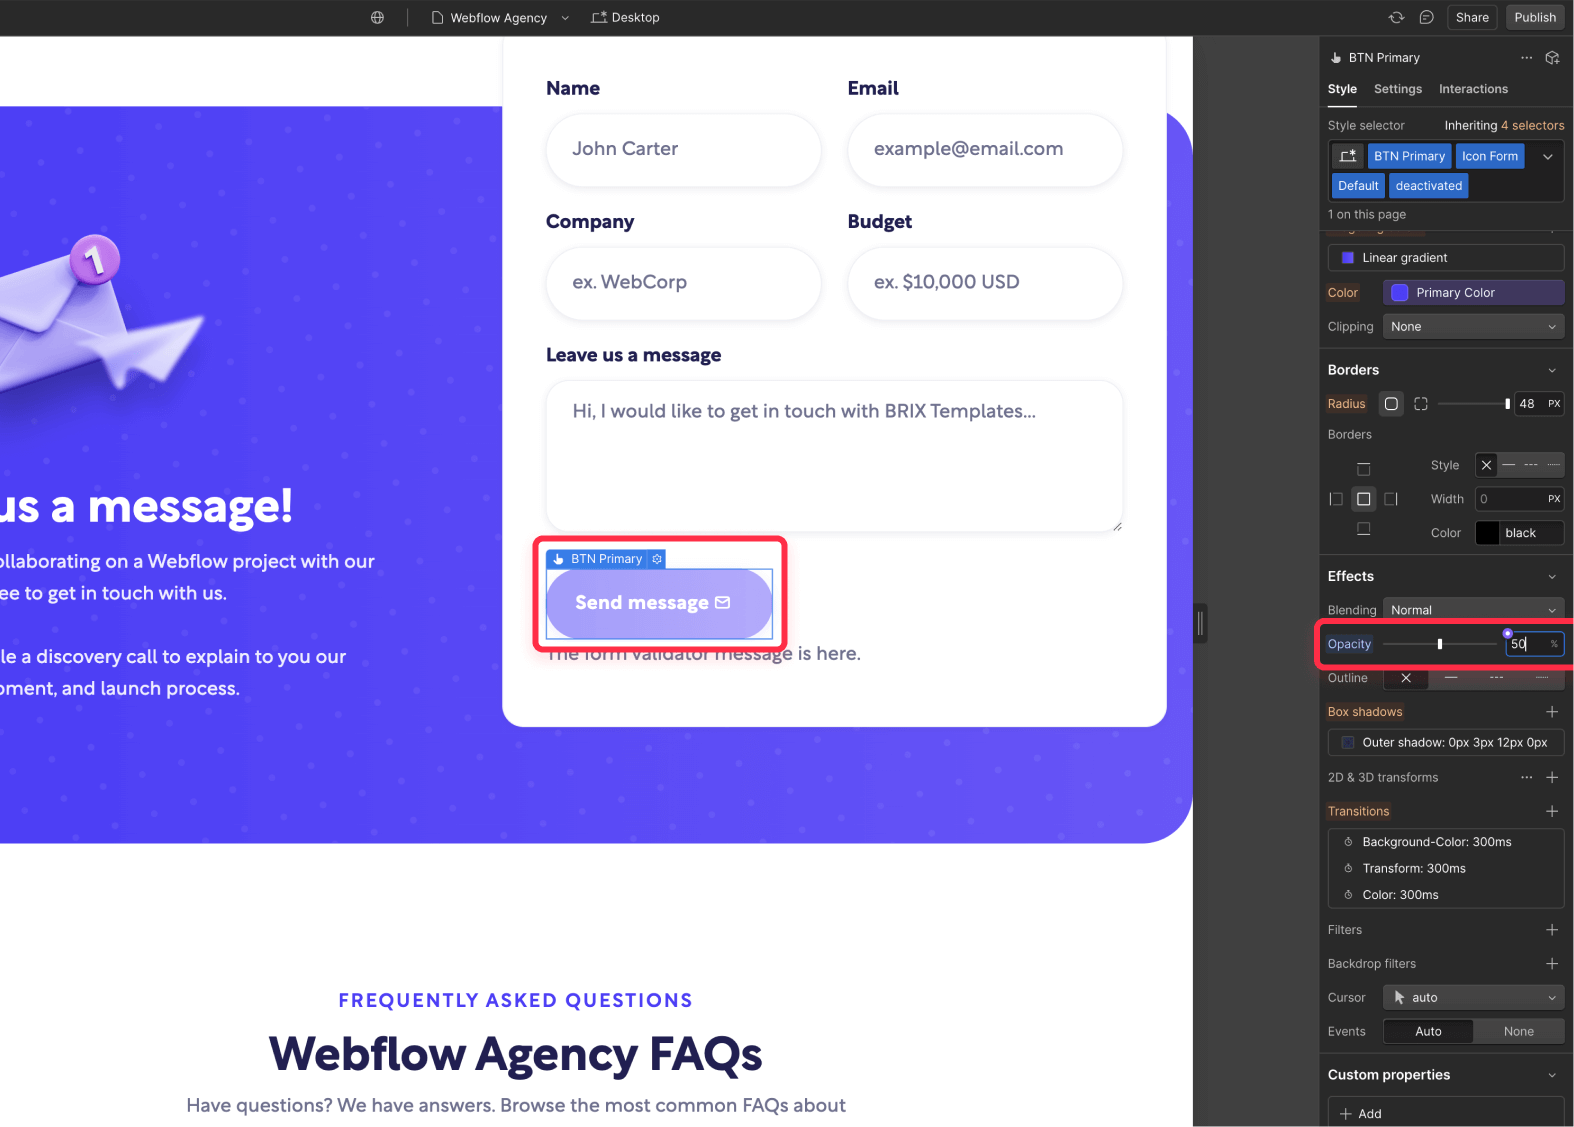
Create a .deactivated class for the submit button:
- Set opacity to 0.5
- Set cursor to not-allowed
- This class visually indicates when the submit button is disabled due to validation failures, so if you want to customize it to have any other look to match your brand guidelines, feel free to do so.
Create a .show class for the message:
- Set display to block
- Style the error message appearance to match your website design style (color, font, etc.)
- This class will control the visibility and styling of error messages
3. Adding the validation code
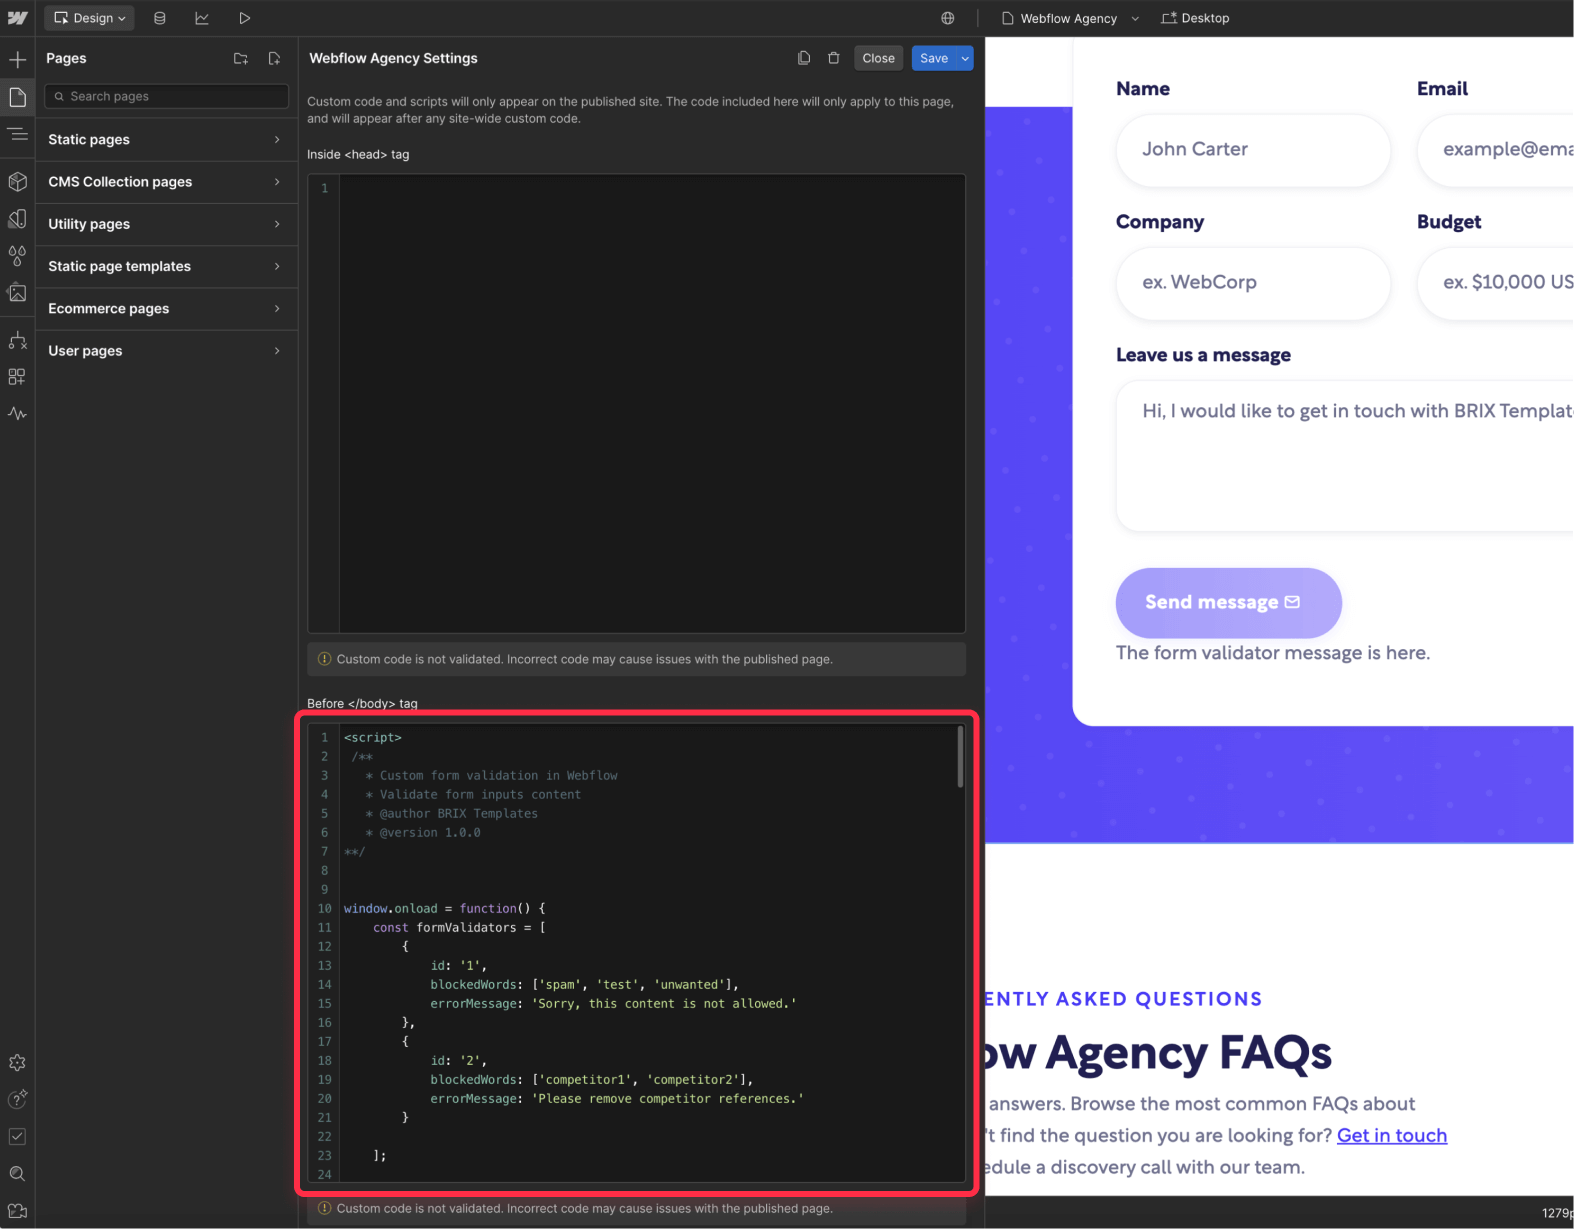
Choose where to add your code based on your form's usage:
For forms on specific pages:
- Go to the page containing the form
- Click the Settings icon
- Select "Page Settings"
- Navigate to "Custom Code"
- Add the code in the "Before </body> tag" area
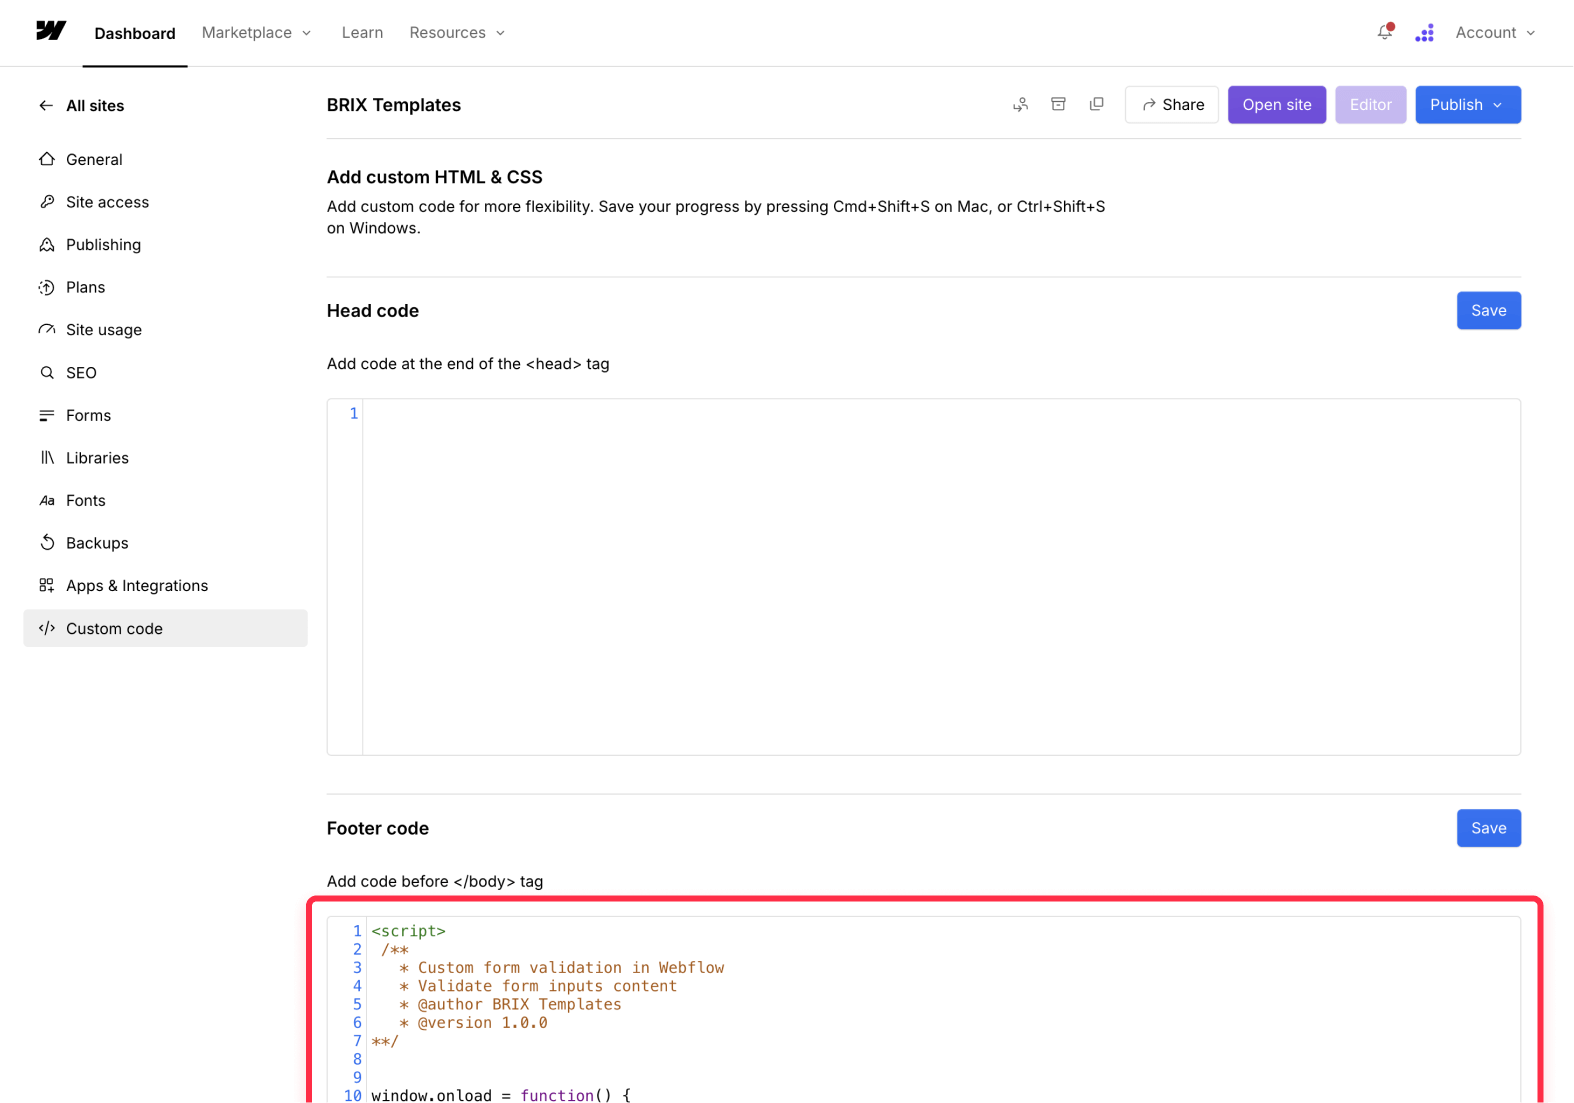
For site-wide forms:
- Click the Settings icon
- Select "Project Settings"
- Navigate to "Custom Code"
- Add the code in the "Before </body> tag" area
Add the following JavaScript code:
<script>
/**
* Custom form validation in Webflow
* Validate form inputs content
* @author BRIX Templates
* @version 1.0.0
**/
window.onload = function() {
const formValidators = [
{
id: '1',
blockedWords: ['spam', 'test', 'unwanted'],
errorMessage: 'Sorry, this content is not allowed.'
},
{
id: '2',
blockedWords: ['competitor1', 'competitor2'],
errorMessage: 'Please remove competitor references.'
}
];
// Get error message element
const messageElement = document.getElementById('brix-form-validator-message');
// Remove any existing styles and classes
if (messageElement) {
messageElement.removeAttribute('style');
messageElement.classList.remove('show');
}
formValidators.forEach(validator => {
initializeValidator(validator);
});
function initializeValidator(validator) {
const inputField = document.getElementById(`brix-form-validator-${validator.id}`);
const submitButton = document.getElementById('brix-form-validator-button');
if (!inputField || !submitButton || !messageElement) {
return;
}
// Remove initial deactivated state
submitButton.classList.remove('deactivated');
inputField.addEventListener('input', function() {
const inputValue = this.value.toLowerCase();
const containsBlockedWord = validator.blockedWords.some(word =>
inputValue.includes(word.toLowerCase())
);
if (containsBlockedWord) {
// Handle error state
submitButton.disabled = true;
submitButton.classList.add('deactivated');
messageElement.textContent = validator.errorMessage;
messageElement.classList.add('show');
} else {
// Handle valid state
submitButton.disabled = false;
submitButton.classList.remove('deactivated');
messageElement.classList.remove('show');
}
});
}
}
</script>
<!-- Clonable Instructions Rich Text Custom Elements (DELETE) -->
<script>
function parseCustomSyntax(richText) {
// Process dividers first
const dividerPattern = /<brix-divider>/g;
richText = richText.replace(dividerPattern, `<div class="divider---brix"></div>`);
// Process headers with HTML-like syntax - handle both encoded and non-encoded versions
const headerPattern = /(?:<brix-header|<brix-header).*?(?:<\/brix-header>|<\/brix-header>)/gs;
return richText.replace(headerPattern, (match) => {
// Decode HTML entities if present
const decodedMatch = match.replace(/</g, '<').replace(/>/g, '>');
// Use DOMParser to parse the custom tag
const parser = new DOMParser();
const doc = parser.parseFromString(decodedMatch, 'text/html');
const brixHeaderElement = doc.querySelector('brix-header');
if (!brixHeaderElement) return match; // Return original if parsing fails
// Extract attributes safely
const params = {
id: brixHeaderElement.getAttribute('id') || '1',
title: brixHeaderElement.getAttribute('title') || '',
paragraph: brixHeaderElement.innerHTML.trim() || ''
};
// If id contains 'id', remove it
if (params.id.includes('id')) {
params.id = params.id.replace('id', '');
}
// Replace code tags with spans for safety
let processedParagraph = params.paragraph
.replace(/\[CODE\]/g, '<code class="code-tag---brix">')
.replace(/\[\/CODE\]/g, '</code>')
.replace(/\[BODY\]/g, '</body>');
// Generate HTML structure
return `
<div class="step-header---brix">
<div class="step-number---brix">
<div>${params.id}</div>
</div>
<div>
<div class="heading-size-4---brix">${params.title}</div>
<div>${processedParagraph}</div>
</div>
</div>
`;
});
}
function processRichText() {
// Select the rich text elements
const richTextElements = document.querySelectorAll('.rich-text---instructions.w-richtext');
richTextElements.forEach(element => {
// Get the HTML content
let content = element.innerHTML;
// Process the content
const processedContent = parseCustomSyntax(content);
// Only update if changes were made
if (content !== processedContent) {
element.innerHTML = processedContent;
}
});
}
// Function to initialize the processing
function initRichTextProcessor() {
// Process immediately
processRichText();
// Set up a mutation observer to handle dynamic content changes
const observer = new MutationObserver((mutations) => {
mutations.forEach((mutation) => {
if (mutation.type === 'childList' || mutation.type === 'characterData') {
processRichText();
}
});
});
// Observe all rich text elements
document.querySelectorAll('.rich-text---instructions.w-richtext').forEach(element => {
observer.observe(element, {
childList: true,
subtree: true,
characterData: true
});
});
}
// Execute when DOM is fully loaded
document.addEventListener('DOMContentLoaded', initRichTextProcessor);
// Execute when Webflow's load event occurs (for editor preview)
window.Webflow && window.Webflow.push(initRichTextProcessor);
// Make function available globally for manual triggering if needed
window.processRichText = processRichText;
</script>4. Customizing the form validation logic
To customize the validation:
- Modify the blockedWords array carefully. Choose specific phrases rather than common words to avoid false positives. For example, use complete spam phrases instead of generic terms.
- Create clear, actionable error messages that help users understand the issue. For example, instead of "Invalid input," use "This field contains blocked content. Please remove any promotional or spam-related text."
- Add new validators by copying the validator object structure and incrementing the ID number. Make sure to add a comma after the closing curly brace. Here's an example:
const formValidators = [
    {
        id: '1',
        blockedWords: ['spam', 'test'],
        errorMessage: 'First validator message'
    }, // <- Note the comma here
    {
        id: '2',
        blockedWords: ['competitor1'],
        errorMessage: 'Second validator message'
    }, // <- Note the comma here
    {
        id: '3',
        blockedWords: ['newword'],
        errorMessage: 'Third validator message'
    } // <- No comma after the last validator
];
Best practices and troubleshooting
Testing and verification
After adding the code:
- Publish your Webflow site
- Open your form in a real browser
- Test each validator with both valid and invalid content
- Verify that error messages appear correctly
- Check that the submit button properly enables/disables
Common issues:
- Validation not working? This usually means the IDs don't match exactly. Double-check that your input field IDs follow the pattern brix-form-validator-1, brix-form-validator-2, etc., and that they correspond to the id values in your validators array.
- Error message not showing? Verify that your message element has the exact ID brix-form-validator-message and that the .show class is properly defined in your styles.
- Submit button not responding? Ensure your button has the exact ID brix-form-validator-button and check your browser's console (F12) for any JavaScript errors.
- Multiple validators conflicting? Make sure each validator has a unique ID number and that the corresponding form fields use matching IDs.
Using our form validation Webflow cloneable
For those looking for an even simpler solution, we offer a free form validator Webflow cloneable that includes this exact functionality.
The cloneable version comes pre-configured and ready to use - you'll just need to customize the validation rules for your specific needs, and then copy / paste it in your Webflow project (keep in mind it will have the design style from BRIX Templates, so you may want to update it 👀).
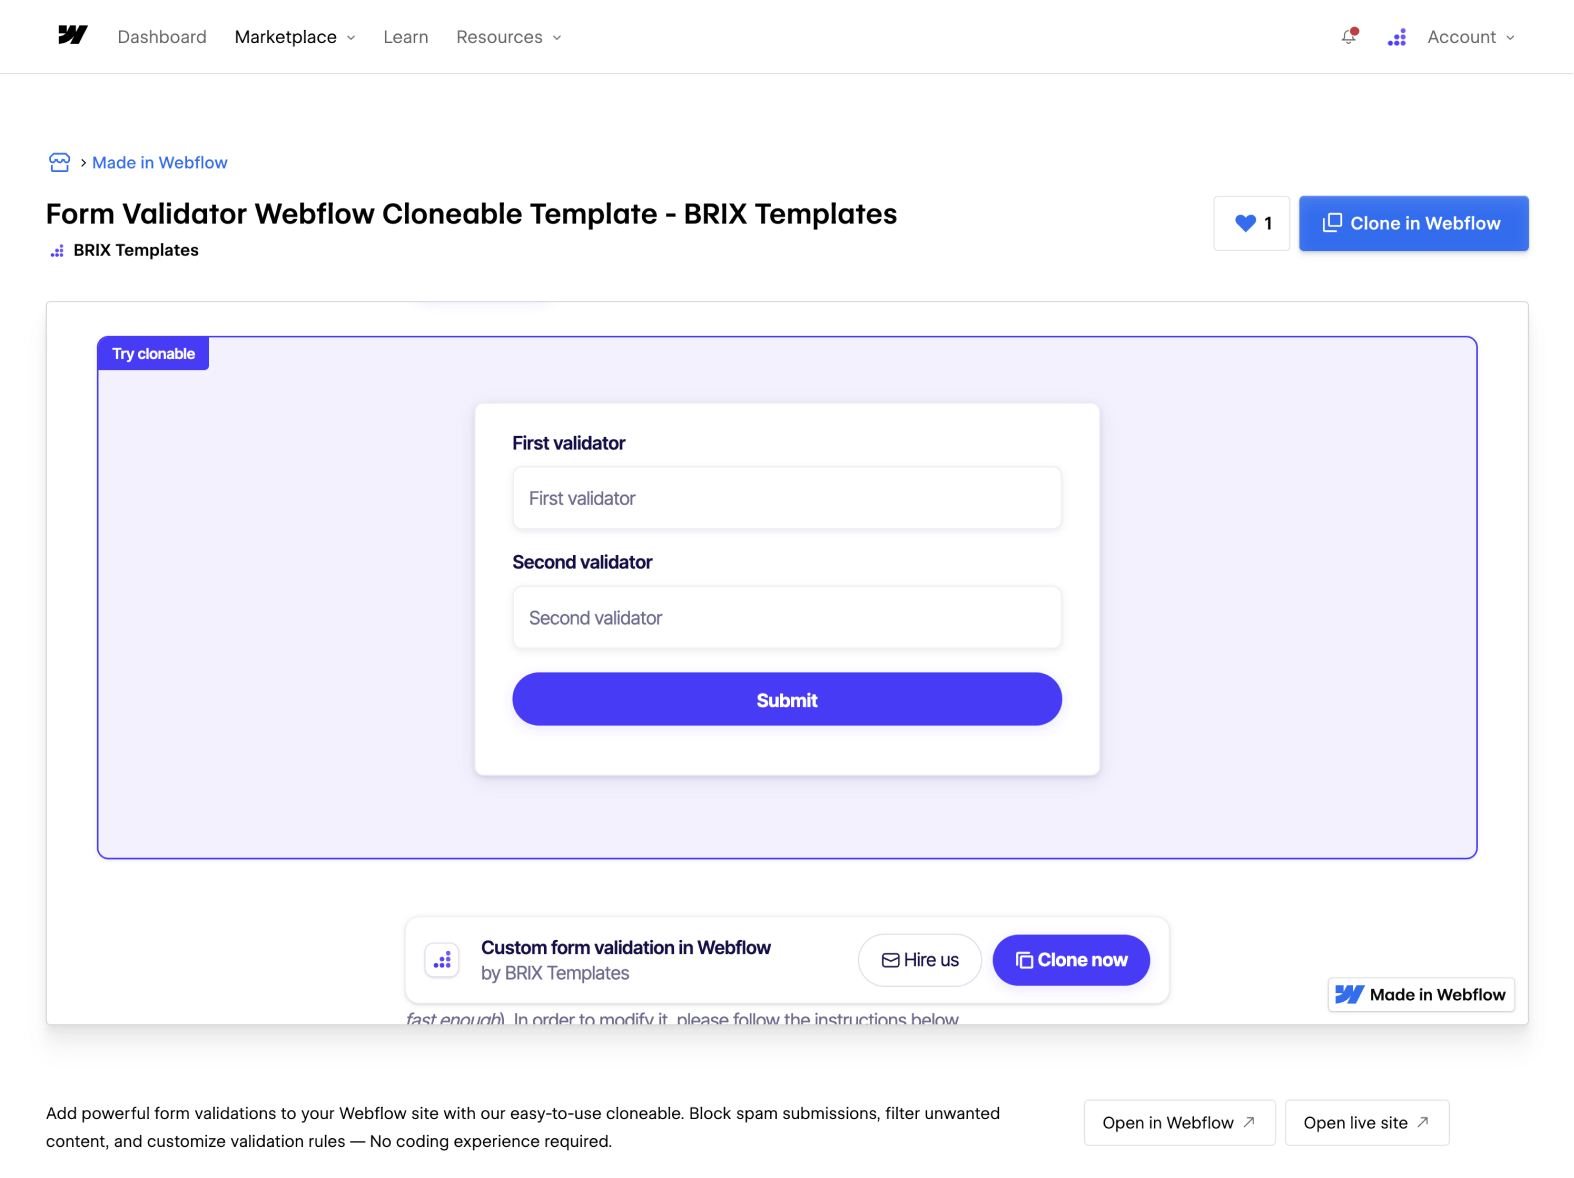
You can find our cloneable in the Made in Webflow Community. Just go to the link, and click the 'Clone in Webflow' button.
Conclusion
This implementation provides a solid foundation for custom form validation in Webflow, helping you maintain data quality and strongly reduce unwanted form submissions. The flexible structure allows for easy expansion and customization to meet your specific needs.
While this implementation works great for keyword-based validation, you might occasionally need more sophisticated solutions. Some examples of advanced implementations could include:
- AI-powered content filtering for more natural language understanding
- Geographic-based validation rules for regional service restrictions
- Custom validation logic for complex business rules
- Multi-step validation workflows
If you find yourself needing any of these more advanced solutions, the team at BRIX Templates would be happy to help you implement them.
Whether you choose to implement the code yourself or use our cloneable, you now have the tools to create more sophisticated form validation in Webflow. Remember to test thoroughly and keep your validation rules updated to maintain the best possible user experience.









Join readers commenting on this post!