
Tired of copy-pasting leads from Webflow to AWeber? You’re not alone. While AWeber excels at email marketing, connecting it to Webflow forms can feel tricky—especially if you want your signup forms to actually look good.
The good news? You’ve got options. We’ve tested multiple methods out there to connect AWeber forms to Webflow, and these three approaches actually work (no fluff, I promise). Let’s dive in.

AWeber integration methods with Webflow overview
Embed AWeber default form in Webflow:
Paste AWeber’s pre-built form code into Webflow. Instant setup, but limited design control. Use for temporary campaigns or testing.
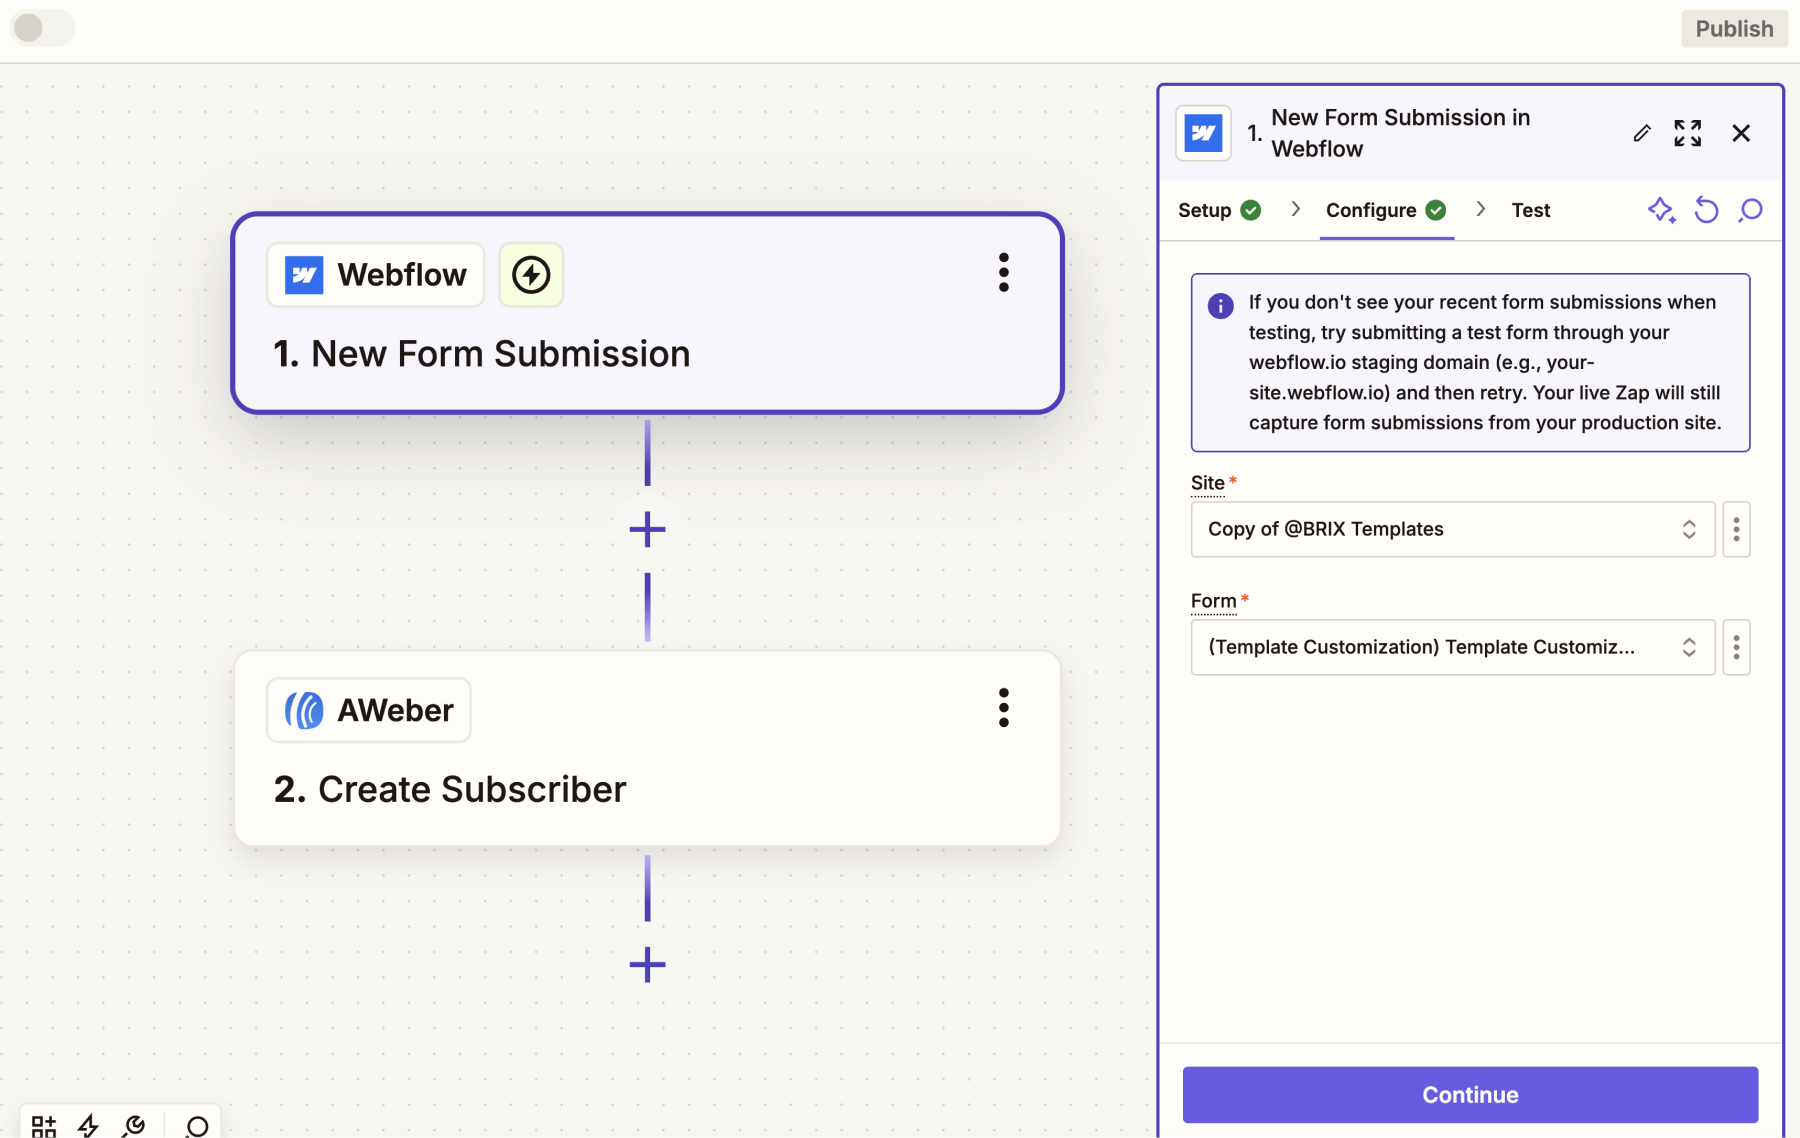
Integrate AWeber forms with Webflow using Zapier:
Preserve your Webflow design while Zapier automatically sends data. Adds subscription costs but enables multi-app workflows.
Add an AWeber raw HTML form in Webflow:
Embed AWeber’s HTML/CSS code into Webflow, then style it to match your site. No third parties, full control, slight learning curve.
Method 1: Embed AWeber default form in Webflow
Best for:
- Launching a form in less than 5 minutes flat.
- Temporary campaigns where design doesn’t matter.
Setup walkthrough:
Step 1: AWeber form creation
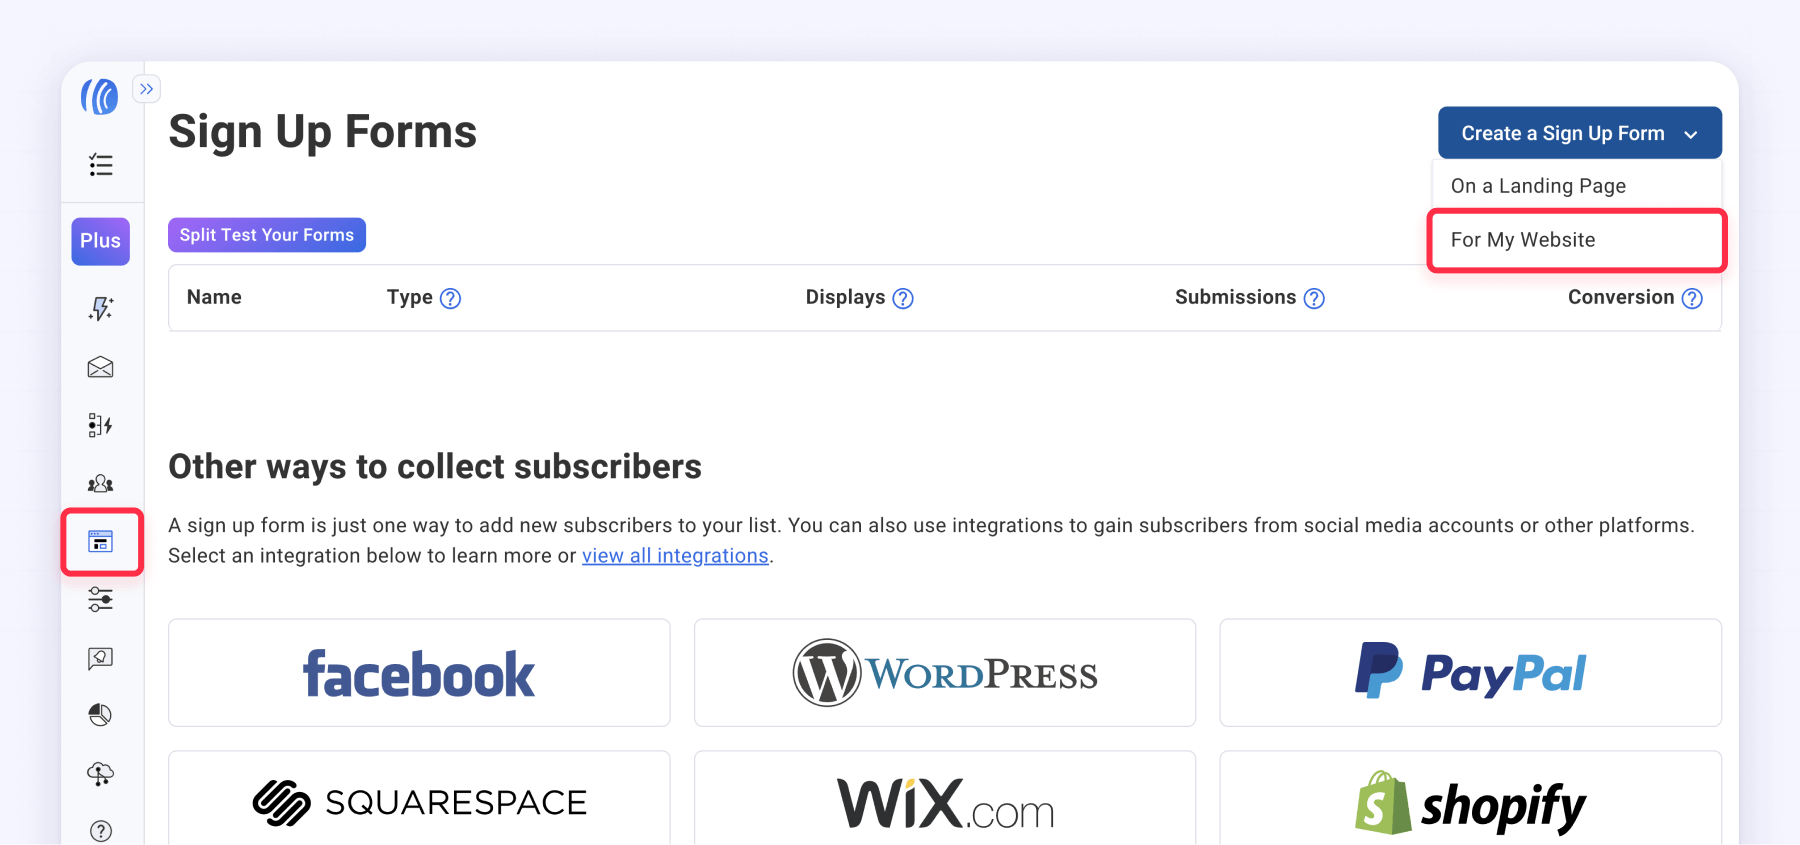
- Log into your AWeber account.
- Navigate to Pages & Forms > Sign Up Forms.
- Click Create a Sign Up Form.
- Select For My Website.
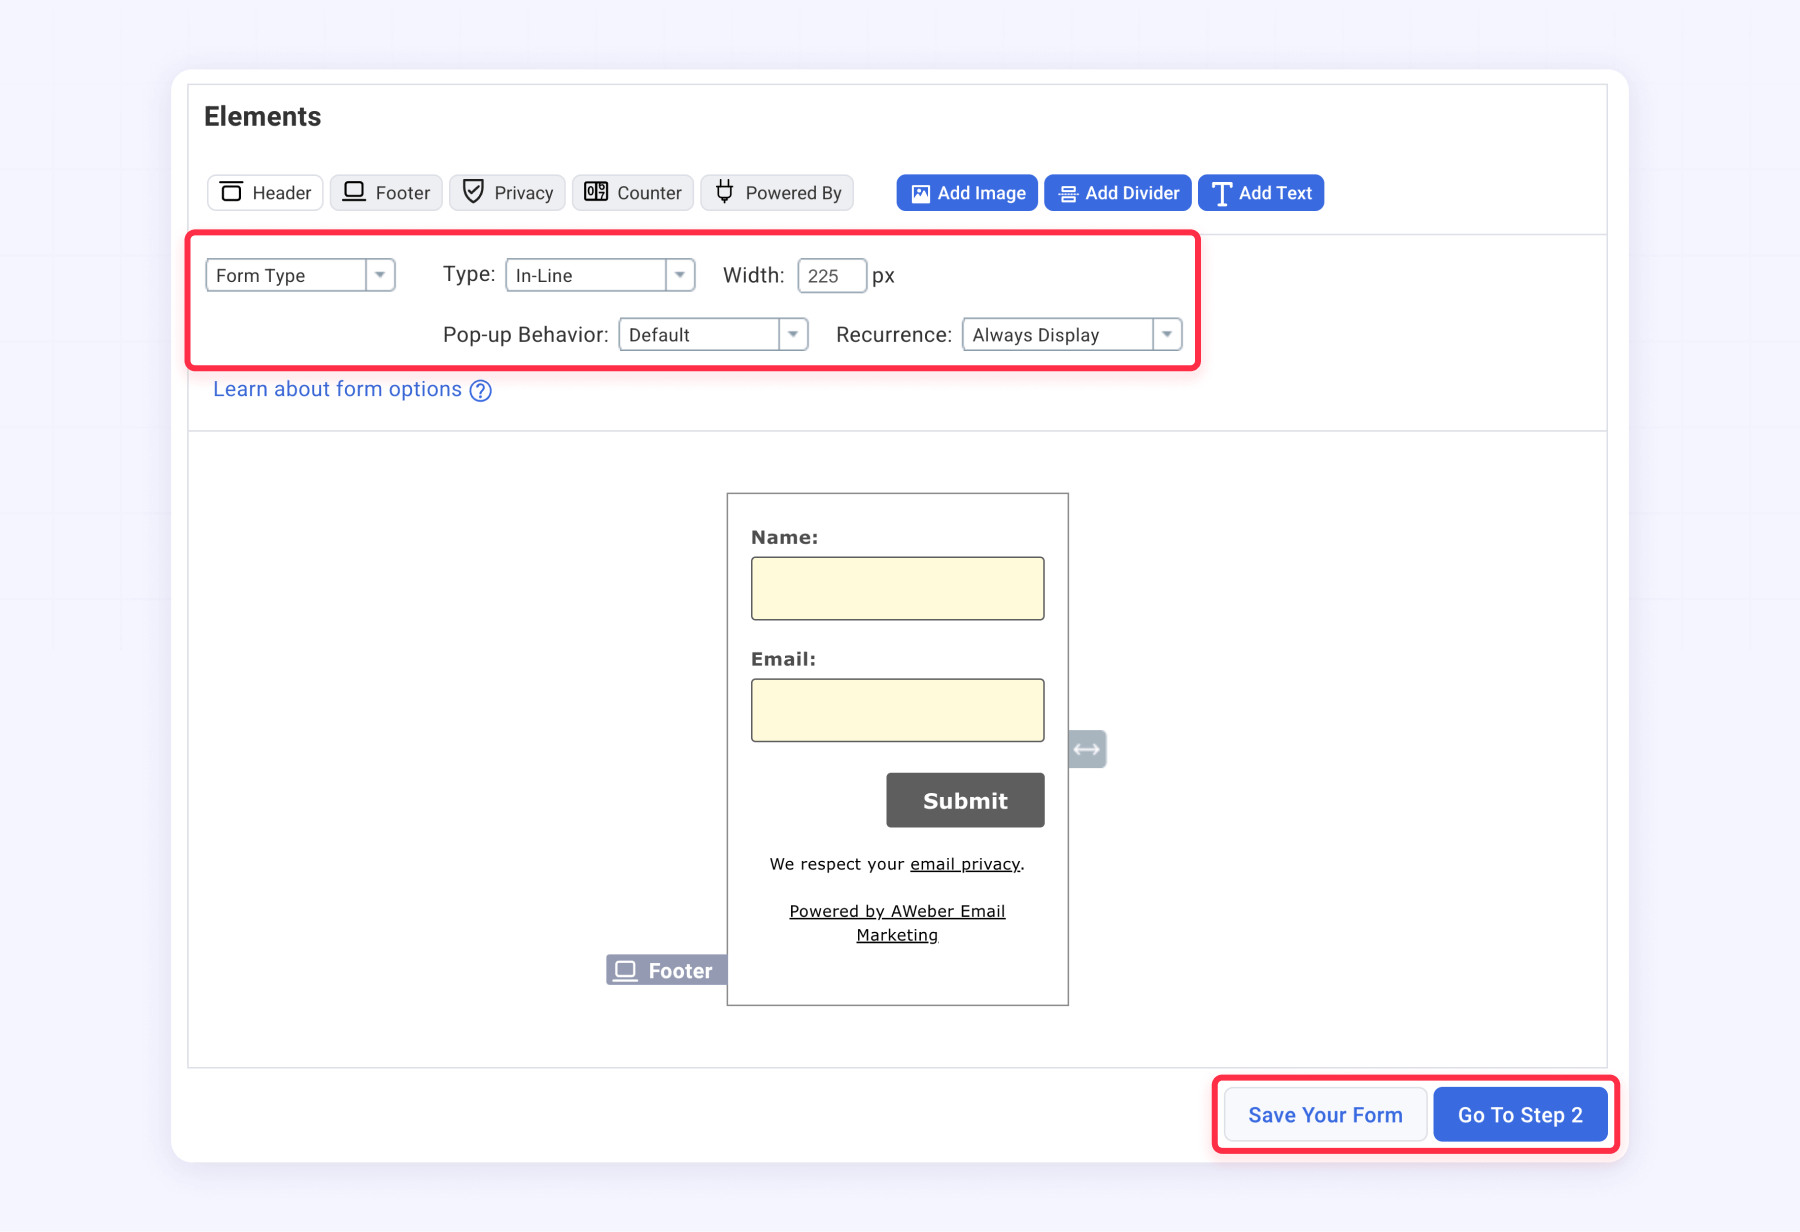
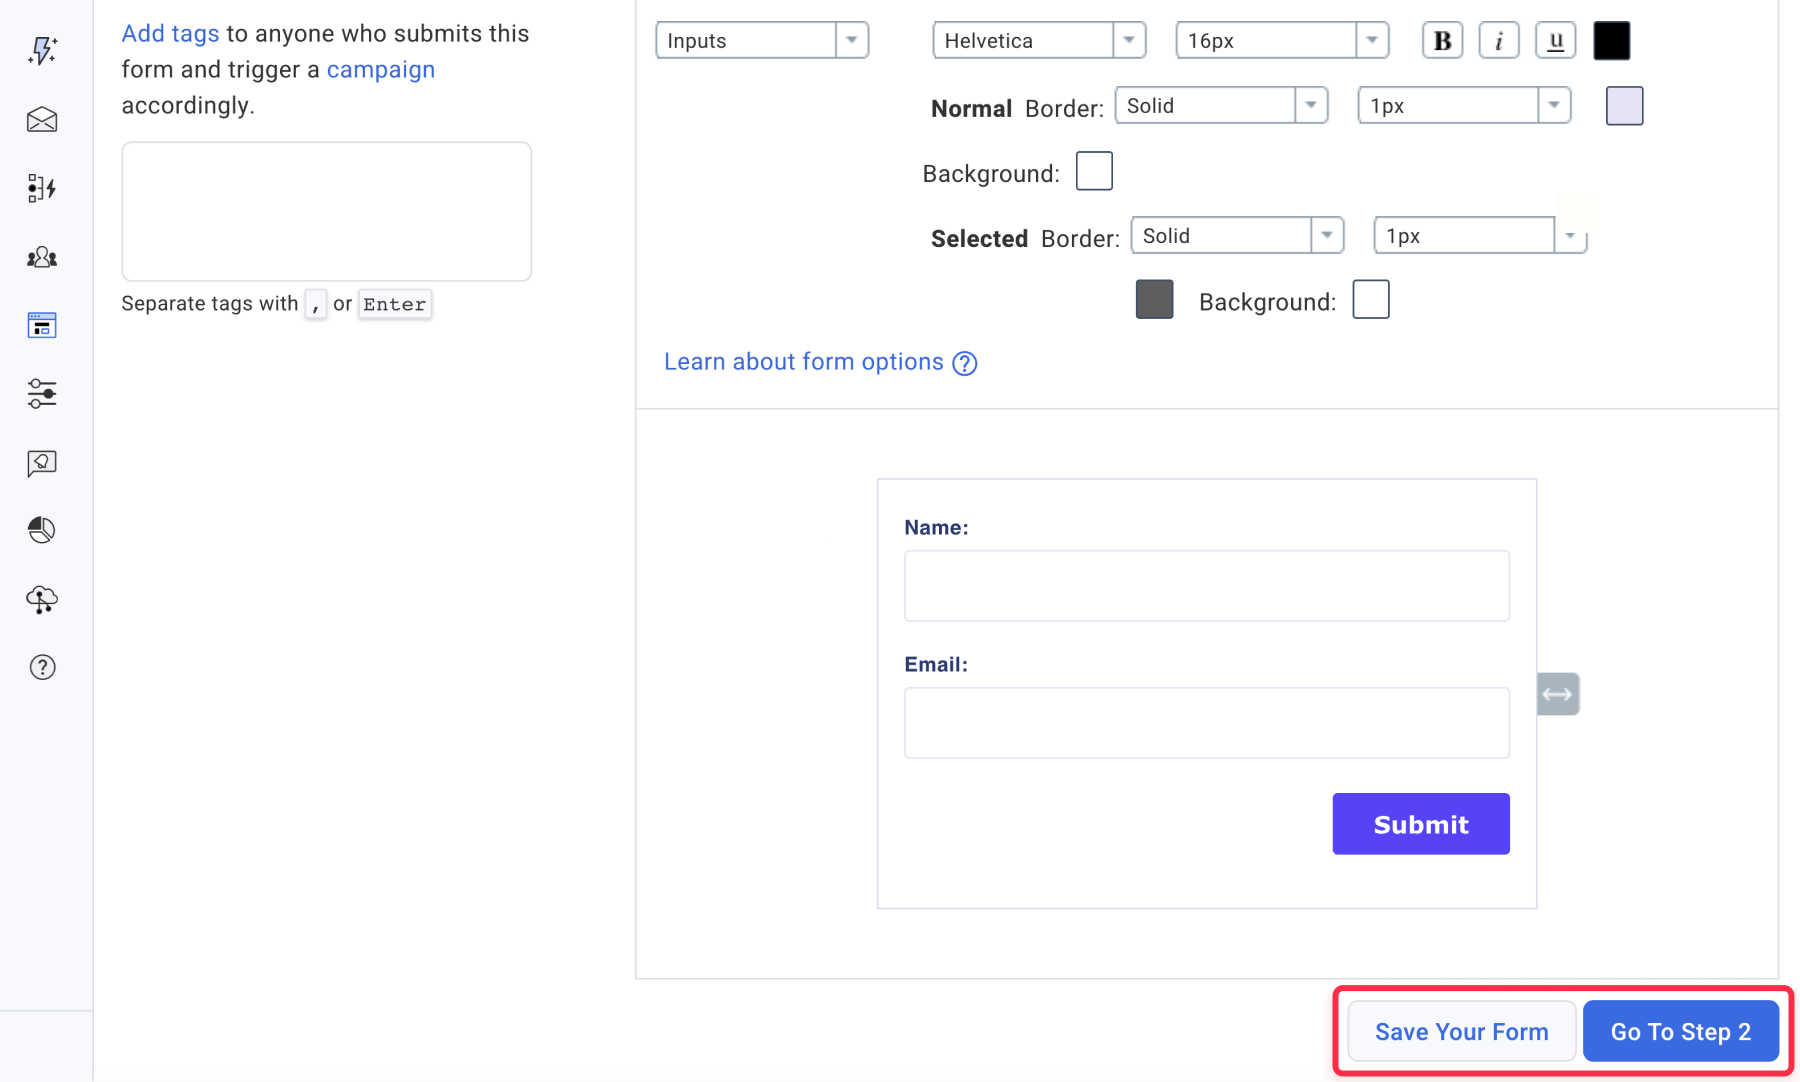
Step 2: Form configuration
- Choose your desired form fields and custom fields (email, name, etc.).
- Add styles to your form (even though the options are very limited).
- Configure field settings (required/optional) and validation rules.
- Click Go to Step 2.
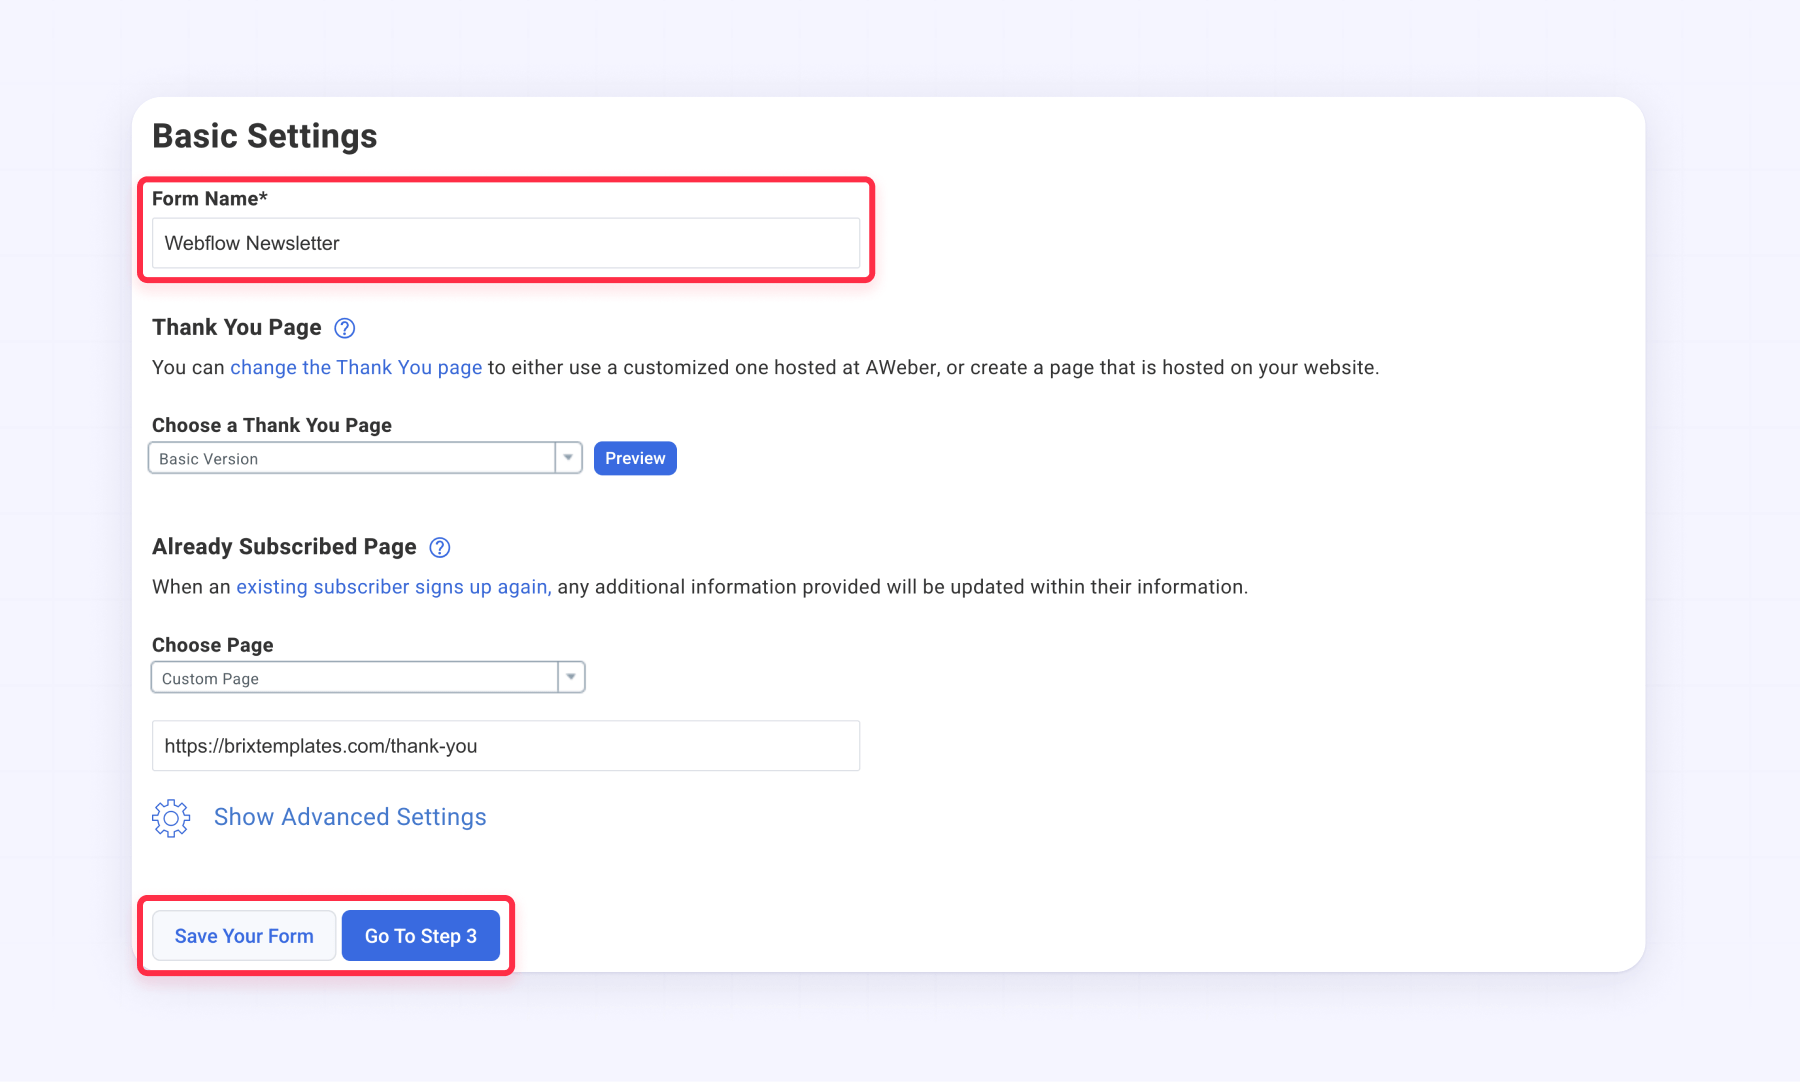
Step 3: Basic settings setup
- Name your form (e.g., “Webflow Newsletter”).
- Configure the Thank You Page URL or message.
- Click Save Your Form.
- Click Go to Step 3.
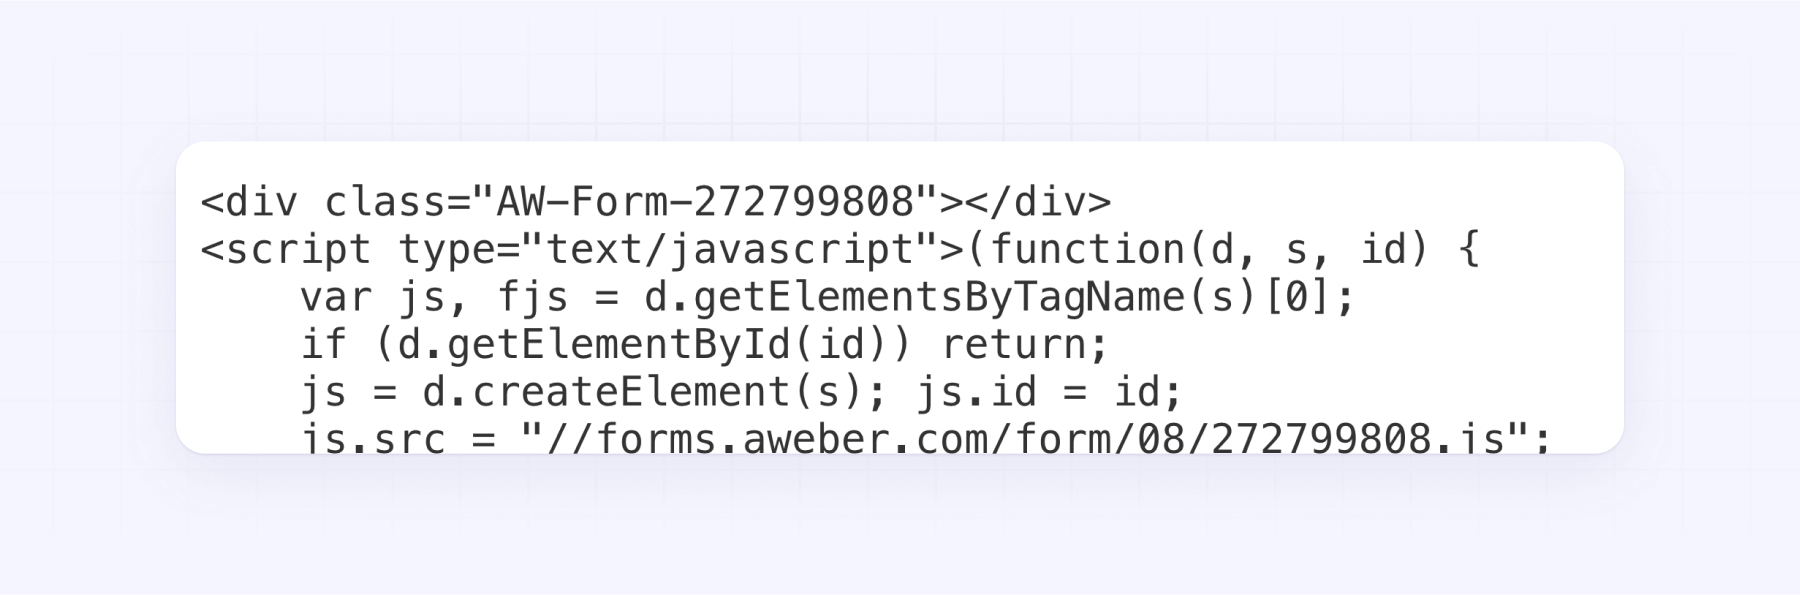
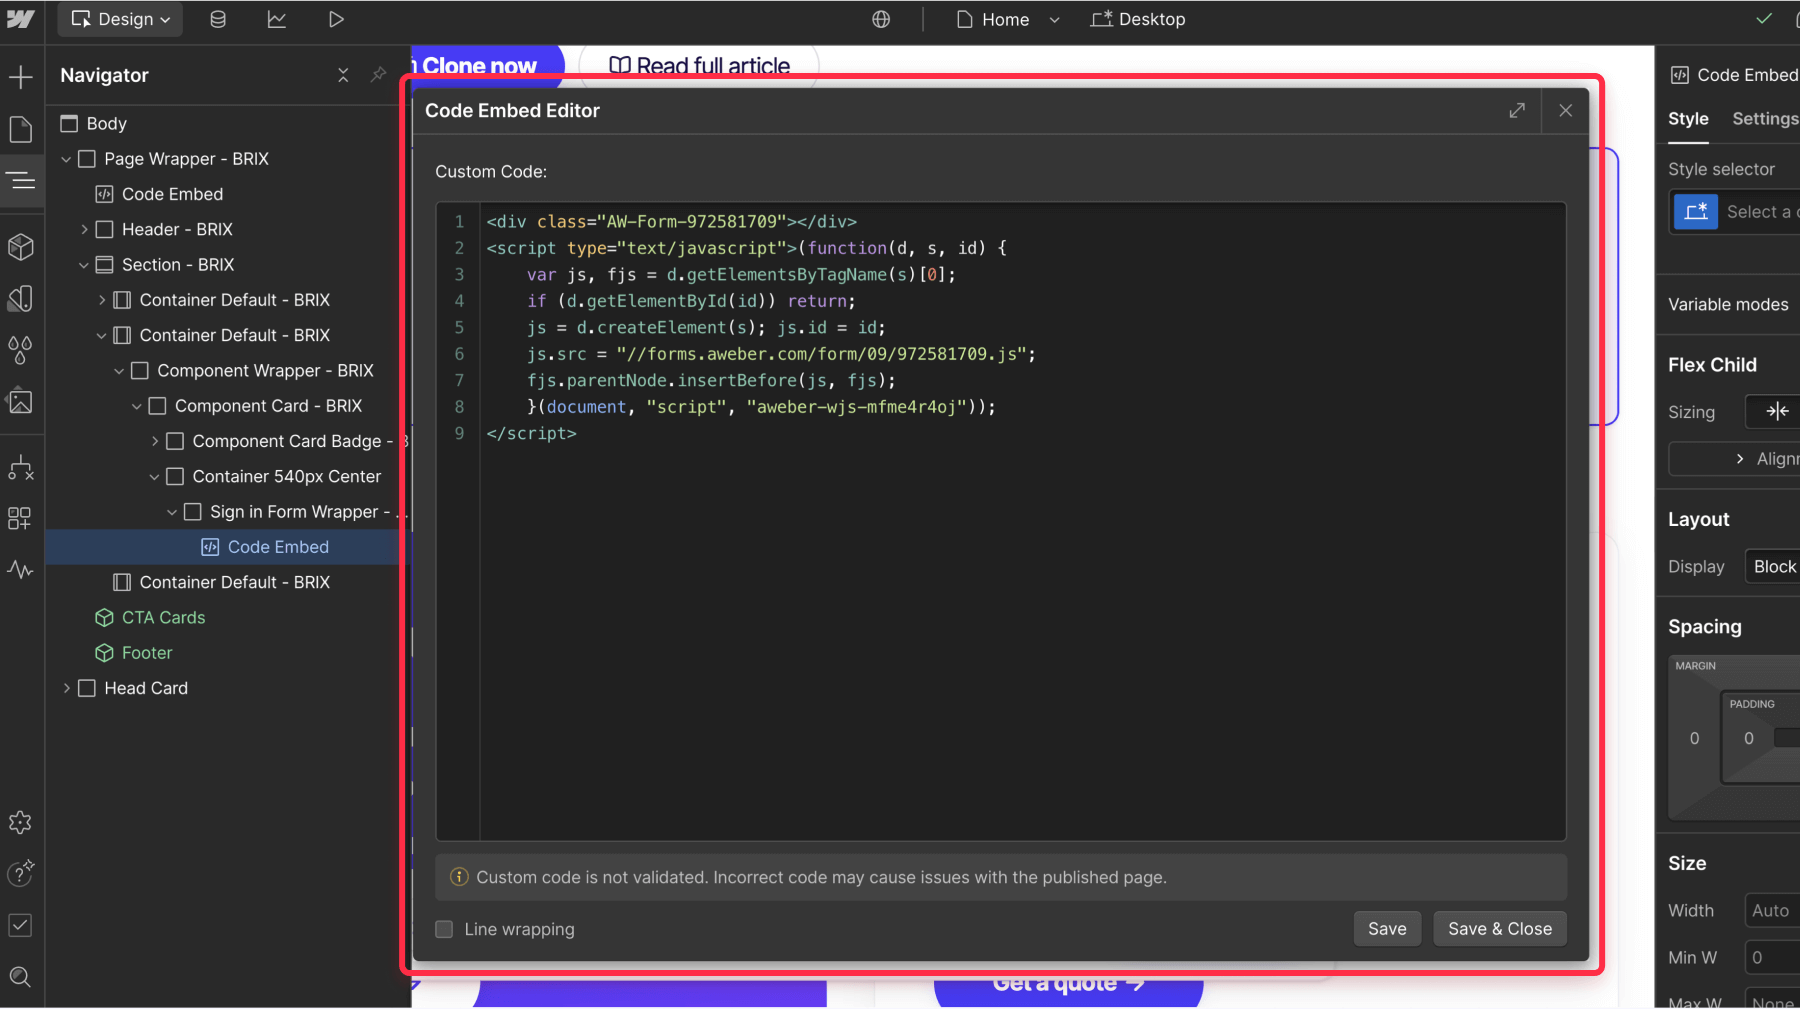
Step 4: Webflow implementation
- Choose I Will Install My Form in AWeber.
- Select Javascript Snippet.
- Copy the provided code.
- Open your Webflow project.
- Add a Code Embed element to your page.
- Paste the AWeber code into the embed.
- Publish your site.
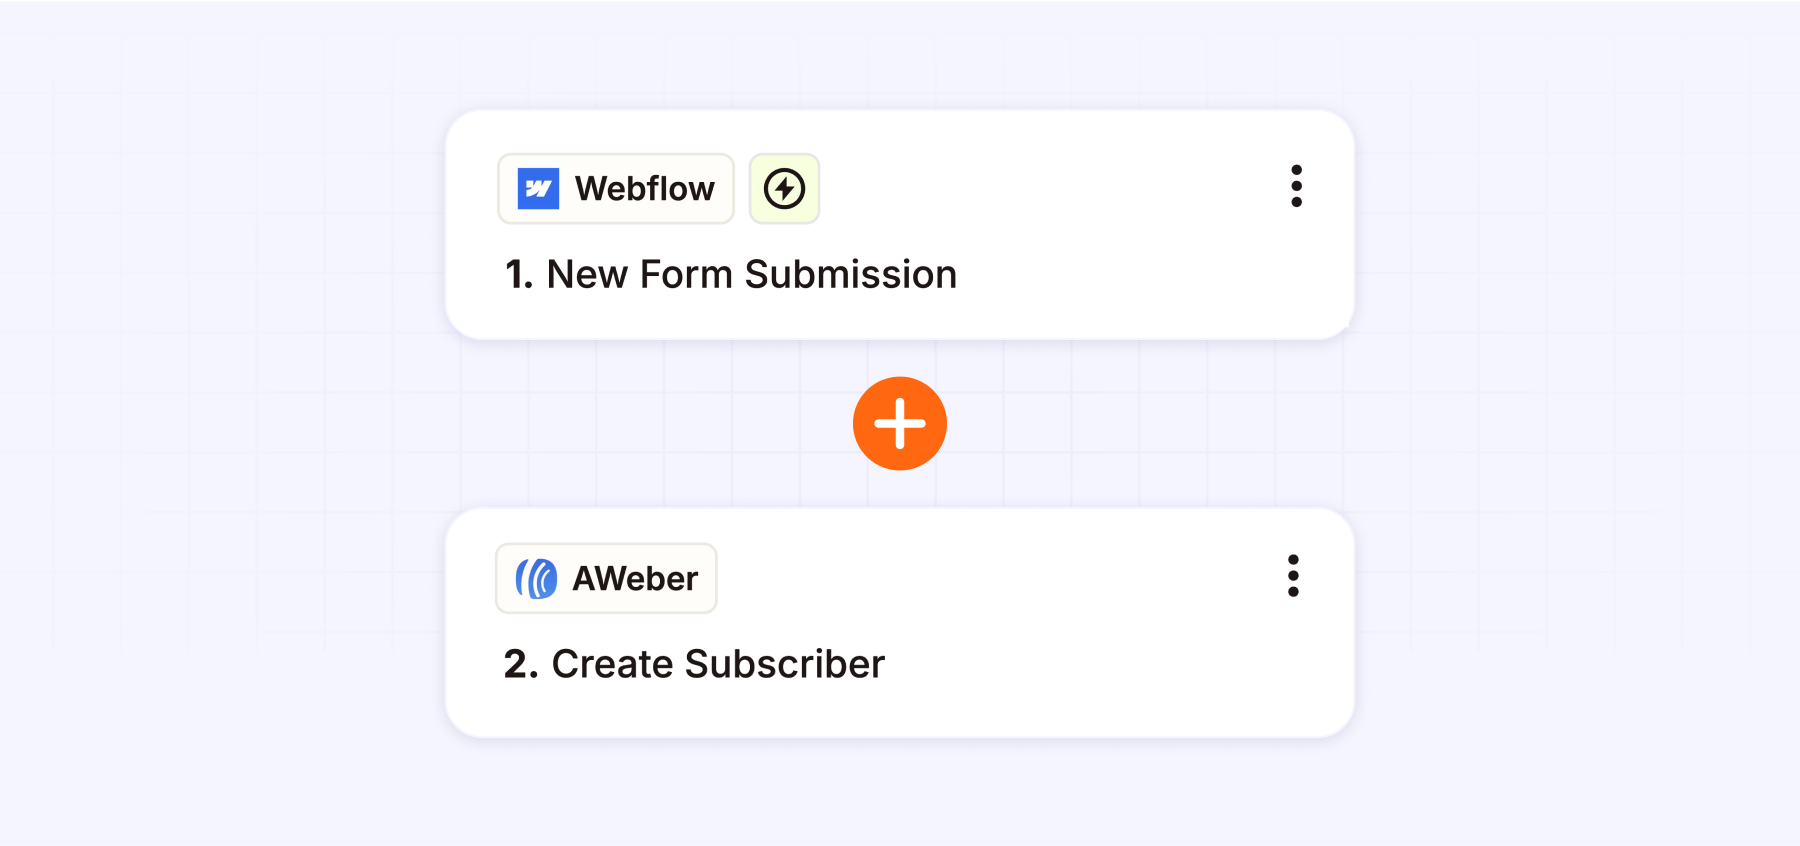
Method 2: Integrate AWeber forms with Webflow using Zapier
Zapier offers a flexible way to connect Webflow forms with AWeber while maintaining your custom form design.
Best for:
- Keeping your sleek Webflow form design.
- Adding extra automation (e.g., sending welcome DMs in Slack).
Keep in mind:
- Zapier’s free plan only handles 100 tasks/month; after that, the basic plan starts at $19.66/month.
- Adds a 2-3 second delay in data transfer.
Setup walkthrough:
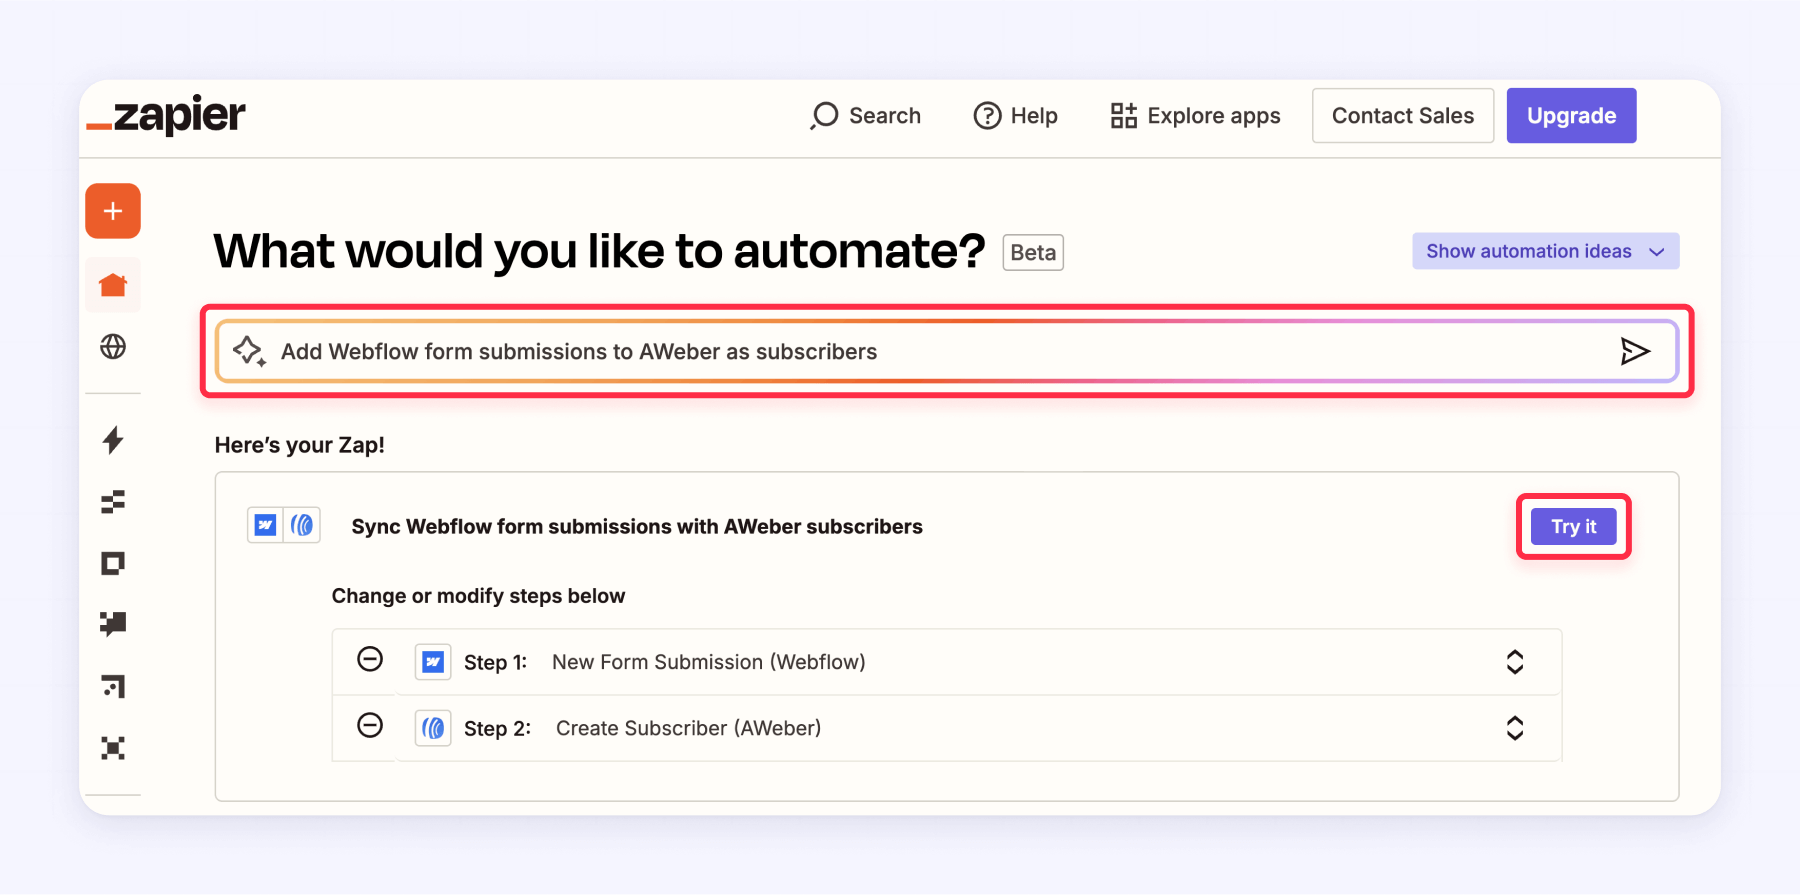
Step 1: Zapier setup
- Log into (or create) your Zapier account.
- Generate a new automation in the AI automation prompt box with the prompt: ‘Add Webflow form submissions to AWeber as subscribers.’
- Click the Try it button to start with the template.
Step 2: Webflow connection
- Connect your Webflow account to Zapier.
- Choose the specific site where your form lives.
- Select the exact form you want to automate (e.g., “Homepage Newsletter”).
- Run a test submission to confirm Zapier can see your form data.
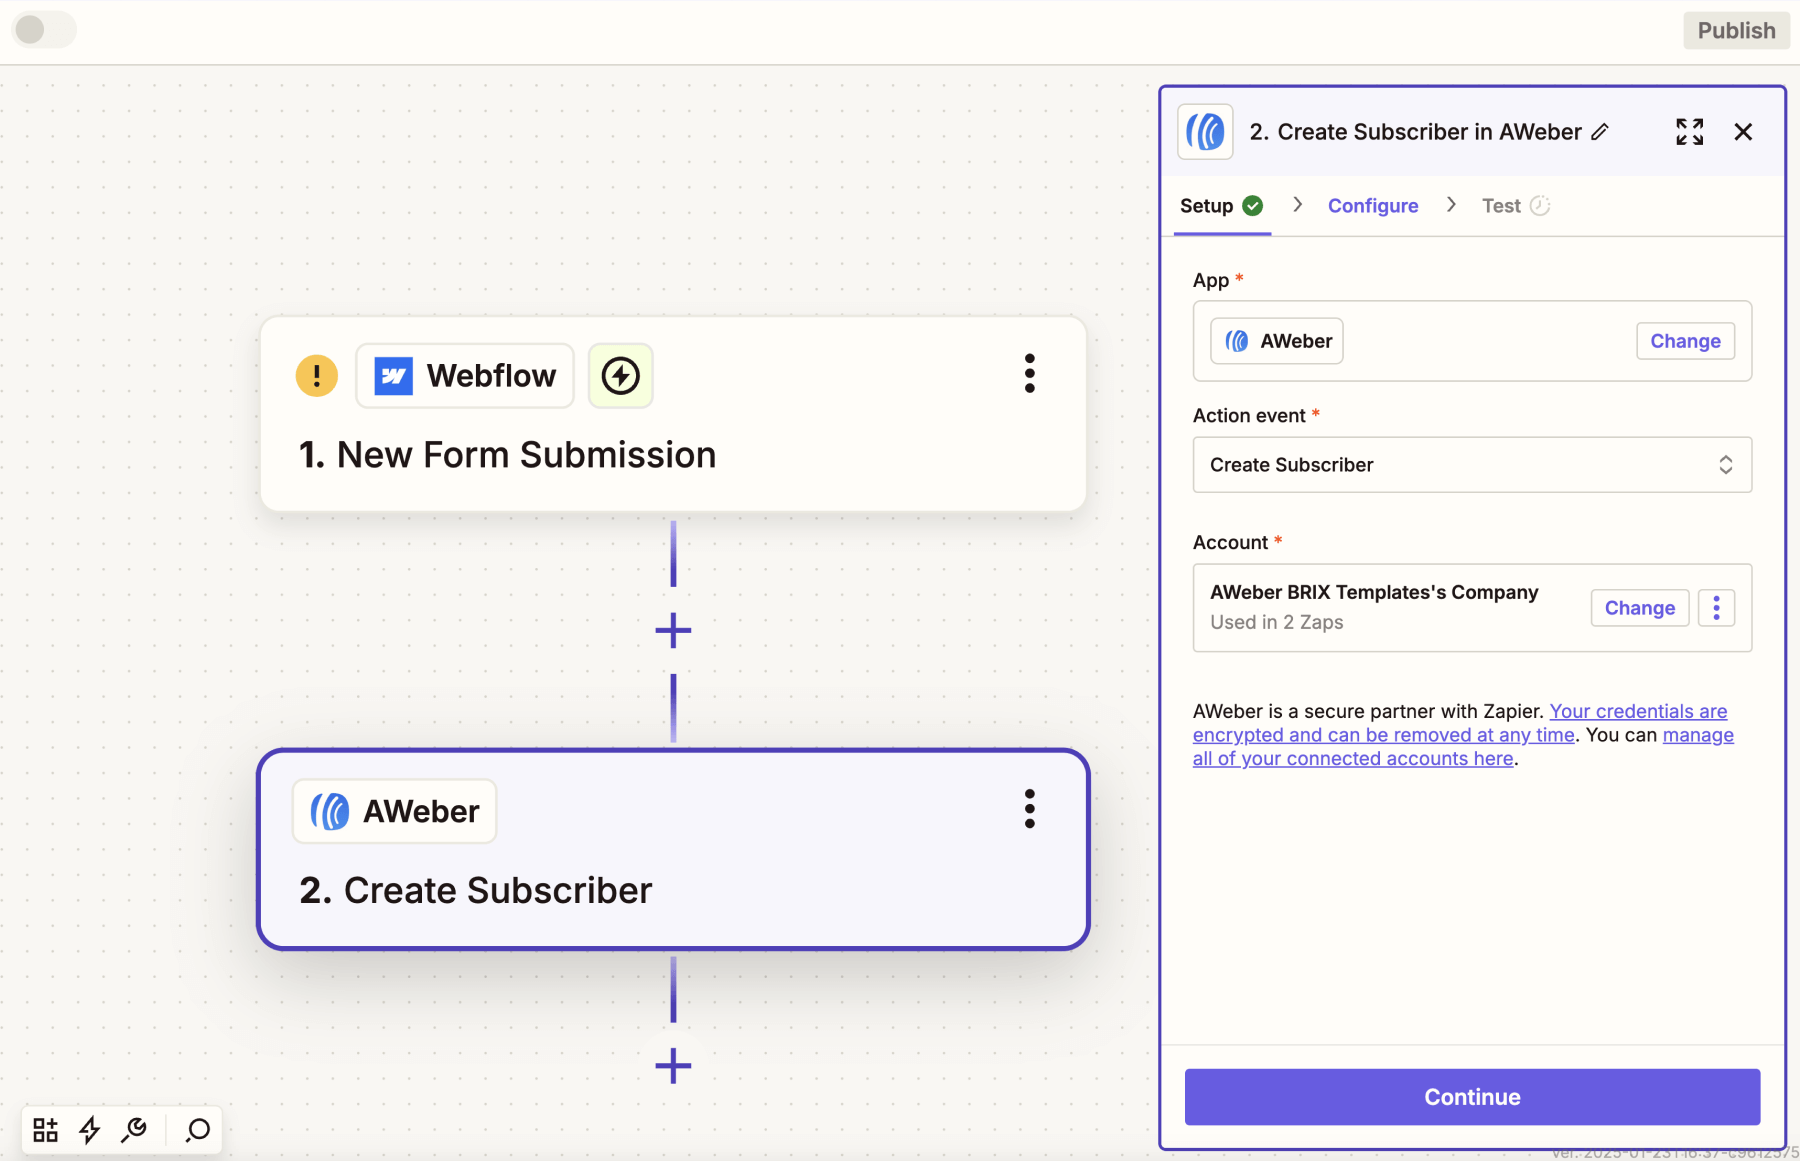
Step 3: AWeber connection
- Connect your AWeber account to Zapier.
- Choose the account and the email list where subscribers will be added.
- Map Webflow fields to AWeber fields (e.g., Email → email, First Name → first name).
- Test the sync to ensure AWeber receives the form data.
Step 4: Activation
- Review all mappings and connections.
- Submit a live test through your Webflow form.
- Confirm the subscriber appears in AWeber.
- Flip the switch to Activate Zap.
Method 3: Add an AWeber raw HTML form in Webflow (Top choice)
This method gives you total design freedom without losing AWeber’s smart features—use their raw HTML form option to style your signup exactly how you want while still keeping auto-responders, analytics, and list management running smoothly behind the scenes.
Our top pick for:
- Pixel-perfect forms matching your site’s aesthetic.
- Avoiding third-party tools.
You’ll need:
- Basic CSS skills (or a frontend developer buddy).
- 20 minutes of patience.
Setup walkthrough:
Step 1: AWeber form creation
- Go to Pages & Forms > Sign Up Forms in AWeber.
- Click Create a Sign Up Form → Select For My Website.
- Configure fields (email, name, etc.) and save.
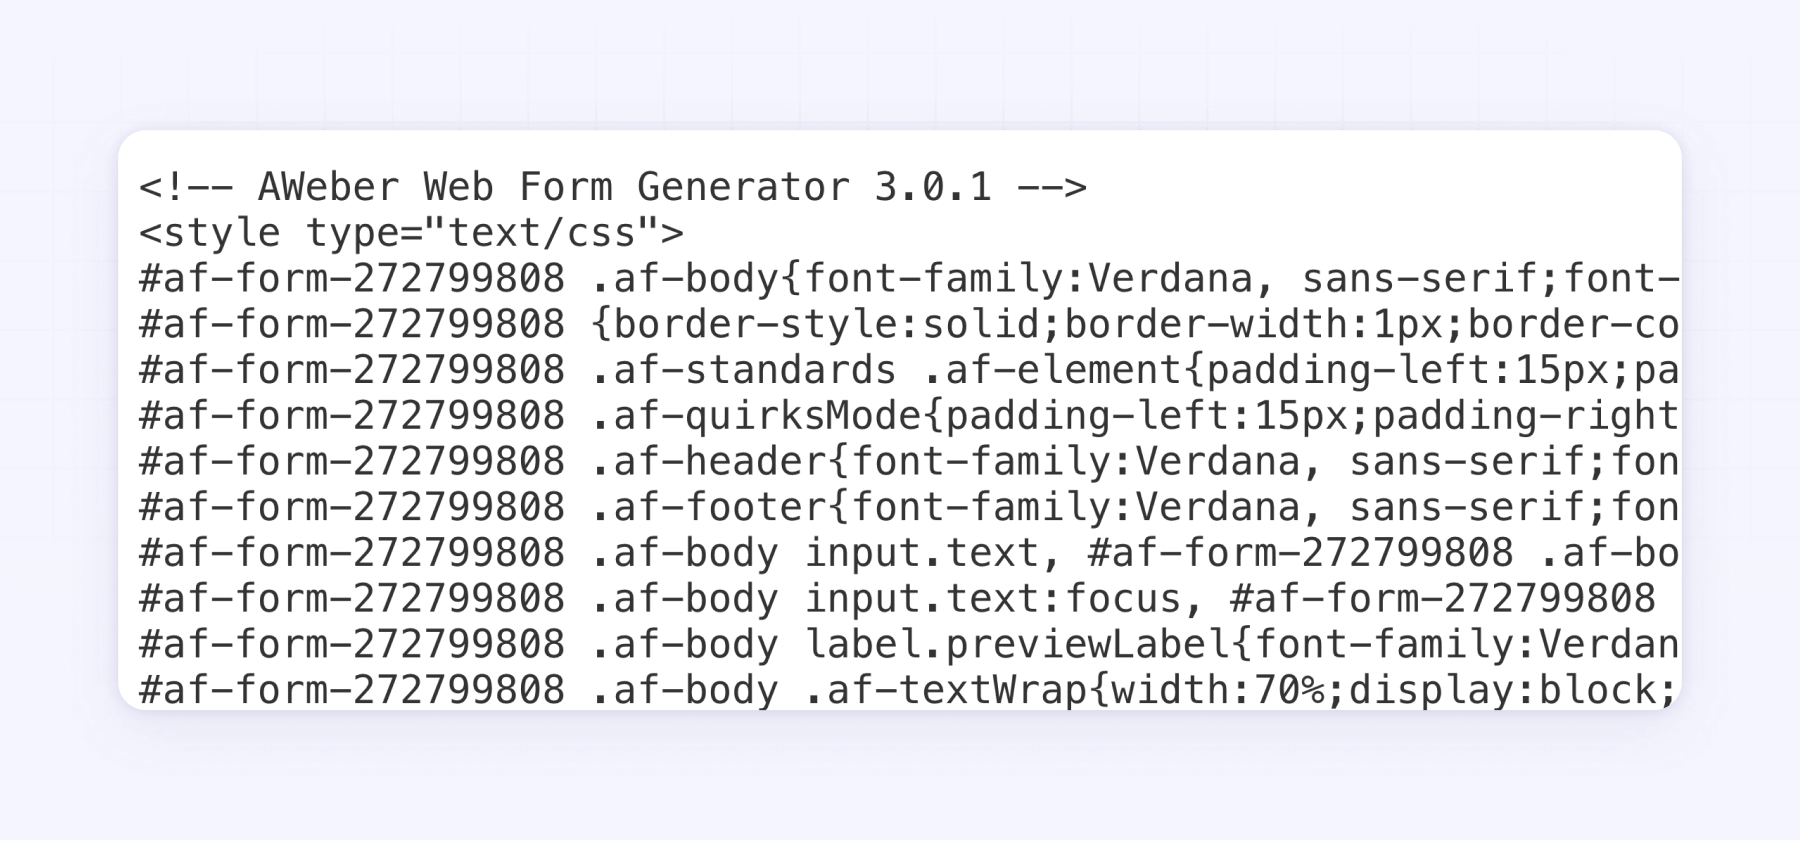
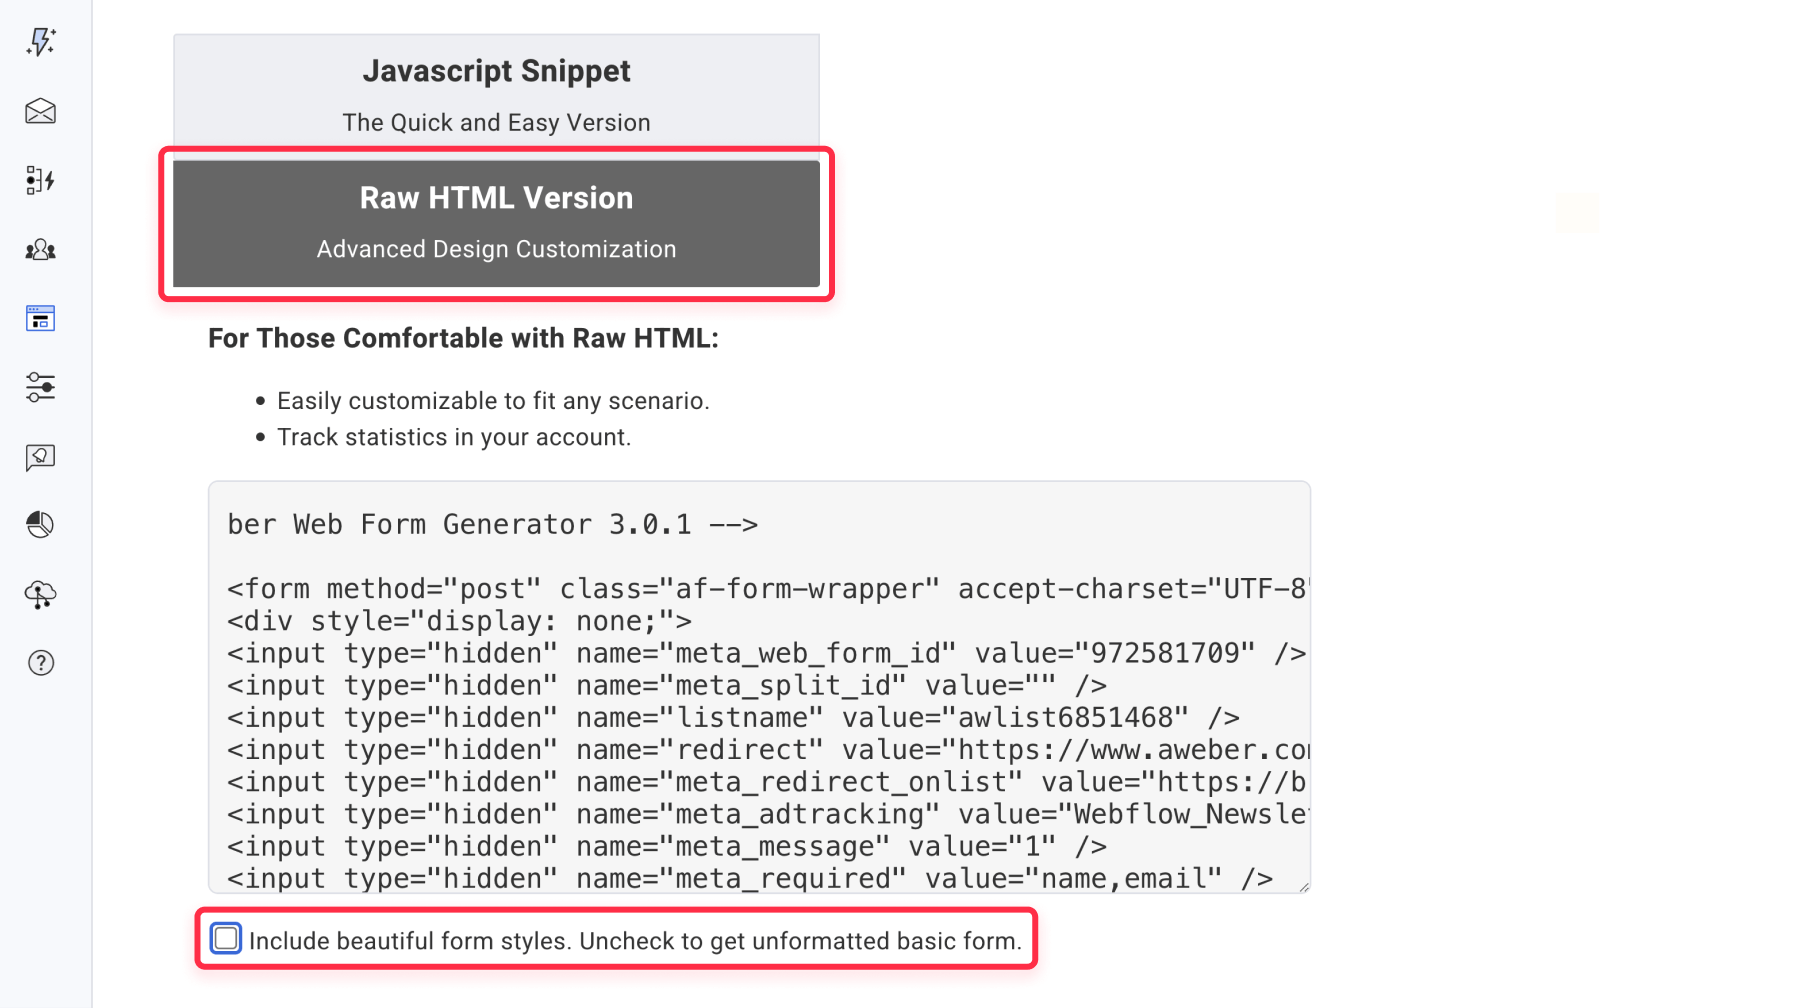
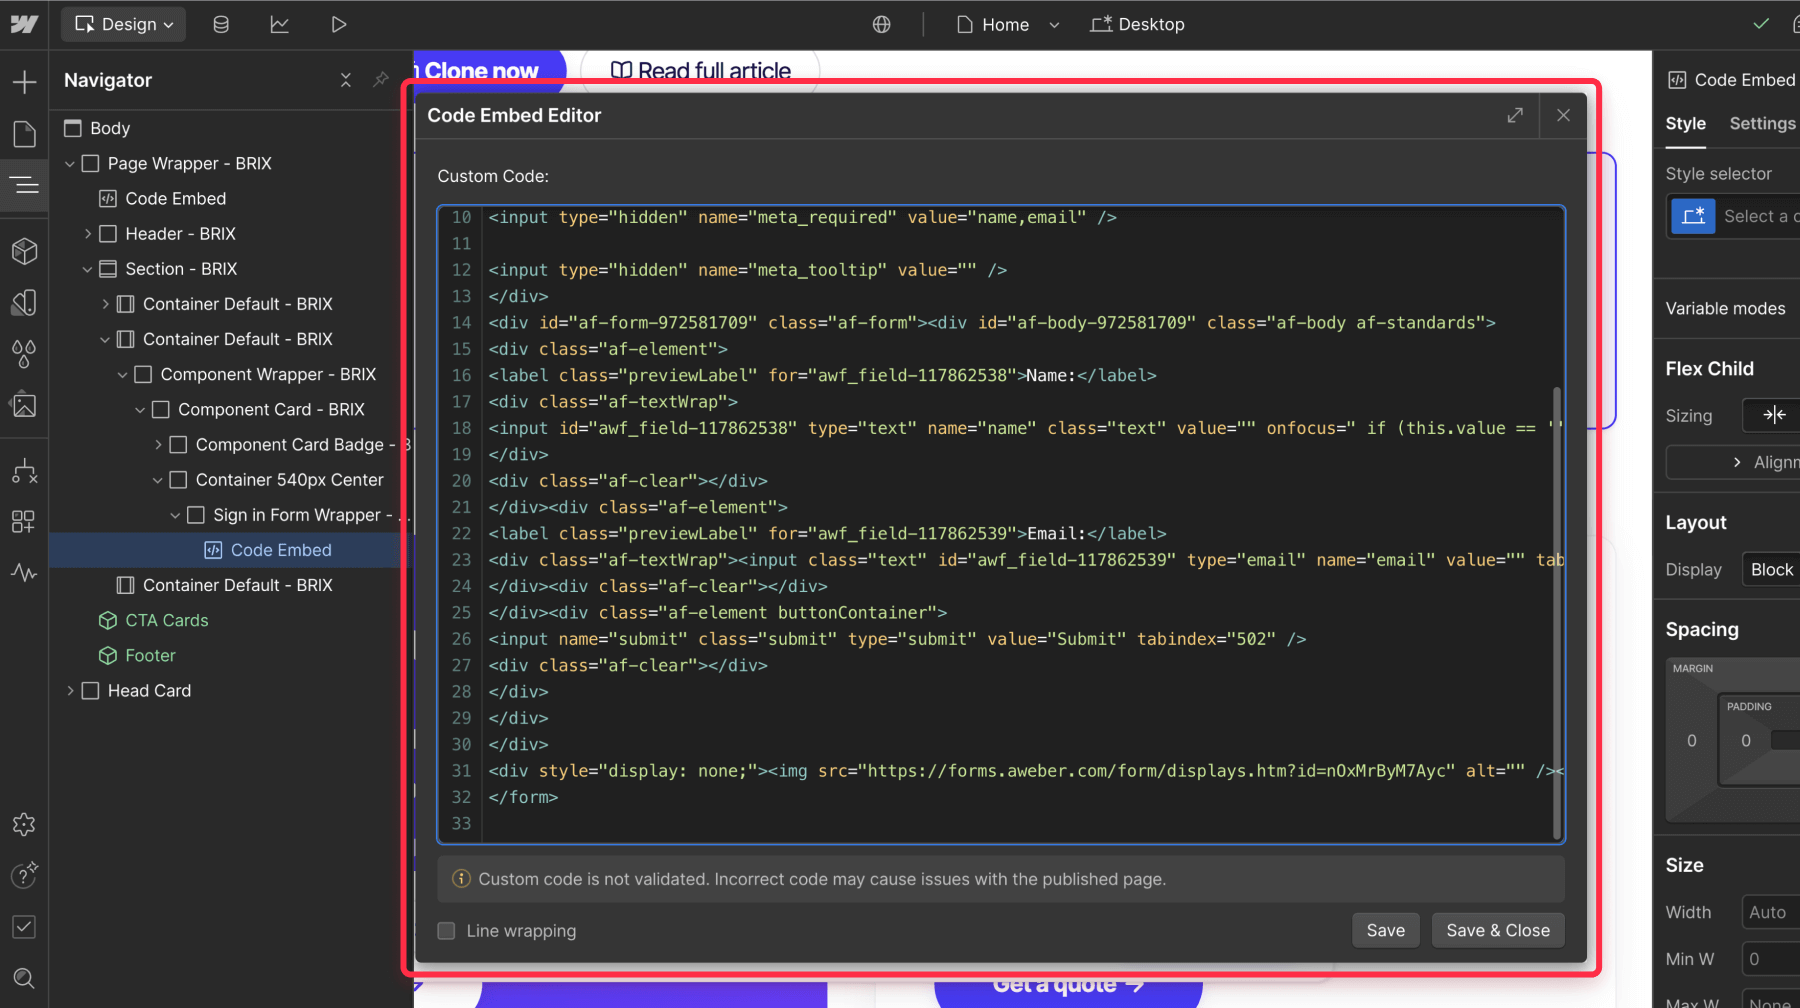
Step 2: Generate Raw HTML
- In AWeber’s form builder, navigate to Step 3
- Select Raw HTML Version
- Copy the HTML and uncheck the option Include beautiful form styles.
- Save your form settings.
Step 3: Webflow implementation
- Open your Webflow project.
- Add an Embed element where you want the form.
- Paste the copied AWeber HTML code.
Step 4: Custom styling (CSS tweaks)
We’ve created CSS styles for this raw HTML AWeber form, so you don’t have to start from scratch. To add the CSS to Webflow, follow these steps:
- Go to Project Settings > Custom Code > Inside <head> tag section
- Add this CSS to override AWeber’s defaults:
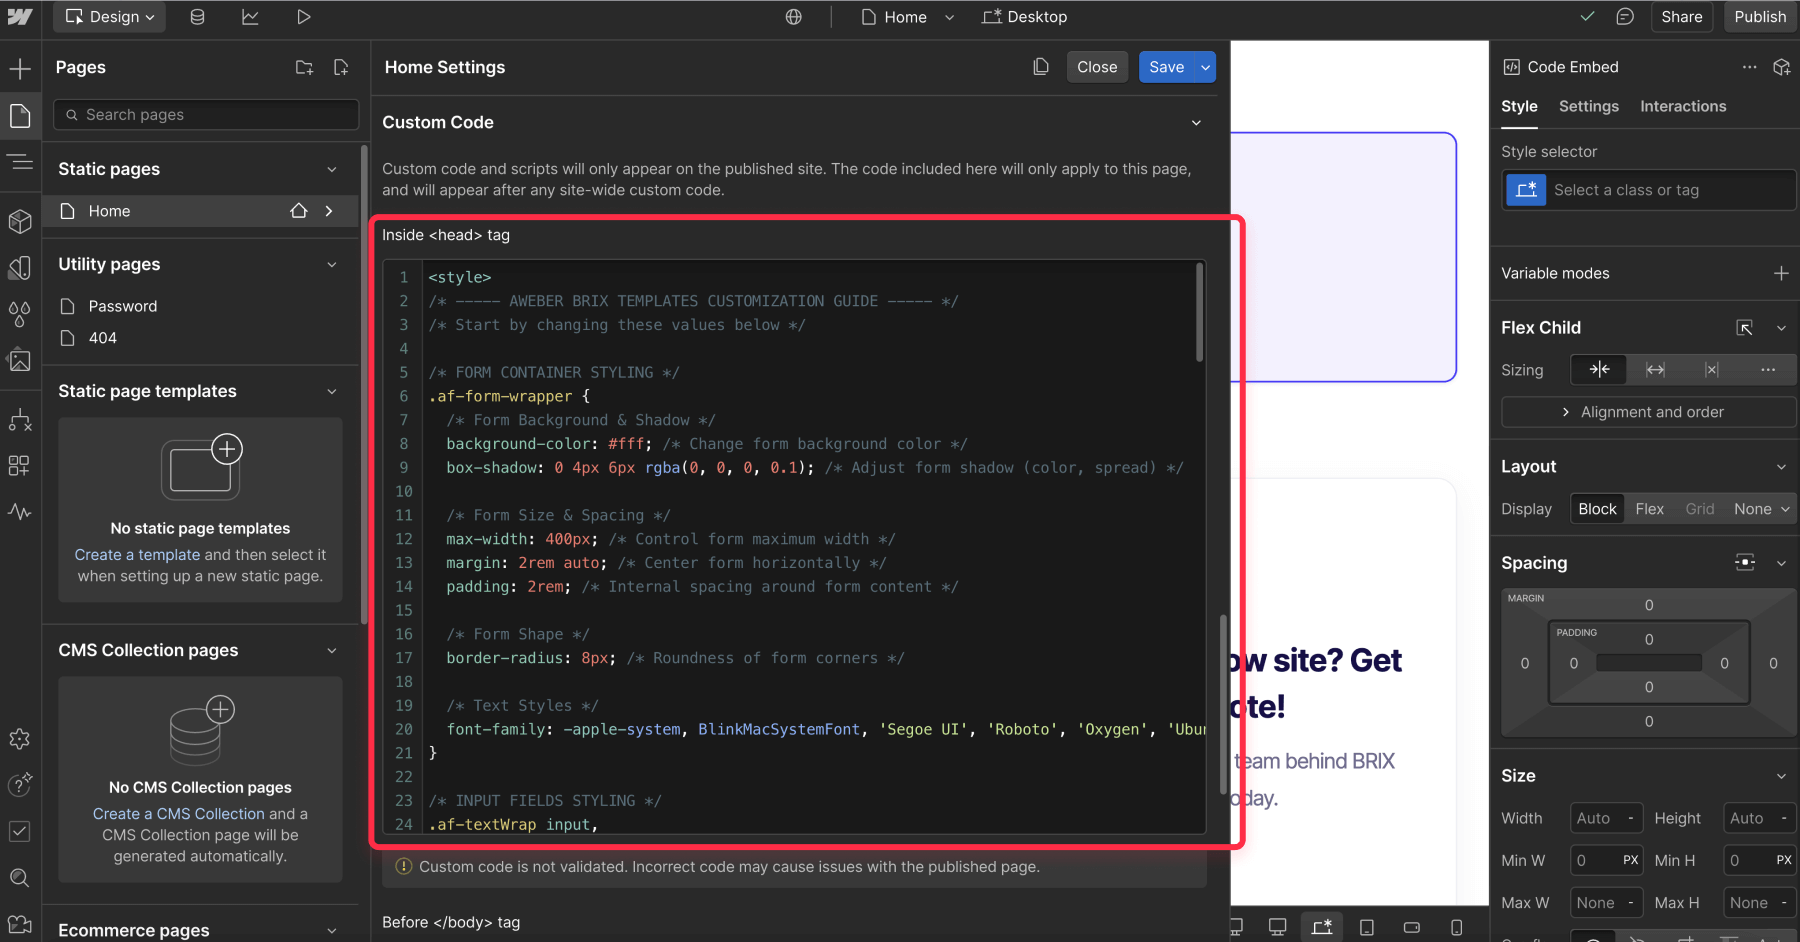
<style>
/* ----- AWEBER BRIX TEMPLATES CUSTOMIZATION GUIDE ----- */
/* Start by changing these values below */

/* FORM CONTAINER STYLING */
.af-form-wrapper {
  /* Form Background & Shadow */
  background-color: #fff; /* Change form background color */
  box-shadow: 0 4px 6px rgba(0, 0, 0, 0.1); /* Adjust form shadow (color, spread) */

  /* Form Size & Spacing */
  max-width: 400px; /* Control form maximum width */
  margin: 2rem auto; /* Center form horizontally */
  padding: 2rem; /* Internal spacing around form content */

  /* Form Shape */
  border-radius: 8px; /* Roundness of form corners */

  /* Text Styles */
  font-family: -apple-system, BlinkMacSystemFont, 'Segoe UI', 'Roboto', 'Oxygen', 'Ubuntu', 'Cantarell', 'Fira Sans', 'Droid Sans', 'Helvetica Neue', sans-serif; /* Form font */
}

/* INPUT FIELDS STYLING */
.af-textWrap input,
.af-textWrap textarea,
.af-element select {
  /* Field Colors */
  border: 1px solid #e0e0e0; /* Border color */
  background-color: #fff; /* Input background color */

  /* Text Styles */
  color: #221d43; /* Text color */
  font-size: 1rem; /* Text size */

  /* Field Sizing */
  padding: 0.75rem; /* Internal spacing */
  border-radius: 4px; /* Roundness of field corners */

  /* Hover/Focus Effects Timing */
  transition: all 0.3s ease; /* Animation speed for interactions */
  width: 100%;
}

/* INPUT HOVER/FOCUS EFFECTS */
.af-textWrap input:hover,
.af-textWrap textarea:hover,
.af-element select:hover {
  border-color: #4640ff; /* Border color on hover */
}

.af-textWrap input:focus,
.af-textWrap textarea:focus,
.af-element select:focus {
  border-color: #0070f3; /* Border color when focused */
  box-shadow: 0 0 0 2px rgba(0, 112, 243, 0.2); /* Glow effect when focused */
}

/* BUTTON STYLING */
.submit {
  /* Button Colors */
  background-color: #4640ff; /* Main button color */
  color: #fff; /* Text color */

  /* Button Size & Shape */
  padding: 0.75rem 1.5rem; /* Vertical/Horizontal spacing */
  border-radius: 4px; /* Roundness of button corners */

  /* Text Styles */
  font-size: 1rem; /* Text size */
  font-weight: 500; /* Text boldness (500 = medium) */

  /* Hover Effect Timing */
  transition: background-color 0.3s ease; /* Color change speed */
  border: none;
}

/* BUTTON HOVER/FOCUS STATES */
.submit:hover {
  background-color: #0060df; /* Button color on hover */
}

.submit:focus {
  box-shadow: 0 0 0 2px rgba(0, 112, 243, 0.4); /* Focus ring color */
}

/* ----- LESS COMMONLY CHANGED STYLES ----- */
/* Adjust these only if you need specific tweaks */

.af-form {
  display: flex;
  flex-direction: column;
}

.af-element {
  margin-bottom: 1.5rem;
}

.previewLabel {
  display: block;
  font-size: 0.875rem;
  font-weight: 500;
  color: #333;
  margin-bottom: 0.5rem;
}

.af-textWrap {
  display: flex;
}

.af-element input[type="radio"],
.af-element input[type="checkbox"] {
  margin-right: 0.5rem;
}

.af-element input[type="radio"] + label,
.af-element input[type="checkbox"] + label {
  font-size: 1rem;
  color: #333;
}

.buttonContainer {
  display: flex;
  justify-content: flex-end;
}

/* MOBILE RESPONSIVE ADJUSTMENTS */
@media (max-width: 480px) {
  .af-form-wrapper {
    padding: 1.5rem; /* Reduced spacing on mobile */
  }
}
</style>
Final Recommendation
Here’s our verdict: Raw HTML Form Embedding (Method 3) is the sweet spot for most teams. You get to design a form that actually looks like part of your website while keeping AWeber’s internal perks—no extra tools or fees (fair warning: you’ll want basic CSS skills or a developer’s help to polish the design.).
Still unsure? Match your priorities:
- Need it live yesterday? → Method 1 (AWeber Default)
- Automate everything? → Method 2 (Zapier)
- Make it look like your brand? → Method 3 (Raw HTML)
Stuck? We’ve got your back.
If AWeber-Webflow integrations feel overwhelming, BRIX Templates specializes in turning technical headaches into done-for-you solutions. We’ll handle the setup so you can focus on growing your list!


Join readers commenting on this post!