
Managing content length across different page contexts is a common challenge in Webflow projects. While you could create separate fields for each length requirement, there's a more efficient approach. Discover how programmatic truncation can help you maintain cleaner collections while achieving perfect content display everywhere.
This guide will walk you through implementing an attribute-based text truncation solution that gives you precise control over text length while respecting word boundaries and maintaining clean layouts across your Webflow site.
Why implement programmatic text truncation in Webflow
Standard character limits in Webflow can sometimes feel restrictive, especially when working with dynamic CMS content. Here's why a programmatic approach to text truncation makes sense for different scenarios:
- CMS content management: When dealing with blog posts, news articles, or product descriptions, you need reliable ways to display excerpts without breaking your layout.
- Layout consistency: Maintain clean grid layouts and card designs by ensuring text blocks stay within their intended boundaries.
- Word-aware truncation: Unlike simple character limits, smart truncation can ensure words aren't cut in the middle, providing a better reading experience.
- Dynamic flexibility: Adjust truncation lengths across different screen sizes or content types without requiring multiple CMS fields.
Understanding the 2 modes in our Text Truncation Webflow attribute
The solution we'll implement offers two distinct truncation modes:
- Absolute truncation (default mode): Cuts text exactly at your specified character limit, adding an ellipsis (...) to indicate more content.
- Word-aware truncation: Similar to absolute truncation but extends slightly beyond your character limit to finish the current word before adding the ellipsis (...), ensuring no words are cut in half.
How to add the text truncation script in your Webflow site
Let's break down the implementation process into clear, manageable steps.
How to add the truncation script to your Webflow project
First, we need to add the script that powers the truncation functionality:
- Access your Webflow project settings
- Navigate to the Custom Code section
- Locate the "Before </body> tag" field
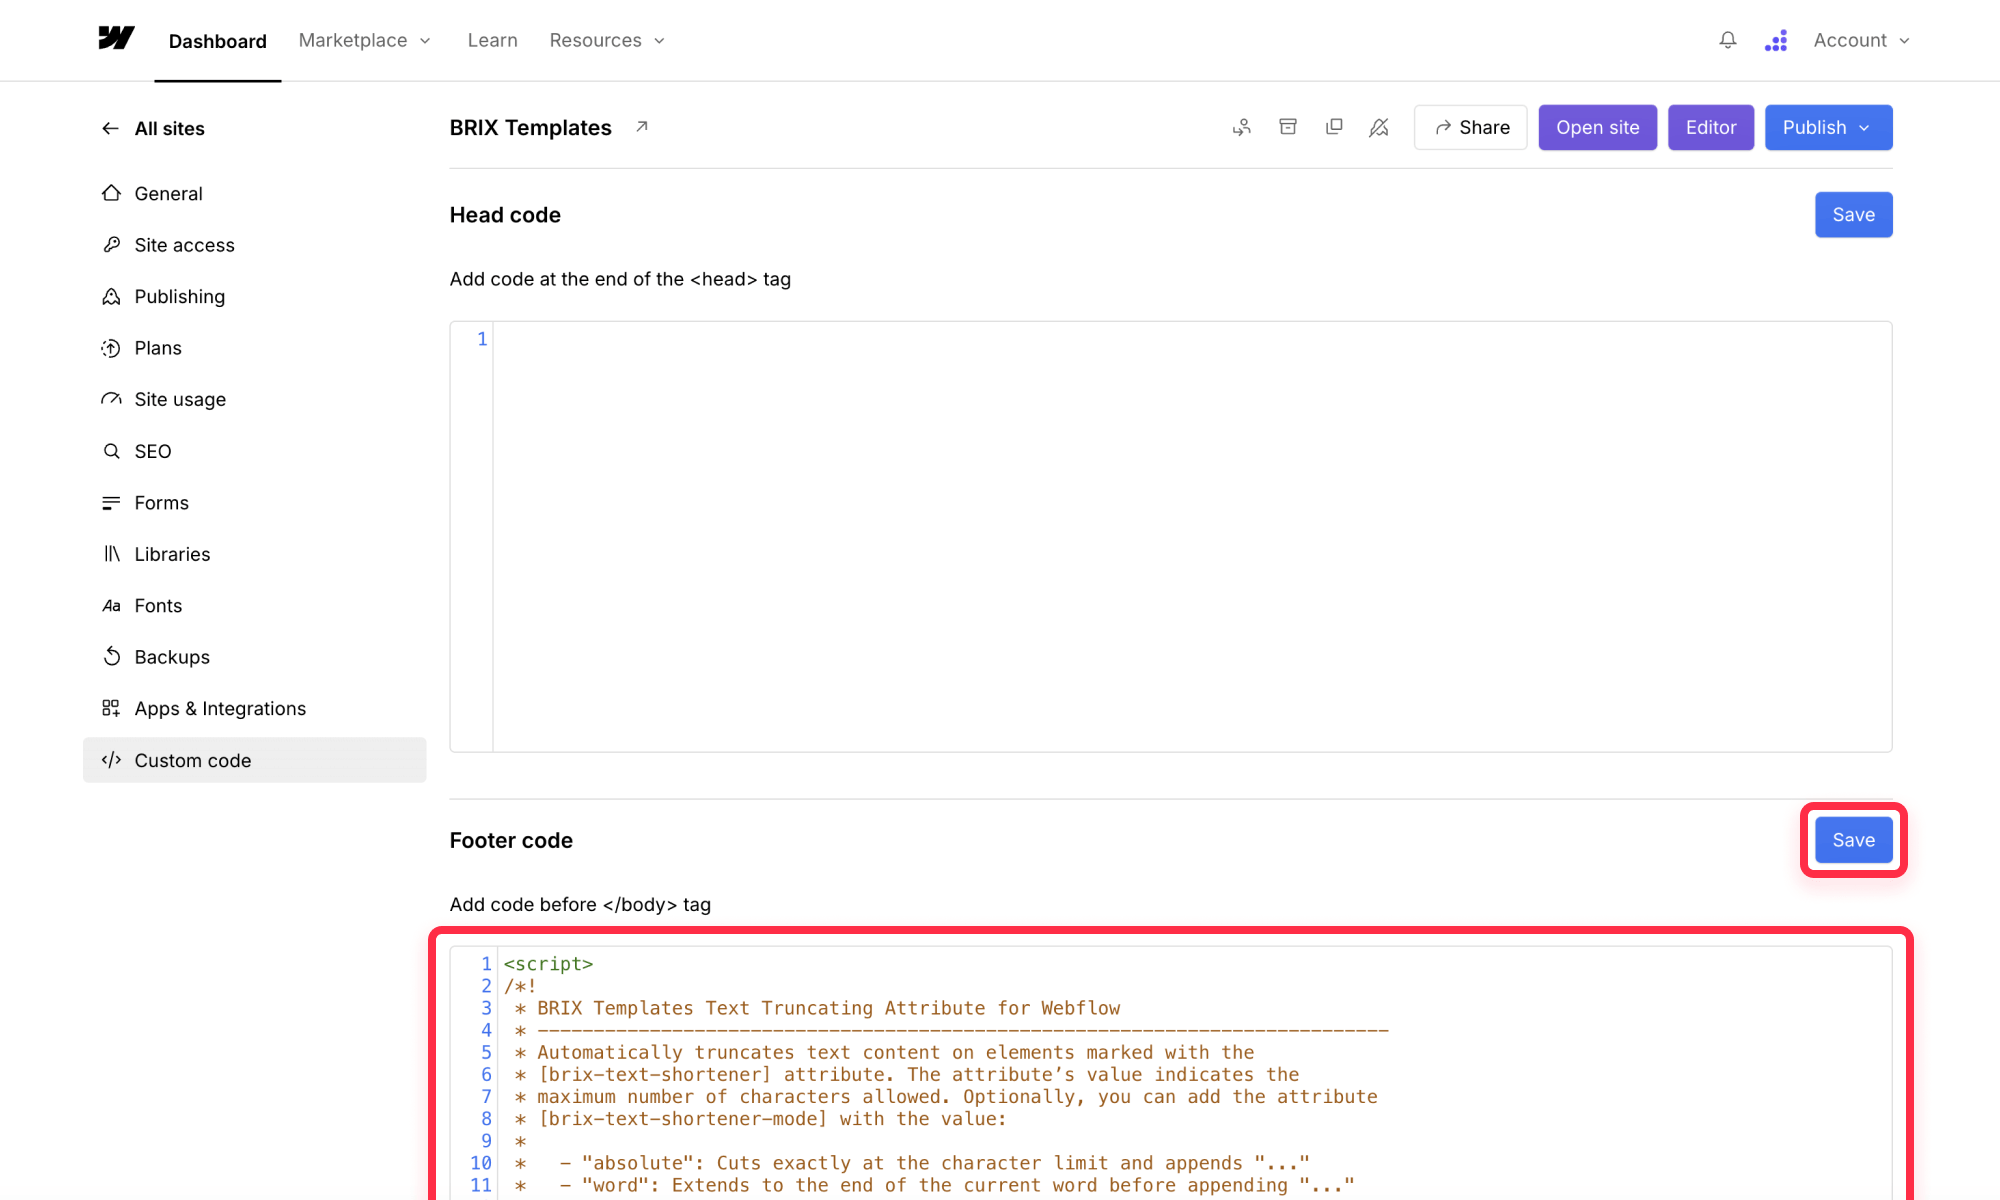
Inside that code box, please insert the following code.
<script>
/*!
 * BRIX Templates Text Truncating Attribute for Webflow
 * ----------------------------------------------------------------------------
 * Automatically truncates text content on elements marked with the
 * [brix-text-shortener] attribute. The attribute’s value indicates the
 * maximum number of characters allowed. Optionally, you can add the attribute
 * [brix-text-shortener-mode] with the value:
 *
 *   - "absolute": Cuts exactly at the character limit and appends "..."
 *   - "word": Extends to the end of the current word before appending "..."
 *
 * If no mode is specified, the script uses a default mode (set below).
 *
 * Version: 1.0.0
 * Author: BRIX Templates
 */

(function() {
  'use strict';

  //--------------------------------------------------------------------------
  // 1) Global Configuration
  //--------------------------------------------------------------------------
  // Default truncation mode if not specified on an element.
  const DEFAULT_MODE = 'absolute'; // options: "absolute" or "word"

  // Toggle detailed console logs for each truncation (except the initial log,
  // which always prints).
  const ENABLE_LOGS = true;

  //--------------------------------------------------------------------------
  // 2) Helper Log Function
  //--------------------------------------------------------------------------
  // Standard logging (used for per-element logging) with bold formatting.
  function log(...args) {
    if (!ENABLE_LOGS) return;
    console.log(...args);
  }

  //--------------------------------------------------------------------------
  // 3) Main Initialization Function
  //--------------------------------------------------------------------------
  function initBrixTextShortener() {
    // Select all elements with the brix-text-shortener attribute.
    const elements = document.querySelectorAll('[brix-text-shortener]');
    let truncatedCount = 0;
    let skippedCount = 0;

    // First, count how many elements require truncation.
    elements.forEach((elem) => {
      const maxChars = parseInt(elem.getAttribute('brix-text-shortener'), 10);
      const originalText = elem.textContent.trim();
      if (originalText.length > maxChars) {
        truncatedCount++;
      } else {
        skippedCount++;
      }
    });

    // Always print the initial log message (regardless of ENABLE_LOGS)
    console.log('------------------------');
    console.log(
      '%cBRIX Templates Text Truncating Attribute for Webflow%c is activated, and it has automatically truncated %c' +
      truncatedCount +
      '%c texts and skipped %c' +
      skippedCount +
      '%c texts that didn\'t reach the character limit.',
      'font-weight:bold;',   // "BRIX Templates Text Truncating Attribute for Webflow" in bold
      'font-weight:normal;',
      'font-weight:bold;',   // truncated count in bold
      'font-weight:normal;',
      'font-weight:bold;',   // skipped count in bold
      'font-weight:normal;'
    );
    console.log('------------------------');

    // Process each element for truncation.
    elements.forEach((elem) => {
      shortenText(elem);
    });
  }

  //--------------------------------------------------------------------------
  // 4) Function to Truncate Text on an Element
  //--------------------------------------------------------------------------
  function shortenText(element) {
    // Retrieve the maximum allowed characters from the attribute.
    const maxChars = parseInt(element.getAttribute('brix-text-shortener'), 10);
    if (isNaN(maxChars) || maxChars <= 0) {
      return; // Invalid configuration; do nothing.
    }

    // Determine the truncation mode: either from the element's attribute or the default.
    let mode = element.getAttribute('brix-text-shortener-mode');
    if (!mode) {
      mode = DEFAULT_MODE;
    }

    // Get the original text from the element.
    const originalText = element.textContent.trim();

    // If the text is shorter than or equal to the maximum, do nothing.
    if (originalText.length <= maxChars) {
      return;
    }

    let finalText = '';
    if (mode === 'word') {
      finalText = truncateByWord(originalText, maxChars);
    } else {
      // For "absolute" mode or any unrecognized mode, do a strict cut.
      finalText = truncateAbsolute(originalText, maxChars);
    }

    // Update the element's text with the truncated version.
    element.textContent = finalText;

    // If detailed logging is enabled, log the truncation event.
    if (ENABLE_LOGS) {
      console.log(
        'The text %c"' + originalText + '"%c had %c' + originalText.length + '%c characters and has been truncated to %c' +
        finalText.length + '%c characters using the %c' + mode + '%c truncating mode.',
        'font-weight:bold;',
        'font-weight:normal;',
        'font-weight:bold;',
        'font-weight:normal;',
        'font-weight:bold;',
        'font-weight:normal;',
        'font-weight:bold;',
        'font-weight:normal;'
      );
    }
  }

  //--------------------------------------------------------------------------
  // 5) Truncate Text in Absolute Mode
  //--------------------------------------------------------------------------
  function truncateAbsolute(str, max) {
    return str.slice(0, max) + '...';
  }

  //--------------------------------------------------------------------------
  // 6) Truncate Text in Word Mode (avoid cutting mid-word)
  //--------------------------------------------------------------------------
  function truncateByWord(str, max) {
    let slice = str.slice(0, max);
    if (/\S/.test(str.charAt(max))) {
      const nextSpaceIndex = str.indexOf(' ', max);
      if (nextSpaceIndex !== -1 && nextSpaceIndex - max < 30) {
        slice = str.slice(0, nextSpaceIndex);
      }
    }
    return slice + '...';
  }

  //--------------------------------------------------------------------------
  // 7) Run on DOM Ready
  //--------------------------------------------------------------------------
  if (document.readyState === 'loading') {
    document.addEventListener('DOMContentLoaded', initBrixTextShortener);
  } else {
    initBrixTextShortener();
  }
})();
</script>
Alternatively, if you only need truncation on a specific page, you can add this to Page Settings > Custom Code > Before </body> tag instead.
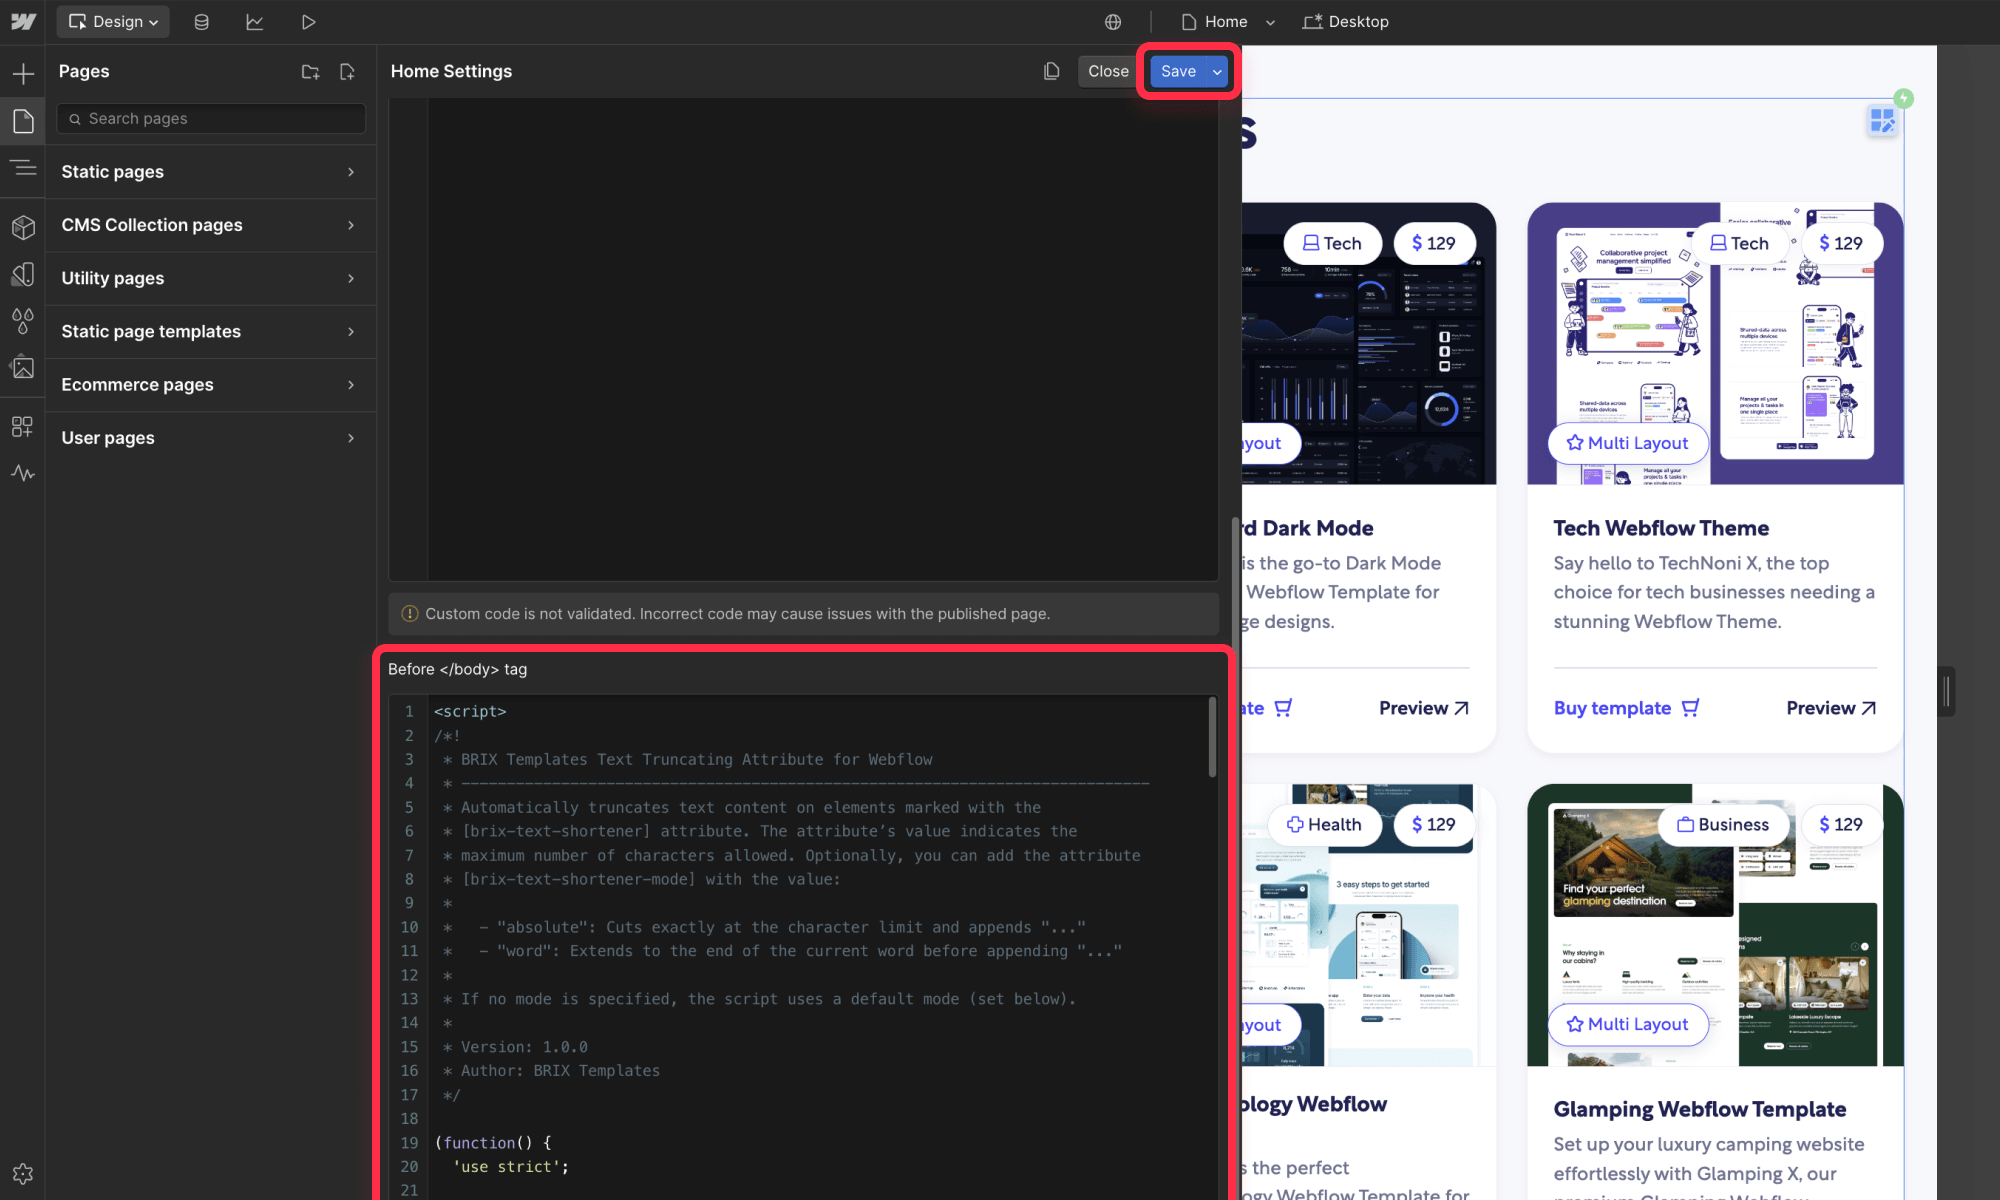
It will work exactly the same, but only on that specific page.
How to add the truncation attribute to your Webflow text elements
After adding the script, you can configure your text elements:
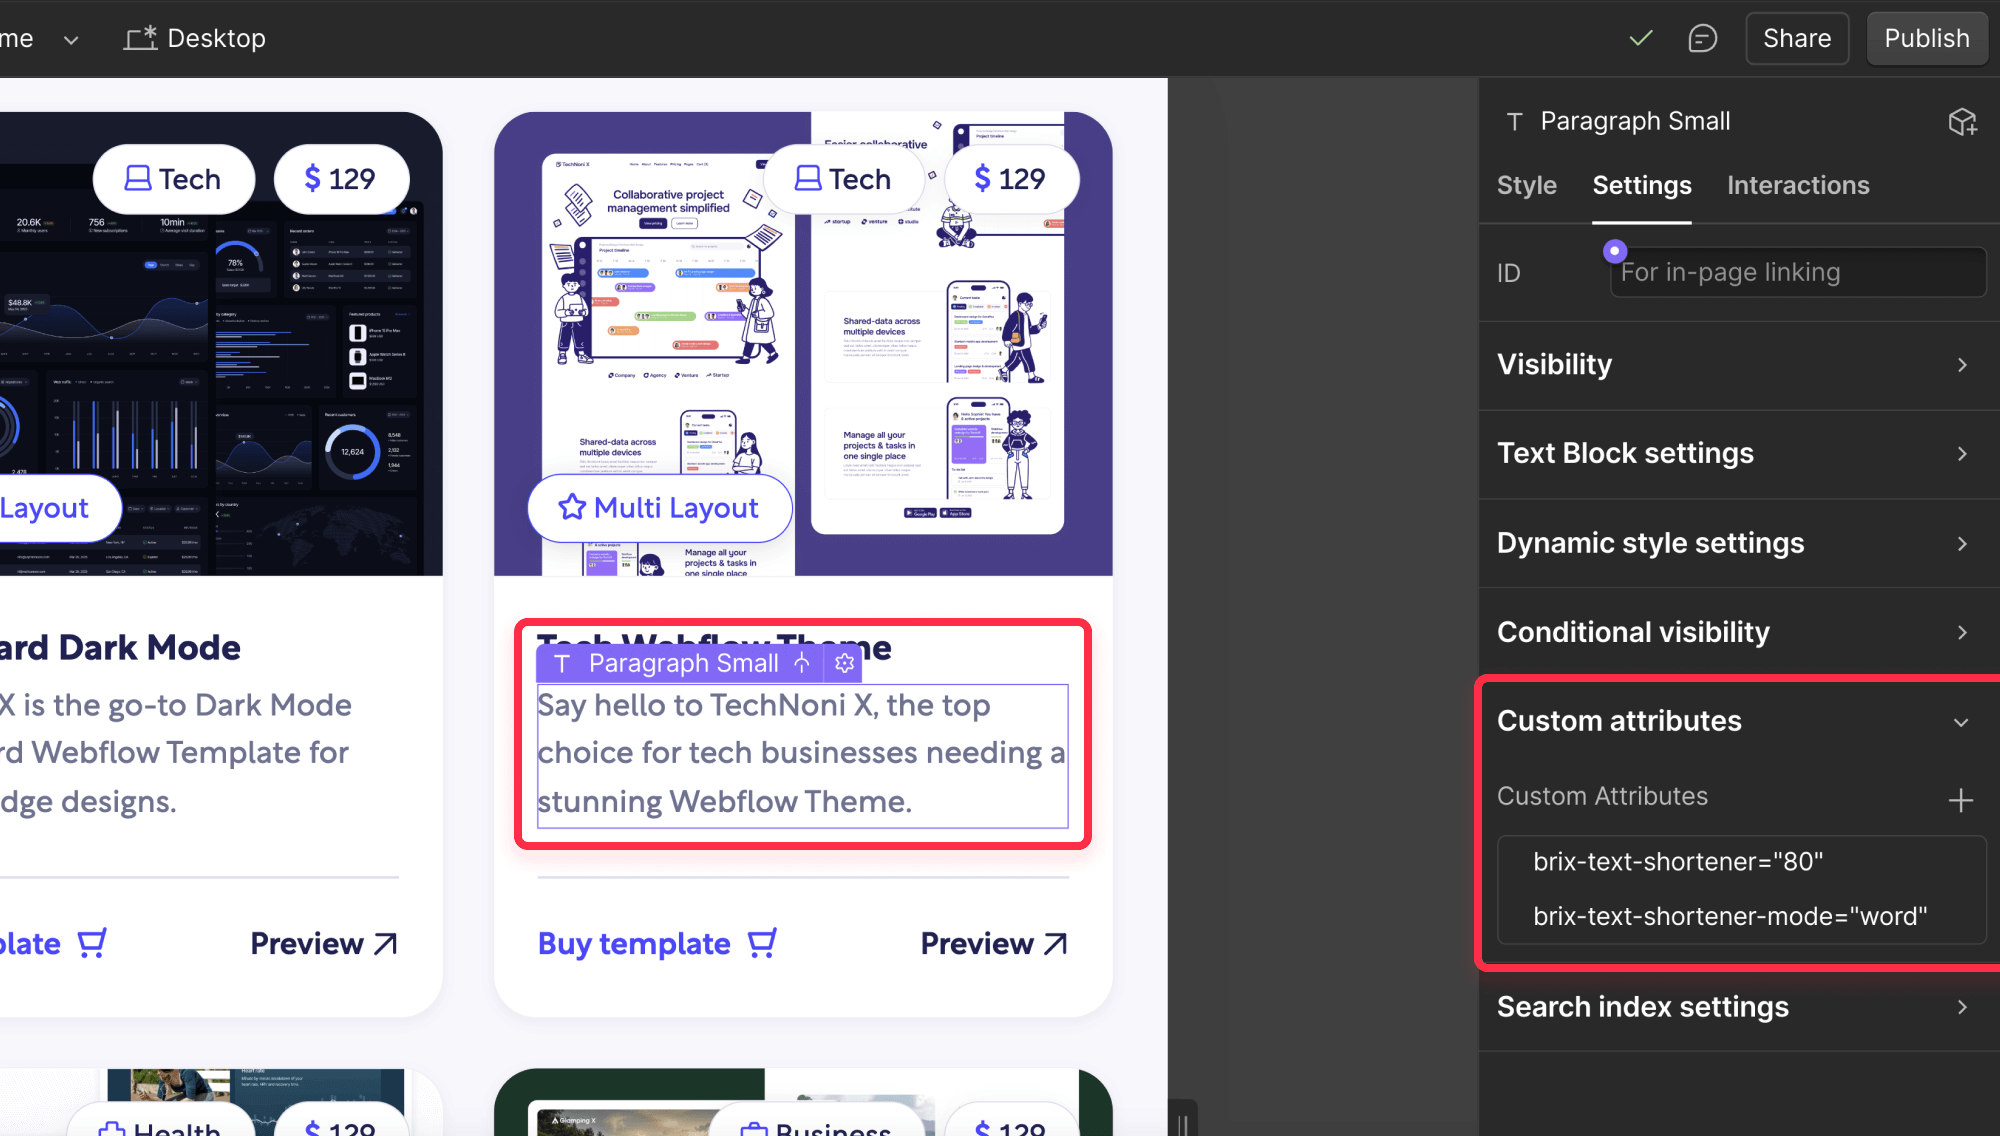
- Navigate to your Text element in the Webflow Designer
- Open the element's Settings panel (gear icon on the right sidebar)
- Locate the Custom Attributes section
- Add your chosen truncation configuration:
For basic truncation:
- Name: brix-text-shortener
- Value: Your desired character limit (e.g., 150)
For word-aware truncation (optional):
- Add an additional attribute:
- Name: brix-text-shortener-mode
- Value: word
If you want to quickly check the character count of your text, feel free to use our simple mini-tool below.
This configuration ensures your text elements display the perfect length while maintaining either absolute character limits or complete words, depending on your chosen approach.
The basic truncation will cut off at exact character counts, while word-aware truncation preserves word integrity by finding the nearest complete word within your specified limit.
Steps before publishing
- Set up your desired truncation settings: Add the brix-text-shortener attribute with your desired character limit to all text elements you want to truncate.
- Publish to staging: Push your changes to the webflow.io staging environment first to ensure everything works as expected.
- Test the implementation: Check your truncated elements with both short and long content, and verify the ellipsis appears correctly.
- Publish to production: After confirming everything works correctly on staging, publish your changes to your live Webflow site.
Common troubleshooting scenarios
If your text isn't truncating properly, check these common issues:
- Verify that your brix-text-shortener attribute contains a valid number (i.e. not 5.5).
- Ensure the script is properly placed in your project's custom code section, under the Footer/Before </body> tag.
- Check that the text element's original content is indeed longer than your specified limit, as otherwise it won't truncate the text.
- Confirm that your custom attributes are spelled exactly as shown above.
- Verify that you've published your site after making these changes.
Conclusion
Implementing programmatic text truncation in Webflow gives you precise control over how your content displays across your site. Whether you're managing a content-heavy blog, a dynamic product catalog, or just maintaining consistent layouts, this solution provides the flexibility and reliability you need.
Need help implementing this solution or looking to explore more advanced use cases? Our top-notch Webflow agency specializes in creating custom solutions that enhance your site's functionality while maintaining clean, professional designs. Feel free to reach out to discuss how we can help optimize your Webflow project.


Join readers commenting on this post!