
In Webflow Ecommerce, collecting comprehensive customer information during checkout can be crucial for business operations. However, the platform's native Additional Info element limits you to just 3 customizable fields.
This guide explores different approaches to extend your checkout form capabilities, with a particular focus on implementing a flexible and simple (but effective) solution.
Understanding your options for custom checkout fields
When it comes to collecting additional customer information in your Webflow Ecommerce checkout, you have three main approaches:
- Use Webflow's native Additional Info element: A straightforward solution that leverages Webflow's built-in functionality, perfect for simple needs but with limited customization options and up to 3 fields only.
- Implement third-party solutions like Foxy or Monto: Comprehensive platforms that offer advanced features and integrations, ideal for complex ecommerce requirements
- Use the custom embed solution with JavaScript (recommended approach): A flexible, cost-effective method that allows unlimited custom fields while maintaining Webflow's native checkout experience
Let's examine each option to help you make an informed decision for your specific needs.

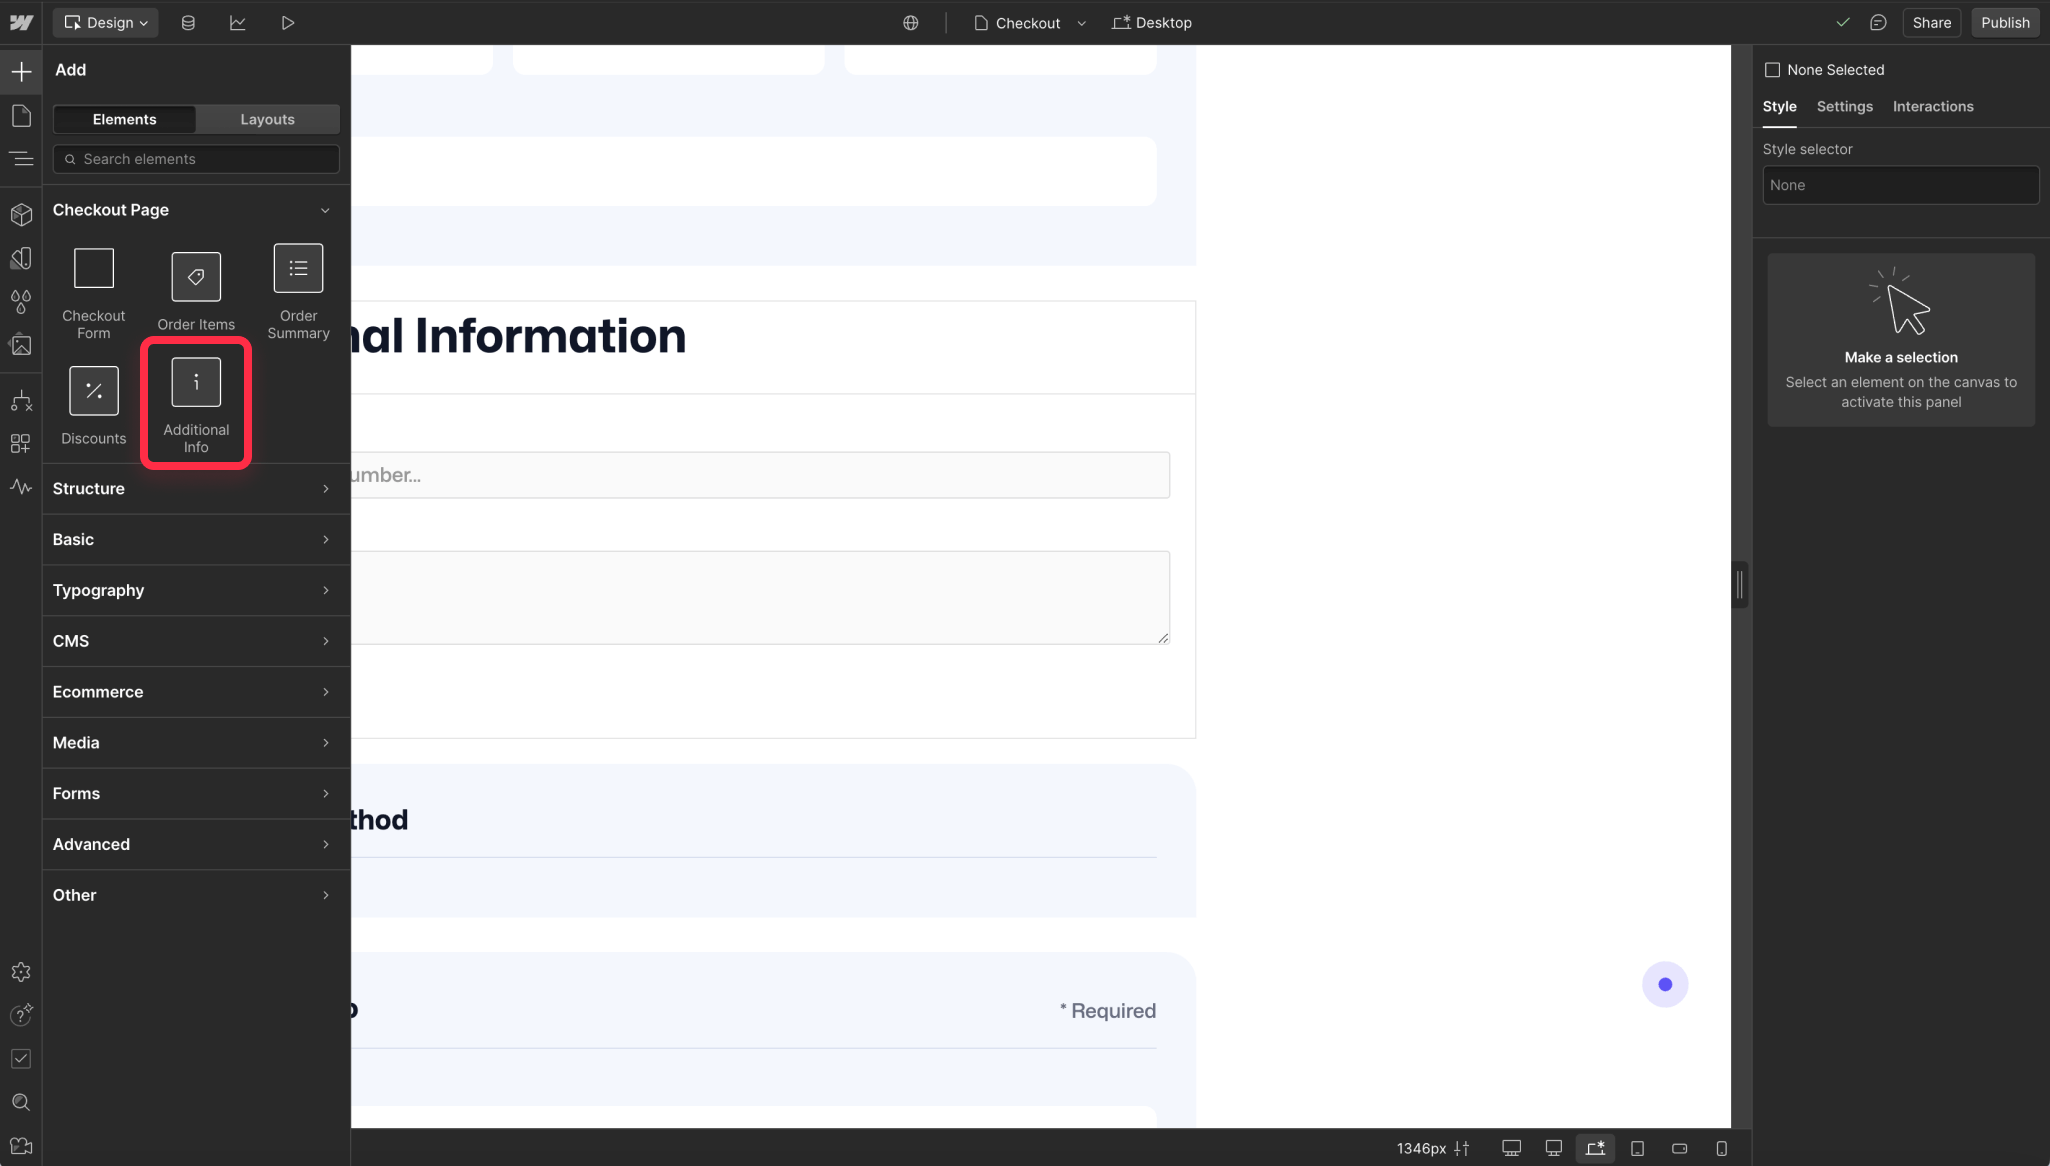
Method 1 — Webflow's native Additional Info element for Ecommerce
The native Additional Info element is Webflow's built-in solution for collecting extra customer information during checkout. It provides 3 distinct field types: a single-line text input, a multi-line textarea for longer responses, and a checkbox for simple yes/no options.
Advantages of using native fields
Webflow's native solution shines in its simplicity and integration. You won't need any technical knowledge to implement it, and it works seamlessly with your existing checkout flow.
The Additional Info element inherits your site's styling automatically, ensuring a consistent look across your checkout process. Plus, since it's part of Webflow's core functionality, you can access all submitted data directly in your order details without any extra setup.
Limitations to consider
The main downside of this approach lies in its inflexibility. Being limited to just three fields can be restrictive for businesses that need to collect more customer information. Also, the fixed field types mean you can't add dynamic elements like dropdowns or date pickers making it very limited for a lot of use cases.

Method 2 — Third-party solutions for advanced Webflow Ecommerce checkouts
When you need more sophisticated checkout functionality, third-party platforms can bridge the gap. Let's look at two popular options:
Foxy: Advanced checkout customization
Foxy.io is a comprehensive ecommerce solution that seamlessly integrates with Webflow. It offers a highly customizable checkout experience with support for unlimited custom fields, advanced validation rules, and sophisticated payment processing options.

Foxy stands out for its flexibility in handling complex product configurations and its ability to process transactions through multiple payment gateways.
Monto: Specialized Webflow integration
Monto focuses specifically on enhancing Webflow Ecommerce with a suite of specialized apps. Their checkout solution provides not just custom fields but also features like abandoned cart recovery, subscription management, and customer relationship management.

Monto's strength lies in its tight integration with Webflow and its modular approach, allowing you to choose only the features you need.
Considerations for third-party platforms
While these solutions offer powerful features, they come with both advantages and tradeoffs.
The enhanced functionality and professional support can significantly improve your checkout process, but you'll need to consider the additional monthly costs and potential complexity of integrating them.

Method 3 — Extra Ecommerce fields attribute by BRIX Templates (recommended!)
Transform your Webflow checkout with unlimited custom fields using a simple yet powerful solution from BRIX Templates — and the best of all? Completely free.
By combining a special Webflow attribute with custom HTML inputs, we can channel all your additional field data through Webflow's native system - no coding knowledge required. Think of it as creating a bridge that connects multiple custom fields to Webflow's single Additional Info field, making it work exactly how you need it to.
Hows does this extra Webflow Ecommerce fields attribute works?
Let's break down the process step by step:
- First, we add custom input fields to your checkout form using a simple HTML embed. These fields can collect any type of information you need from your customers.
- Behind the scenes, our script monitors these custom fields and automatically combines their values into a format that Webflow can understand.
- As customers type information into your custom fields, the script instantly updates Webflow's Additional Info field in the background. This field acts as a hidden data container that seamlessly collects and stores all the information from your custom fields without being visible to your customers.
- To prevent data loss during page refreshes, the script temporarily stores the information in the customer's browser.
- When the order is submitted, all the custom field data flows seamlessly into your Webflow order details, just like it would with the native Additional Info field.
Step 1: Set up the Additional Info element
1. Navigate to your Checkout Page in Webflow Designer
2. Add the Additional Info element to your checkout form
3. Enable the text area option in the Additional Info element settings
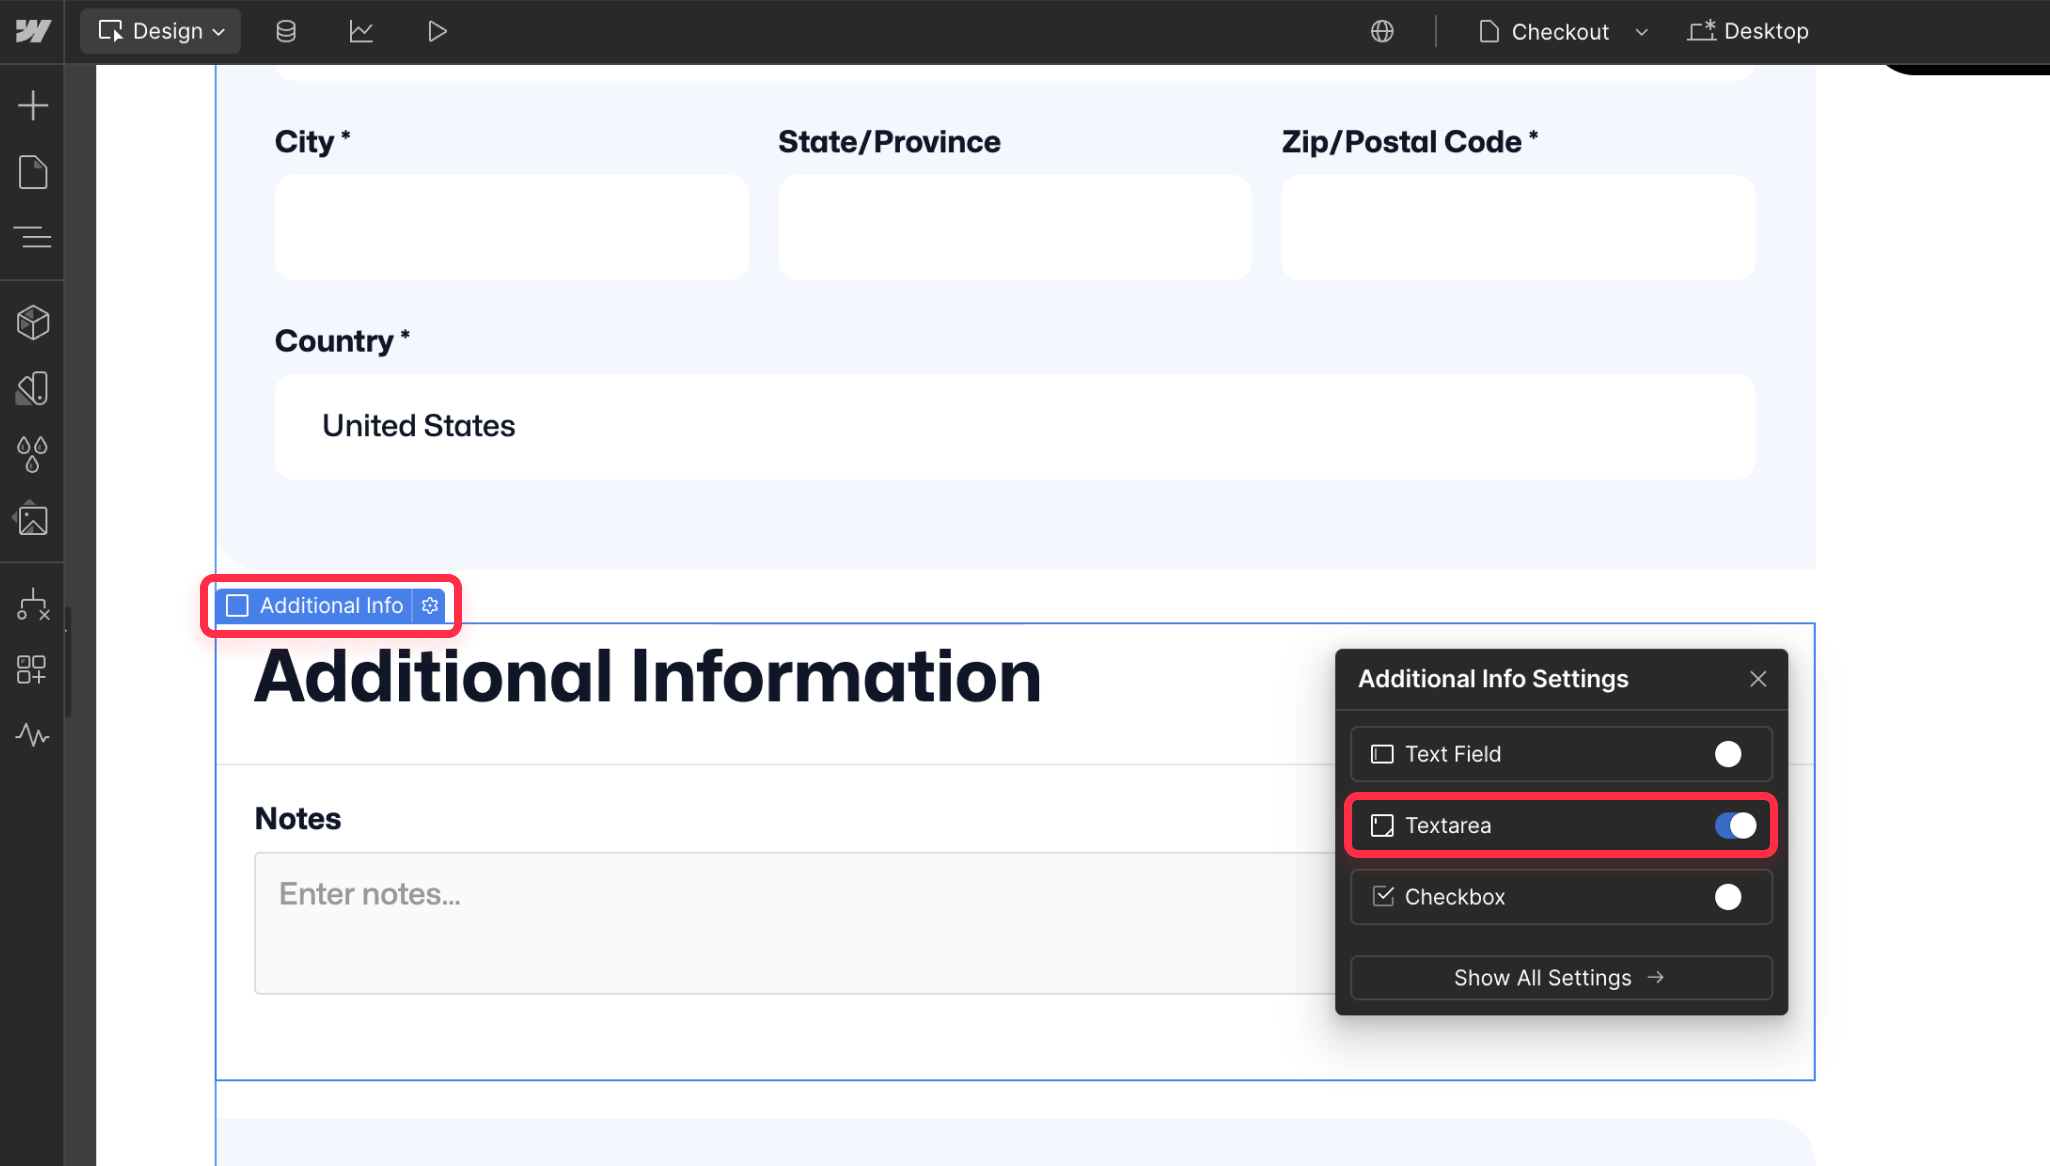
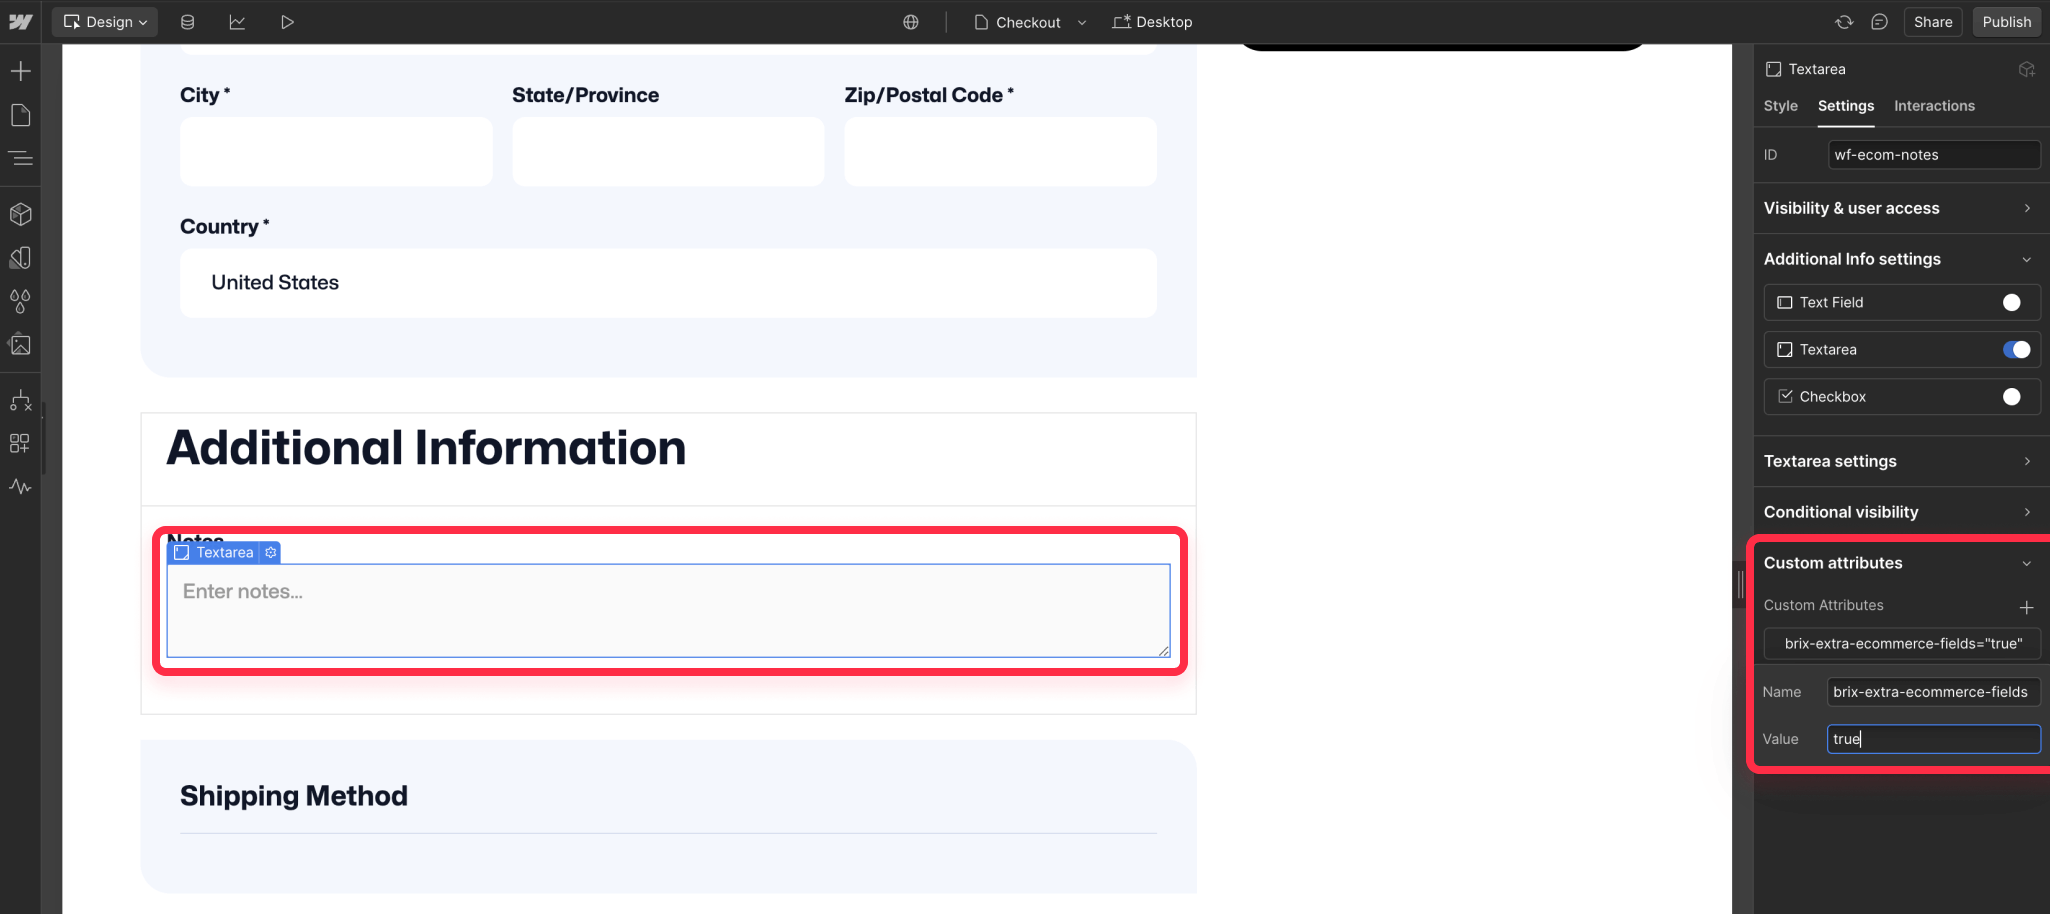
4. Add a custom attribute to the textarea that belongs to the Additional Info element:
- Name: brix-extra-ecommerce-fields
- Value: true
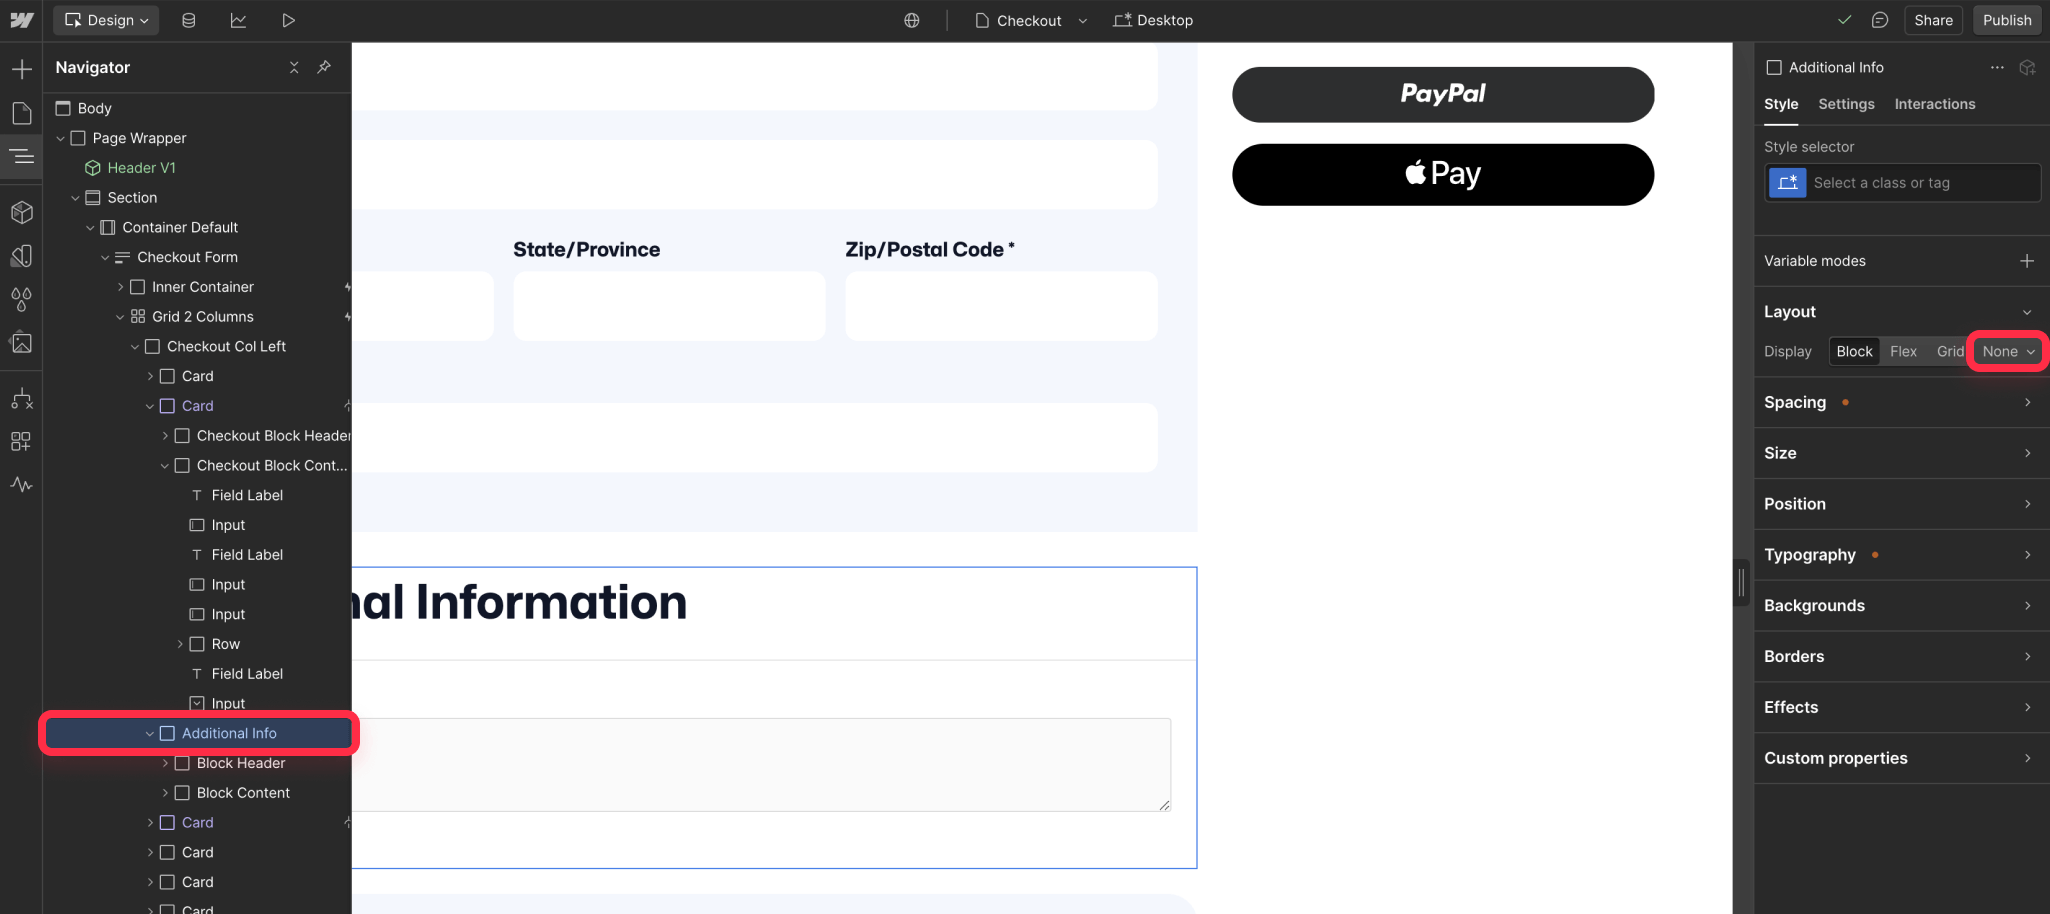
5. Hide the Additional Info field using the Style panel:
Set Display to "none" to keep it invisible while maintaining functionality. You can also hide all of the other parts of the Additional Informa
This field serves as a hidden container that stores all your custom field data behind the scenes, creating a clean and professional checkout experience for your customers.
Step 2: Create your custom input fields
1. Add a Code Embed element inside your checkout form. For UX logic, we recommend to place it below the Shipping information fields, but you can put it on any place you prefer.
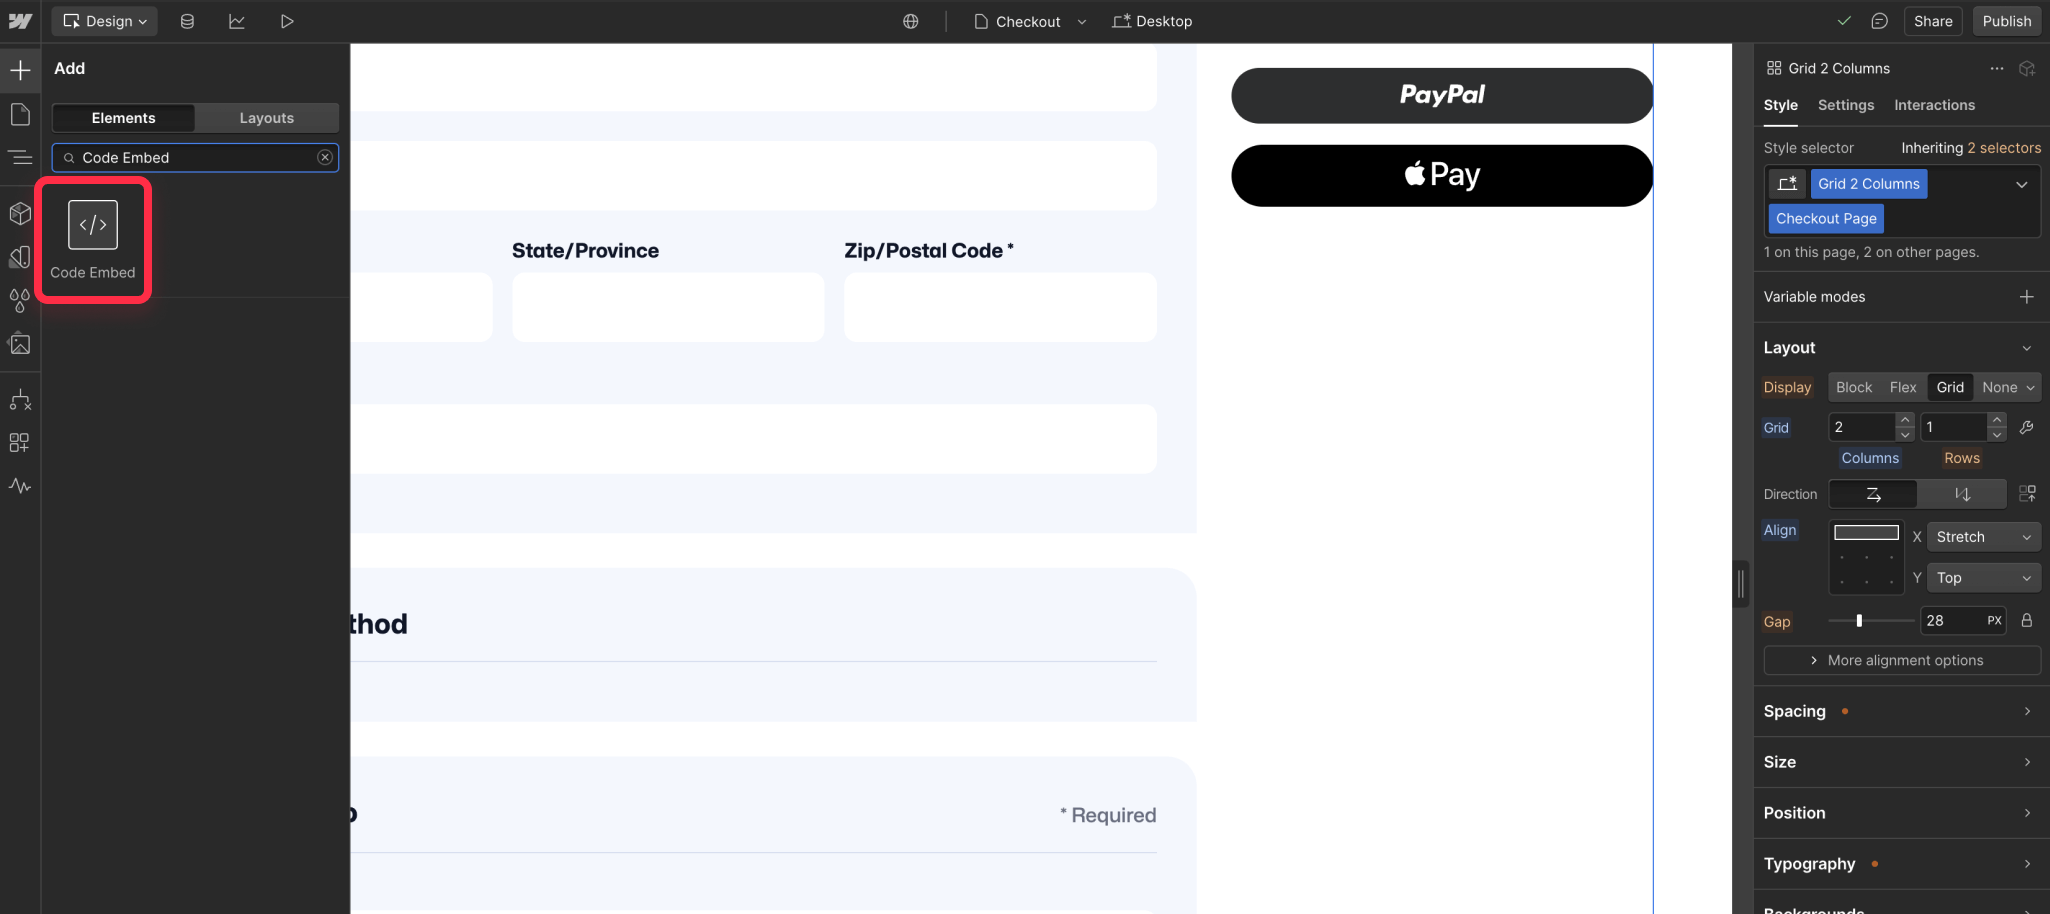
2. Insert your custom input fields using this structure:
<label for="full-name" class="w-commerce-commercecheckoutlabel">
  Full Name
</label>
<input
  id="full-name"
  class="w-commerce-commercecheckoutinput w-input"
  type="text"
  required
>

<label for="company-name" class="w-commerce-commercecheckoutlabel">
  Company
</label>
<input
  id="company-name"
  class="w-commerce-commercecheckoutinput w-input"
  type="text"
>

<!-- Add more fields as needed by copying and pasting the label and input structure above -->
To add more fields, you can simply copy and paste the label and input HTML code, just remember to change the id value to something unique for each new field (i.e. full-address, product-color, etc). If you want to make a field required, just add the required attribute to the input tag right after the type attribute - it's that simple!
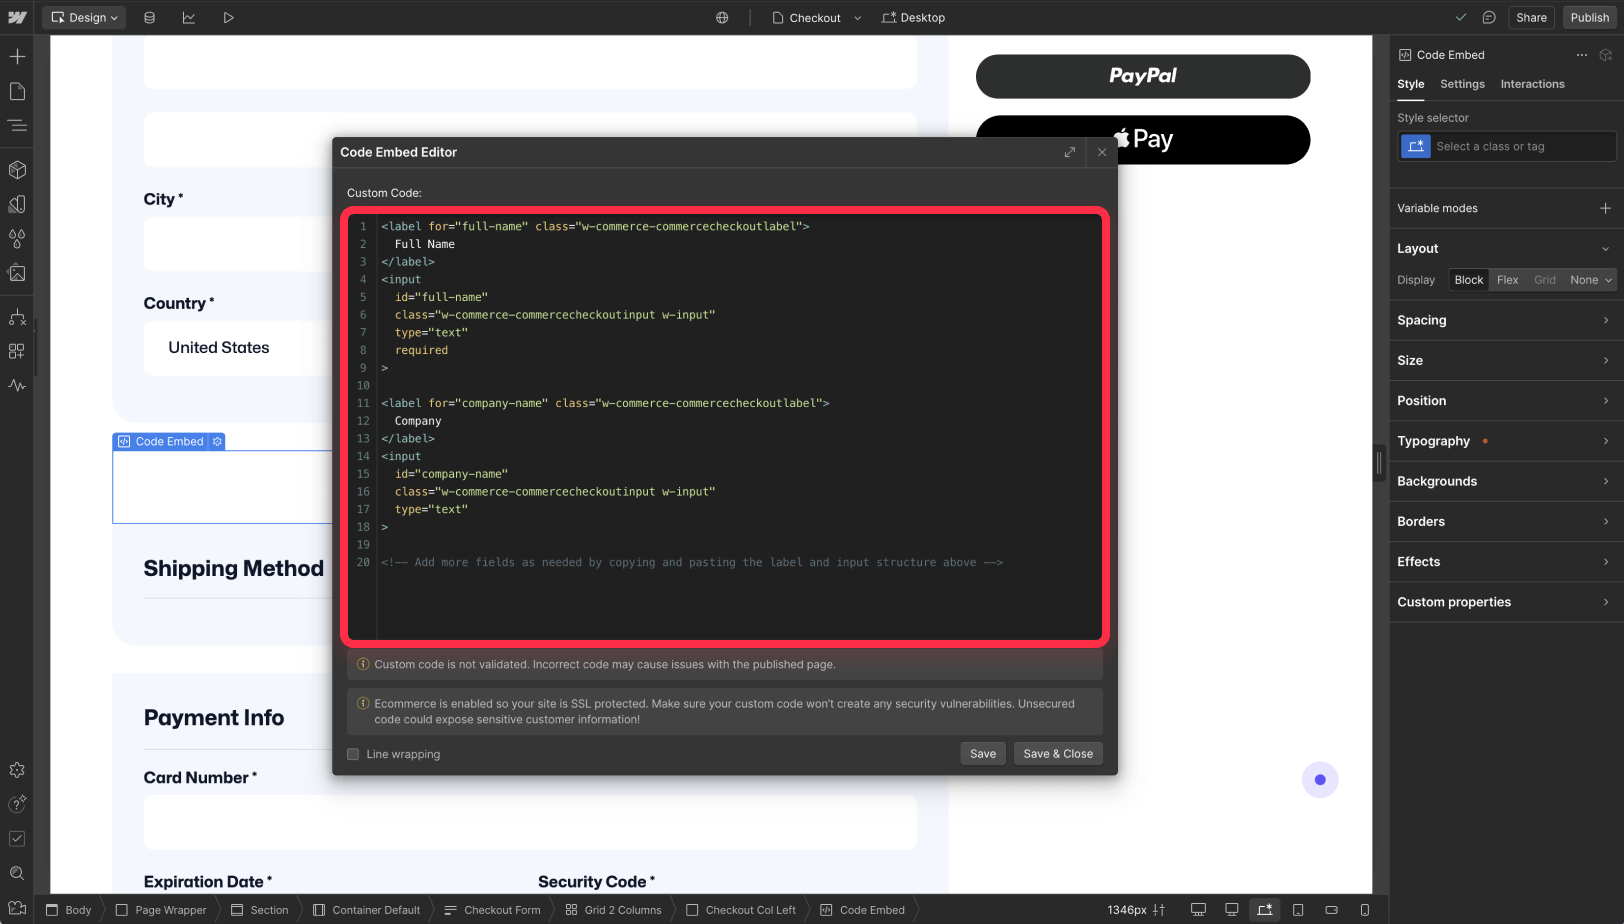
We've already included Webflow's default classes in the template above, so your new fields will automatically match the style of your checkout form, so you don't need to worry about that.
Step 3: Add the integration script
1. Access your Checkout page settings
2. Navigate to the "Before </body> tag" section
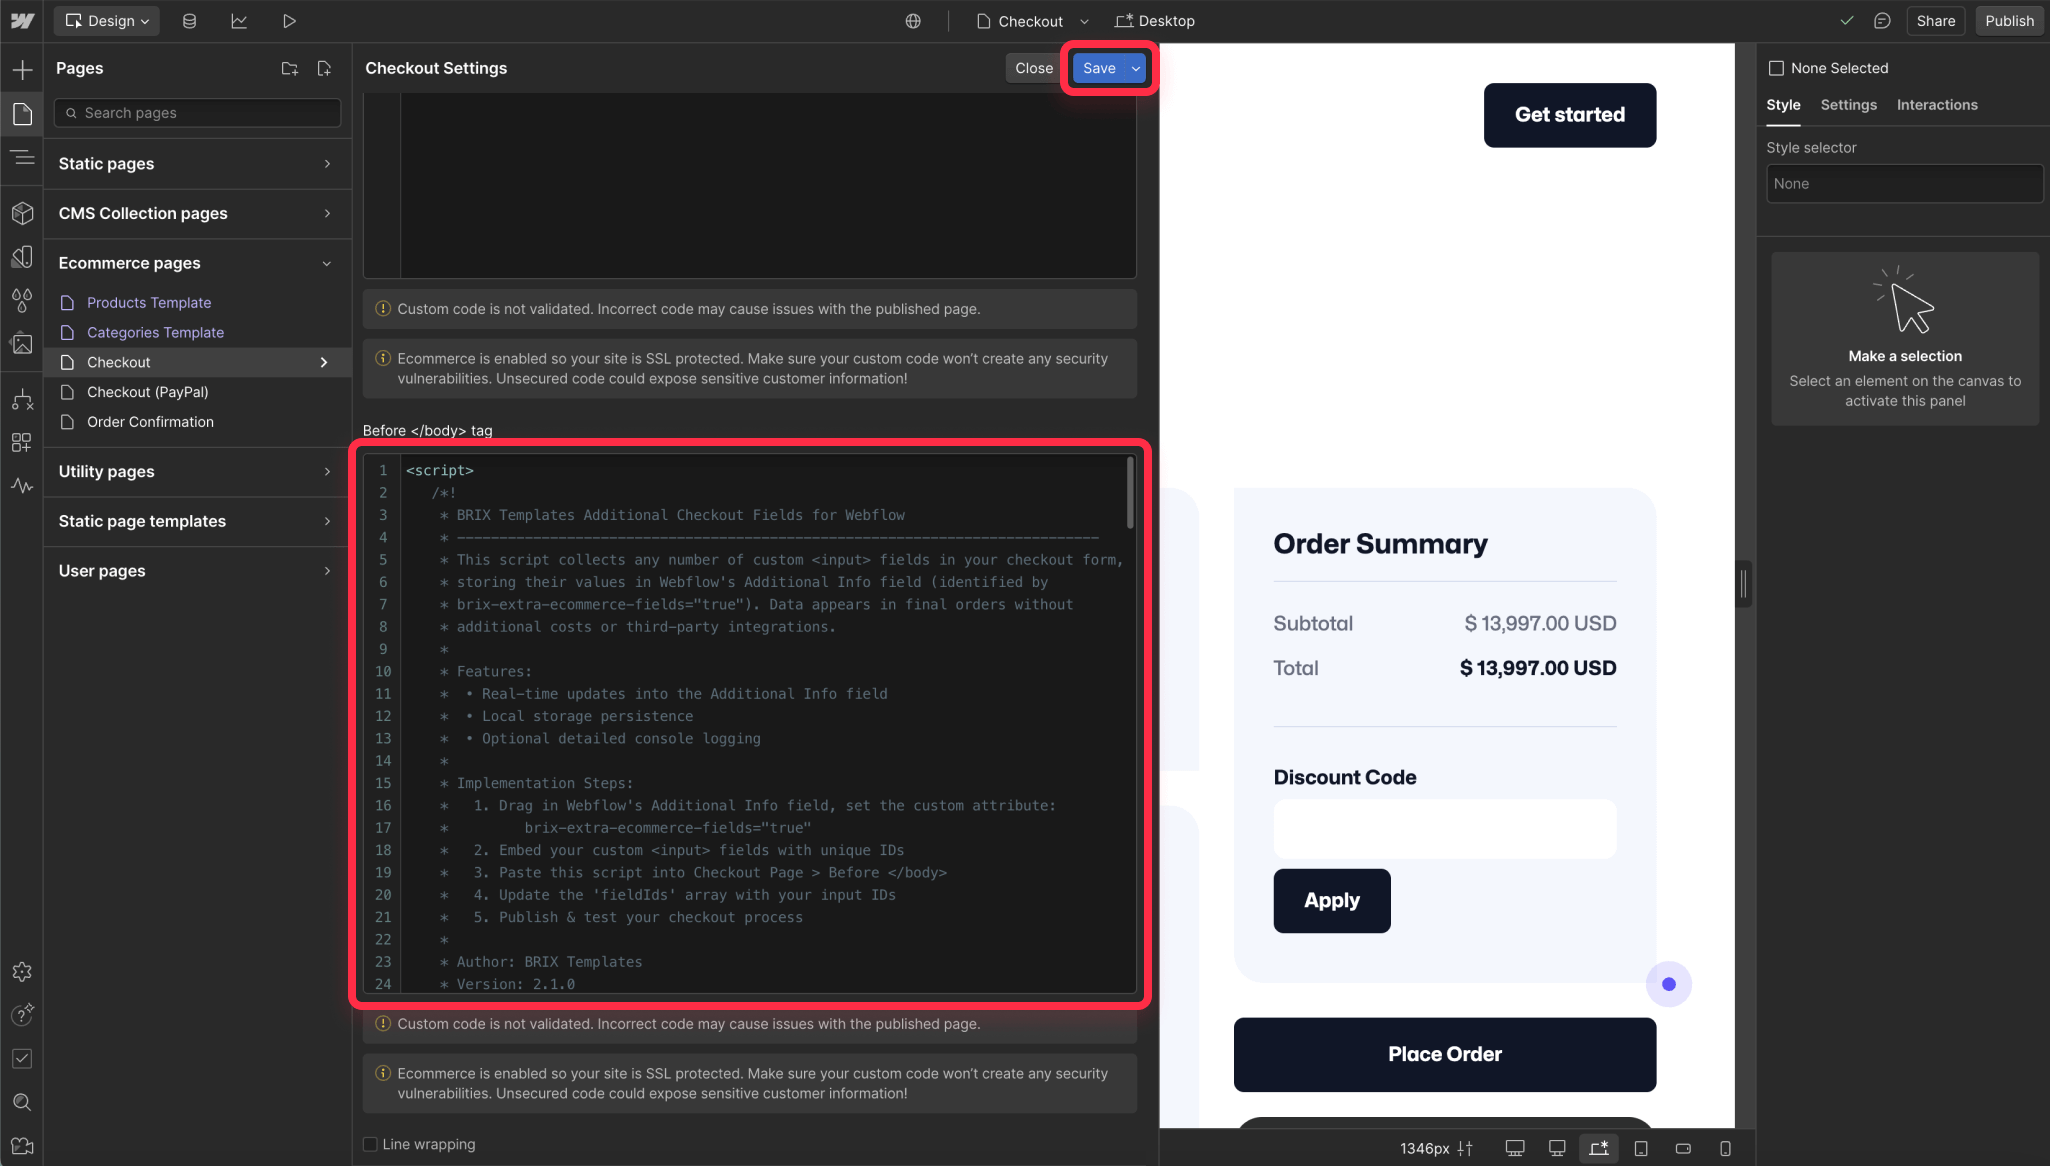
3. Insert the provided JavaScript code:
<script>
   /*!
    * BRIX Templates Additional Checkout Fields for Webflow
    * ----------------------------------------------------------------------------
    * This script collects any number of custom <input> fields in your checkout form,
    * storing their values in Webflow's Additional Info field (identified by
    * brix-extra-ecommerce-fields="true"). Data appears in final orders without
    * additional costs or third-party integrations.
    *
    * Features:
    *  • Real-time updates into the Additional Info field
    *  • Local storage persistence
    *  • Optional detailed console logging
    *
    * Implementation Steps:
    *   1. Drag in Webflow's Additional Info field, set the custom attribute:
    *         brix-extra-ecommerce-fields="true"
    *   2. Embed your custom <input> fields with unique IDs
    *   3. Paste this script into Checkout Page > Before </body>
    *   4. Update the 'fieldIds' array with your input IDs
    *   5. Publish & test your checkout process
    *
    * Author: BRIX Templates
    * Version: 2.1.0
    */

   (function() {
     'use strict';

     //--------------------------------------------------------------------------
     // 1) Configuration
     //--------------------------------------------------------------------------
     // List the IDs of each custom <input> you have embedded
     const fieldIds = [
       'full-name',
       'company-name',
       'phone-number'
       // Add more if needed: 'favorite-color', 'notes', etc.
     ];

     // Toggle console logs:
     // true => logs appear in the console
     // false => no logs
     const ENABLE_LOGS = true;

     // We'll store user entries with this prefix in localStorage
     const STORAGE_PREFIX = 'brixtemplates-checkout-';

     // Instead of using the #add-info ID, we select the Additional Info field via attribute
     const ADD_INFO_SELECTOR = '[brix-extra-ecommerce-fields="true"]';

     //--------------------------------------------------------------------------
     // 2) Fancy log function for bold text in console
     //--------------------------------------------------------------------------
     function boldLog(...args) {
       if (!ENABLE_LOGS) return;
       console.log(...args);
     }

     //--------------------------------------------------------------------------
     // 3) Main Initialization
     //--------------------------------------------------------------------------
     function initBrixTemplatesCheckout() {
       // Let's create an ASCII banner around the initial log
       if (ENABLE_LOGS) {
         console.log('------------------------');
         console.log(
           '%cBRIX Templates Additional Checkout Fields for Webflow%c is activated, and it has detected %c' +
           fieldIds.length +
           '%c additional fields with the IDs %c' +
           fieldIds.join(', ') +
           '%c.',
           'font-weight:bold;',
           'font-weight:normal;',
           'font-weight:bold;',
           'font-weight:normal;',
           'font-weight:bold;',
           'font-weight:normal;'
         );
         console.log('------------------------');
       }

       populateFromStorage();
       injectAllInputs();      // Immediately push data into the Additional Info field
       setupListeners();       // Listen to changes in real-time
     }

     //--------------------------------------------------------------------------
     // 4) Populate each input from localStorage
     //--------------------------------------------------------------------------
     function populateFromStorage() {
       fieldIds.forEach((id) => {
         const el = document.getElementById(id);
         if (!el) return;
         const savedVal = localStorage.getItem(STORAGE_PREFIX + id) || '';
         el.value = savedVal;
       });
     }

     //--------------------------------------------------------------------------
     // 5) Gather all input values, build a string, set that into Additional Info
     //--------------------------------------------------------------------------
     function injectAllInputs() {
       const addInfoEl = document.querySelector(ADD_INFO_SELECTOR);
       if (!addInfoEl) return;

       let combinedText = '';
       fieldIds.forEach((id) => {
         const el = document.getElementById(id);
         if (!el) return;
         const labelFriendly = id.replace(/-/g, ' ');
         combinedText += `${labelFriendly}: ${el.value}\n`;
       });

       addInfoEl.value = combinedText;
     }

     //--------------------------------------------------------------------------
     // 6) Listen for user typing => update localStorage and Additional Info
     //--------------------------------------------------------------------------
     function setupListeners() {
       fieldIds.forEach((id) => {
         const el = document.getElementById(id);
         if (!el) return;

         el.addEventListener('input', () => {
           // Save to localStorage
           localStorage.setItem(STORAGE_PREFIX + id, el.value);

           // Decide which console message to show
           if (ENABLE_LOGS) {
             if (el.value.trim() === '') {
               console.log(
                 'The custom input %c' + id + '%c managed by %cBRIX Templates Additional Checkout Fields for Webflow%c is now empty.',
                 'font-weight:bold;',
                 'font-weight:normal;',
                 'font-weight:bold;',
                 'font-weight:normal;'
               );
             } else {
               console.log(
                 'The custom input %c' + id + '%c managed by %cBRIX Templates Additional Checkout Fields for Webflow%c has been updated with the text %c' + el.value + '%c and it has been appended to the additional information input.',
                 'font-weight:bold;',
                 'font-weight:normal;',
                 'font-weight:bold;',
                 'font-weight:normal;',
                 'font-weight:bold;',
                 'font-weight:normal;'
               );
             }
           }

           // Re-inject combined data
           injectAllInputs();
         });
       });
     }

     //--------------------------------------------------------------------------
     // 7) Fire on DOM Ready
     //--------------------------------------------------------------------------
     if (document.readyState === 'loading') {
       document.addEventListener('DOMContentLoaded', initBrixTemplatesCheckout);
     } else {
       initBrixTemplatesCheckout();
     }
   })();
   </script>
Configuring your custom fields in the Webflow extra Ecommerce fields script
Before we dive into the script's features, let's understand how to configure it for your specific needs.
Every custom input field you create needs its id to be listed in the fieldIds array/variable. For example, if you added three new fields for shipping notes, preferred delivery time, and gift messages, your configuration would look like this:
const fieldIds = [
    'full-name',
    'company-name',
    'phone-number',
    'shipping-notes',
    'preferred-time',
    'gift-message'
];Important: Make sure each ID in this array exactly matches the id attributes you used in your HTML input fields. Even a small typo like 'fullname' instead of 'full-name' will prevent that field from working.
During setup, you can keep ENABLE_LOGS as true to see helpful messages in your browser's console (press F12 to view). Once everything is working, set it to false for production.
const ENABLE_LOGS = true;  // Shows helpful messages while setting up
                          // Remember to set this to false when you're done!
How does this script works?
Let's explore the key features that make this solution work seamlessly:
- Real-time synchronization with Webflow's Additional Info field: The script continuously monitors your custom fields and instantly updates the Additional Info field whenever a customer types or modifies any information. This ensures that no data is lost during the checkout process.
- Automatic data persistence: To prevent frustration from lost information, the script automatically saves all field data in the customer's browser storage. If they accidentally refresh the page or need to come back later, their information will still be there.
- Built-in debugging capabilities: For developers or site owners who want to verify everything is working correctly, the script includes detailed console logging that can be enabled or disabled as needed (by default, the logging functionality is on, but you can turn it off by changing const ENABLE_LOGS to false). This helps track data flow and troubleshoot any issues.
- Smart data formatting: The script automatically formats all collected information in a clean, organized way before sending it to Webflow. This ensures that your order details are easy to read and process in your Webflow dashboard.
How to customize field styling
You can style your custom fields using two approaches:
- Using Webflow's built-in classes (Already included): Our HTML template already includes Webflow's native classes (w-commerce-commercecheckoutlabel and w-commerce-commercecheckoutinput w-input). These classes ensure your custom fields perfectly match Webflow's native checkout styling, maintaining a professional and consistent look throughout your checkout process.
- Adding custom classes (Optional): If you want to add special styling to specific fields, you can add your own classes alongside the built-in ones:
<input
  id="phone"
  class="w-commerce-commercecheckoutinput w-input my-custom-class"
  type="tel"
>
Then use Webflow's Style panel to customize my-custom-class with your desired styles. This gives you the flexibility to highlight certain fields, add special hover effects, or create unique styling for different types of information while maintaining the base Webflow checkout appearance.
Steps before publishing your checkout
- Open your browser's console (F12) and ensure ENABLE_LOGS is set to true
- Fill out each custom field and verify you see the update messages in the console
- Check that the Additional Info field (temporarily make it visible by removing the display: none) is collecting all your field data
- Make the Additional Info field invisible again using display: none
- Test the form by adding products to cart and completing a test purchase
- Review your test order in Webflow's Ecommerce dashboard - each custom field should appear as "field_name: value"
- Verify your confirmation emails show the custom field data in a clean format
- Set ENABLE_LOGS to false and republish your site
Troubleshooting common issues
- Fields not syncing: Verify that all field IDs match exactly in both the HTML and script configuration
- Styling inconsistencies: Ensure you're using Webflow's built-in classes correctly
- Form submission issues: Verify that the Additional Info field is properly configured with the custom attribute
Conclusion
Implementing custom checkout fields in Webflow Ecommerce doesn't have to mean compromising between functionality and cost. The custom embed solution provides a robust, scalable approach that maintains the native Webflow experience while giving you complete control over your checkout process.
Whether you're collecting specialized shipping instructions, customer preferences, or business-critical information, this solution adapts to your needs while keeping implementation and maintenance costs minimal.
If you need help implementing this solution or require more complex customizations for your Webflow Ecommerce store, our agency specializes in creating tailored solutions that match your specific business requirements. Feel free to reach out to our agency to discuss how we can help optimize your Webflow site.


Join readers commenting on this post!