If your Webflow site can be accessed through multiple URL variations — www vs non-www, http vs https, URLs with tracking parameters — search engines may treat each variation as a separate page. That splits your ranking signals across duplicates instead of consolidating them on one URL. Canonical tags solve this by telling search engines which version is the real one.
Webflow doesn't set a canonical tag by default. You need to configure it manually — but it takes less than five minutes, and getting it right from the start prevents duplicate content issues that are harder to fix later. This guide walks you through the full setup: default domain, global canonical tag, per-page overrides, and verification.
Why canonical tags matter for Webflow sites
A canonical tag is an HTML element in the <head> of your page that looks like this:
<link rel="canonical" href="https://example.com/some-page" />
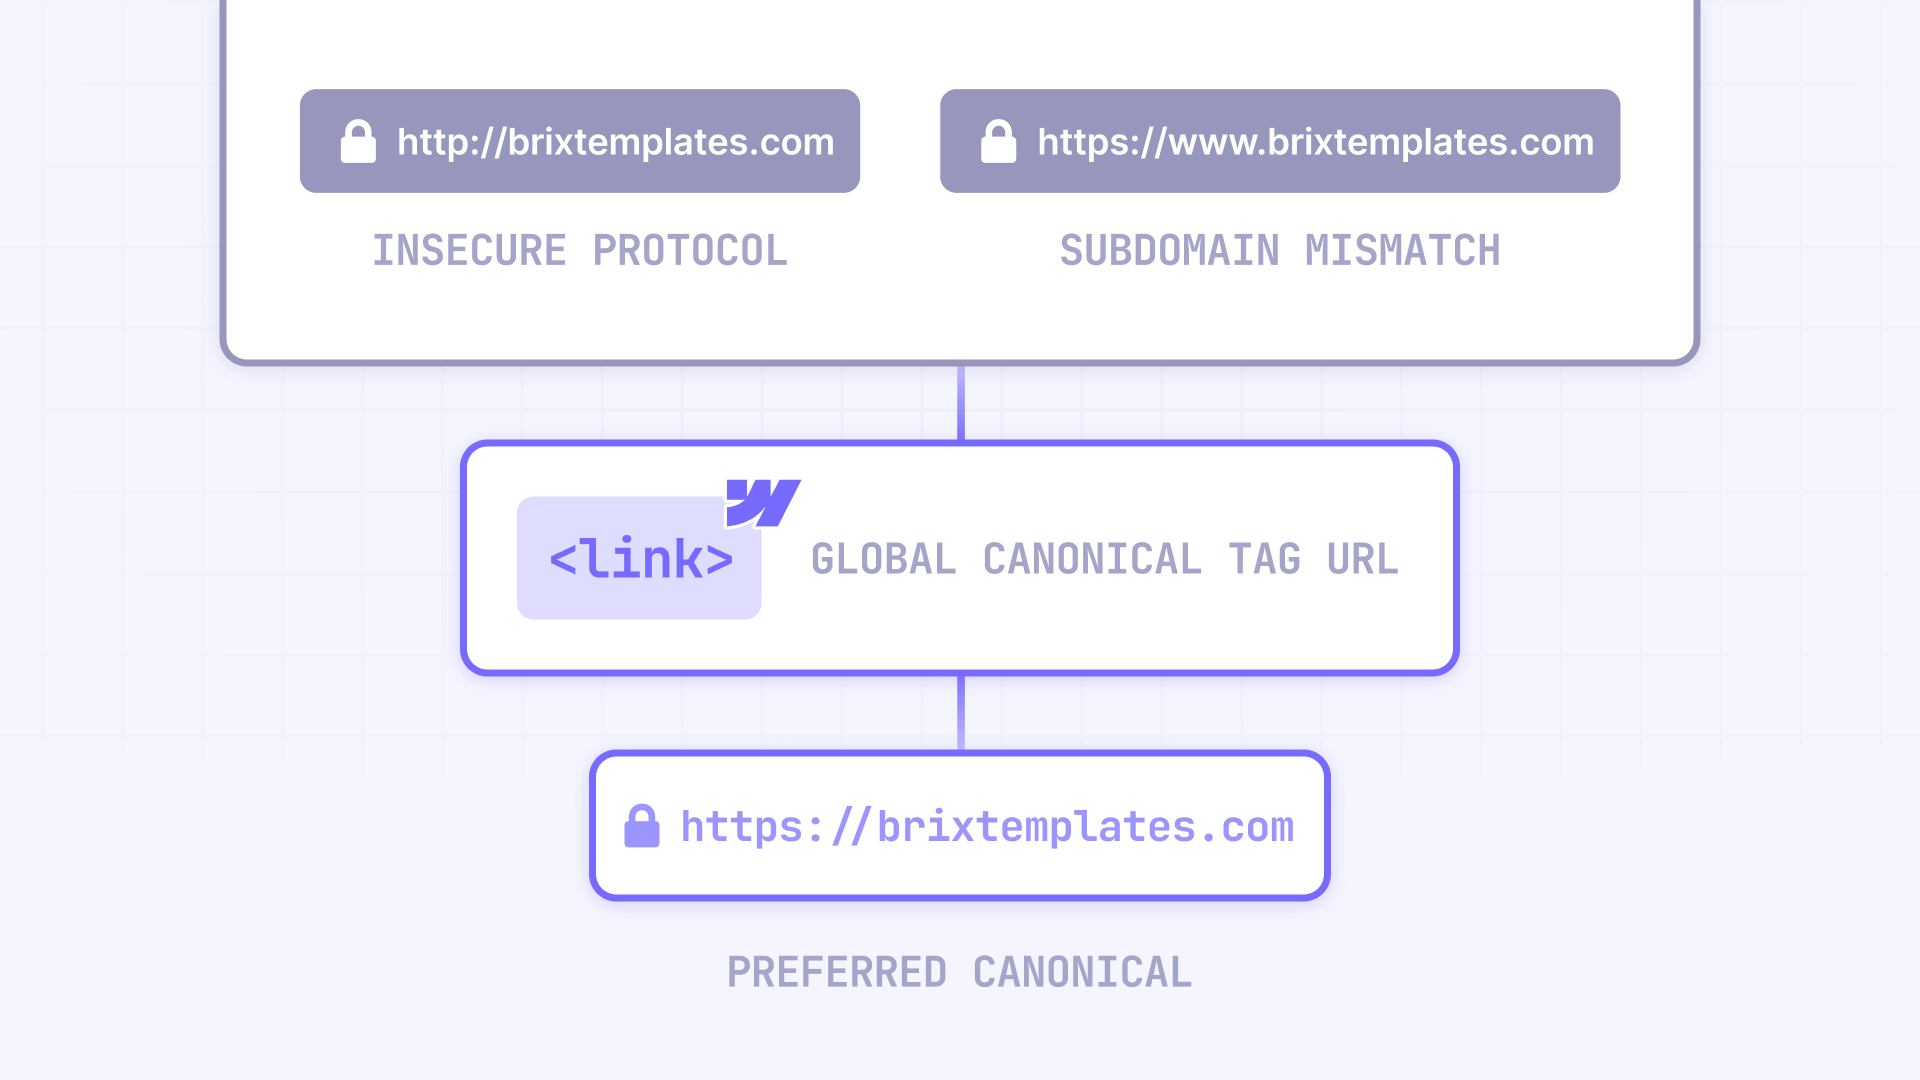
It tells search engines: "If you see this content under multiple URLs, treat this URL as the main one." This matters because search engines consider even small URL differences as separate pages:
- URL parameters create duplicates: yourdomain.com/pricing and yourdomain.com/pricing?ref=newsletter are treated as two different pages by Google, even though the content is identical.
- www vs non-www are treated as different sites: www.yourdomain.com and yourdomain.com are technically two different hostnames. Without canonicalization, search engines may index both and split your ranking signals between them.
- HTTP vs HTTPS creates duplicates: If both protocol versions are accessible, search engines may crawl and index both — diluting your authority across two versions of every page.
- Trailing slashes add another variant: /about and /about/ can be treated as distinct URLs unless you consolidate them.
One important nuance: a canonical tag is a signal, not a forced redirect. Users can still visit the alternate URL — the tag just tells search engines which version to prioritize for indexing and ranking. If you need to force traffic to one URL, use 301 redirects alongside canonicals.
1 - Set your default domain in Webflow before configuring canonicals
Before touching the canonical tag setting, make sure Webflow is redirecting all domain variants to one main domain. If you have multiple domains connected (like www.yourdomain.com and yourdomain.com), Webflow needs to know which one is the default.
How to choose and set your default domain in Webflow
- Open your site in the Webflow Dashboard.
- Go to Site settings → Publishing → Production.
- Find the domain you want as your primary and click Make default.
- Publish your site for the change to take effect.
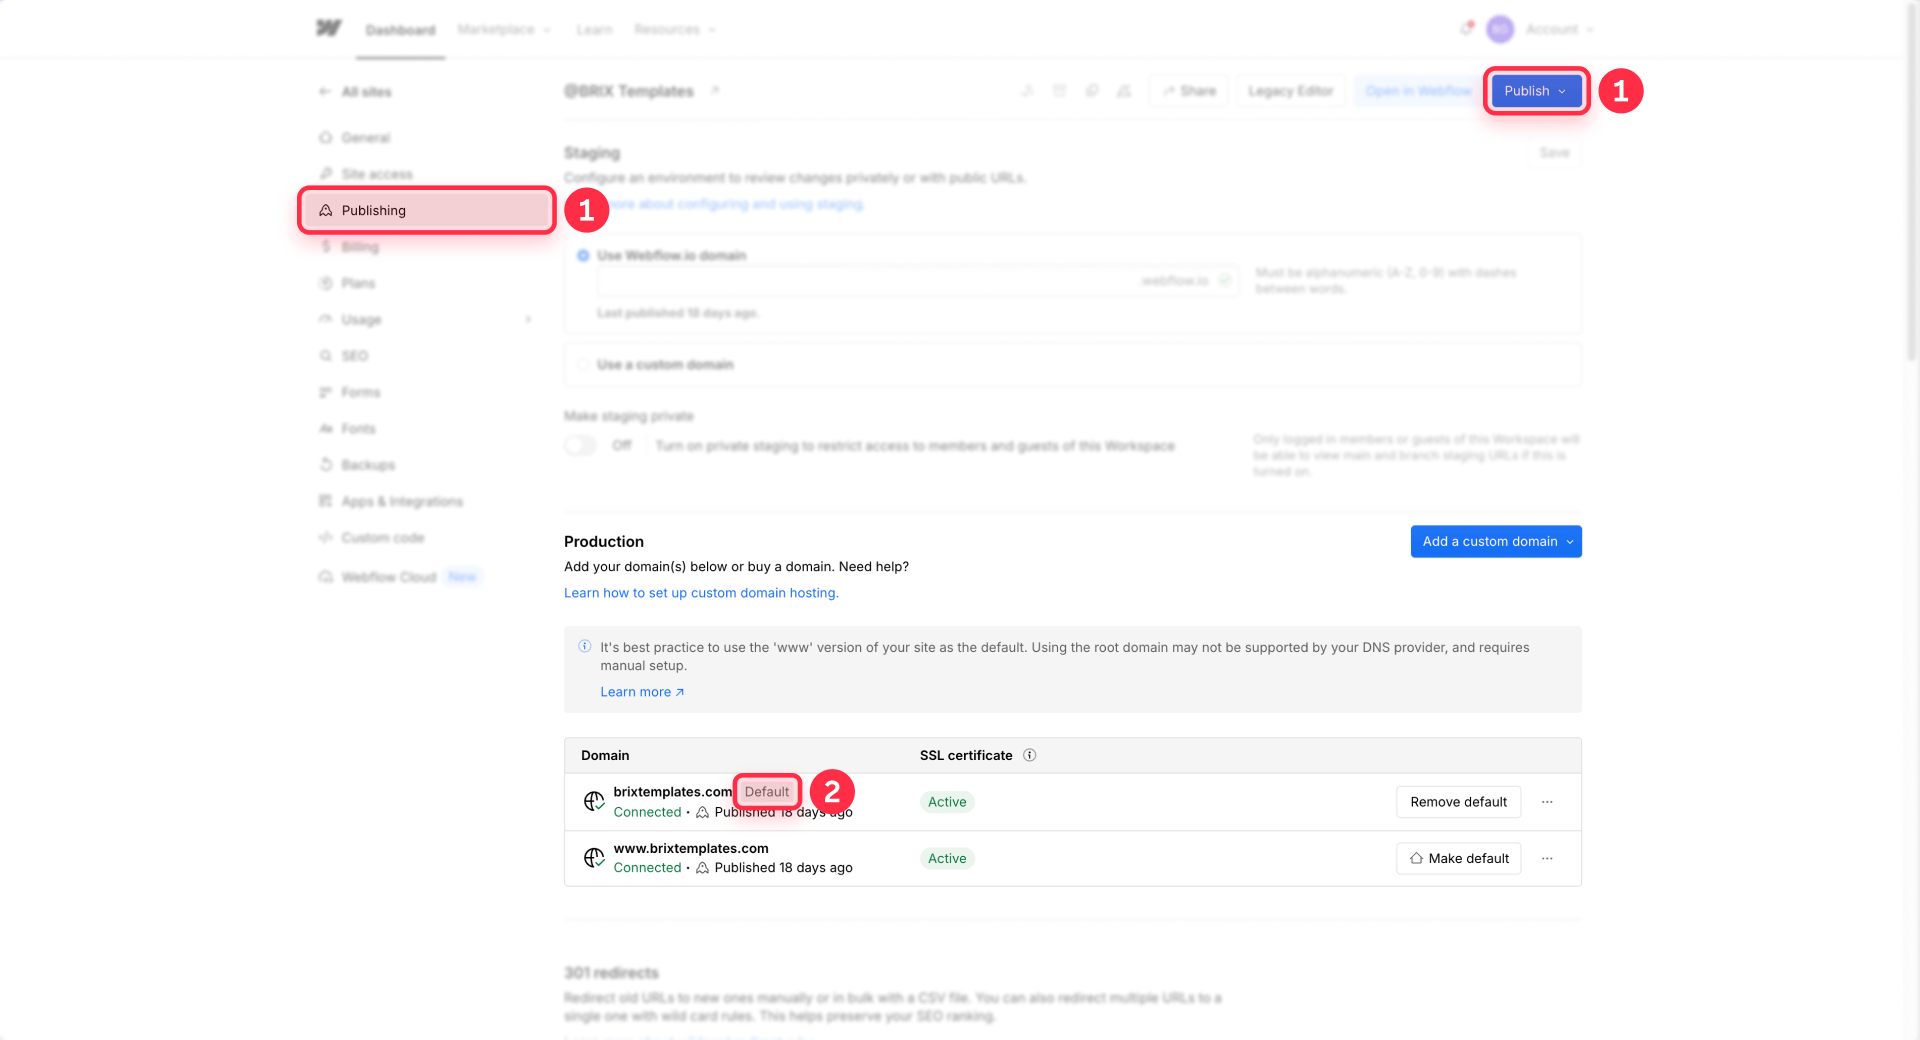
Once set, Webflow will redirect all other connected domains to your default. This means visitors hitting www.yourdomain.com get redirected to yourdomain.com (or vice versa, depending on what you chose).
On choosing www vs non-www: there's no SEO advantage to either option. The only thing that matters is consistency — your canonical tag, default domain, and any external links should all point to the same version. If you're launching a brand-new domain, pick whichever you prefer. If you're migrating an existing site, keep whatever version was historically used as the primary to avoid unnecessary reindexing.
2 - Set the global canonical tag URL in Webflow
This is the main setting that tells search engines which domain to treat as canonical across your entire site.
Where to find the Webflow global canonical tag setting
- Open your site in the Webflow Dashboard.
- Go to Site settings → SEO.
- Scroll down to Global canonical tag URL.
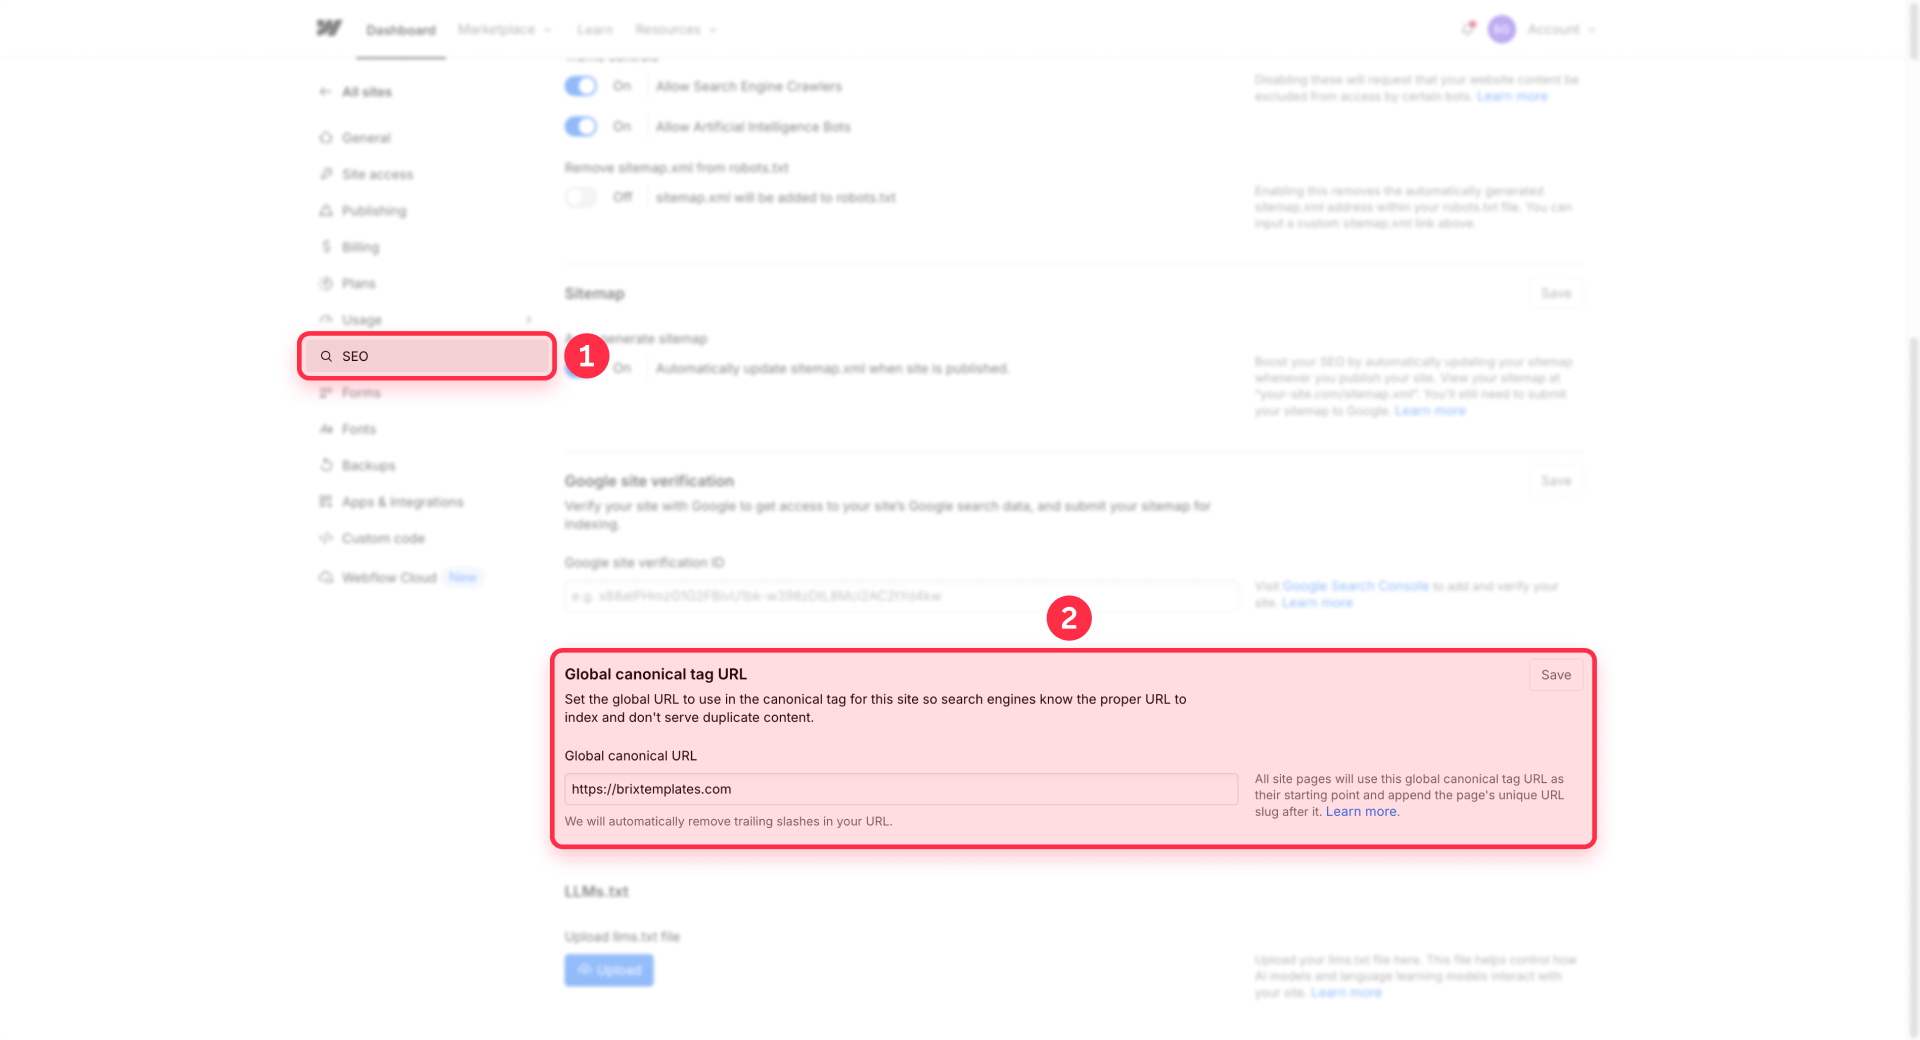
How to format your Webflow canonical URL correctly
Enter your preferred domain exactly, including the protocol. Webflow combines this base URL with each page's slug to generate a self-referencing canonical for every page on your site.
The correct format:
What to avoid:
- ❌ https://example.com/ — do NOT include a trailing slash. Webflow appends the page slug directly to this base URL, so a trailing slash creates double slashes in the canonical: https://example.com//contact instead of https://example.com/contact. This is the most common mistake and it causes real SEO problems.
- ❌ example.com — always include the protocol (https://). Omitting it produces an incomplete canonical tag that search engines may ignore.
Your canonical base URL should match your default domain exactly. If your default domain is yourdomain.com (non-www), your canonical should be https://yourdomain.com. If it's www.yourdomain.com, use https://www.yourdomain.com.
How to save and publish your Webflow canonical tag
- After entering the URL, click Save.
- Publish your site — the canonical tag doesn't take effect until you publish.
Once published, Webflow automatically generates a canonical tag for every page by combining your base URL with each page's slug. For example, if your base is https://yourdomain.com and you have a page with slug /about, the canonical tag will be:
<link rel="canonical" href="https://yourdomain.com/about" />
You don't need to set canonicals per page — the global setting handles everything unless you need a specific override.
3 - How to override the canonical tag for a specific Webflow page
Sometimes you need a specific page to point its canonical to a different URL. Common use cases include campaign landing pages with duplicate content, A/B test variants, or pages that exist on multiple domains intentionally.
Webflow supports per-page canonical overrides for static pages only — not CMS Collection pages.
To set a per-page canonical:
- Open the Webflow Designer.
- Go to the Pages panel and click the gear icon next to the page you want to override.
- Scroll down to SEO settings.
- Find the Page canonical URL field.
- Enter the full absolute URL you want as the canonical (including https://).
- Save and Publish.
This overrides the global canonical for that specific page only. All other pages continue using the global canonical tag URL as their base.
4 - Common Webflow canonical tag mistakes to avoid
- Including a trailing slash in the base URL: This produces double slashes on every subpage canonical (https://example.com//pricing). It's the most frequent issue we see on Webflow sites, and it silently undermines your SEO. Always use https://example.com without a trailing slash.
- Creating multiple canonical tags at the same time: If you inject a canonical tag through Google Tag Manager, a custom script, or an SEO app, and you also set the global canonical in Webflow, your pages end up with two competing canonical tags. Search engines may ignore both when they see conflicting signals. Choose one method and stick with it.
- Canonical doesn't match the default domain: If your default domain is yourdomain.com but your canonical base says www.yourdomain.com, you're telling search engines the canonical is on a different host than where users land. This creates confusion. Always keep them aligned.
- Forgetting to verify after using a reverse proxy: If you're serving your Webflow site through Cloudflare Workers or another proxy, the canonical tag may point to the Webflow staging domain instead of your live domain. Always check the page source after publishing to confirm the canonical shows your actual public URL.
How to verify your Webflow canonical tags are working
After publishing, run this quick check on at least two pages — your homepage and one deeper page:
- Open the page in your browser.
- Right-click → View Page Source (or press Ctrl+U / Cmd+U).
- Search for rel="canonical" in the source code.
- Confirm there is exactly one canonical tag on the page.
- Verify it uses your correct domain (www vs non-www), includes https://, shows the correct page path, and has no double slashes.
If you recently changed your canonical settings, Webflow recommends asking Google to recrawl your pages so the update propagates faster. You can do this in Google Search Console → URL Inspection → Request Indexing for your key pages.
Frequently asked questions about Webflow canonical tags
What is a canonical tag and why does Webflow need one?
A canonical tag is an HTML element that tells search engines which URL is the preferred version of a page. Webflow needs one because your site can be accessed through multiple URL variations — www vs non-www, http vs https, URLs with tracking parameters — and without a canonical tag, search engines may treat each variation as a separate page. This splits your ranking signals across duplicates. Setting a global canonical tag URL in Webflow's site settings prevents this by designating one URL as the main version for every page.
Does Webflow set canonical tags automatically?
No — Webflow does not generate canonical tags by default. You must configure the Global canonical tag URL manually in Site settings → SEO. Once set, Webflow automatically generates a self-referencing canonical for every page by combining your base URL with each page's slug. But the initial setup is on you, and many Webflow sites skip this step entirely.
Where do I find the canonical tag setting in Webflow?
Go to Site settings → SEO → Global canonical tag URL. This is in the Webflow Dashboard (not the Designer). Note that the UI was renamed from "Project Settings" to "Site settings" — if you're following older tutorials that reference "Project Settings", it's the same place with a different name.
Should I use www or non-www for my Webflow canonical URL?
There's no SEO difference between www and non-www. The only rule is consistency — your canonical base URL must match your default domain. If your default domain in Site settings → Publishing is yourdomain.com, use https://yourdomain.com as your canonical. If it's www.yourdomain.com, use that instead. Mismatching them tells search engines different things about which URL is the real one.
What happens if I include a trailing slash in my Webflow canonical URL?
Webflow appends each page's slug directly to your canonical base URL. If your base ends with a slash (https://example.com/), every subpage canonical gets a double slash — like https://example.com//contact. This is a broken URL that search engines may not recognize as valid. Always enter your canonical base without a trailing slash: https://example.com.
Can I set a different canonical tag for a specific Webflow page?
Yes, but only for static pages — not CMS Collection pages. Go to the Designer → Pages panel → page settings (gear icon) → SEO settings → Page canonical URL. Enter the full absolute URL including https://. This overrides the global canonical for that specific page while all other pages continue using the global setting.
Can I use Google Tag Manager to add canonical tags in Webflow instead?
You can, but don't use both methods at the same time. If you set a global canonical in Webflow site settings and inject a canonical through GTM or custom scripts, your pages end up with two competing canonical tags. Search engines may ignore both when they detect conflicting signals. Pick one approach and use it consistently across your site.
How do I check if my Webflow canonical tag is working correctly?
Open any page on your published site, right-click → View Page Source, and search for rel="canonical". Verify that there's exactly one canonical tag, it uses the correct domain (www vs non-www), includes https://, shows the right page path, and has no double slashes. Check at least your homepage and one deeper page to confirm the global setting is generating correctly across your site.
Do Webflow CMS pages get canonical tags too?
Yes — when you set the Global canonical tag URL, Webflow generates canonical tags for all published pages, including CMS Collection pages. Each CMS page gets a canonical tag combining your base URL with its Collection URL and item slug. The per-page canonical override, however, is only available for static pages — you cannot set a custom canonical for individual CMS items through the UI.
How do canonical tags interact with Webflow localization?
Webflow's localization feature generates hreflang tags (in the page HTML and/or sitemap) to tell search engines about language variants. Locale routing uses 302 redirects, which you cannot override natively. Canonical tags and hreflang tags work together but serve different purposes — canonicals handle duplicate URLs within the same language, while hreflang handles the relationship between language versions. After setting up localization, check a few localized URLs to verify that canonical tags and hreflang tags are both present and pointing correctly.
Conclusion
Setting up canonical tags in Webflow is straightforward but easy to overlook — and getting it wrong (or not doing it at all) can silently split your SEO authority across URL duplicates. The process takes five minutes: set your default domain in Publishing settings, configure the Global canonical tag URL in SEO settings without a trailing slash, publish, and verify in the page source. For edge cases, use the per-page canonical override on specific static pages.
If you're running a complex Webflow setup with multiple domains, reverse proxies, or localization, canonical configuration becomes more nuanced. Our Webflow agency team can audit your current setup and make sure every page points to the right canonical URL.


Join readers commenting on this post!