
Form validation is essential when you want to avoid spam or ensure that only certain types of email addresses are used in your website’s forms.
Webflow’s basic form functionality might not cover all your needs, especially if you want to restrict personal email providers (like Gmail or Yahoo) to maintain higher-quality leads. By adding custom validation, you can block unwanted email addresses in real-time — no extra tools needed.
Why would you Webflow site need this?
- Higher quality leads: If you rely on B2B business leads, you can discourage personal email addresses and ensure leads are more likely to be valuable.
- Better control over submissions: If certain email providers often result in low-quality or irrelevant leads, you can easily filter them out and save time for your sales team.
How does the personal email JS validation works?
In order to block personal email addresses, we’ll add a small JavaScript code snippet that runs right in the user’s browser. The code does the following:
- Checks user input as they type: The code looks at the email field as the user enters their address.
- Matching against blocked lists: If the email contains any provider you’ve decided to block (e.g., @gmail.com or @yahoo.com), the script automatically disables the submit button and shows an error message.
- Easily updated: The script can be easily edited to adjust the blocked list of emails at any time. Add new providers, remove old ones—no need for advanced coding skills.
Step-by-step implementation of personal email blocking in Webflow forms
1. Setting up IDs to control the Webflow form
First, you need to assign specific IDs to your form elements so the validation script can find and control them seamlessly. Follow these instructions exactly:
Open your form in the Webflow Designer
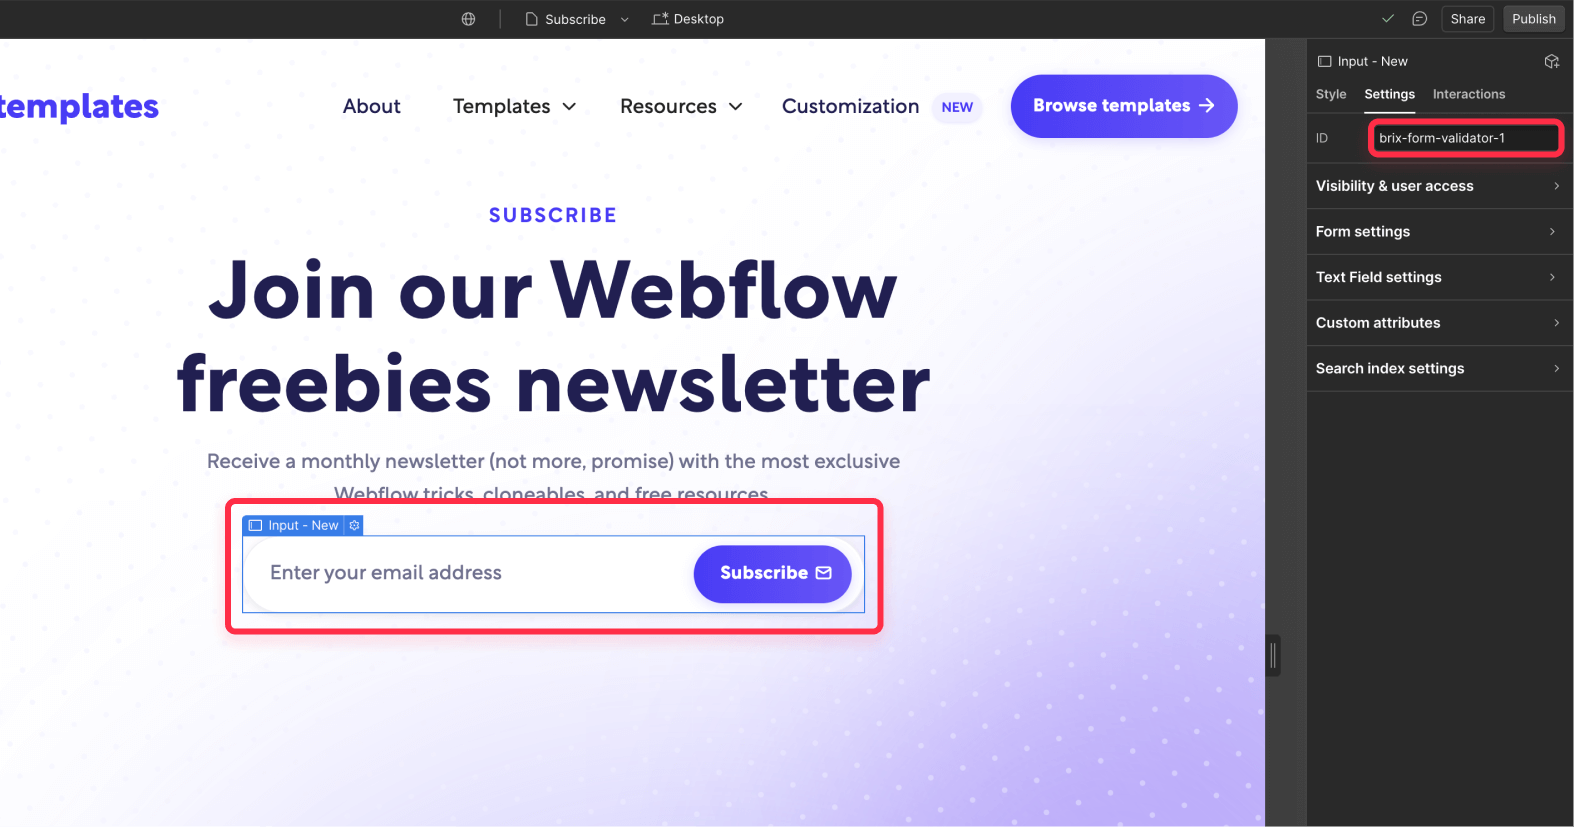
Select your email input field:
- Go to the Element Settings panel (gear icon).
- In the field’s settings, set the ID exactly to: brix-form-validator-1
Select your form’s submit button:
- In the Element Settings, assign the ID exactly to: brix-form-validator-button

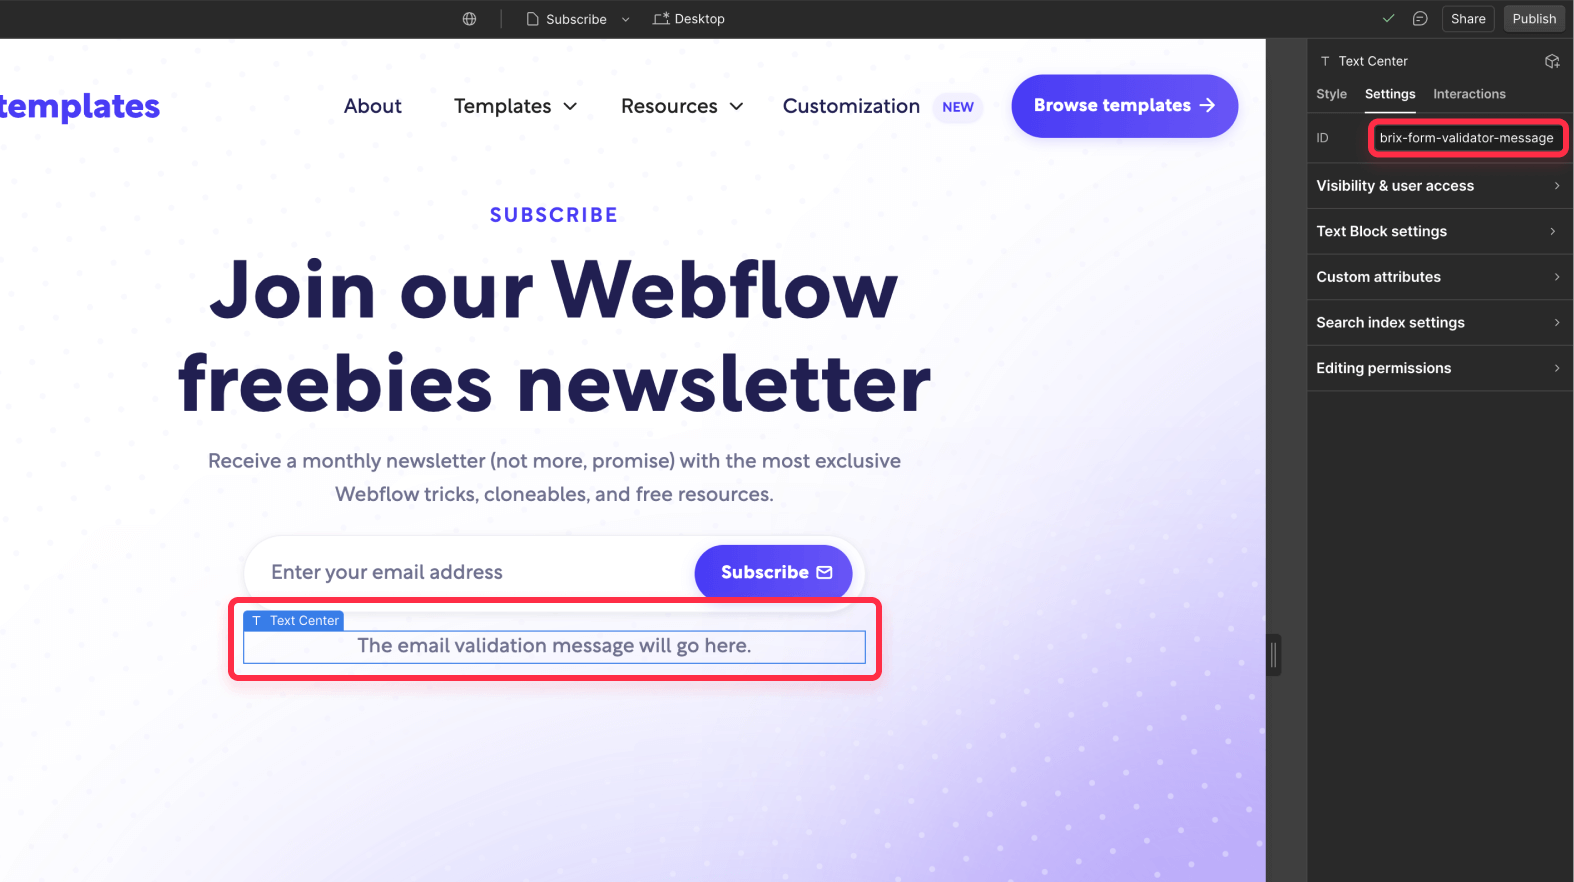
Add a text element for error messages below the submit button:
- Assign its ID exactly to: brix-form-validator-message
- Set its display to “None” so it’s hidden by default. The code will make it appear automatically it when needed.
For all of these instructions, please make sure to use the exact IDs mentioned. Do not use any other ID, as otherwise the script won't be able to locate this form input.
2. Adding the CSS classes
We need to create two CSS classes that give users immediate visual feedback about the form’s status. By applying these classes dynamically as the user interacts with the form, we guide them towards making the necessary corrections before attempting to re-submit.
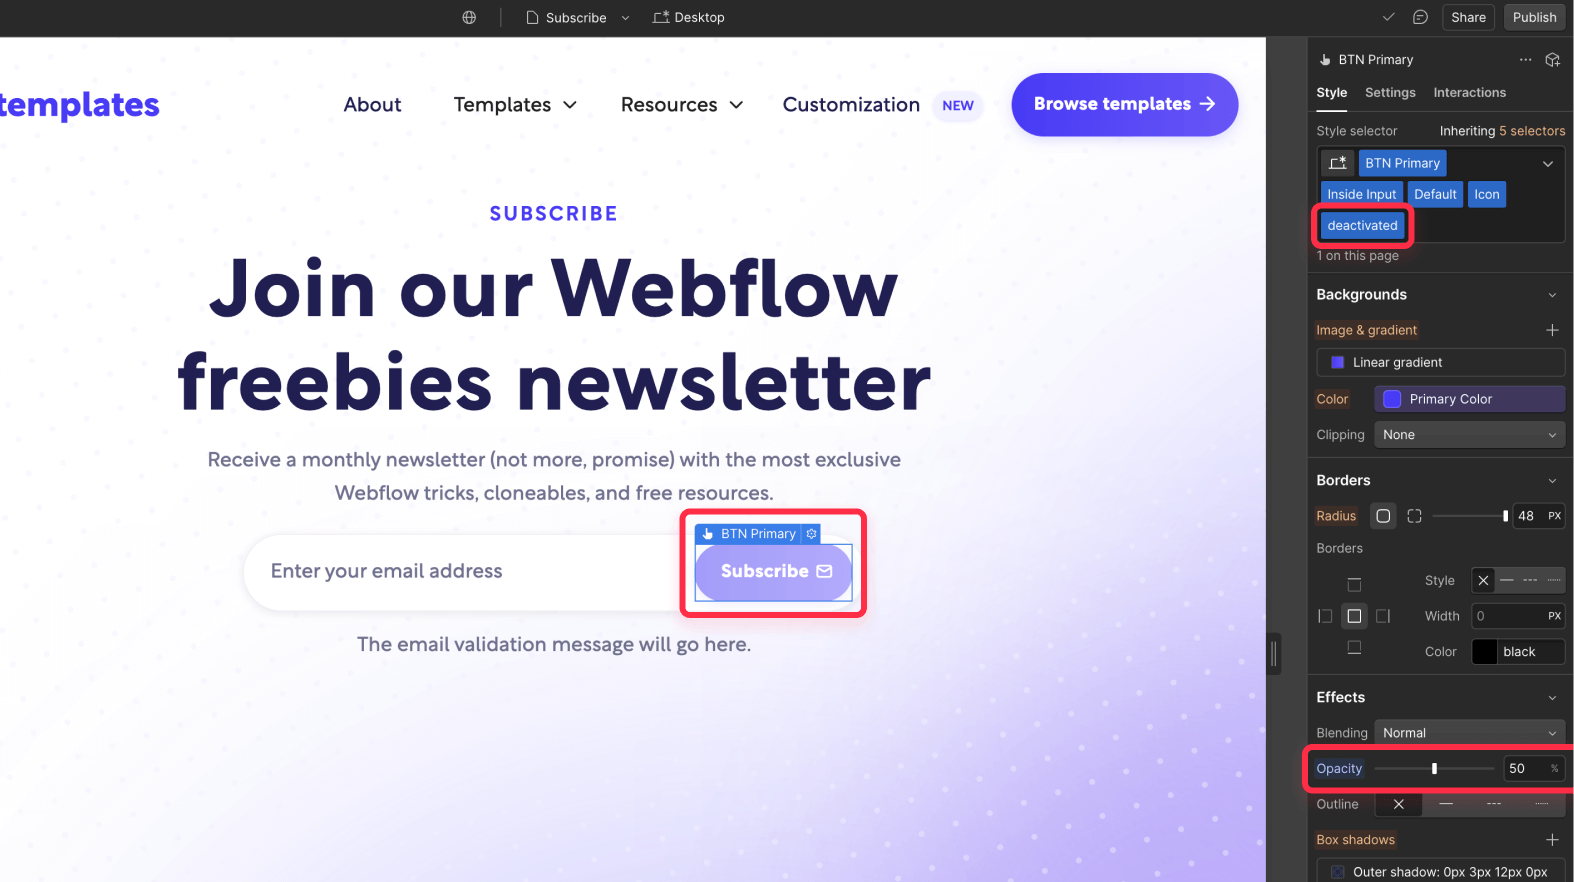
.deactivated class (for the submit button)
- Set opacity to around 0.5: This will make the button look “faded,” giving a subtle visual cue that it’s not currently active.
- Set cursor to not-allowed: Changing the cursor on hover makes it clear that the button isn’t clickable while the input is invalid.
You might also consider adjusting other styles (like changing the button color) to properly match your branding and website design style.
.show class (for the error message)
- Set display to block: This ensures the error message is visible when applied. By default, the message should be hidden (e.g., display: none) to avoid cluttering the interface before it’s needed.
- Style it to match your site’s design: Choose a font size, color, and possibly an icon that aligns with your brand’s look and feel. Consider using a contrasting color or a subtle highlight so the message is easily noticeable.
By combining these classes, you create an immediate and intuitive feedback loop. When a user enters an invalid email address, the submit button becomes visibly unavailable, and a helpful error message appears. This guides them to correct their input before trying again, resulting in a smoother, more user-friendly experience.
3. Adding the personal email address validation code
Now that we’ve prepared our form elements and styling, the next step is to integrate the custom validation logic into your Webflow project. We’ll add a small JavaScript snippet that monitors input fields, applies our validation rules, and provides immediate feedback to users.
For forms on specific pages: Go to Page Settings > Custom Code > Before </body> tag.

For site-wide forms: Go to Project Settings > Custom Code > Before </body> tag.
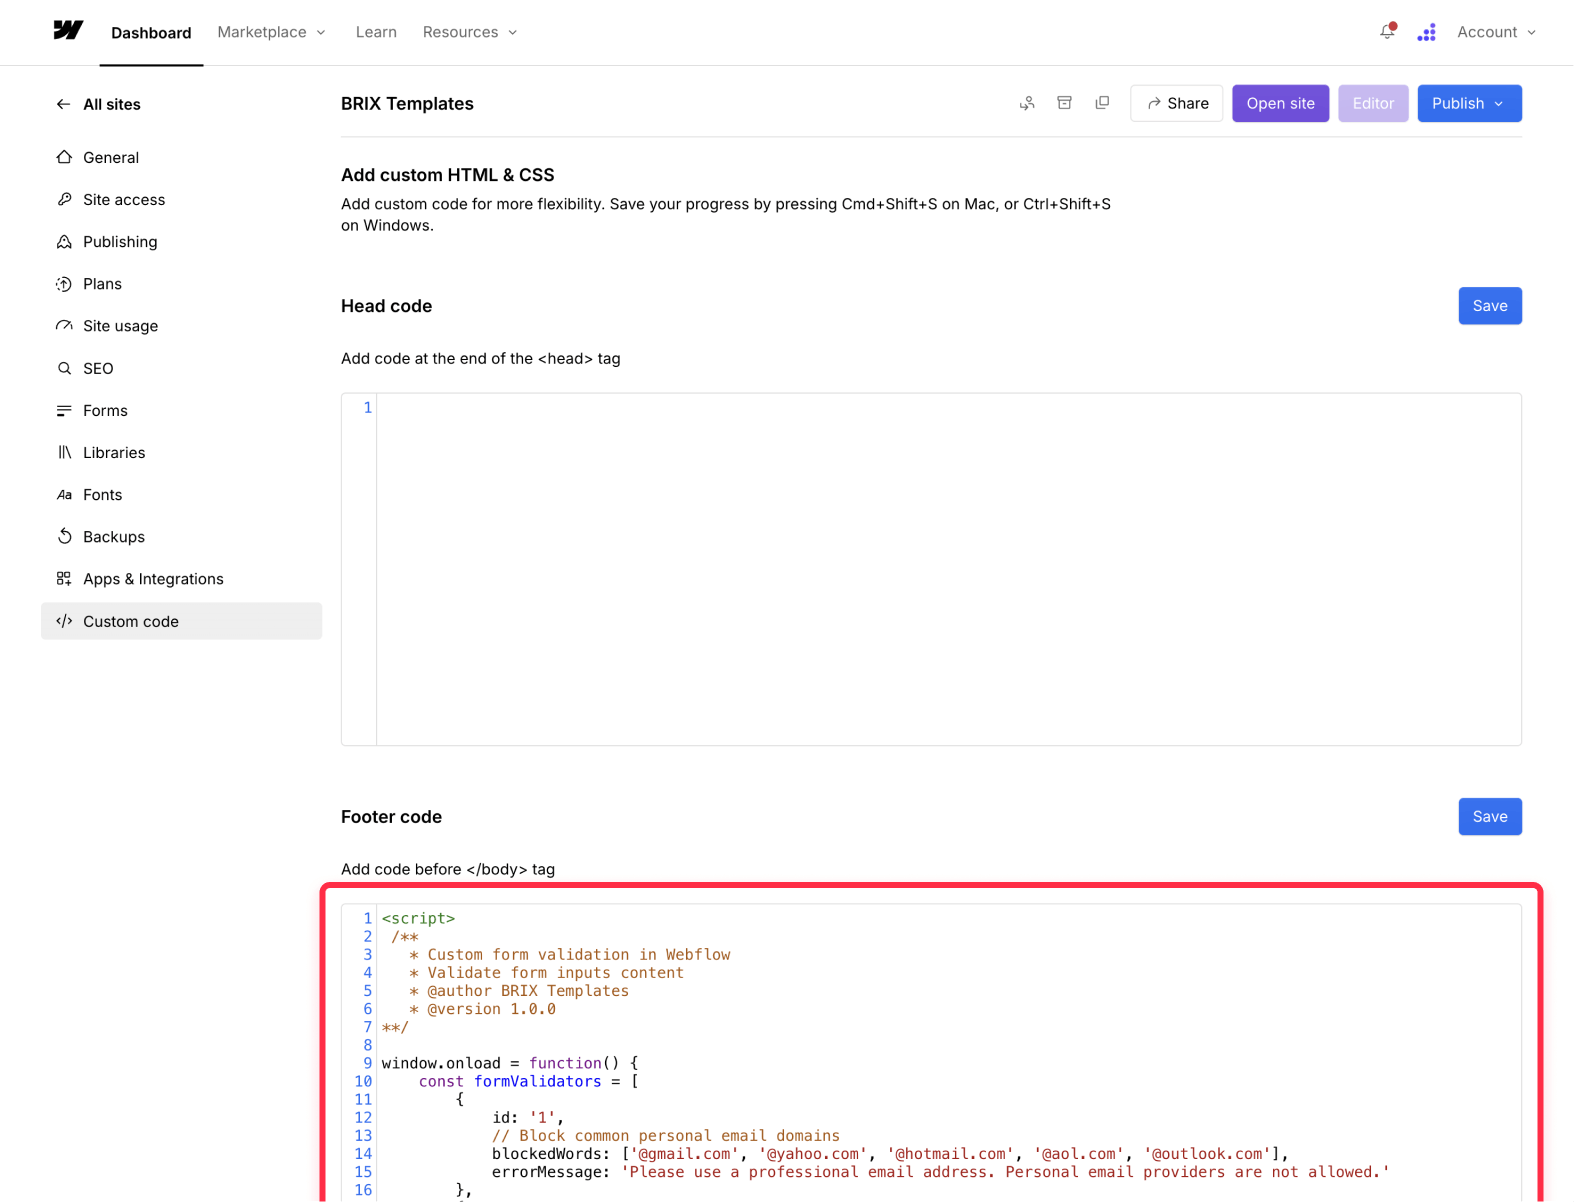
Depending on whether you want these rules to apply to a single page or the entire site, you can insert the code in the appropriate custom code area. The code to add is the following:
<script>
 /**
   * Custom form validation in Webflow
   * Validate form inputs content
   * @author BRIX Templates
   * @version 1.0.0
**/

window.onload = function() {
    const formValidators = [
        {
            id: '1',
            // Block common personal email domains
            blockedWords: ['@gmail.com', '@yahoo.com', '@hotmail.com', '@aol.com', '@outlook.com'],
            errorMessage: 'Please use a professional email address. Personal email providers are not allowed.'
        },
        {
            id: '2',
            // Example: Block Russian domains or any other region-specific domains
            blockedWords: ['@mail.ru', '@yandex.ru', '@bk.ru', '@list.ru', '.ru'],
            errorMessage: 'We are not accepting submissions from these email domains. Please try another email.'
        }
    ];

    // Get error message element
    const messageElement = document.getElementById('brix-form-validator-message');

    // Remove any existing styles and classes
    if (messageElement) {
        messageElement.removeAttribute('style');
        messageElement.classList.remove('show');
    }

    formValidators.forEach(validator => {
        initializeValidator(validator);
    });

    function initializeValidator(validator) {
        const inputField = document.getElementById(`brix-form-validator-${validator.id}`);
        const submitButton = document.getElementById('brix-form-validator-button');

        if (!inputField || !submitButton || !messageElement) {
            return;
        }

        // Remove initial deactivated state
        submitButton.classList.remove('deactivated');

        inputField.addEventListener('input', function() {
            const inputValue = this.value.toLowerCase();
            const containsBlockedWord = validator.blockedWords.some(word =>
                inputValue.includes(word.toLowerCase())
            );

            if (containsBlockedWord) {
                // Handle error state
                submitButton.disabled = true;
                submitButton.classList.add('deactivated');
                messageElement.textContent = validator.errorMessage;
                messageElement.classList.add('show');
            } else {
                // Handle valid state
                submitButton.disabled = false;
                submitButton.classList.remove('deactivated');
                messageElement.classList.remove('show');
            }
        });
    }
}
</script>
4. Customizing the form validation logic
Customizing the validation logic is both simple and flexible. Whether you’re just adding another blocked provider to an existing validator or establishing entirely new rules for a separate validator, you can easily adjust the script as following:
- Adding more providers to an existing validator: If you discover another free email provider you’d like to block, just add it to the blockedWords array of the validator that already targets personal email domains. No need to create a new validator object if it fits the same category.
- Creating a new validator: If you want to create a separate rule that doesn’t mix with the existing ones, copy one of the validator objects and paste it as a new entry in the formValidators array. Update the id (e.g., from '2' to '3'), add your chosen blocked words, and adjust the errorMessage. For example, you might want to use a separate validator for region-specific addresses (like the Russian domains shown in the code).
Best practices and troubleshooting
- Match IDs exactly: If validation isn’t working, double-check that your input field and button IDs exactly match what’s in the code.
- Publish and test: Always publish your Webflow site and test in a live browser environment, as JS code is not loaded in the Webflow designer, so if you try to test there, it won't work.
Conclusion
By implementing this custom form validation in Webflow, you take control of which email addresses can be submitted through your forms. Whether you’re aiming to block free, personal addresses to ensure more professional leads, or planning to restrict certain regions, this approach helps maintain data quality and reduce spam.
If you run into any problems while adding these features or need guidance on other Webflow integrations, just drop us a message. The BRIX Templates team is always ready to help keep things running smoothly.


Join readers commenting on this post!