

Webflow CMS is great for structured blog content, but reusable CTAs can get messy fast. If every article needs a different banner, newsletter block, product card, or "book a demo" section, you can easily end up with hardcoded template sections, too many CMS fields, or fragile HTML inside Rich Text.
The cleanest solution is to decide whether your CTA needs a predictable template position or true inline placement inside the article body. Webflow can handle the first option well with components, CMS fields, Reference fields, and conditional visibility. For the second option, you need an advanced workaround like Finsweet Inject.
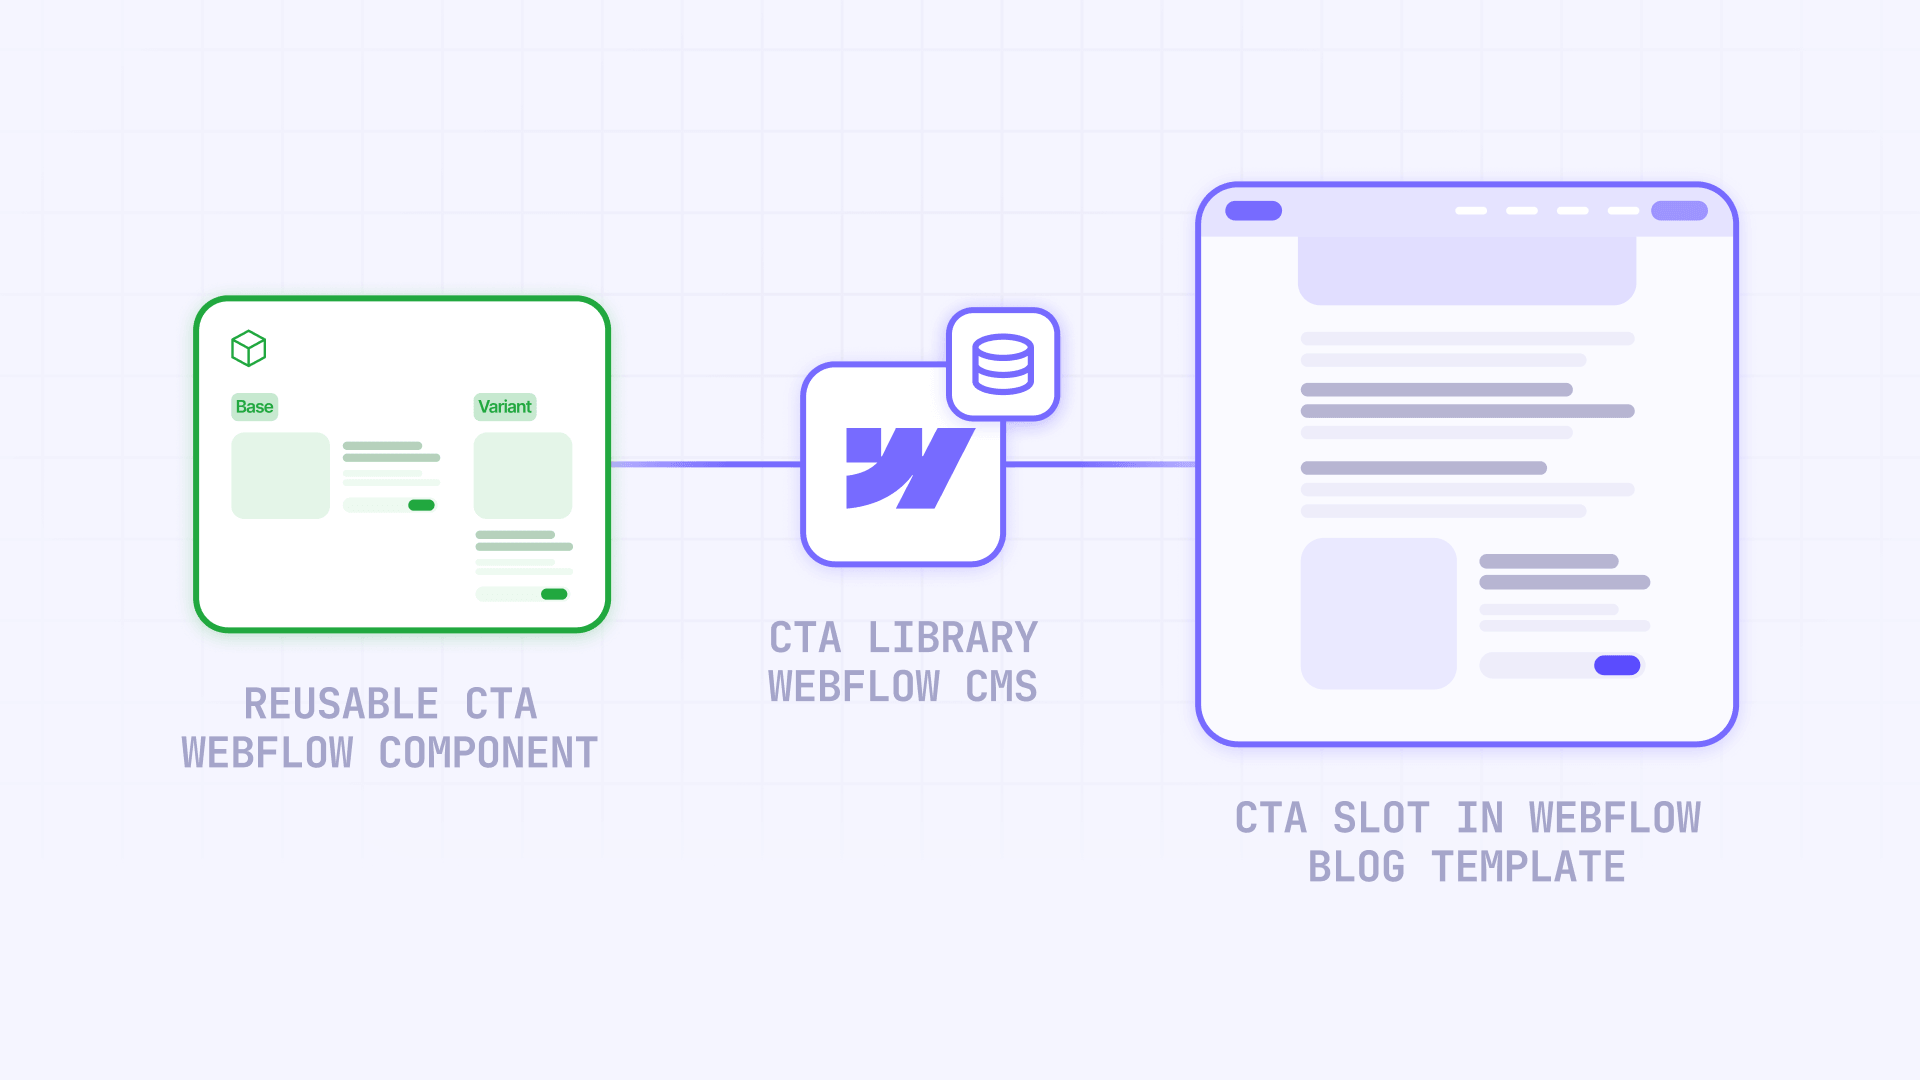
Introduction to reusable CTA blocks in Webflow CMS
A reusable CTA block is a designed call-to-action section that can be reused across multiple CMS blog posts without rebuilding the design each time. It might be a newsletter signup, product card, resource download, consultation banner, webinar promo, or related offer.
In this guide, you will learn two ways to build reusable CTA blocks in Webflow CMS: a native CTA Library method for fixed template placements, and a Finsweet Inject method for inline placement inside Rich Text. Most sites should start with the native method and only use Finsweet Inject when the CTA must appear between specific paragraphs.
Why reusable CTA blocks matter for Webflow CMS blog posts
Reusable CTAs are not just a design convenience. They make your Webflow CMS easier to scale, easier to hand off, and easier to optimize.
- Better conversion placement: Add a relevant offer near the part of the article where the reader is most engaged, such as after the intro, before a pricing section, or near the conclusion.
- Cleaner Webflow CMS management: Avoid creating one-off sections or duplicating CTA content manually across dozens of posts.
- Reusable design system: Keep spacing, typography, buttons, images, and variants consistent by building the CTA as a controlled Webflow component.
- Easier client editing: Let editors choose approved CTAs from CMS fields or Reference fields instead of editing layout, styles, or HTML.
- Less maintenance: Update a reusable CTA component or CTA Library item once instead of hunting through individual blog posts.
- Better campaign control: Create different CTA types for lead magnets, newsletters, demos, webinars, product pages, and resources.
Choose the right Webflow CTA method before building
There are two practical ways to add reusable CTA blocks to Webflow CMS blog posts. The right method depends on whether the CTA can live in a fixed template position or needs to appear inside the Rich Text body.
Method 1: Use a native Webflow CTA Library for fixed template placements
Use this method when the CTA can appear in a predictable template position, such as after the article, before related posts, in a sidebar, or near the top of the page.
This is the cleanest option for most Webflow CMS blogs because it stays native, is easier for clients to edit, and does not require third-party scripts.
Method 2: Use Finsweet Inject for inline Rich Text placement
Use this method when the CTA needs to appear between exact paragraphs inside the CMS Rich Text field.
This is more flexible, but it adds a script, attributes, naming rules, and published-site testing.
Quick decision rule
Use the native CTA Library method if editors only need to choose which CTA appears.
Use Finsweet Inject if editors need to choose exactly where the CTA appears inside the article.
Method 1: Build a native Webflow CTA Library for fixed template placements
This method is best when the CTA can appear in a fixed place in the Blog Post template. You will create a reusable CTA component, store CTA content in a CTA Library Collection, connect Blog Posts to CTAs with Reference fields, and display the selected CTA in the template.
Create a reusable Webflow component CTA with editable properties
Build the CTA as a reusable Webflow component, not a one-off blog section. Design it for the article width first — not only for a full-width landing page — and test it at desktop, tablet, and mobile breakpoints inside a real blog post layout.

Once the design is ready, convert the CTA wrapper into a Webflow component. Then expose only the properties that editors or CMS fields need to control:
- CTA heading
- CTA body
- Button label
- Button URL
- CTA image
- Show image
- Show secondary link
- Approved visual variant, controlled through component variants or CMS conditionals
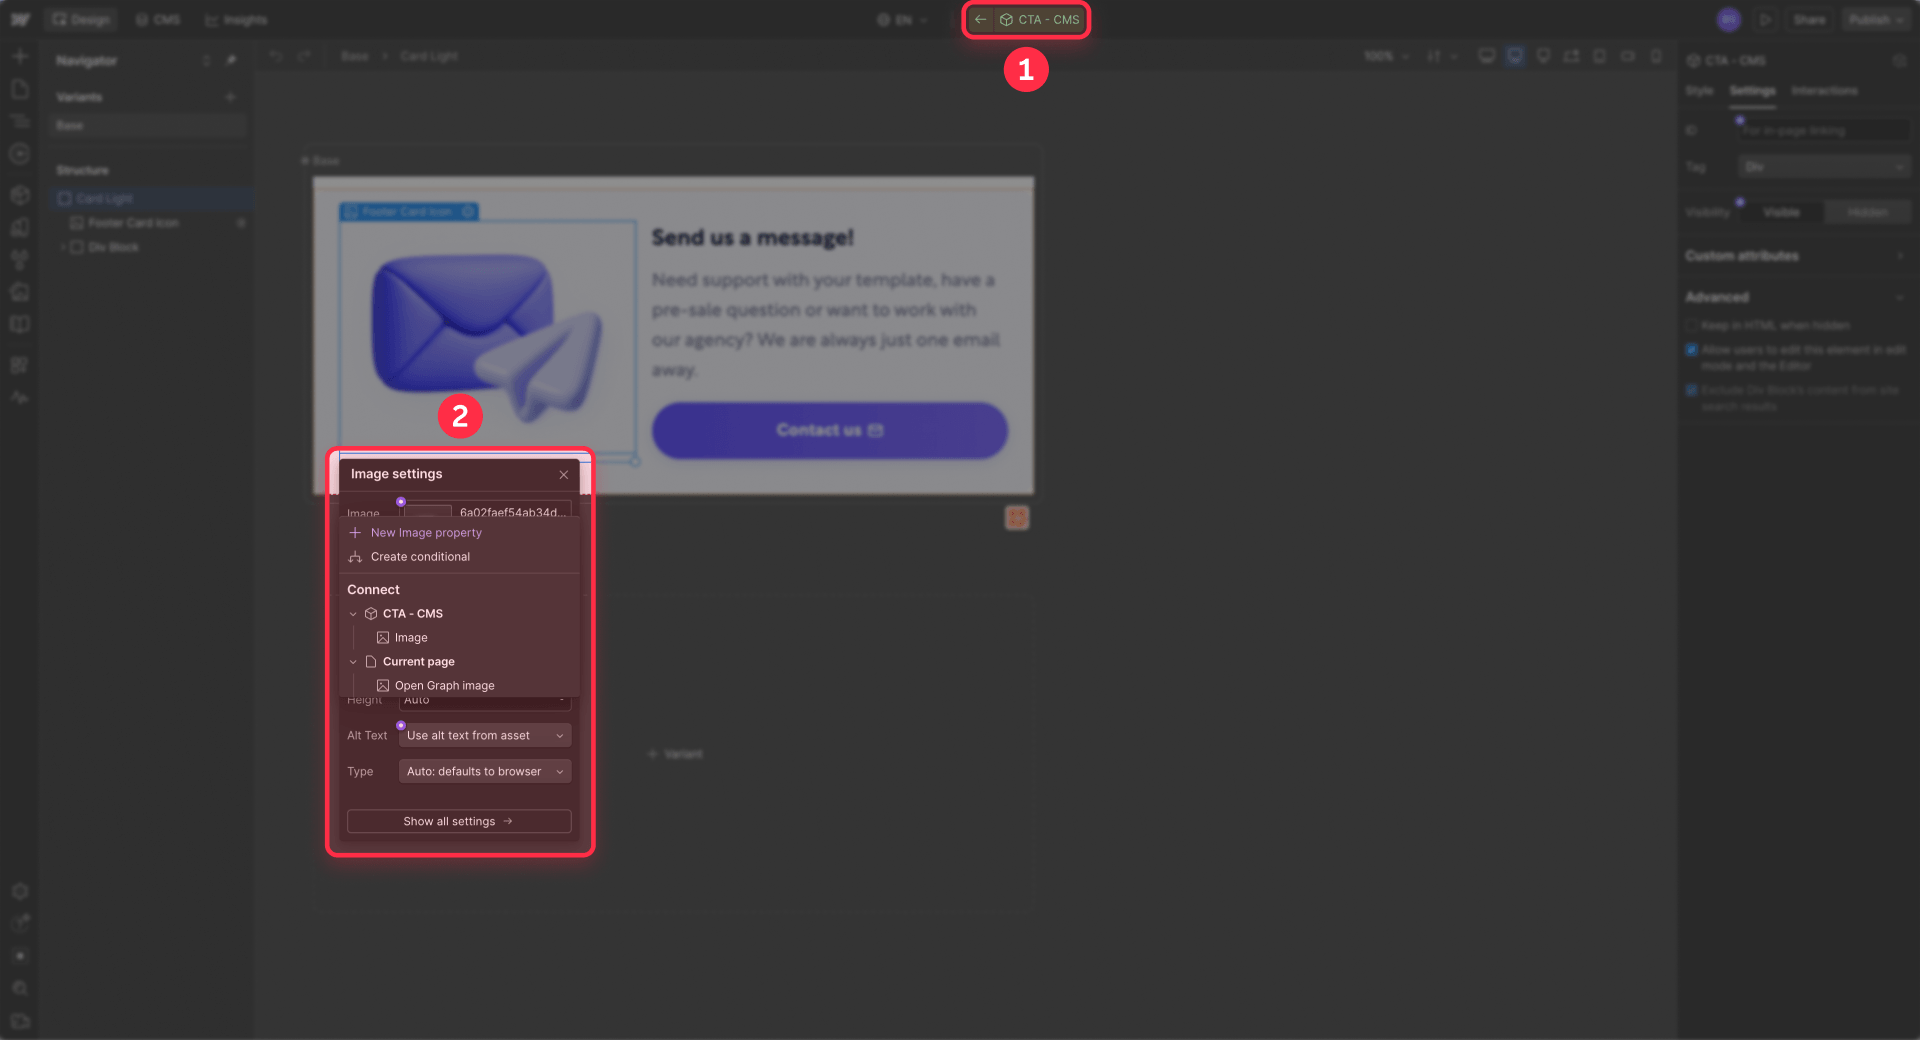
Keep layout, spacing, typography, colors, and responsive behavior locked inside the main component. These properties will be connected later to the CTA Library and Reference fields.
Create a Webflow CTA Library and connect it with Reference fields
A CTA Library lets you manage reusable CTA content from one CMS Collection. Instead of typing CTA copy directly into every blog post, editors choose a CTA item from a shared library. You only need this method if you want editors to choose reusable CTAs from the CMS. If every blog post should always show the same CTA, you can place a fixed CTA component in the template without creating a CTA Library.
Webflow Reference fields are designed to connect items from different Collections. A Blog Posts Collection item can reference an item from another Collection, and the referenced item's data can then be used on Collection pages or Collection lists.
Create the Webflow CTA Library collection
Create a new CMS Collection called CTA Library or CTA Blocks.
Recommended fields:
- CTA name (Plain text) — Internal name for editors
- Eyebrow (Plain text) — Optional small label
- Heading (Plain text) — Main CTA headline
- Body (Plain text or Rich Text) — Supporting copy
- Button label (Plain text) — CTA button text
- Button URL (Link) — Destination URL
- Image (Image) — Optional visual
- Variant (Option) — Style such as primary, light, dark, resource, newsletter
- Campaign type (Option) — Demo, newsletter, download, webinar, product
- Active (Switch) — Helps hide outdated offers
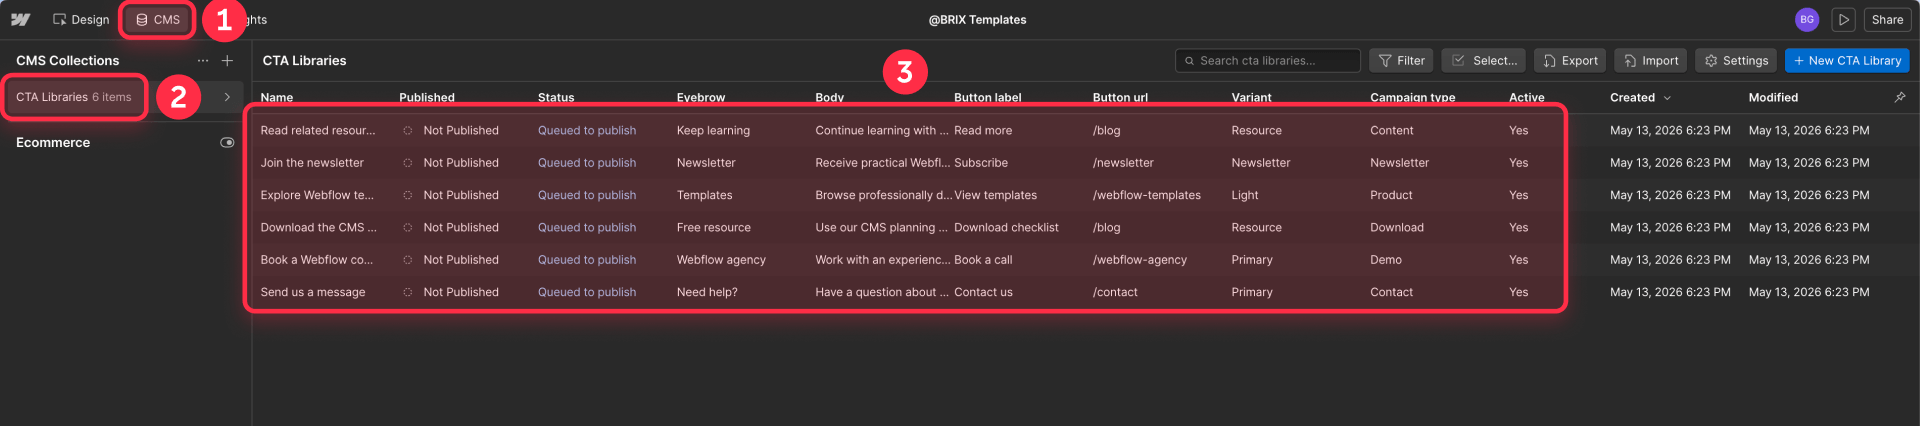
Keep this Collection simple. A CTA Library should be easy for clients and editors to understand. If your CTA Library grows large and you approach the CMS item limit, learn how to overcome the Webflow CMS item limit.
Add Reference fields to Webflow blog posts
Next, add Reference fields to the Blog Posts Collection.
For a basic setup, add:
- Top CTA
- Bottom CTA
For a more flexible setup, add:
- Intro CTA
- Mid article CTA
- Sidebar CTA
- End of post CTA
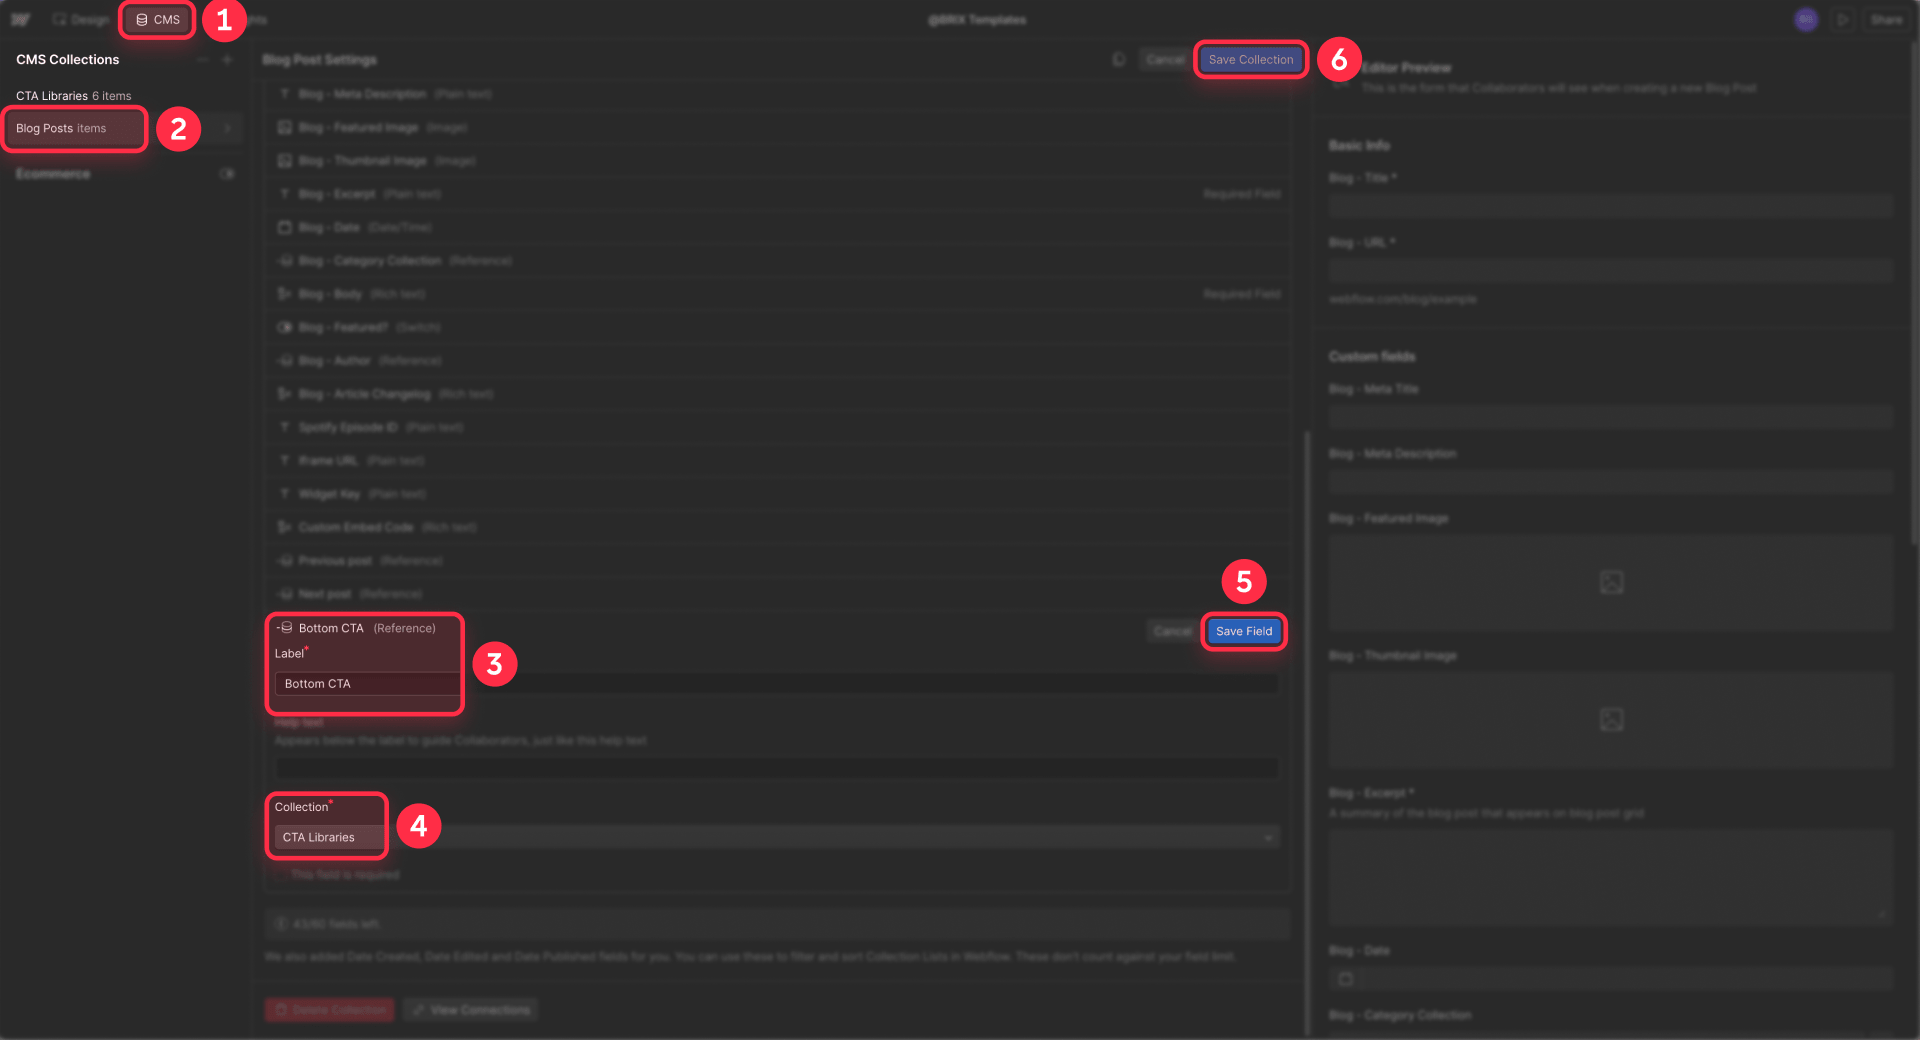
Each Reference field should point to the CTA Library Collection. Webflow's Reference field setup lets you select the referenced Collection and then choose referenced items for each Collection item. Avoid adding too many CTA slots. If the editor sees six or seven CTA selectors on every post, the CMS becomes harder to use.
Connect referenced Webflow CTA fields in the blog template
In the Blog Post template, place your reusable CTA component where the fixed CTA slot should appear.
Then connect the component's properties to fields from the referenced CTA item:
- Connect CTA heading to Top CTA → Heading
- Connect CTA body to Top CTA → Body
- Connect Button label to Top CTA → Button label
- Connect Button URL to Top CTA → Button URL
- Connect CTA image to Top CTA → Image
- Use Top CTA → Variant to choose or conditionally set the component variant, depending on how your Webflow component is configured
Repeat the same process for the bottom CTA or sidebar CTA if you use multiple slots.
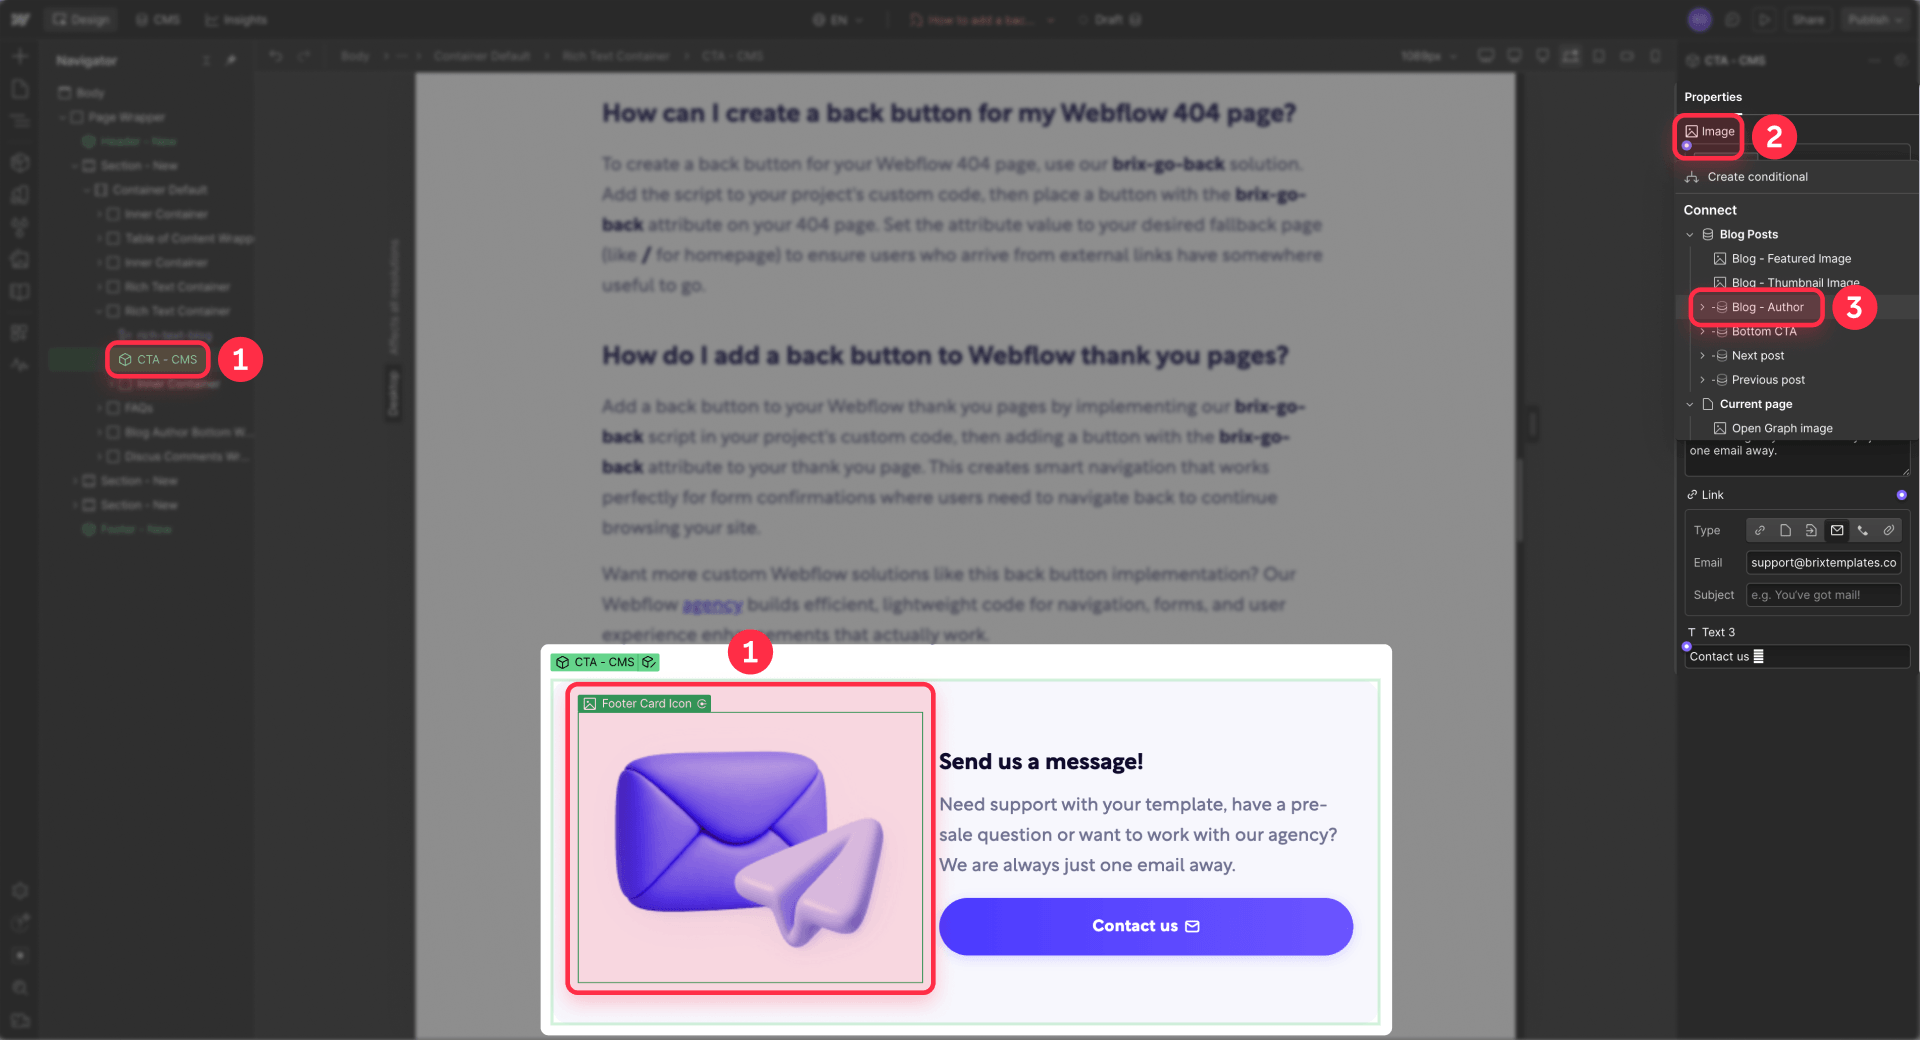
Once the CTA component and CTA Library are connected, place the component in the Blog Post template wherever it makes sense.
Hide empty Webflow CTA slots with conditional visibility
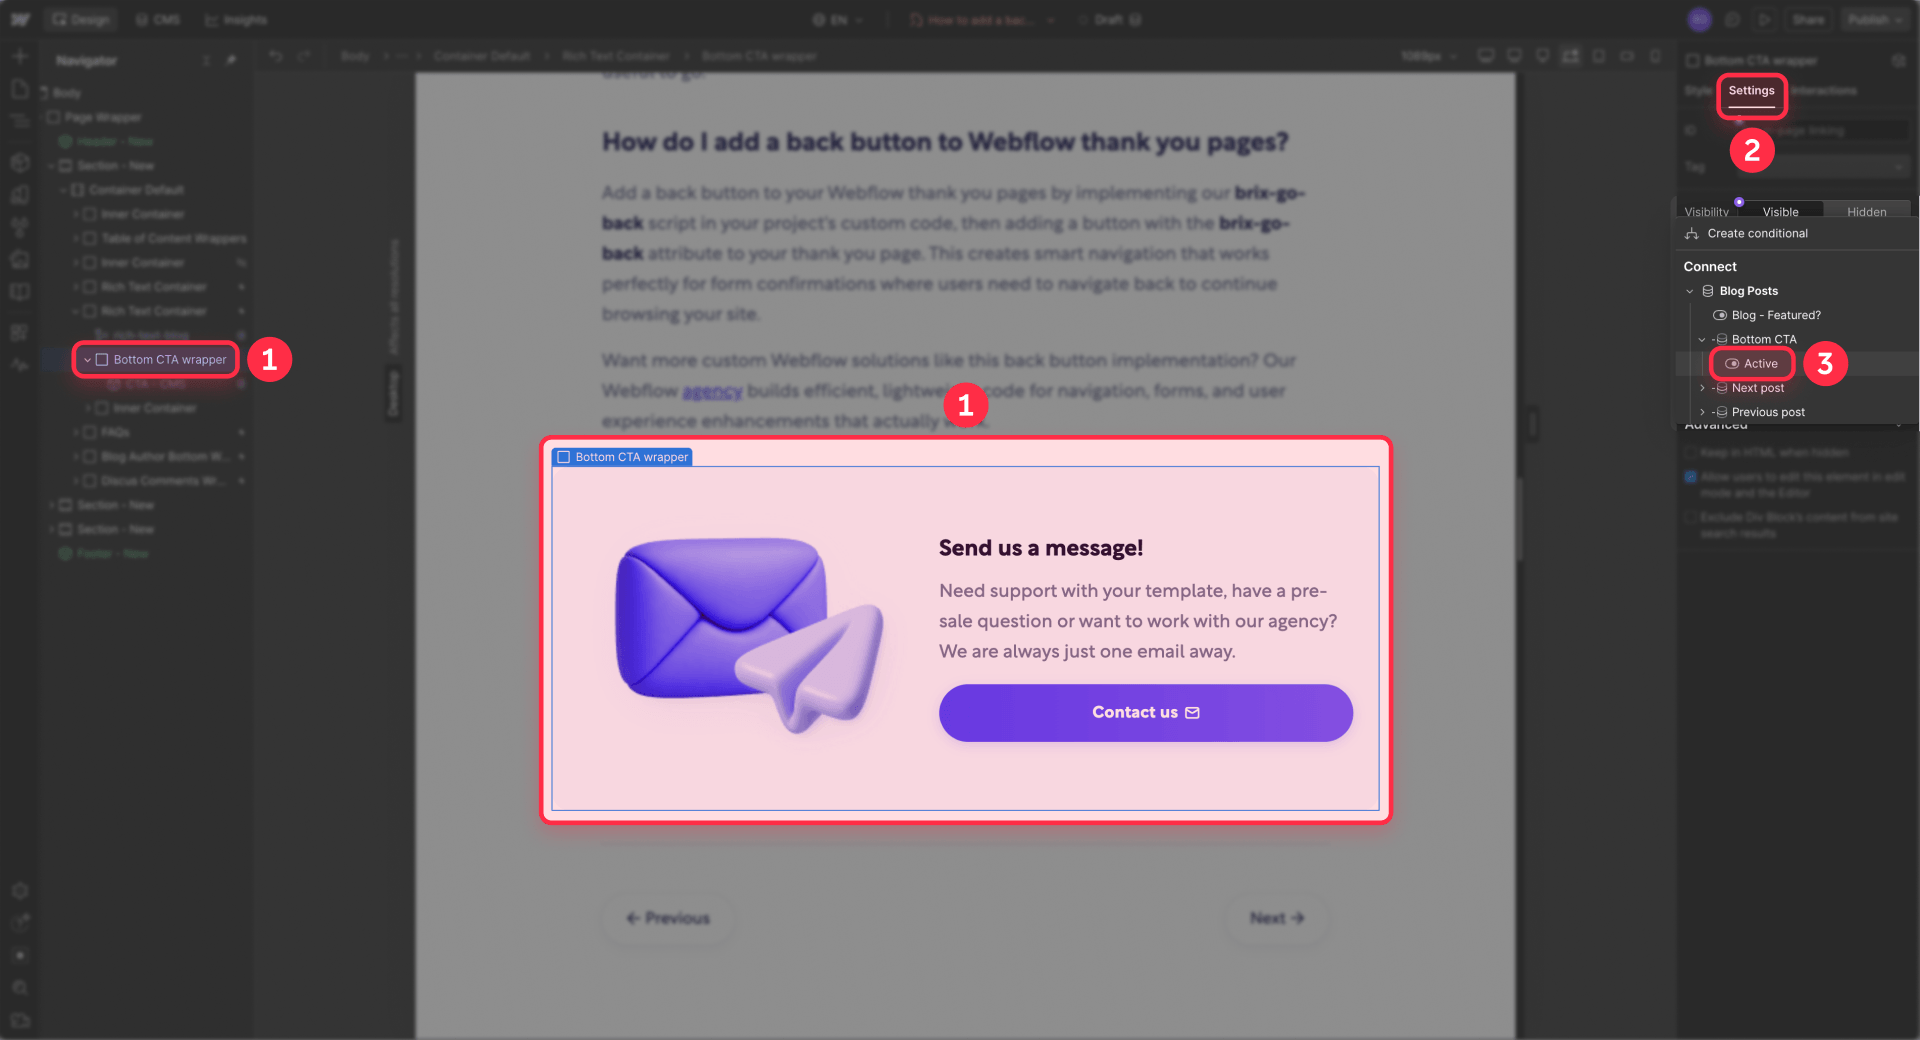
If a blog post does not have a CTA selected, hide the full CTA wrapper using conditional visibility. Set the wrapper to show only when the corresponding CTA Reference field is set. Apply the condition to the full wrapper element, not just the text or button, so empty spacing, backgrounds, or padding do not remain visible when no CTA is chosen. For a broader look at this technique across your entire site, read our guide to hiding empty CMS sections in Webflow.
Method 2: Use Finsweet Inject for inline Webflow CTA placement inside Rich Text
Use this method only when editors need to place CTAs between exact paragraphs inside one CMS Rich Text field. Unlike the native CTA Library method, this setup uses Finsweet Inject to take a CTA source element from outside the Rich Text and insert it into a specific target inside the article body.
This method has three parts: a hidden CTA source, a target Code Embed inside Rich Text, and matching Finsweet instance names.
Install the Finsweet Attributes script
The Finsweet Attributes script should be added once to the page or project where the Blog Post template loads. Add this script to your project settings or to the page-level custom code:
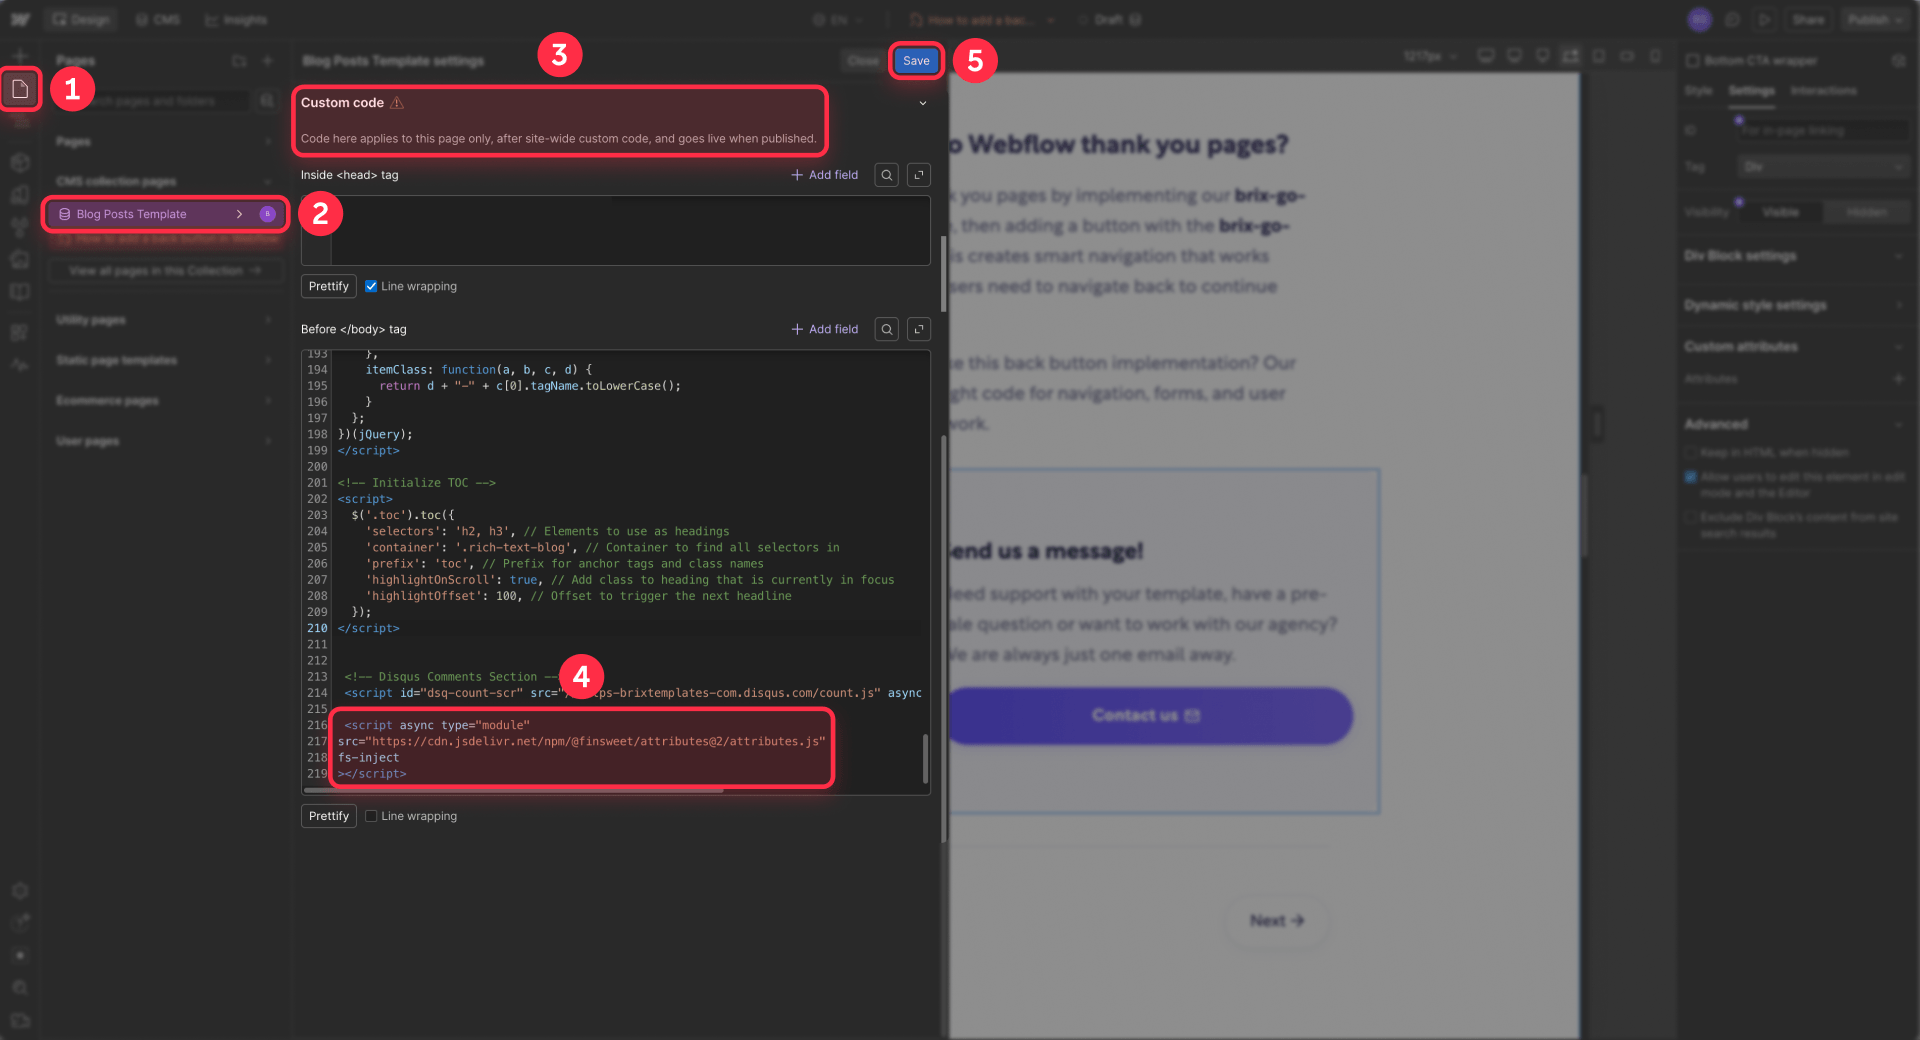
Add Finsweet source attributes to the CTA wrapper
Add the Finsweet source attributes to the CTA wrapper or source element. If Webflow does not allow custom attributes directly on a component instance, wrap the component in a div and add the attributes there.
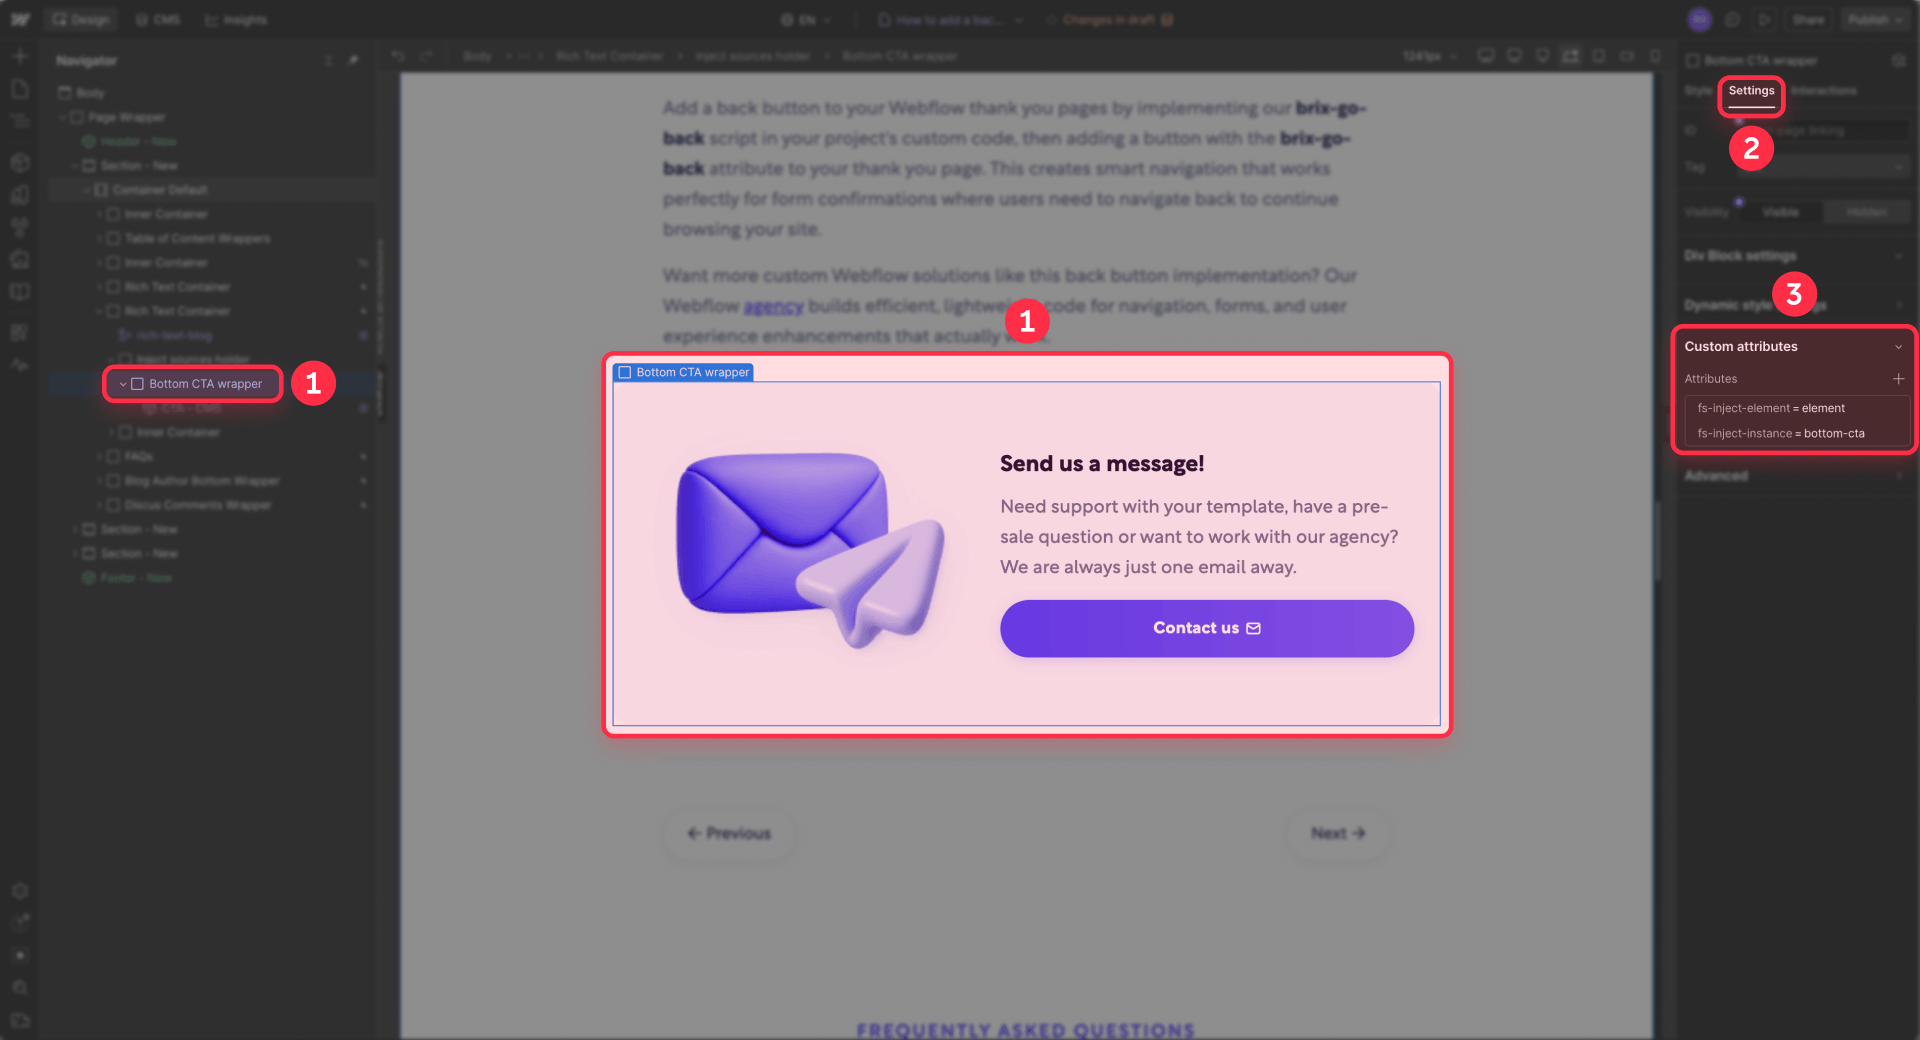
bottom-cta is a custom identifier. It can be renamed, but the same value must be used on the target Code Embed.
Create a hidden source holder for the CTA
The reusable CTA source should live outside the Rich Text. Place it in the Blog Post template using this recommended structure:
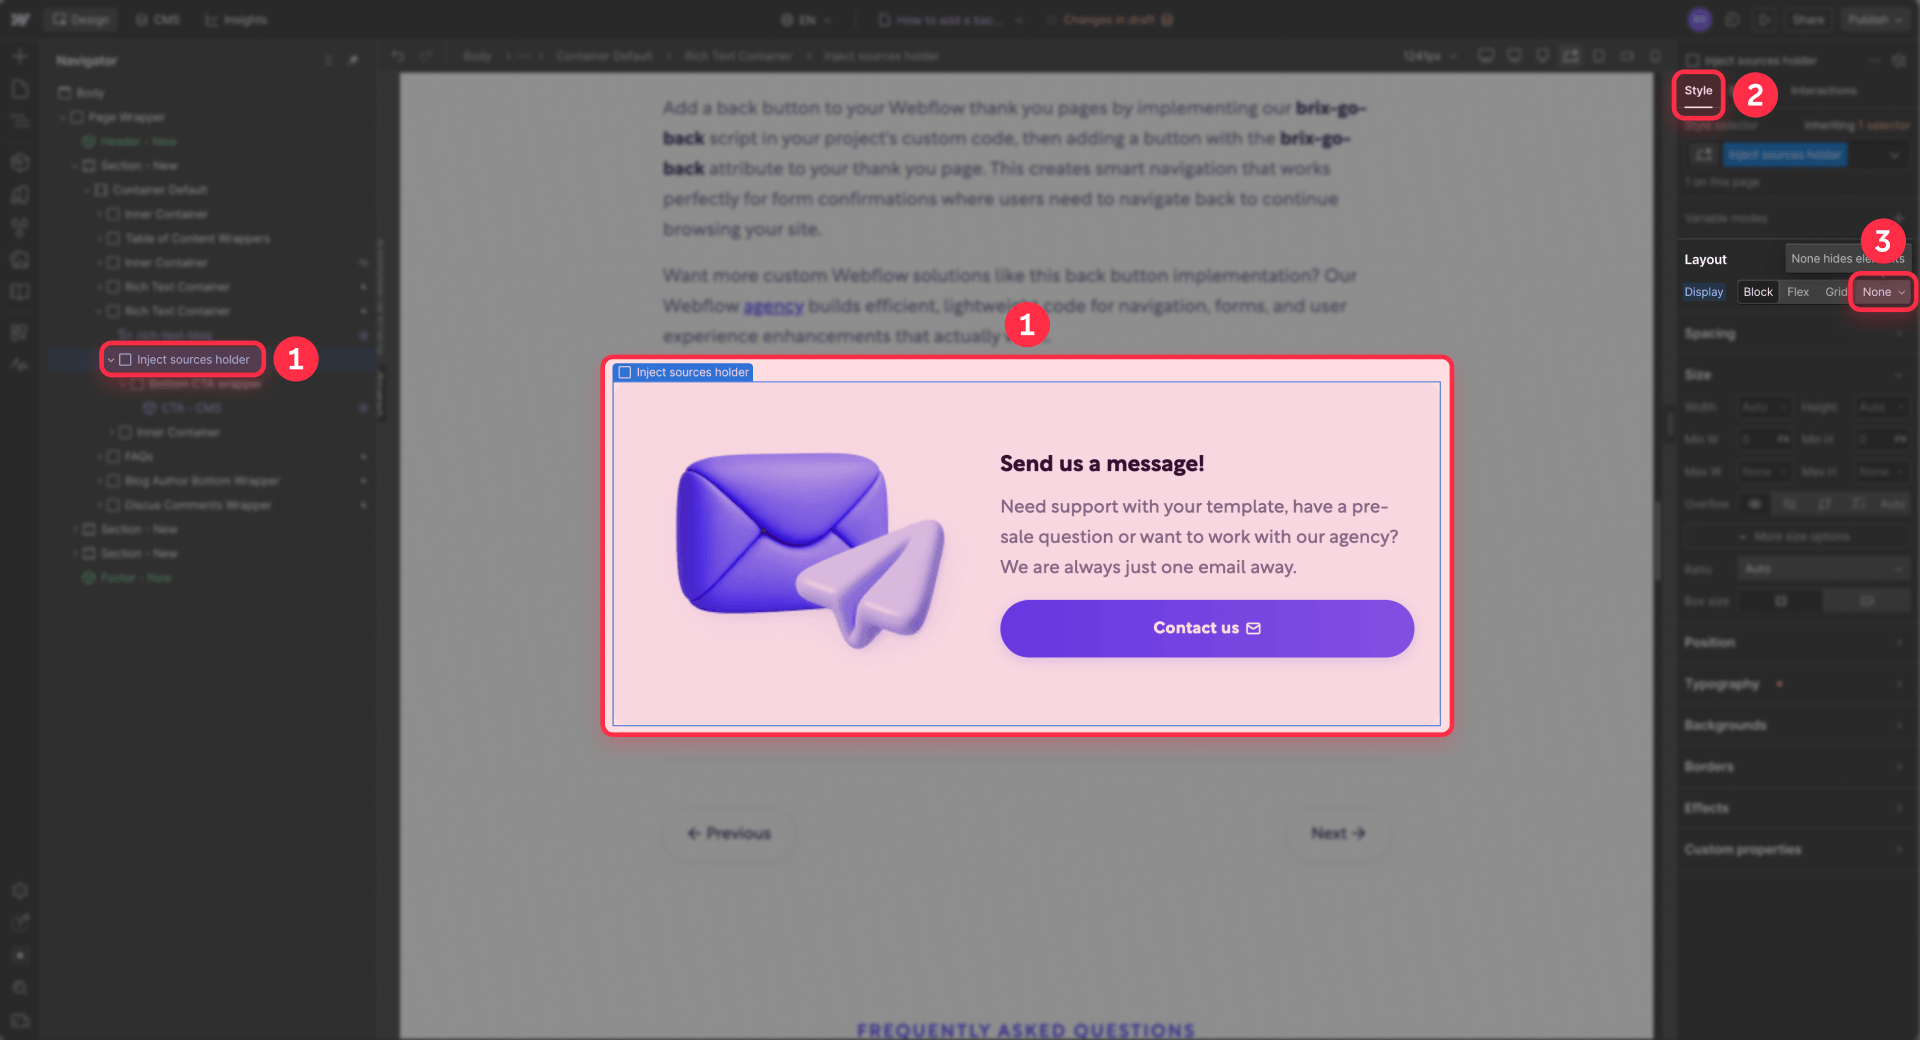
Hide the Inject sources holder so the source CTA does not appear as a duplicate on the page. The source CTA still needs to exist in the Blog Post template so Finsweet can find and inject it into the target.
Add the exact target inside Webflow Rich Text with a Code Embed
For reliable exact placement, insert a Code Embed block inside the CMS Rich Text where the CTA should appear.
Use this code inside the Code Embed:
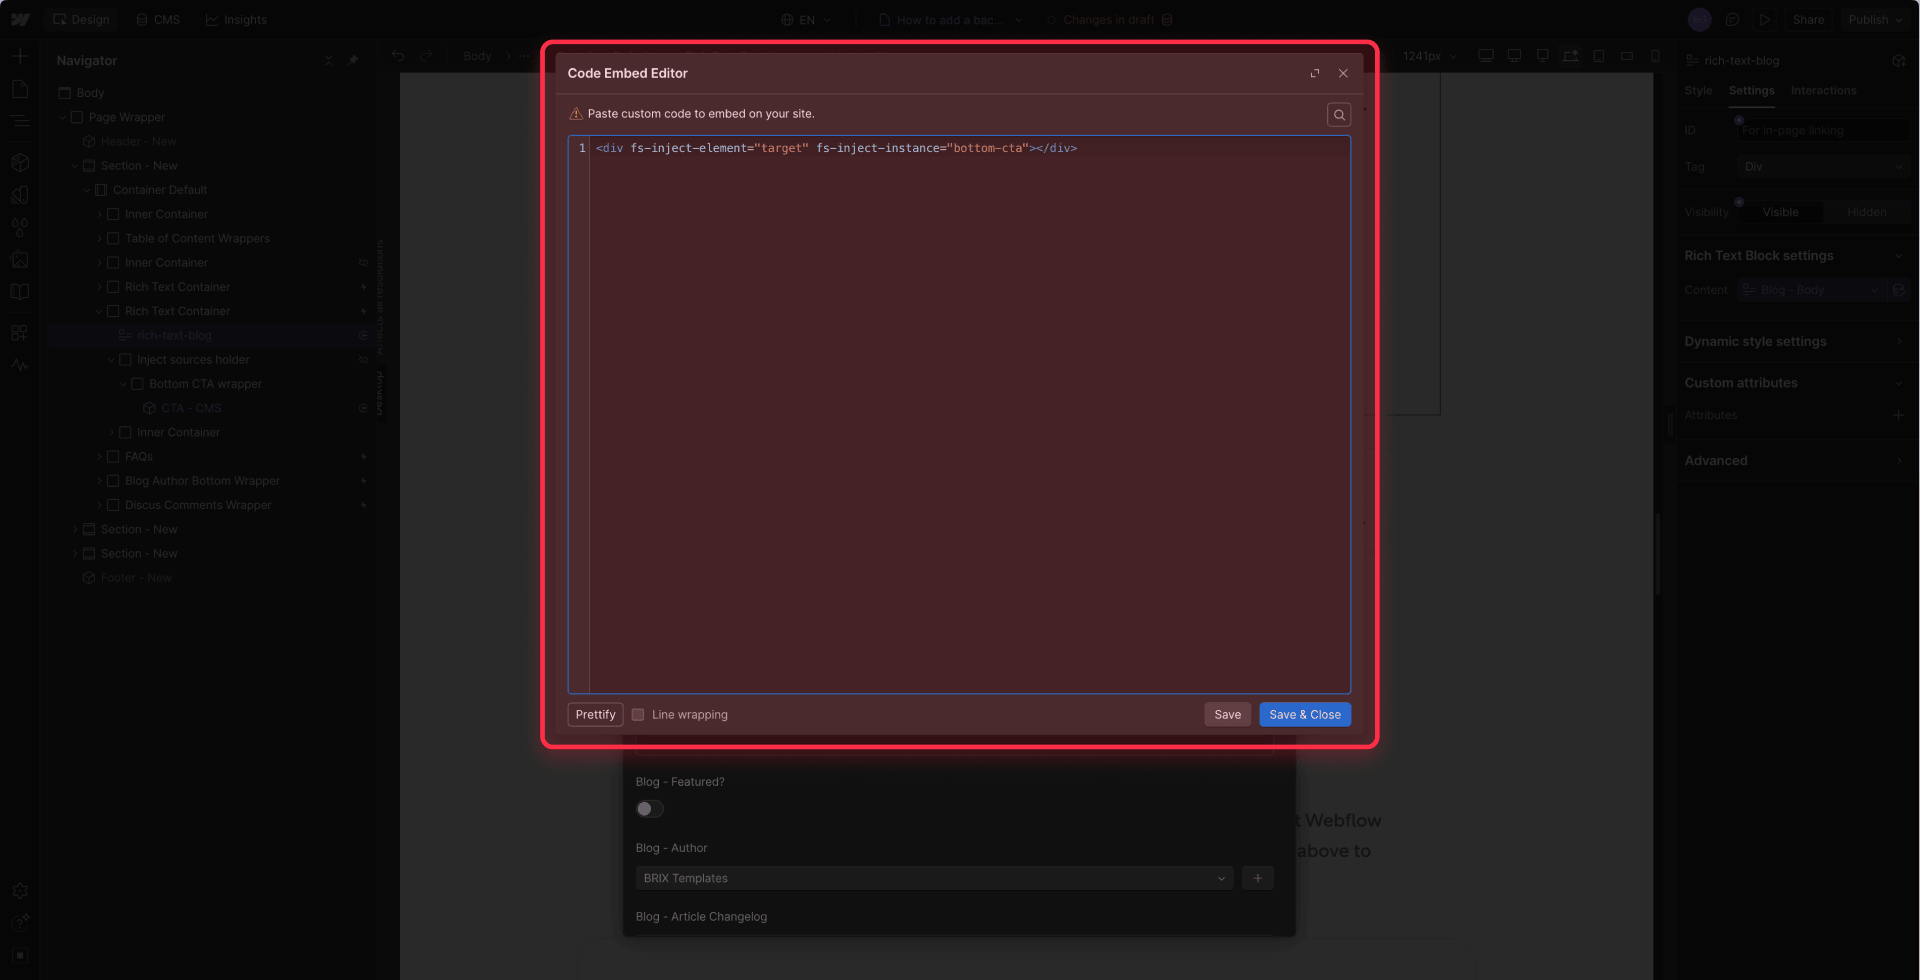
This must be inserted as a Code Embed block in the Rich Text editor, not pasted as plain text. If pasted as plain text, the code will appear visibly in the published article.
The target instance bottom-cta must match the source instance exactly.
Publish and test the Finsweet Inject setup
Finsweet Attributes must be tested on the published site, not only in Webflow Designer or Preview mode.
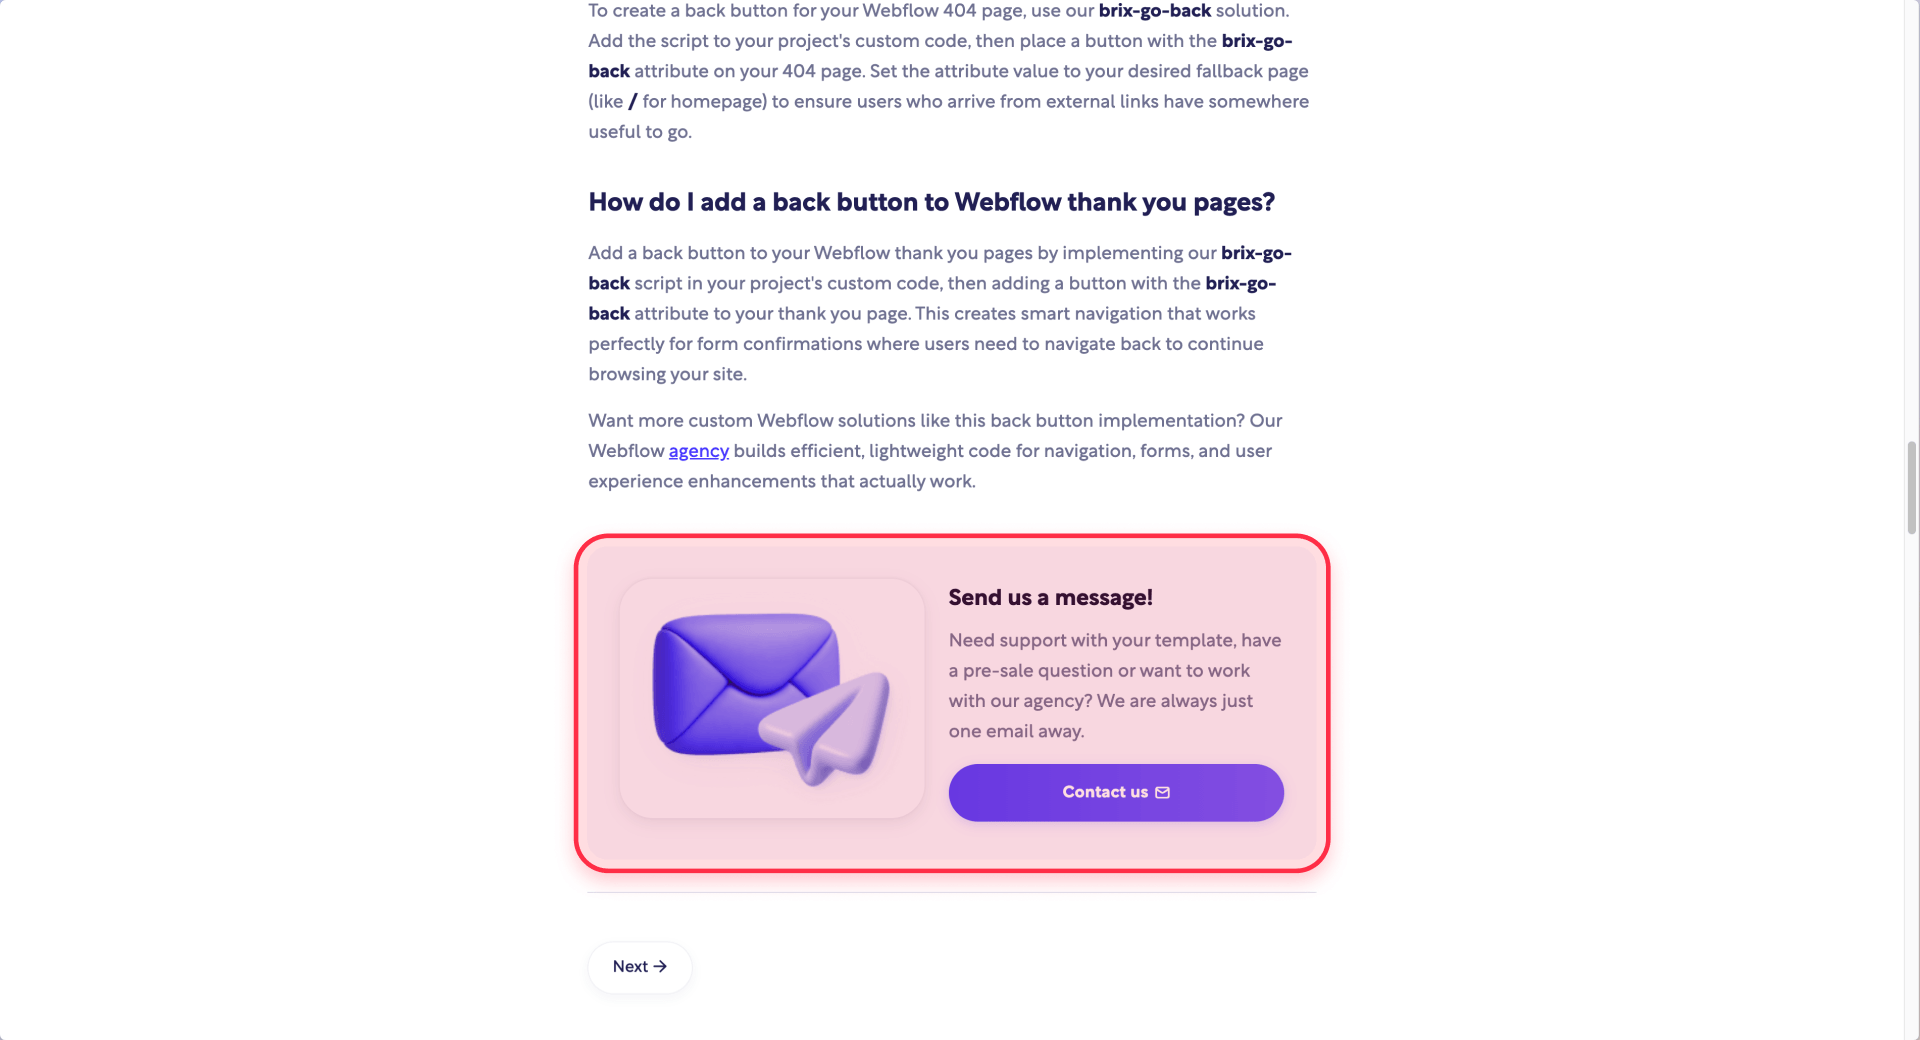
After publishing, verify:
- The embed code does not appear as text.
- The CTA appears exactly where the Code Embed was inserted.
- The original source CTA does not appear as a duplicate.
- The CTA image, text, button, link, styles, and responsive layout still work.
When to use the native Webflow method vs Finsweet Inject
Use the native CTA Library method when the CTA can appear in a fixed template position and editors only need to choose which CTA shows on each post.
Use Finsweet Inject when the CTA must appear between exact paragraphs inside CMS Rich Text.
For most Webflow CMS blogs, the native method is easier to maintain. Use Finsweet Inject only when inline placement is required.
Troubleshooting reusable Webflow CTA blocks
- The Webflow CTA slot is blank but still taking space. Check that conditional visibility is applied to the full CTA wrapper, not just the inner text or button. Confirm the condition is based on the relevant Reference field, such as Top CTA is set. Preview a post with no CTA selected and verify the wrapper disappears completely, including any background colors or padding.
- The Webflow CTA content is not pulling from the CTA Library. Confirm the Blog Post item has a CTA selected in the correct Reference field. Then check each component property and make sure it is connected to the referenced CTA field, not to the Blog Post field directly. A common mistake is connecting a component property to the wrong Collection's field.
- The Webflow CTA design changes are not updating everywhere. Make sure you edited the main component, not an unlinked or duplicated version. Changes to the main component should propagate to all its instances. Instance properties control unique content per instance, so style changes must be made on the main component to take effect globally.
- The Finsweet Inject CTA appears twice on the published Webflow page. The source CTA is still visible in the template. Move it into a hidden Inject sources holder so only the injected copy appears.
- The Finsweet Inject code appears as visible text in the article. The target code was pasted into Rich Text as plain text instead of inserted as a Code Embed block. Delete the plain text, insert a Code Embed block at the same position, and paste the targetv> inside it.
Frequently asked questions about reusable CTAs in Webflow CMS
What is a reusable CTA block in Webflow CMS?
A reusable CTA block in Webflow CMS is a designed call-to-action section that can appear across multiple blog posts without recreating the layout each time. It usually includes a heading, short message, button, link, and optional image. The cleanest setup is to build the design as a Webflow component, store the content in a separate CTA Library Collection, and connect the two using Reference fields. This keeps the design consistent while allowing each blog post to display a relevant offer. For most teams, reusable CTA blocks work best as fixed template slots with conditional visibility so empty sections stay hidden.
How do I add a CTA button inside a Webflow CMS blog post?
The simplest way to add a CTA button inside a Webflow CMS blog post is to place a CTA component in the Blog Post template and connect its text and link to CMS fields through a Reference field pointing to a CTA Library. This gives editors a dropdown to choose which CTA appears on each post. If the CTA must appear inside the Rich Text body rather than in a fixed template position, use Finsweet Inject with a Code Embed target inside Rich Text to place it between specific paragraphs. Avoid asking editors to paste raw button HTML unless they are technical and comfortable maintaining code. A button usually works better as part of a small CTA block with context, such as a heading and one sentence of supporting copy.
Can I insert Webflow components inside CMS Rich Text?
Not natively. Webflow Rich Text fields support formatted article content, media, code blocks, and code embeds, but reusable Webflow components are not currently listed as a native insertable Rich Text content type. There is an open Webflow Wishlist request for this capability, but until it is available, the practical workaround is to place component instances in the Blog Post template and connect them to CMS fields using Reference fields. For true inline placement inside Rich Text, the community uses Finsweet Inject, which uses a Code Embed target to inject a CTA source element at specific positions within the article body.
What is the difference between Webflow Reference fields and Finsweet Inject?
Webflow Reference fields connect one CMS Collection item to another, such as a Blog Post referencing a CTA Library item. They are best for fixed CTA slots where the editor chooses which CTA appears but the template controls where it appears. Finsweet Inject is different: it injects a designed element into a specific position inside Rich Text, controlled by a Code Embed target the editor places in the article body. Reference fields solve content management and selection. Finsweet Inject solves inline placement precision. Use Reference fields when editors only need to choose which CTA appears, and use Finsweet Inject when editors also need to choose exactly where the CTA appears inside the article.
How do I hide empty CTA sections with conditional visibility in Webflow CMS?
To hide empty CTA sections in Webflow CMS, apply conditional visibility to the entire CTA wrapper element in the Blog Post template. For each optional CTA slot, set the condition so the wrapper is visible only when the corresponding Reference field is set. This prevents blank backgrounds, padding, and spacing from showing when no CTA is selected. Do not apply the condition only to the button or text, because the outer section may still take up space even when the inner content is hidden. Apply the condition at the wrapper level so the entire CTA block, including its container styling, disappears when no CTA is chosen.
What fields should a Webflow CTA Library include?
A Webflow CTA Library should include only the fields editors need to manage reusable offers. Start with CTA name (internal label), eyebrow (optional small label), heading (main headline), body (supporting copy), button label, button URL, image (optional visual), variant (style option like primary, newsletter, or resource), campaign type (demo, newsletter, download, webinar, product), and active status (switch to hide outdated offers). Keep design choices inside the component, not the CMS. Editors can choose a variant, but they should not manually control padding or typography. A simple CTA Library is easier to maintain and safer to hand off to clients.
Which Webflow CTA setup works best for client handoff?
For client handoff, the best Webflow CTA setup is a CTA Library connected to Blog Posts with Reference fields and displayed through fixed template slots with conditional visibility. This gives clients a simple editing workflow: create or update CTA items in one place, then choose the right CTA for each post from a dropdown. Unused slots stay hidden automatically. Only introduce Finsweet Inject if the client truly needs inline placement and can follow Code Embed instructions. For most client sites, native fixed CTA slots are easier to explain, safer to edit, and more reliable long term because they do not depend on third-party scripts or published-site testing.
Conclusion: Keep your Webflow CMS CTA system reusable and simple
A good reusable CTA system in Webflow should protect the design, keep the CMS easy to edit, and avoid turning every article into a manual layout task. Start with native fixed CTA slots, connect them to a CTA Library with Reference fields, and use conditional visibility so empty sections stay hidden.
Use Finsweet Inject only when editors need exact inline placement inside CMS Rich Text. That gives you flexibility without making the entire blog system depend on an advanced workaround.
If you need help building a scalable CMS, reusable components, CTA systems, or custom blog workflows in Webflow, BRIX Templates' Webflow agency team can help design and develop the right setup for your site.










Join readers commenting on this post!