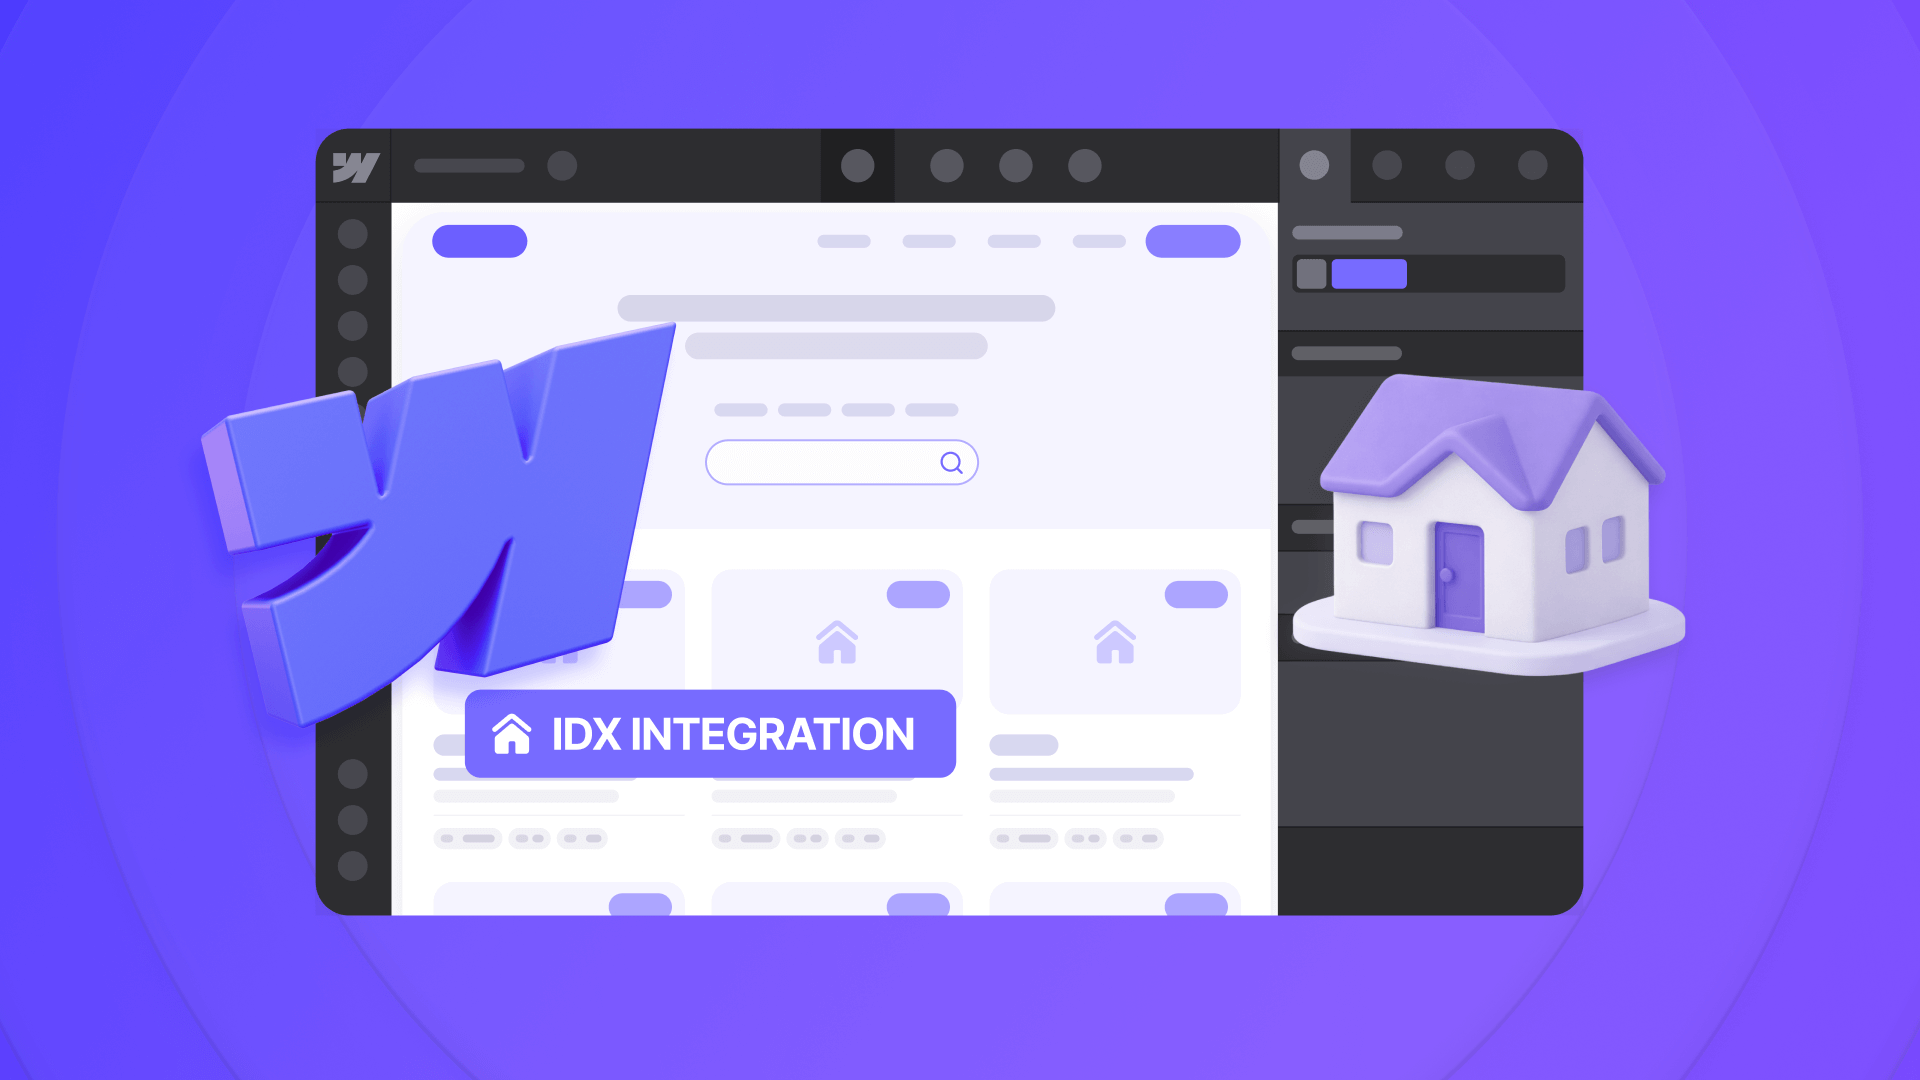
Real estate professionals face a frustrating dilemma: they want the design flexibility and modern feel of Webflow, but they also need live MLS listings on their sites. The problem is that Webflow doesn't connect to MLS databases directly — and many agents waste hours searching for an "IDX button" that doesn't exist.
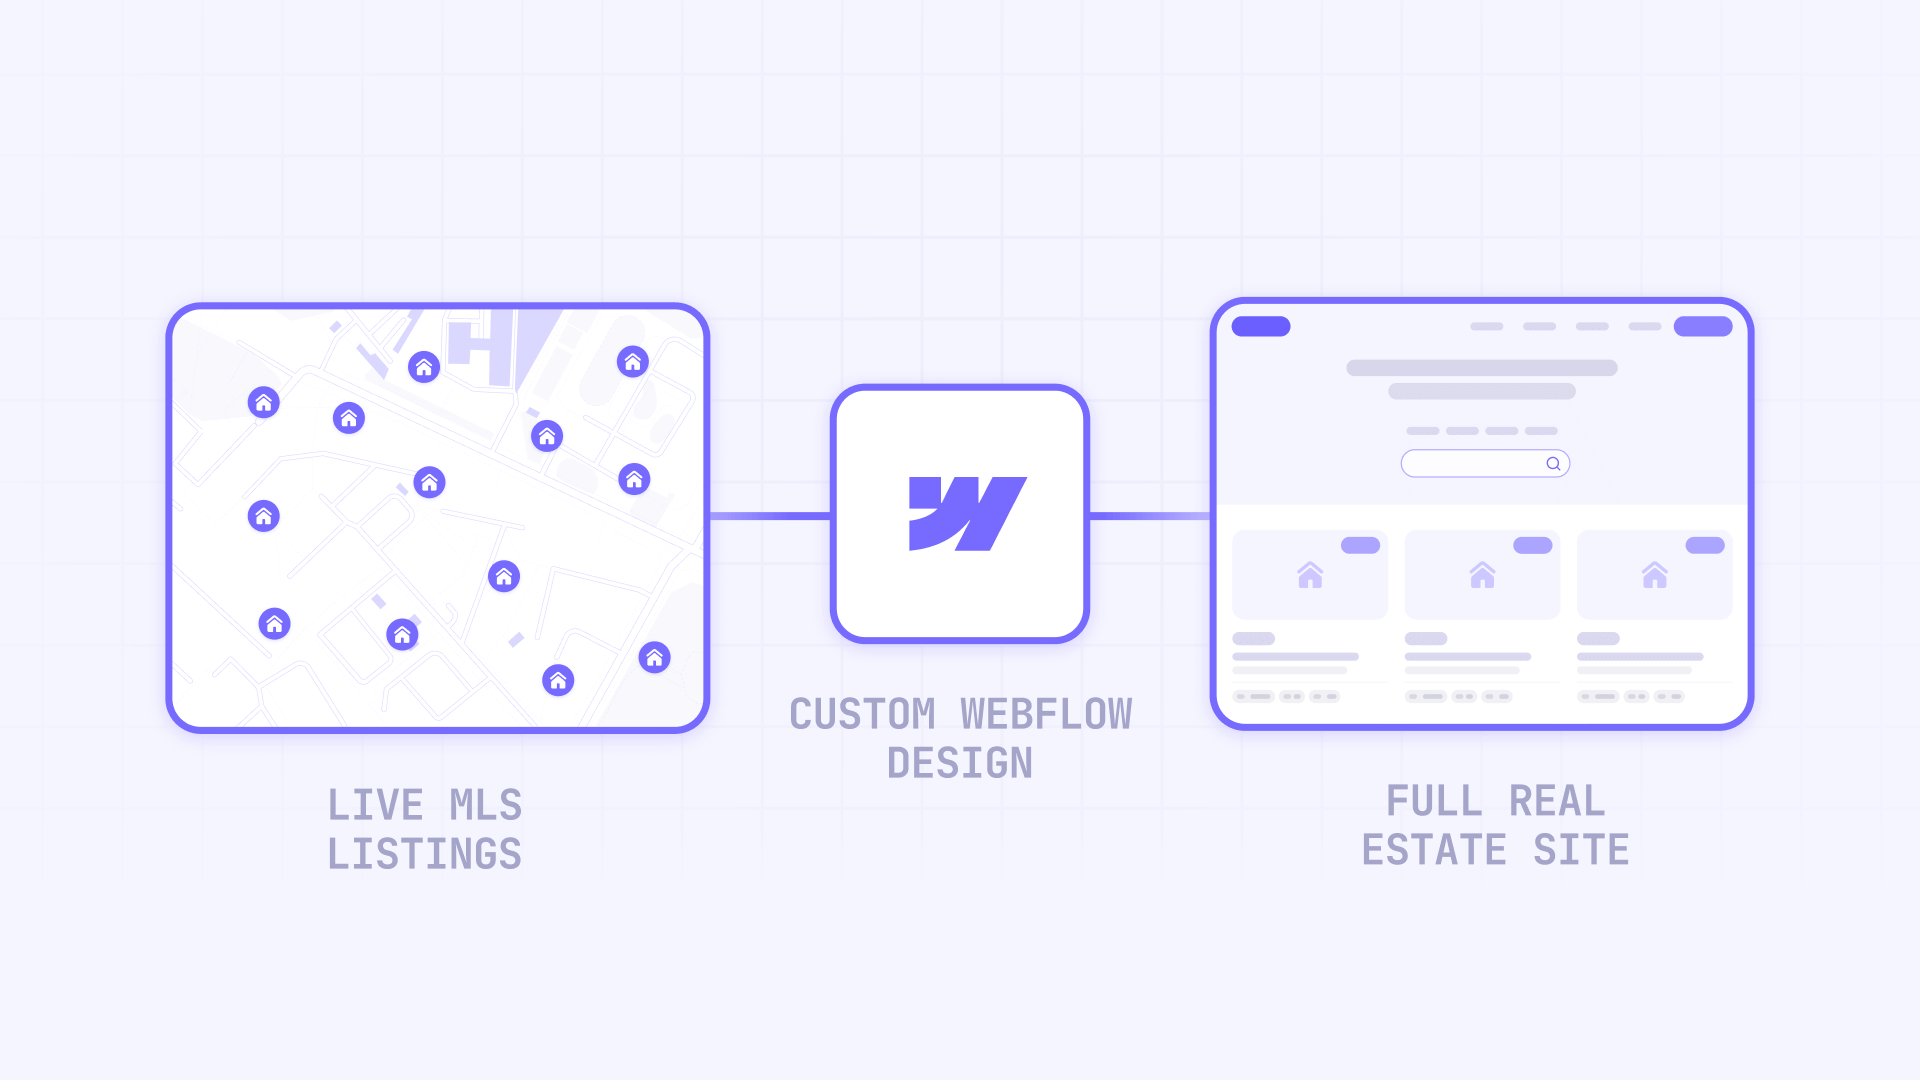
The reality is that adding IDX to Webflow requires understanding a three-part ecosystem: your MLS membership, an IDX provider, and your Webflow site working together. Once you grasp this relationship, implementation becomes straightforward rather than mysterious.
This guide walks you through the complete process — from understanding what IDX actually means to implementing widgets or wrapper pages, handling the technical gotchas, and troubleshooting common issues along the way.
Why IDX matters for Webflow real estate sites
Understanding why this integration is worth the effort helps you make better decisions about which approach to take and how much to invest in the implementation.
- Design differentiation: Most IDX-focused platforms lock you into templated designs. Webflow lets you create a distinctive brand presence while still displaying live MLS data — something template-based real estate platforms can't match.
- Lead capture integration: IDX providers include lead capture forms that feed into their CRM systems, giving you buyer intent data that generic contact forms can't provide. Someone requesting info on a specific property is a warmer lead than someone filling out a general contact form.
- Client expectations: Home buyers expect to search listings on agent websites. Without IDX, visitors leave for Zillow or Realtor.com — taking their contact information with them.
- SEO opportunities: Properly implemented IDX (especially wrapper pages) can help your site rank for local property searches, though this requires the right technical approach and realistic expectations.
- Credibility signals: Displaying live MLS data signals that you're a legitimate, active agent with current inventory access — not someone with a brochure site and outdated "featured listings."
- Mobile functionality: Modern IDX widgets provide responsive search experiences that work on phones, where most property searches now happen.
What IDX is and what Webflow can do with it
Before touching any code or settings, you need to understand the fundamental architecture of how MLS data gets from a database to your website. This isn't just background knowledge — it determines which integration approach will work for your specific situation.
Understanding IDX and MLS for Webflow sites
IDX (Internet Data Exchange) is a protocol — essentially a set of permissions and rules — that allows MLS participants to display other participants' listings on their own websites. It's not a product you install or a feature you activate. Think of it as a licensing agreement between you, your MLS, and the technology that connects them.
MLS (Multiple Listing Service) is the centralized database where agents share property information. Each region has its own MLS with its own rules, and access is restricted to licensed professionals with active memberships.
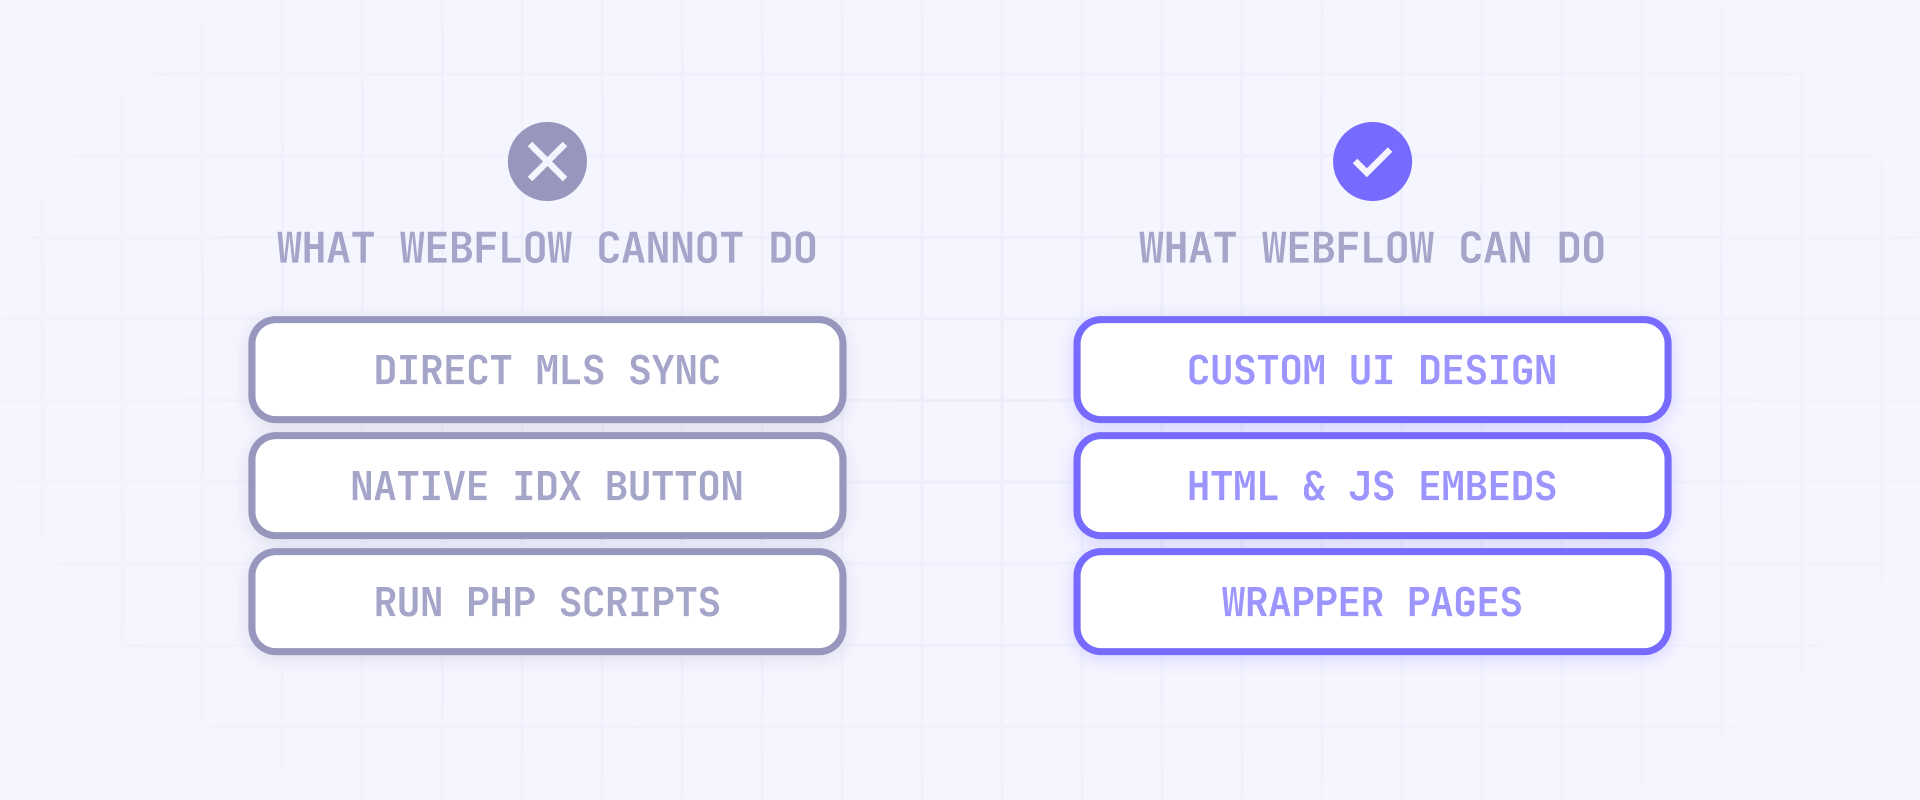
Here's the critical point that trips up most Webflow users: IDX is not something Webflow provides. Webflow is a website builder — it handles design, hosting, and publishing. It has no connection to any MLS database. You need an external IDX provider to bridge that gap.
What Webflow can and cannot do with IDX
Webflow excels at several things that make it valuable for real estate sites. You can host visually impressive websites with complete design control, insert HTML and JavaScript code from IDX providers into your pages, create wrapper pages that frame IDX content with your site's header and footer, and publish with custom domains and HTTPS, which most IDX providers require.
What Webflow cannot do is equally important to understand. It cannot connect directly to MLS databases — there's no native integration. It cannot "activate" IDX through any setting or toggle. It cannot execute server-side code like PHP or Python that some older IDX solutions require. And it cannot automatically sync MLS data to the CMS without external tools and custom development work.
MLS compliance basics you should know for Webflow IDX
Even though your IDX provider handles most compliance details, you should understand the rules that shape your implementation:
- Refresh cadence: IDX displays must refresh automatically at least every 12 hours. Your provider handles this, but it's why you can't just "screenshot listings" or cache data indefinitely.
- Attribution requirements: Listings must identify the listing firm and agent. Your provider's widgets and pages include this automatically.
- Disclaimers: Many MLSs require a "reliable but not guaranteed" notice on listing data. Again, providers typically handle this.
- No manipulation: You generally can't modify other participants' listing information — only display it as provided.
You don't need to memorize MLS policy documents. Just know that these rules exist, your provider enforces them, and that's why certain things work the way they do.
How to choose your Webflow IDX integration approach
Before diving into implementation, you need to decide which method fits your needs. Each approach has distinct trade-offs, and choosing wrong means redoing work later.
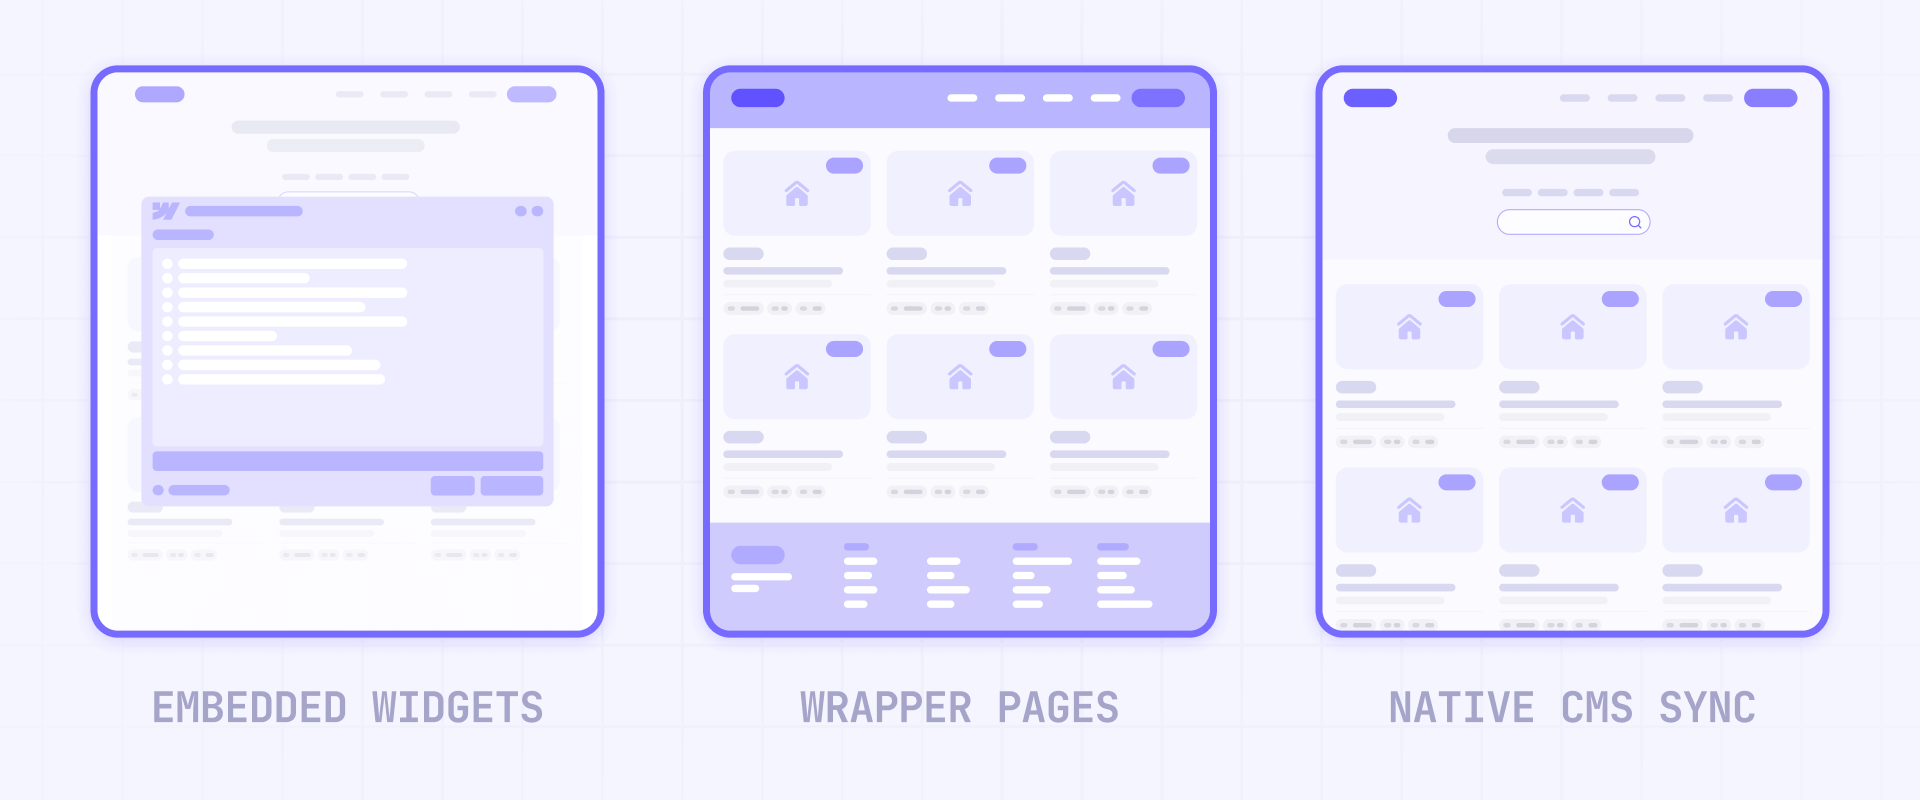
- Option A — Embedded widgets (fastest implementation): Your IDX provider gives you JavaScript code snippets. You paste these into Webflow Embed elements, and the widgets render on your published site. This works best for adding a search bar to your homepage, displaying featured listings, or embedding a map-based search. The tradeoffs: limited styling control, minimal SEO benefit if widgets use iframes, and each widget adds external scripts that can slow page load. Timeline: hours to implement once MLS approval is complete.
- Option B — Wrapper pages (better brand integration): You create a special page in Webflow containing your header and footer. The IDX provider "injects" their content between these elements. Visitors see your navigation and branding on every page, even when browsing MLS listings. This works best for full MLS search experiences, SEO-focused implementations, and professional agency sites. The tradeoffs: requires DNS configuration (subdomain setup), more complex troubleshooting, and navigation links need special handling. Timeline: days to implement, including DNS propagation.
- Option C — CMS sync (advanced, limited use cases): You pull listing data via API and create Webflow CMS items. This gives you complete design control but is only practical for small, controlled inventories (your own office listings or 10-50 featured properties). The tradeoffs: high technical complexity, Webflow CMS item limits, and ongoing maintenance burden. Timeline: weeks of development work.
Some providers like iHomefinder offer JavaScript-based implementations that claim to work without iframes or subdomains, which can simplify the wrapper approach. Worth asking about if brand consistency and SEO matter to you.
If you want the one-sentence summary: start with widgets to validate UX quickly, graduate to wrapper pages for full MLS integration, and only consider CMS sync if you have specific requirements that other methods genuinely can't meet.
What you need before adding IDX to your Webflow site
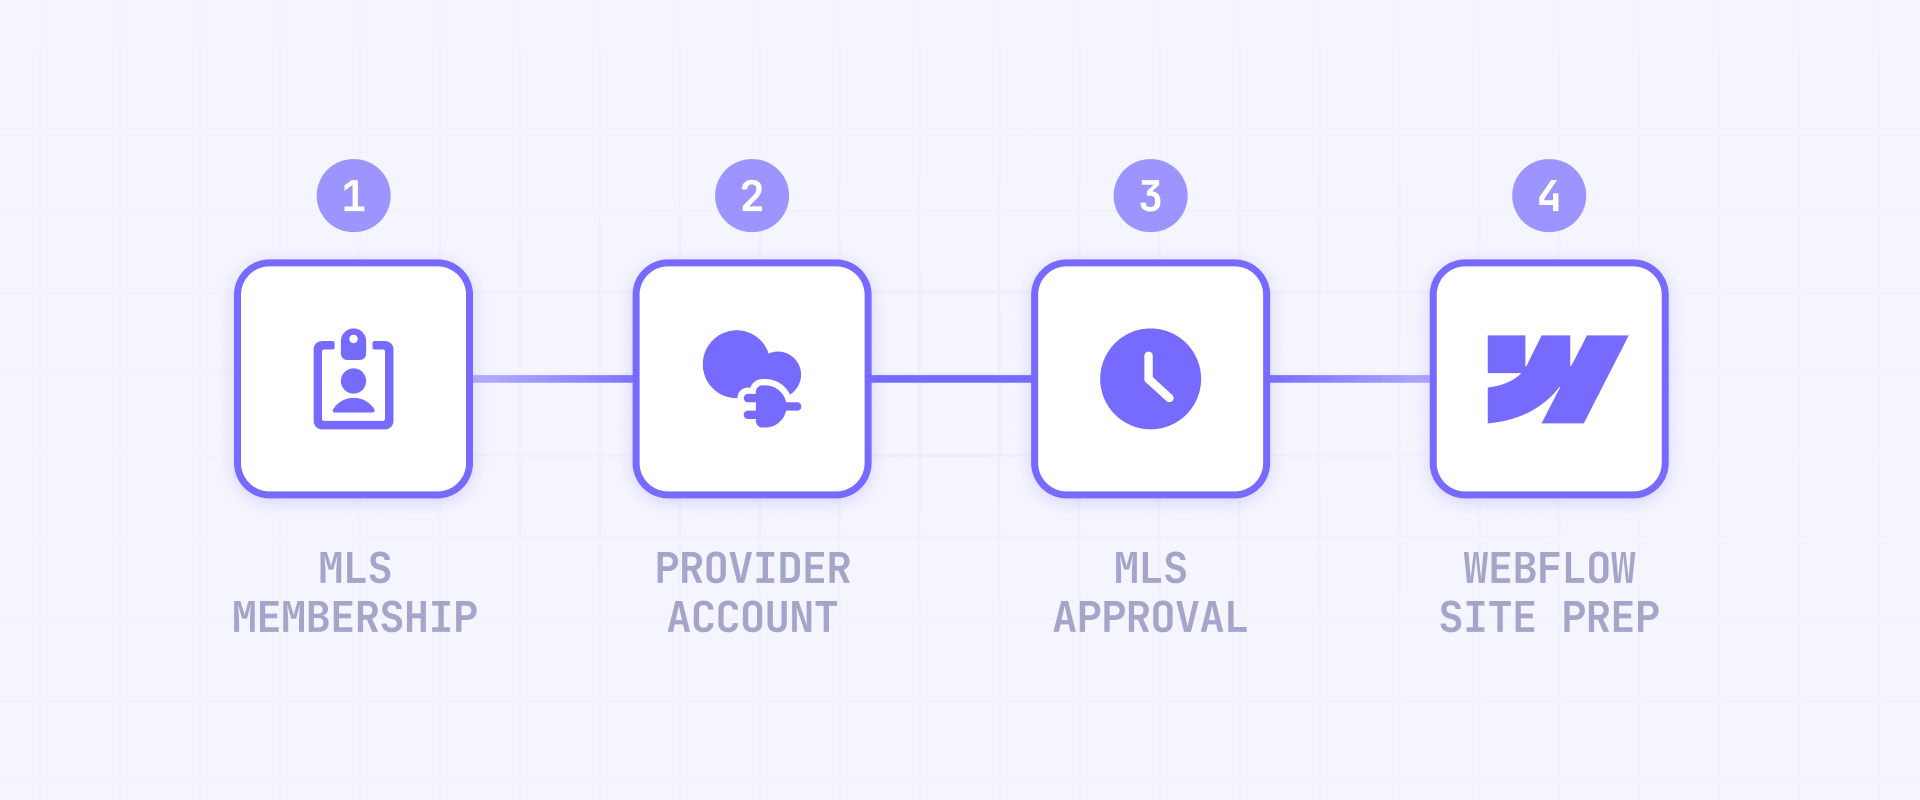
Attempting to implement IDX before completing these prerequisites leads to frustration. Your code will work, but no listings will appear because the data connection isn't authorized.
How to verify your MLS eligibility for Webflow IDX
IDX access requires MLS membership. You must be a licensed real estate agent or broker with active membership in your local MLS, or working for a brokerage that holds MLS membership and can authorize your IDX use.
Each MLS has different rules about who can display listings and how. Contact your MLS directly if you're unsure about your eligibility status.
How to choose and set up your IDX provider account
Select a provider that supports your specific MLS — not all providers cover all markets.
Common providers include:
- IDX Broker: Widely used with extensive documentation for Webflow integration
- iHomefinder: JavaScript-based implementation, claims no iframes needed
- Add On IDX: Webflow specifically mentions this provider in their documentation
- Showcase IDX: Popular with WordPress but works with any platform
- Buying Buddy: Another option with Webflow compatibility
Create your account with your chosen provider before proceeding. You'll need this account to generate widget codes and configure settings.
How to submit and wait for MLS approval
This is the step most people underestimate. Your IDX provider will submit paperwork to your MLS requesting data feed authorization. Some providers handle this entirely; others require you to submit forms directly.
Approval timelines vary dramatically — from a few days to several weeks depending on your MLS. During this waiting period, you can set up your Webflow site structure and prepare widget placements, but actual listings won't appear until approval completes. Plan for at least two weeks when setting project timelines.
How to prepare your Webflow site for IDX
Before adding IDX code, ensure your Webflow site meets these requirements:
- Custom domain connected: Most IDX providers require your site to run on your own domain, not a webflow.io subdomain.
- HTTPS enabled: Modern browsers block mixed content, and IDX scripts typically require secure connections.
- Site plan with custom code support: You need an active Site plan or a Workspace plan (Core or above) that allows custom code capabilities.
- Lead routing plan: Webflow Logic is sunset (as of June 2025), so any "IDX lead → automation" flow must be built in Zapier or Make instead of native Webflow automations.
- Saved searches strategy: Webflow User Accounts is sunset (as of January 2026), but this doesn't change much for IDX — there was never a native integration between Webflow accounts and IDX saved searches anyway. These features should live in your IDX provider's system or a third-party membership tool.
Getting these prerequisites sorted before touching any IDX code prevents the most common "why isn't this working?" moments.
Method A — Add IDX widgets to your Webflow site
This section walks through embedding IDX widgets — the quickest way to get MLS functionality on your site. The steps apply to most providers, with notes where processes differ.
Understanding IDX widget types for Webflow
Most IDX providers offer several widget types, each serving different purposes:
- Quick Search widget: A compact form (typically city, price range, bedrooms) that redirects users to a full results page
- Featured/Showcase widget: A gallery displaying selected properties — often your own listings or curated picks
- Map Search widget: An interactive map where users draw areas or click regions to find properties
- Recent Listings widget: An automatically updating feed of the newest properties in your market
Decide which widgets you need before generating code. Adding too many widgets to one page significantly impacts load time.
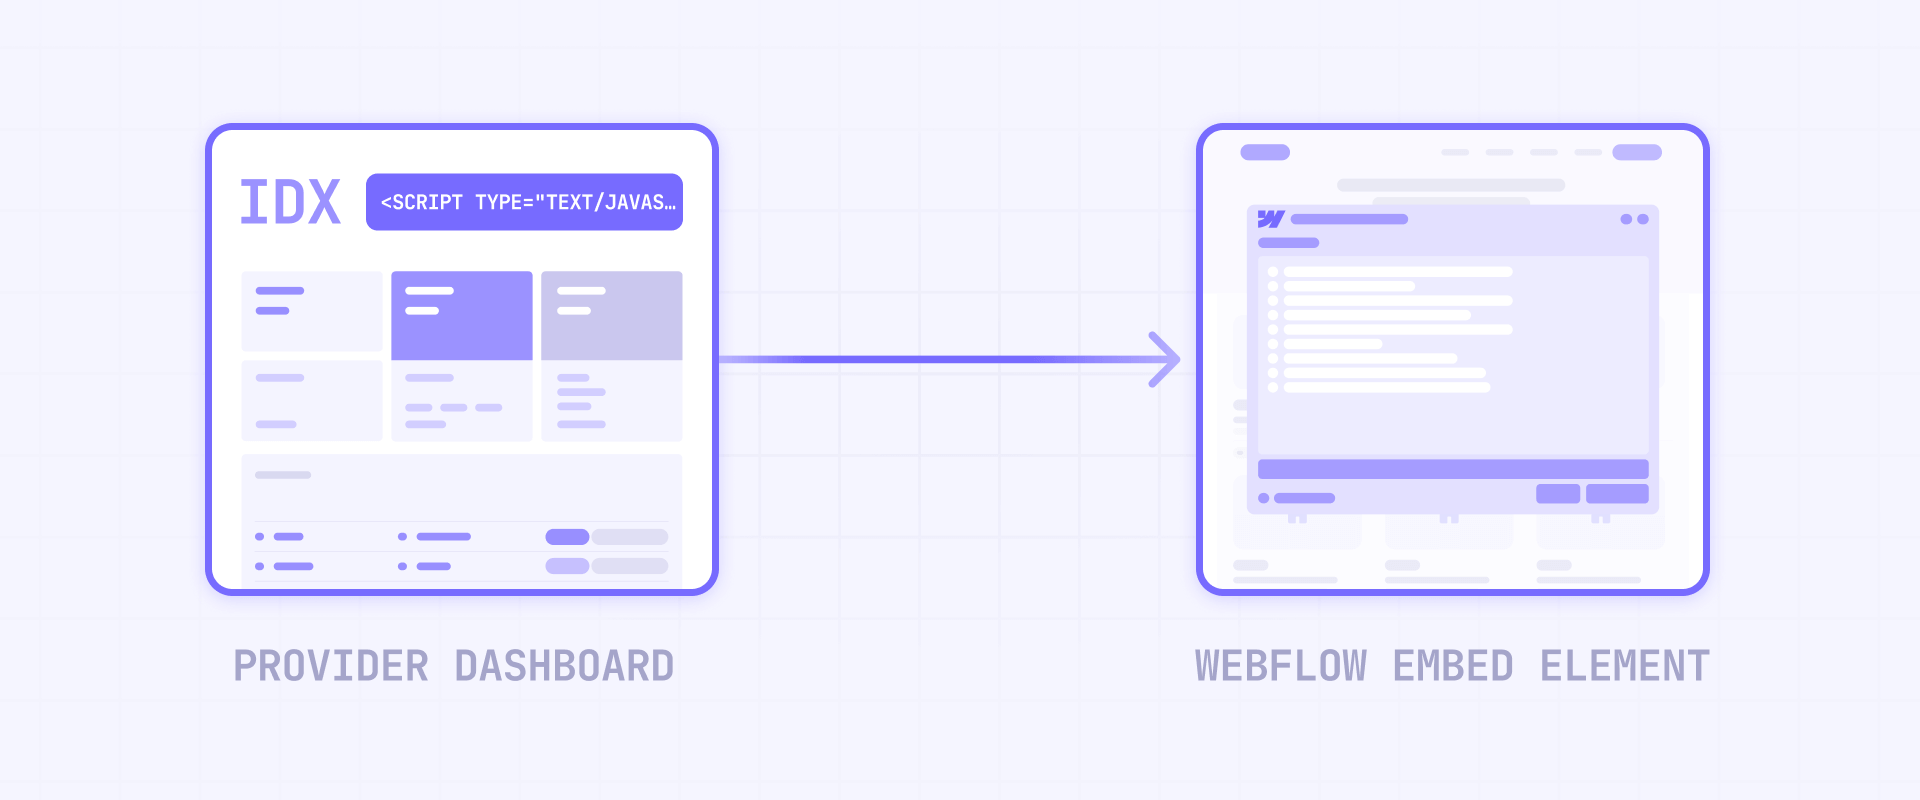
How to get your widget code from your IDX provider
The exact navigation varies by provider, but the general process is consistent:
- Log into your IDX provider dashboard.
- Navigate to the widgets or design section (often labeled Design → Widgets or similar).
- Either select an existing widget or create a new one.
- Configure the widget settings — area coverage, number of listings displayed, styling options.
- Copy the generated code.
Some providers also require a global initialization script that must go in your site's head or footer code. Check your provider's documentation for this requirement.
How to add an IDX widget to a Webflow page
With your widget code copied, you're ready to place it in Webflow:
- Open your project in Webflow Designer.
- Navigate to the page where you want the widget to appear.
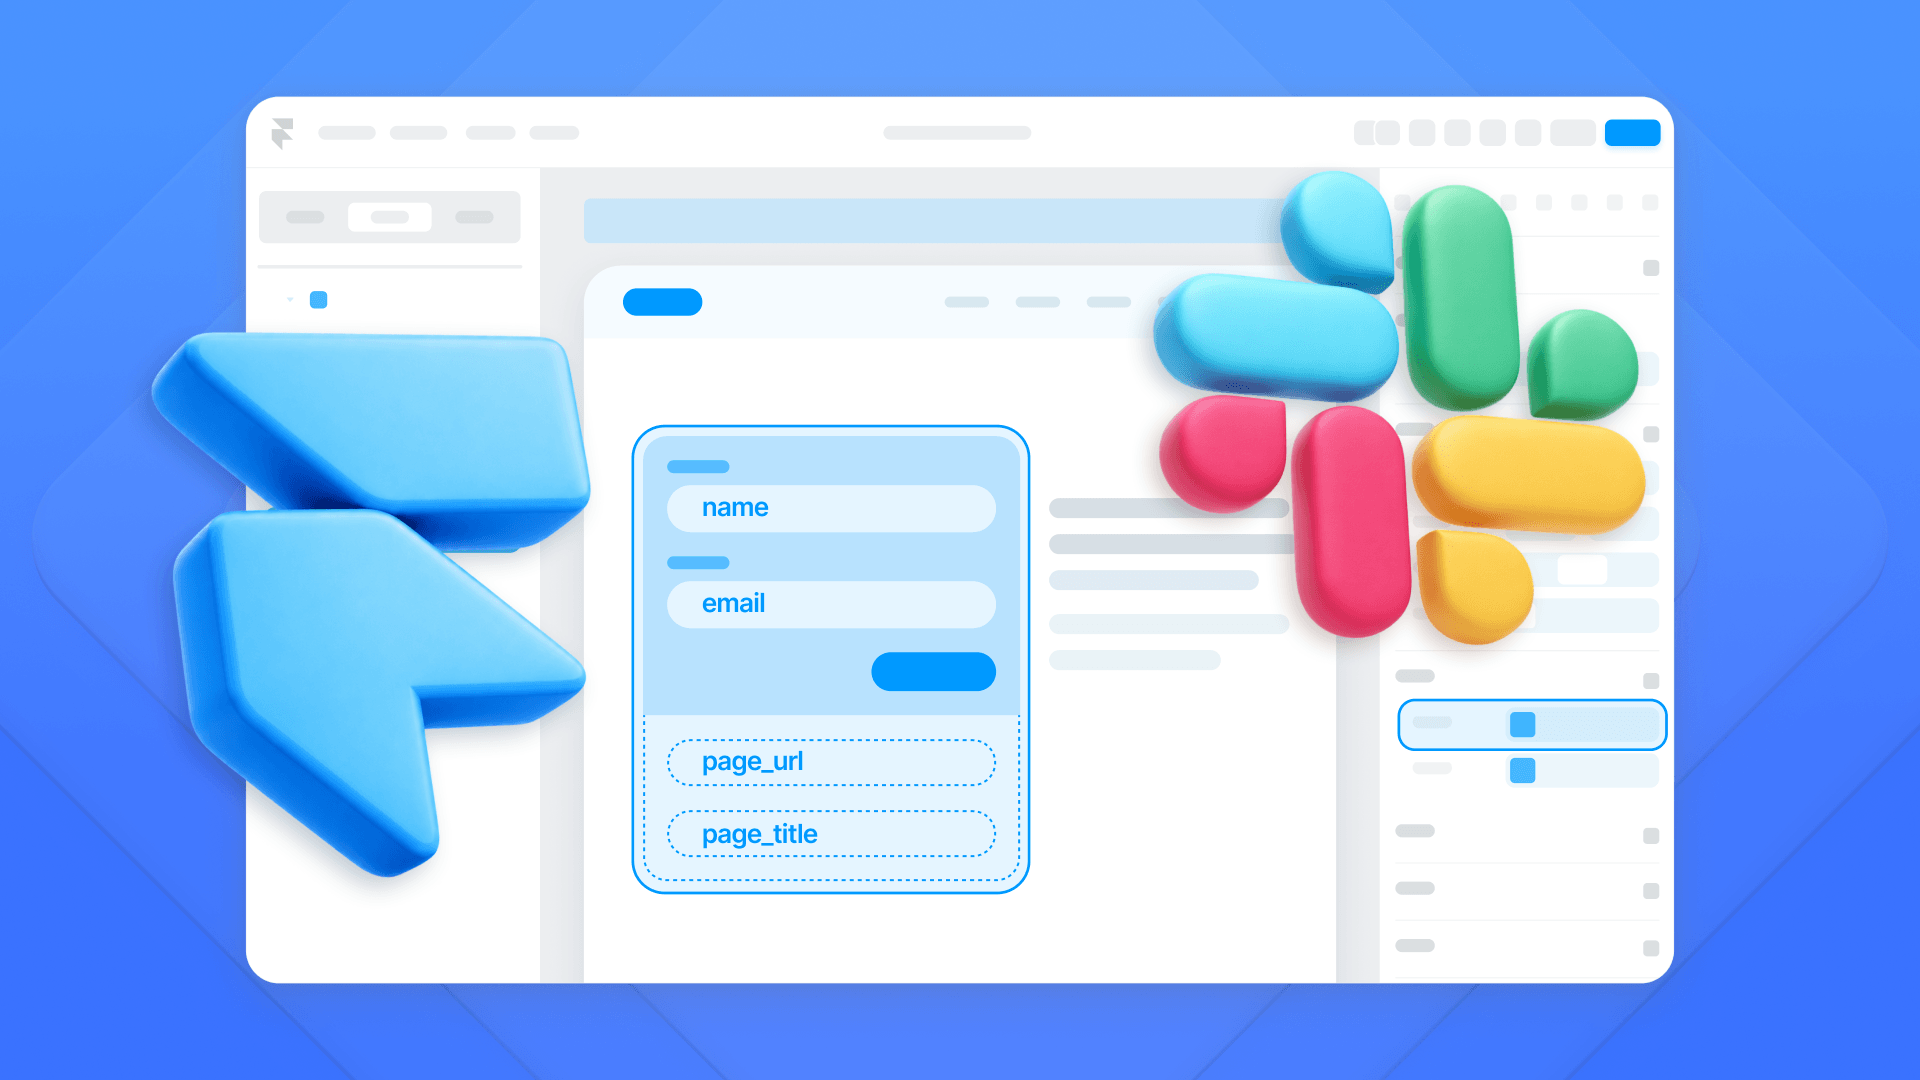
- In the Add panel (keyboard shortcut: A), scroll to Components and drag an Embed element to your desired location.
- Click on the Embed element to open the code editor.
- Paste your widget code into the HTML Embed Code field.
- Click Save & Close.
In Webflow Designer, you may see a placeholder for embeds that rely on external scripts. To see it working, enable Run custom code in Preview in Site settings → Custom code, then test in Preview mode and on the published site.
Give your Embed element's parent container a minimum height matching your widget's expected size. This prevents layout shift when the widget loads and pushes content around.
How to add global IDX scripts in Webflow site settings
Some providers need initialization code that runs on every page, separate from individual widget code.
- Go to your Project Settings (gear icon in the left panel).
- Select the Custom Code tab.
- Paste the initialization script in either the Head Code or Footer Code section.
- Click Save Changes.
Footer placement is generally better for page speed since it doesn't block initial page rendering. However, check your provider's documentation — some scripts specifically require head placement to function correctly.
After adding your code, publish your site and verify the widget appears and functions correctly on the live URL.
How to handle responsive behavior for IDX widgets in Webflow
IDX widgets don't always handle mobile screens gracefully. Test your implementation on actual mobile devices or using browser developer tools' device simulation.
If a widget displays poorly on mobile:
- Check if your provider offers a mobile-specific widget variant
- Consider hiding complex widgets on smaller breakpoints using Webflow's display settings
- Some providers allow responsive configuration in their widget settings — explore those options first
Method B — Create IDX wrapper pages in Webflow
Wrapper pages provide a more integrated experience where IDX content appears within your site's design framework. This method requires more setup but delivers better brand consistency and potential SEO benefits.
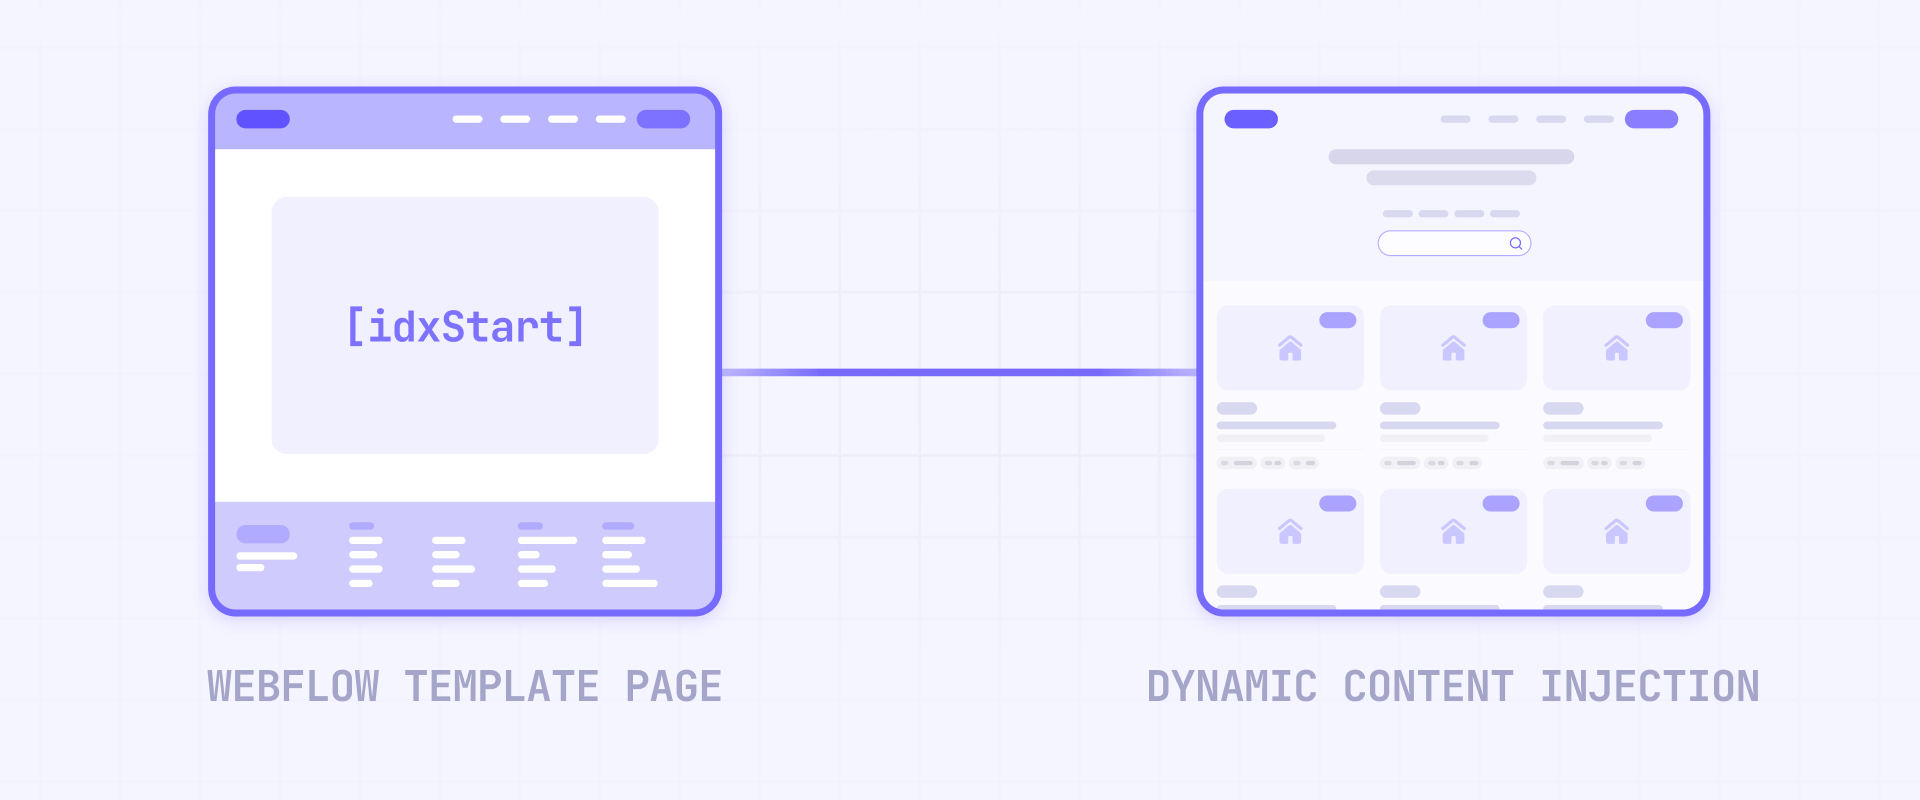
What an IDX wrapper is and why use it in Webflow
A wrapper page is a template page on your site that contains your header, footer, and an empty space in between. When someone visits an IDX URL (like a search results page), your IDX provider fetches your wrapper page and injects their content into that empty space.
The result: visitors see your navigation, branding, and footer on every IDX page, even though the listing content comes from your provider's servers.
Key benefits include consistent brand experience across all pages, URLs that are generally more indexable than iframe embeds (though this depends on provider settings), and visitors staying "on your site" visually even when browsing thousands of listings.
How to set up DNS for your Webflow IDX subdomain
IDX wrapper pages typically run on a subdomain like search.yourdomain.com or listings.yourdomain.com. This subdomain points to your IDX provider's servers, not Webflow's.
- Log into your domain registrar or DNS provider (GoDaddy, Cloudflare, Namecheap, etc.).
- Navigate to DNS settings for your domain.
- Add a new CNAME record with these values:
- Host/Name: Your chosen subdomain (e.g., search or listings)
- Points to/Value: Your provider's subdomain server (check your provider's documentation for the exact value)
- Save the record.
Important for Cloudflare users: Set the proxy status to DNS only (gray cloud icon, not orange). Cloudflare's proxy can interfere with IDX provider functionality.
DNS propagation can take up to 24-48 hours, though it's often faster. You can verify propagation using online tools like whatsmydns.net.
How to create the wrapper page in Webflow Designer
Your wrapper page needs specific elements for the IDX provider to recognize where to inject content.
- In Webflow Designer, create a new page (e.g., name it idx-wrapper with slug /idx-wrapper).
- Do not add this page to your navigation — it's a template, not a destination page visitors should see directly.
- Add your site's header/navbar (you can use a Component if you have one).
- Add a container or section element where IDX content will appear.
- Inside that container, add an Embed element containing the provider's start and stop markers. Check your specific provider's documentation for the exact code required — each provider uses different marker formats.
- Below the container, add your site's footer.
- Publish the page.
The structure should be: Header → Content Container (with provider markers inside) → Footer.
How to configure the wrapper in your IDX provider dashboard
With your wrapper page published, tell your IDX provider where to find it.
- Log into your IDX provider dashboard.
- Navigate to wrapper settings (typically Design → Website → Wrappers or similar).
- Select the wrapper type: Dynamic.
- Enter the full URL to your Webflow wrapper page (e.g., https://yourdomain.com/idx-wrapper).
- Choose the scope — apply globally or to specific page categories.
- Save your settings.
The provider will fetch your wrapper page and cache it. This process can take anywhere from a few minutes to a few hours depending on the provider.
How to fix relative navigation links on Webflow IDX pages
This is the most common "gotcha" with wrapper implementations. Webflow outputs navigation links as relative URLs by default (e.g., /about instead of https://yourdomain.com/about).
When your wrapper page loads on the IDX subdomain (search.yourdomain.com), those relative links point to the wrong place. Clicking your "About" link would go to search.yourdomain.com/about, which doesn't exist — resulting in a 404 error.
Solution 1 — Manual absolute URLs: Edit each navigation link in your wrapper page to use the full URL instead of a relative path. Change /about to https://yourdomain.com/about.
Solution 2 — JavaScript conversion: Add this script to your wrapper page in an Embed element to automatically convert relative links.
<script>
/**
 * BRIX Templates — Relative to Absolute Link Converter
 * ----------------------------------------------------------------------------
 * Converts relative navigation links to absolute URLs for IDX wrapper pages.
 * Prevents 404 errors when wrapper loads on IDX subdomain.
 *
 * Version: 1.0.0
 * Author: BRIX Templates
 */
document.addEventListener("DOMContentLoaded", function () {
  document.querySelectorAll('a[href^="/"]').forEach(function (link) {
    link.href = "https://yourdomain.com" + link.getAttribute("href");
  });
});
</script>
Replace yourdomain.com with your actual domain.
Solution 3 — Unlink Components: If your header and footer are Components (formerly Symbols), you may need to unlink them on the wrapper page specifically so changes don't affect your main site. Then edit the links only on that unlinked instance.
After configuration, verify everything works: visit your IDX subdomain directly, confirm your header and footer appear, verify IDX content loads in the middle section, click navigation links to confirm they go to your main domain (not 404 pages), and test the search functionality end to end.
Method C — Sync MLS data to Webflow CMS (advanced)

This approach appears frequently in Webflow community discussions as the "ideal solution." In reality, it's only appropriate for specific, limited use cases.
What CMS sync is: A way to pull listing data into Webflow's native CMS, giving you complete design control over how listings appear. You design the listing pages entirely within Webflow.
What CMS sync is not: A drop-in replacement for full IDX functionality. You won't get the full MLS inventory through this method, and interactive search would need to be built separately using Webflow's native filtering or custom development — it's not included by default.
When it makes sense: Only consider this approach if you're displaying only your brokerage's own listings (limited, controlled inventory), you need featured properties or curated showcases (10-50 listings maximum), you require complete design control that provider widgets can't deliver, and you have development resources for building and maintaining sync infrastructure.
When it doesn't make sense: Avoid this approach if you need full MLS search with thousands of listings (Webflow CMS limits vary by plan — CMS plan allows 2,000 items, Business allows up to 20,000), you don't have development resources for custom API work, or you need interactive search, saved searches, or lead capture features that IDX providers already offer out of the box.
Technical reality check: If you pursue this, you'll need to handle Webflow API rate limits (60-120 requests per minute depending on plan), build sync infrastructure using external tools, maintain that infrastructure over time, and still have a source for MLS data (typically through a provider's API anyway).
For most teams, the wrapper approach delivers 90% of the design control benefit with 10% of the complexity. If you have a genuine need for CMS sync and the resources to build it properly, our Webflow agency can help scope and implement it.
SEO and performance considerations for IDX in Webflow
Not all IDX implementations are equal when it comes to search engine visibility and site speed. Understanding these trade-offs helps you make informed decisions.
What Google can and cannot index with Webflow IDX
Iframe-embedded content: Generally not indexed. Google sees the iframe as a container pointing elsewhere, not as content on your page. If your widgets use iframes, don't expect those listings to appear in search results.
JavaScript-rendered widgets: Partially indexable. Google can render JavaScript, but results are inconsistent. Some widgets may be indexed, others not.
Wrapper pages with injected content: Best chance for indexing. Since the content appears in the page's DOM, Google can crawl and index it. However, the listing content technically lives on the provider's subdomain, which affects where the SEO value accrues.
If ranking for property-specific searches matters to you, the wrapper approach offers better SEO potential than embedded widgets.
How IDX scripts affect Webflow page speed
IDX scripts load external resources — JavaScript files, CSS, fonts, and API calls to fetch listing data. Each widget can add multiple HTTP requests and significant download weight.
Practical speed mitigation strategies:
- Place scripts in the footer rather than the head when your provider allows it
- Limit listings per widget — showing 50 properties loads much slower than showing 6. If your IDX provider supports pagination, use it instead of loading everything at once.
- Reduce widget count per page — one well-placed widget beats three competing for attention
Troubleshooting Webflow IDX integrations
Even careful implementations encounter problems. Here are the most common issues and their solutions:
- Widget not appearing on published Webflow site: Check that the code pasted completely without truncation. Open browser DevTools (F12) and look for red errors in the Console tab. Verify your provider account is fully activated and MLS approval is complete. Test the widget on a simple HTML page outside Webflow to isolate whether the issue is provider-side or Webflow-side.
- Widget appears but shows no listings: This usually means MLS approval is pending or the widget is configured for an area with no current listings. Check your provider dashboard for approval status and feed sync status. Adjust the widget's geographic coverage or filters to ensure it's looking at an area with active inventory.
- Wrapper page shows 404 or blank: DNS may not have propagated yet — wait 24-48 hours and test again. Verify the wrapper URL in your provider settings exactly matches your published Webflow page URL (including https://). Check that your provider's injection markers are present and correctly formatted in your Embed element.
- Navigation links broken on IDX wrapper pages: Relative links are pointing to the IDX subdomain instead of your main domain. Convert links to absolute URLs manually, via JavaScript, or by unlinking and editing Components specifically for the wrapper page.
- IDX styles conflict with Webflow design: Provider CSS may override your styles or vice versa. Use browser DevTools to inspect which styles are winning and add more specific selectors in your Webflow custom code.
- Mixed content warnings blocking IDX widgets: Your provider is attempting to load HTTP resources on your HTTPS page. Verify your provider account is configured for HTTPS. Contact provider support if the issue persists — they may need to update your account settings.
Frequently asked questions about IDX in Webflow
What does IDX mean for a Webflow real estate website?
IDX stands for Internet Data Exchange — a protocol that allows licensed real estate agents to display MLS property listings on their websites. For Webflow specifically, IDX means you can show live, searchable MLS data on your site, but you need an external provider to make this happen. Webflow handles your site's design and hosting while the IDX provider handles the MLS data connection and search functionality. The provider typically gives you widgets or wrapper pages that integrate into your Webflow design.
Does Webflow support IDX natively or do I need a separate provider?
Webflow does not support IDX natively. There's no built-in MLS connection or IDX toggle in Webflow's settings. You need an external IDX provider like IDX Broker, iHomefinder, or Add On IDX that maintains connections with MLS organizations. These providers give you code to embed in Webflow, essentially bridging the gap between your Webflow site and MLS databases. This separation actually provides flexibility — you can switch providers without rebuilding your entire site.
How long does MLS approval take before listings appear on my Webflow site?
MLS approval timelines range from a few days to several weeks depending on your specific MLS organization. Some MLSs process approvals quickly while others have extensive review procedures. Many IDX providers handle the paperwork submission on your behalf, which can streamline the process. While waiting, you can build your Webflow site structure and place widget embed elements, but actual listing data won't display until your MLS grants approval. Plan for at least two weeks when setting project timelines.
What's the difference between IDX widgets and wrapper pages in Webflow?
Widgets are code snippets you embed on specific Webflow pages — they display search forms, featured listings, or maps within your existing page design. Wrapper pages are template pages containing your header and footer where the IDX provider injects full search results and property detail pages. Widgets offer faster setup with limited design control; wrappers provide better brand consistency and SEO potential but require DNS configuration. Choose widgets for simple implementations and wrappers for comprehensive MLS search experiences.
Will IDX iframe widgets get indexed by Google on my Webflow site?
Generally no. Google has difficulty indexing content inside iframes because that content technically exists on another domain. If SEO for individual listings matters to your marketing strategy, iframe-based widgets won't help. JavaScript-based widgets offer slightly better indexing potential, and wrapper pages provide the best chance for listing content to appear in search results. Ask your provider whether their widgets use iframes and consider the wrapper approach if search visibility is a priority.
Where do I paste IDX code in Webflow: Embed element or site settings?
It depends on the code type. Individual widget code goes in Embed elements placed directly on pages where you want widgets to appear. Global initialization scripts that must run on every page go in Project Settings → Custom Code, either in the head or footer section. Many providers require both — a site-wide initialization script plus page-specific widget code. Check your provider's documentation for specific placement requirements; incorrect placement is a common cause of widgets failing to load.
Why does my IDX widget show a gray box in Webflow Designer?
Webflow Designer doesn't always execute third-party JavaScript during editing, so you may see a placeholder for embeds that rely on external scripts. To see the widget working, enable Run custom code in Preview in Site settings → Custom code and test in Preview mode, or publish and view the live site. If the widget still doesn't appear after publishing, check browser developer tools for JavaScript errors that might indicate the actual problem.
Can I import all MLS listings into Webflow CMS instead of using IDX?
Technically possible but rarely practical. Webflow CMS limits vary by plan — CMS plan allows 2,000 items, Business plan allows up to 20,000 — while most MLS databases contain far more listings. You'd also need custom development for API integration, ongoing sync infrastructure, and a data source (typically still through a provider). This approach only makes sense for small, controlled inventories like your own office listings or curated featured properties. For full MLS search capability, traditional IDX integration is more practical and maintainable.
Will adding IDX slow down my Webflow website significantly?
IDX scripts can impact page speed depending on the provider and widget complexity. Each widget loads external JavaScript, CSS, and makes API calls to fetch listing data. Minimize impact by placing scripts in the footer rather than head, limiting the number of listings displayed per widget, reducing widget count per page, and avoiding multiple heavy widgets on your homepage. If your provider supports pagination, use it instead of loading everything at once.
Do I need to be a licensed real estate agent to add IDX to my Webflow site?
Yes, in most cases. MLS organizations require that anyone displaying IDX listings hold a real estate license and maintain active MLS membership — or work for a brokerage that has membership. Your IDX provider will verify your credentials during account setup, and your MLS must approve your data feed before listings display. Web designers building sites for agents typically work with the agent's credentials rather than their own. There's no workaround for this requirement; it's fundamental to how MLS data access works.
Conclusion
Adding IDX to a Webflow site works best when you accept the reality: you're integrating a licensed MLS display system, not enabling a native Webflow feature. The three-part ecosystem — your MLS membership grants the permission, an IDX provider supplies the data connection and tools, and Webflow provides the design canvas — is how this works.
For most real estate professionals, embedded widgets provide the fastest path to working functionality while wrapper pages deliver better brand integration for those willing to invest in DNS configuration and link management. The CMS sync approach remains a specialized option for limited use cases requiring complete design control over small listing inventories.
If your implementation requires custom solutions, complex multi-site setups, or you'd rather have professionals handle the technical configuration, our Webflow agency can help build real estate sites that integrate IDX effectively while maintaining the design quality your brand deserves.


Join readers commenting on this post!