
Webflow's "Published On" field is confusing and often implemented incorrectly, leading to serious SEO problems. The field resets to today's date every time you republish any CMS item, which means your entire blog archive can end up showing the same recent date. This breaks chronological ordering and sends wrong signals to Google about when your content was actually created.
Many Webflow users don't realize this behavior and use "Published On" as their main date field, unknowingly harming their SEO. In this tutorial, you'll learn the correct way to implement both publication and update dates using Webflow's native "Created On" and "Updated On" fields, add proper BlogPosting schema markup, and avoid the common mistakes that damage search rankings.

Why 'last updated' dates matter for Webflow sites
Properly implementing update dates isn't just an aesthetic detail - it's a tactic with measurable impact on your site's performance. Here's why it matters so much:
- Boost organic traffic: Studies show that displaying last updated dates can increase organic traffic by 50% or more, as Google rewards content that appears current and relevant.
- Improve Click-Through Rate (CTR): Content with recent dates has significantly higher CTR. User behavior analysis shows people prefer clicking on information they perceive as "fresh".
- Maintain ranking stability: Content showing a last modified date maintains its search ranking positions for much longer periods.
- Build user trust: Users trust information that's visibly updated, especially in niches where timeliness is critical.
- Comply with Google's Helpful Content Guidelines: Google's guidelines favor sites that demonstrate expertise and keep their content updated and reliable.
Preparation: using Webflow's native date fields
To effectively and automatically display publication and update dates, you don't need to create custom fields. The key is understanding and correctly using the two date fields Webflow already provides:
- Created On: This is the date and time when an item was first created in your CMS and never changes. It's the source of truth for the original publication date. We'll use this for our "Published On" text and for the schema's datePublished property.
- Updated On: This field automatically updates every time you click Save on a CMS item. It's the perfect indicator of content freshness. We'll use this for our "Last updated on" text and for the schema's dateModified property.
Advanced option for total control
For most sites, the strategy above is perfect. However, if you need more granular control (for example, when migrating content from WordPress and need to preserve old dates, or if you want full editorial control over the displayed date), you can create a custom Date/Time field in your Collection and use it instead of Created On or Published On.
Updating the Webflow blog template to show both dates
Now that we understand the strategy, let's connect these fields in our blog design to make them visible to users.
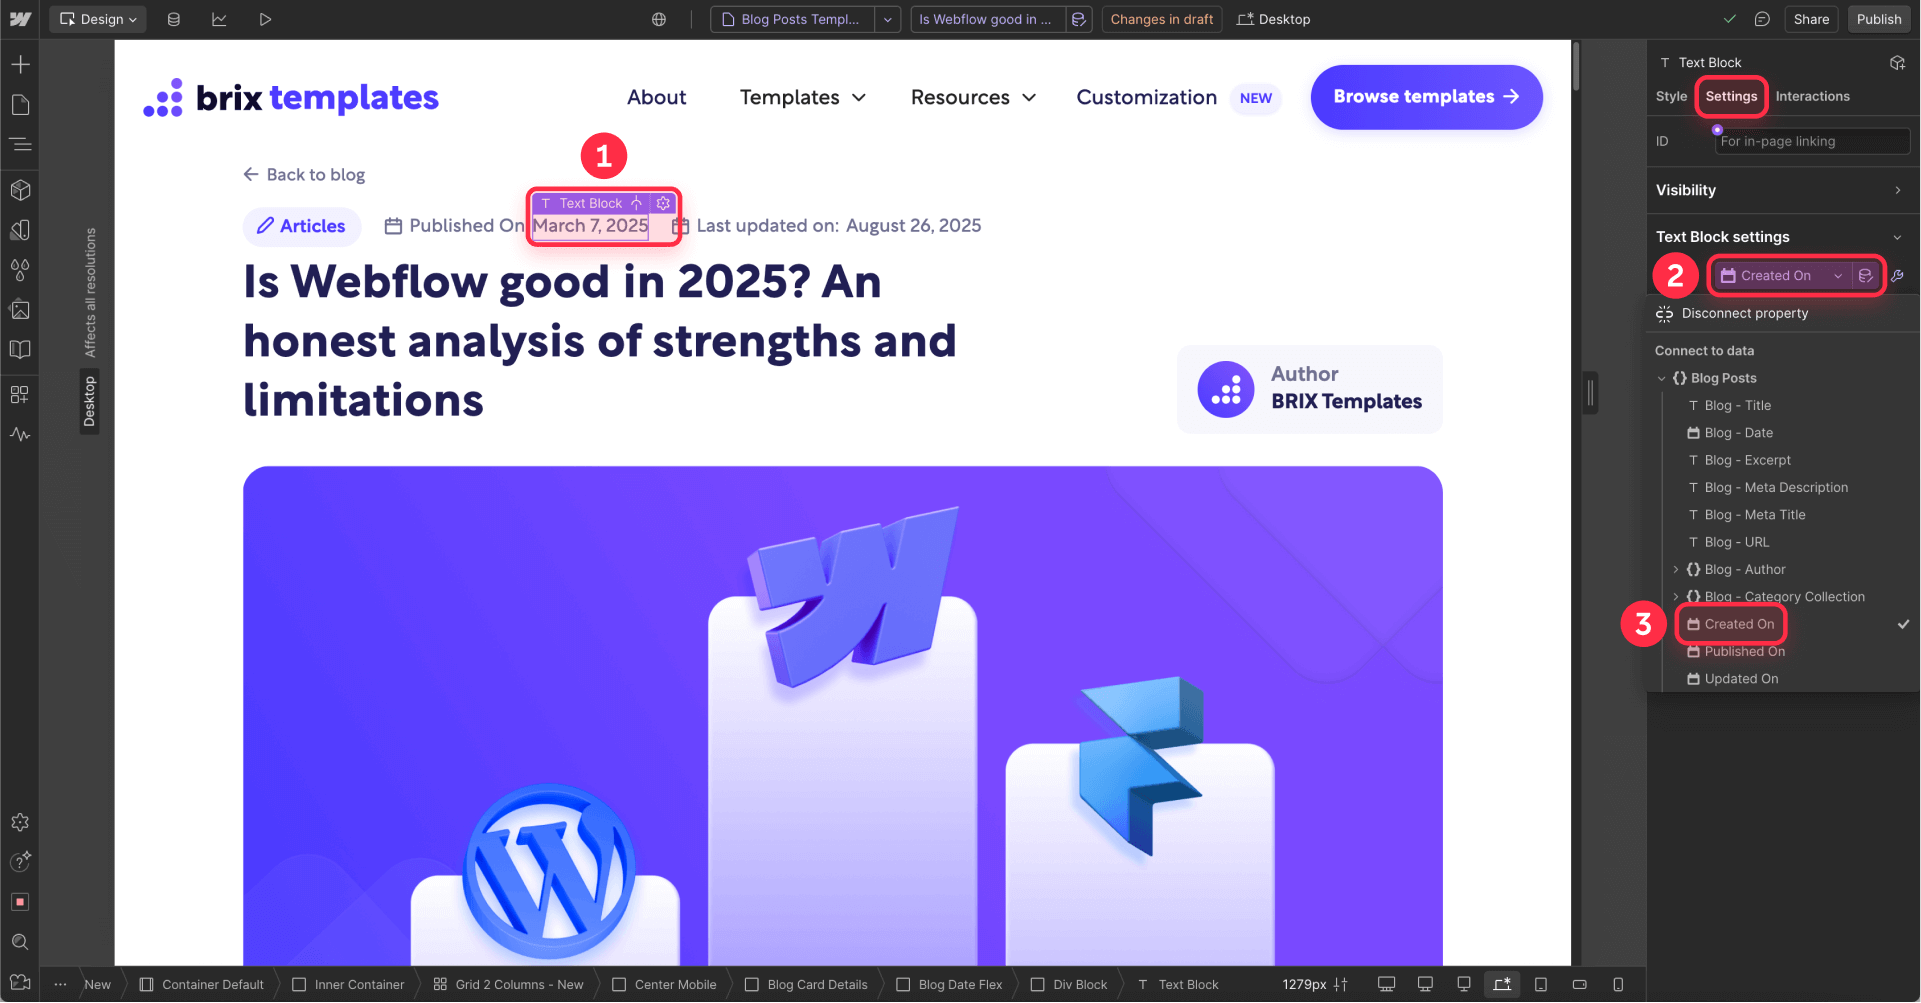
- In the Pages panel on the left, look for the CMS Collection pages category and click your Blog Posts Template to open it in the Designer.
- Add two Text Blocks where you want the dates to appear. You can add static text before each one, for example: Published on: [Date1] | Last updated on: [Date2].
- Select the first date Text Block.
- In the Settings Panel on the right, scroll down to the Text Block settings section.
- Check the Text box and in the dropdown that appears, select the native Created On field.
- Repeat steps 3 to 5 for the second Text Block, but this time, connect it to the native Updated On field.
How to implement BlogPosting schema with dateModified in Webflow
This is the most important step for SEO. We'll communicate the dates to Google technically using robust schema markup.
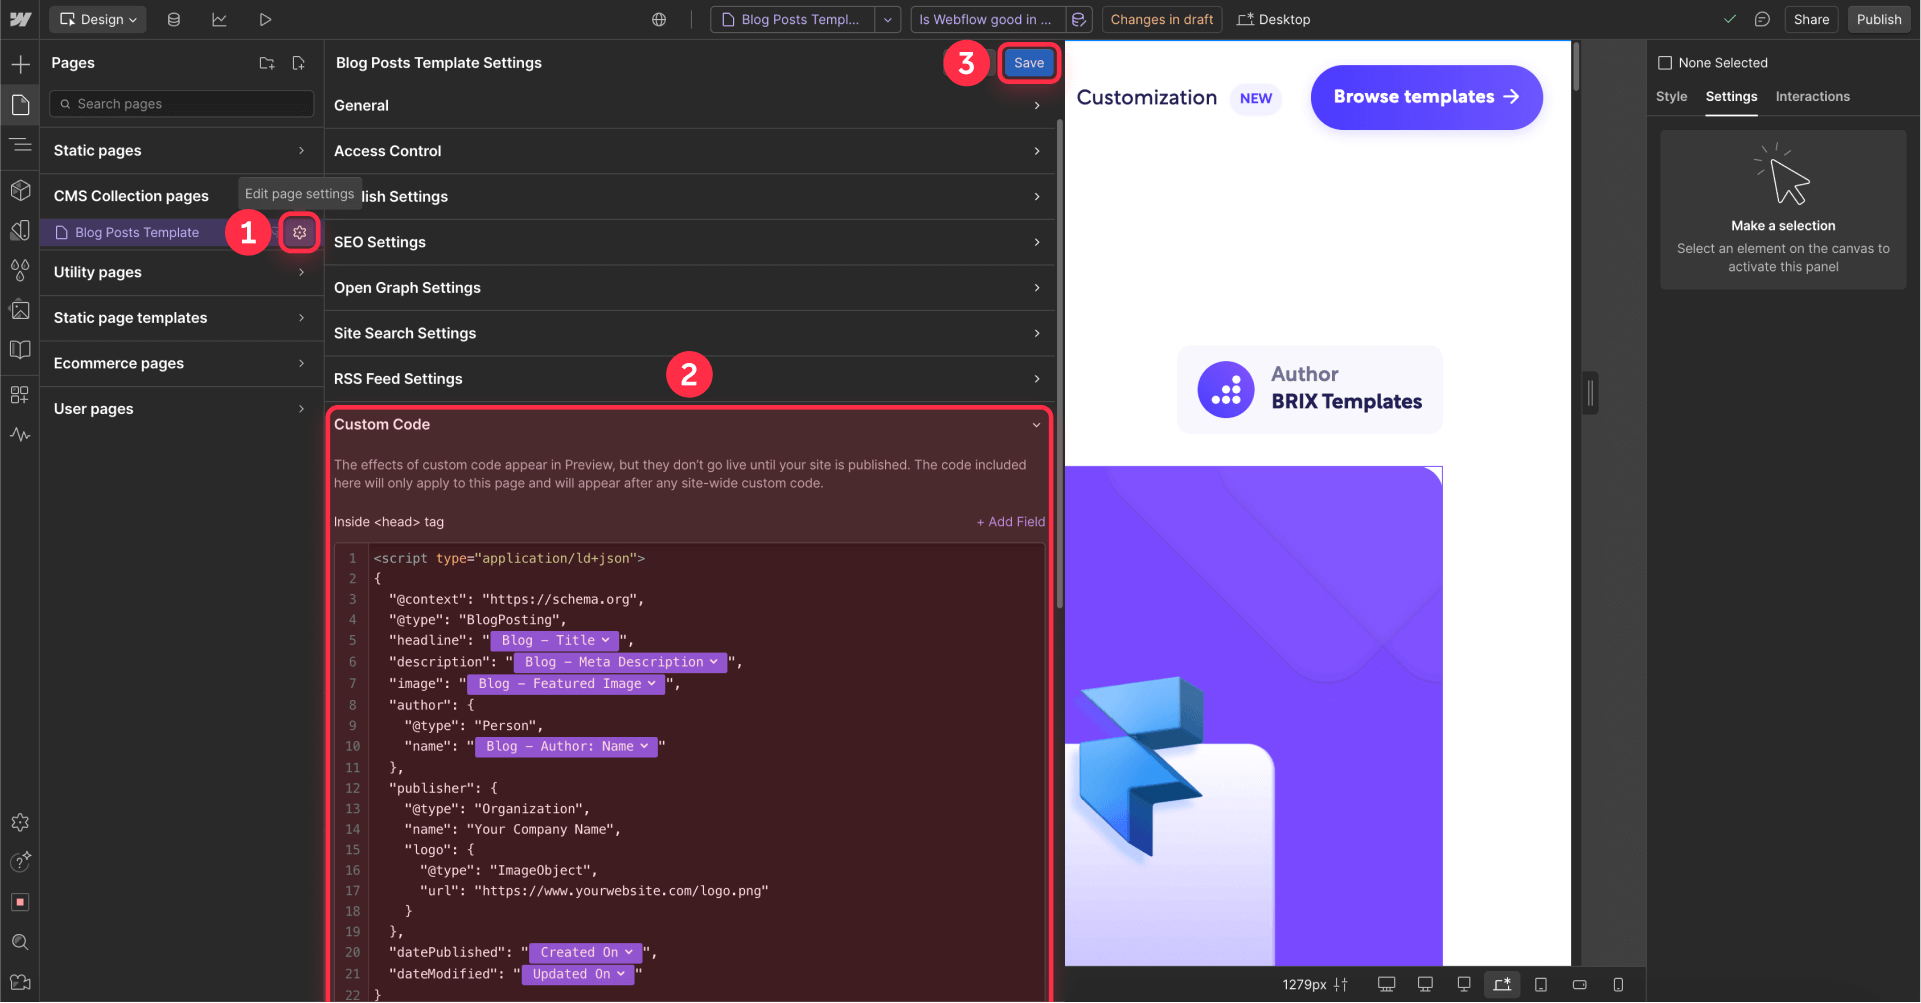
1 - In the Pages panel, hover over your Blog Posts Template and click the Settings icon (gear icon).
2 - In the panel that opens, go to the Custom Code section.
3 - Paste the following clean code in the Inside <head> tag box.
Here's the schema code with friendly instructions:
<script type="application/ld+json">
{
  "@context": "https://schema.org",
  "@type": "BlogPosting",
  "headline": "ADD DYNAMIC FIELD: Name",
  "description": "ADD DYNAMIC FIELD: Meta Description or Summary",
  "image": "ADD DYNAMIC FIELD: Main Image",
  "author": {
    "@type": "Person",
    "name": "ADD DYNAMIC FIELD: Author Name"
  },
  "publisher": {
    "@type": "Organization",
    "name": "Your Company Name",
    "logo": {
      "@type": "ImageObject",
      "url": "https://www.yourwebsite.com/logo.png"
    }
  },
  "datePublished": "ADD DYNAMIC FIELD: Created On",
  "dateModified": "ADD DYNAMIC FIELD: Updated On"
}
</script>
4 - Connect the dynamic fields: Use the purple + Add Field button to replace the placeholders (ADD DYNAMIC FIELD...) with your CMS fields. This includes headline, description, image, and author.
- For dates, simply connect "datePublished" to the Created On field and "dateModified" to the Updated On field. Webflow will automatically format them correctly for Google.
5 - Modify the publisher information: This part of the code is your "signature" and you need to edit it manually.
- Replace "Your Company Name" with your actual company name (e.g., "BRIX Templates").
- Replace the placeholder URL with your actual logo URL. To get it, go to the Assets panel (image icon on the left), find your logo, click the gear icon, then click the link icon to copy the URL. Your logo should be at least 112x112 pixels (square format works best).
6 - Click Save to save your changes.
How to validate your Webflow schema with the Rich Results Test
After implementing the code, you need to verify that Google can read it correctly.
- Publish your site to make the changes live.
- Copy the URL of one of your blog posts.
- Go to Google's official Rich Results Test tool.
- Paste the URL and click Test URL.
- Look for the Blog posting item in the results. When you expand it, verify that the datePublished and dateModified properties are filled with dates in the correct format.

Troubleshooting common issues in Webflow
My posts are in the wrong chronological order: This is a common side effect after changing the reference date. To fix it, go to the page where your post list is displayed (your "Blog" page), select the Collection List element, and in the Settings Panel, adjust the Sort Order to sort by Created On from Newest to Oldest.
The Updated On date doesn't change or is the same as Created On: This is normal for newly created posts. The Updated On field only changes when you Save a modification to a CMS item. On initial creation, both dates are practically identical. The date will become different the first time you edit and save that post in the future.
I pasted the schema code but Google doesn't detect it: The most likely error is that you pasted the code in the wrong place. The schema shouldn't go in the Site Settings (global for the entire site), but in the Page Settings of your specific Blog Posts Template, inside the Inside <head> tag box.
Webflow's "Published On" field keeps showing confusing dates: This is and always will be expected behavior. The main lesson of this tutorial is to completely ignore the Published On field. Your source of truth is always Created On for publication and Updated On for modification.
Frequently asked questions about 'last updated' dates in Webflow
Why shouldn't I use the default "Published On" field in Webflow?
You shouldn't use the Published On field because it resets every time you publish the item, making it unreliable as an original publication date. The combination of Created On (which never changes) and Updated On (which changes with each save) is the correct and 100% automatic strategy. This approach ensures consistent date tracking without any manual intervention.
What is BlogPosting schema and why is it important for SEO in Webflow?
The BlogPosting schema is a type of structured data that describes your content to search engines as a blog article. It's crucial for SEO because it lets you explicitly define properties like headline, author, datePublished and dateModified, helping Google understand the context and freshness of your content. This structured data can lead to rich snippets in search results and better ranking signals.
What's the difference between 'Created On' and 'Updated On' in Webflow?
Created On records the exact moment when an item was first created in the CMS and never changes. Updated On records the moment of the last Save for that same item, acting as a precise and automatic "last modified date". These native fields provide reliable date tracking without needing custom fields or manual updates.
Is it better to show publication date or last updated date on a Webflow blog?
Showing both (Published on and Last updated on) is the most transparent and recommended practice. For highly competitive evergreen content, some SEO experts choose to show only the "last updated" date to maximize freshness perception and CTR. The choice depends on your content strategy and whether timeliness or historical context matters more for your audience.
How can I verify that my date schema works correctly in Webflow?
The best way is to publish your changes and use Google's official Rich Results Test tool. Paste your post's URL. If the tool detects a valid "Blog posting" item with correct datePublished and dateModified properties, you've implemented it perfectly. You can also check Google Search Console after a few days to see if Google recognizes the structured data.
How often should I update blog content to benefit from last updated dates?
There's no magic frequency, but meaningful updates every 3-6 months for important content can maintain freshness signals. The key is making substantial improvements - adding new sections, updating statistics, or expanding on topics - rather than minor edits just to change the date. Google can detect thin updates that don't add value.
Can I manually override the automatic dates in my Webflow CMS items?
Yes, you can create custom Date/Time fields in your CMS collection for complete control. This is useful when migrating content from other platforms or when you need editorial control over displayed dates. Simply create fields like "Manual Publish Date" and "Manual Update Date", then use these instead of the native fields in your template.
Conclusion
Properly implementing publication and update dates in Webflow using the automatic Created On and Updated On fields is a fundamental SEO strategy. Combining these fields with robust, properly formatted schema markup creates an error-proof system that satisfies both users and search engines, without adding manual work to your daily routine.
This adjustment, combined with high-quality content updates, is one of the most effective ways to maintain your blog's competitive edge long-term. If you need assistance with advanced schema implementations or advanced technical SEO settings, BRIX Templates specializes in technical Webflow optimizations that drive measurable results.


Join readers commenting on this post!