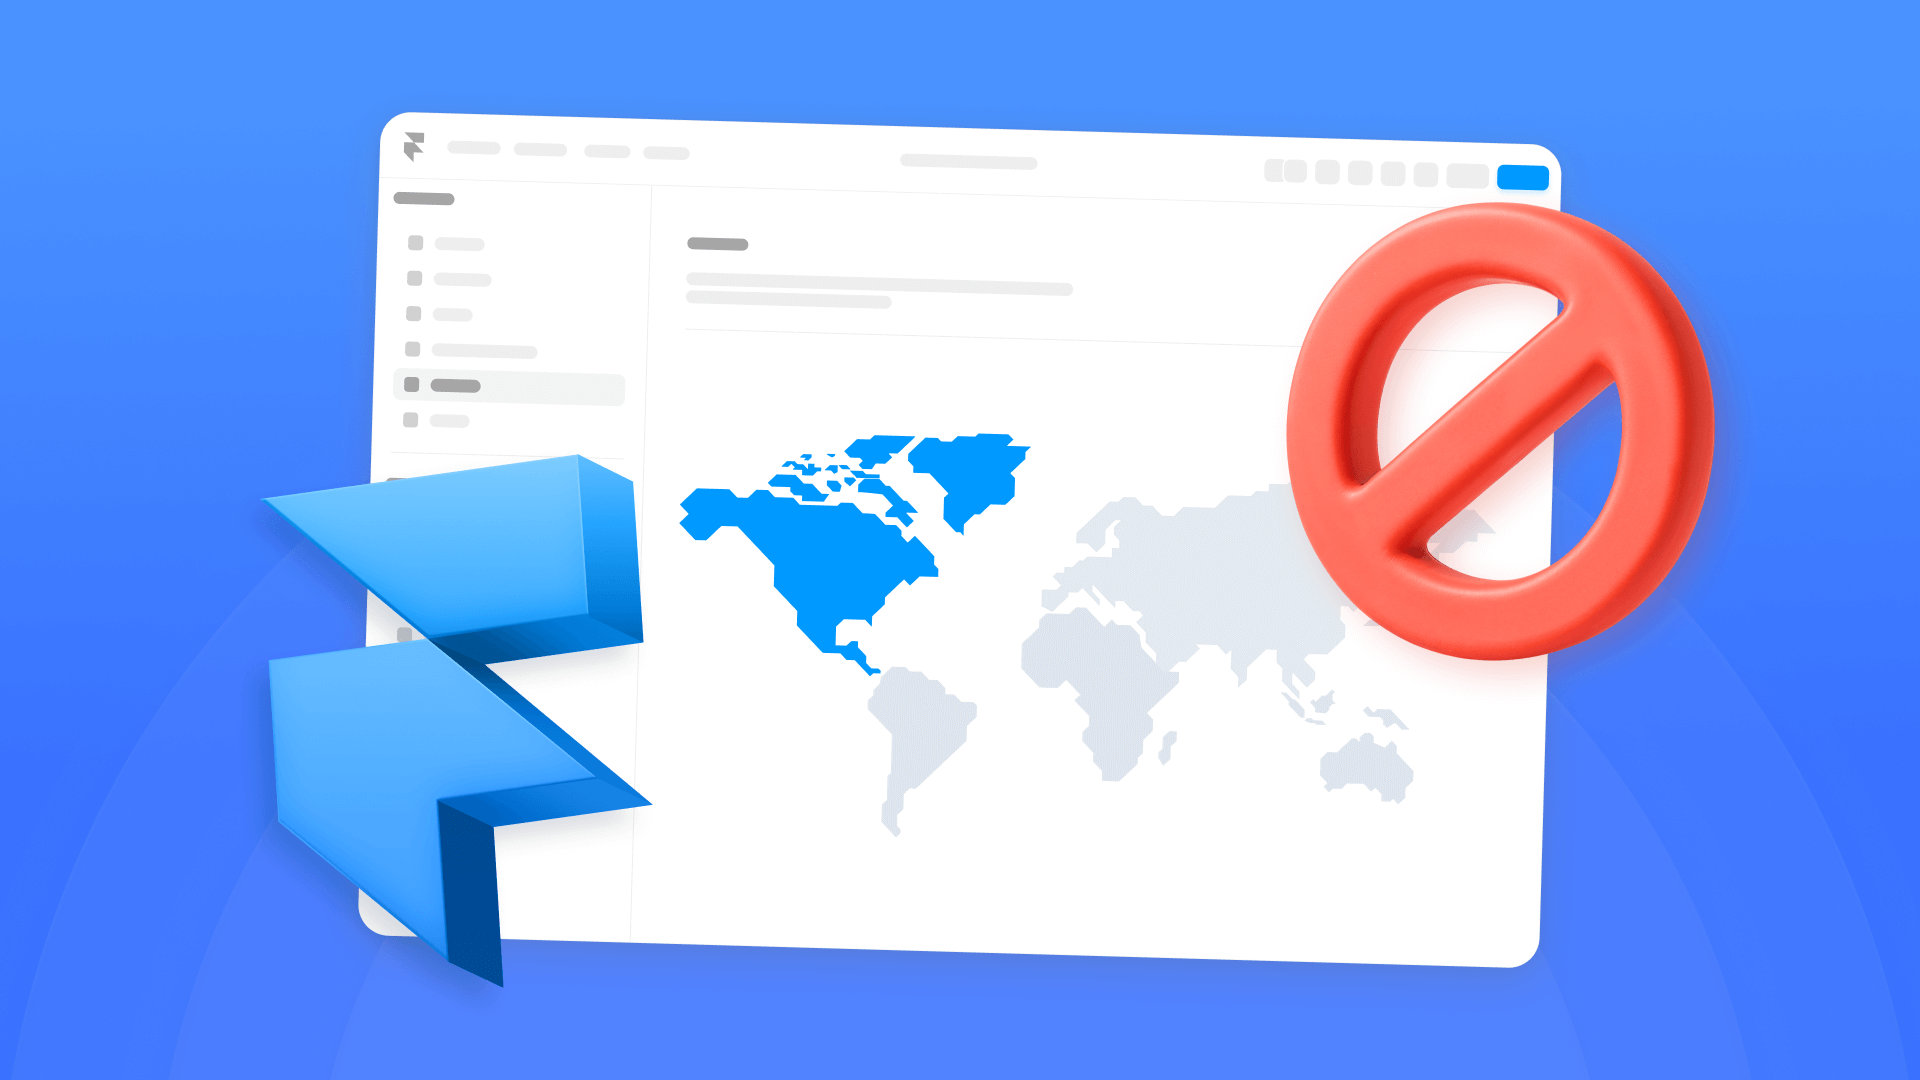
Not every website needs to be accessible worldwide. Some businesses operate in specific regions, face regulatory restrictions, or simply want more control over who can access their content. However, Framer doesn't include built-in geographic restriction tools, which can make it difficult to manage access based on location.
If you need to filter visitors by country or region on your Framer site, Cloudflare's Web Application Firewall (WAF) provides a straightforward solution. This guide walks you through how to set up geo-blocking using Cloudflare WAF with Framer.
Why implement geo-blocking on your Framer site
Controlling access based on geography can be an important consideration for businesses. Whether it's to reduce spam, meet legal requirements, or focus on a specific market, geo-blocking provides a way to manage traffic more effectively.
These are the most common reasons businesses choose to implement it:
- Spam and attack mitigation: If your Framer site is being bombarded with spam, bot traffic, or malicious attacks from a particular country, blocking that country can help significantly reduce the problem and protect your server resources.
- Regulatory compliance and legal requirements: Your business or organization might be subject to regulations or legal restrictions that prevent you from serving content or conducting transactions with users in certain countries, especially in sectors like finance or healthcare.
- Market focus: Some businesses simply want to concentrate their resources on specific geographic markets, limiting access to regions where they actively operate or have an established customer base.
- Resource optimization: By blocking unnecessary traffic from regions that aren't your target market, you can optimize bandwidth usage and improve overall site performance.
How geo-blocking works with Cloudflare and Framer
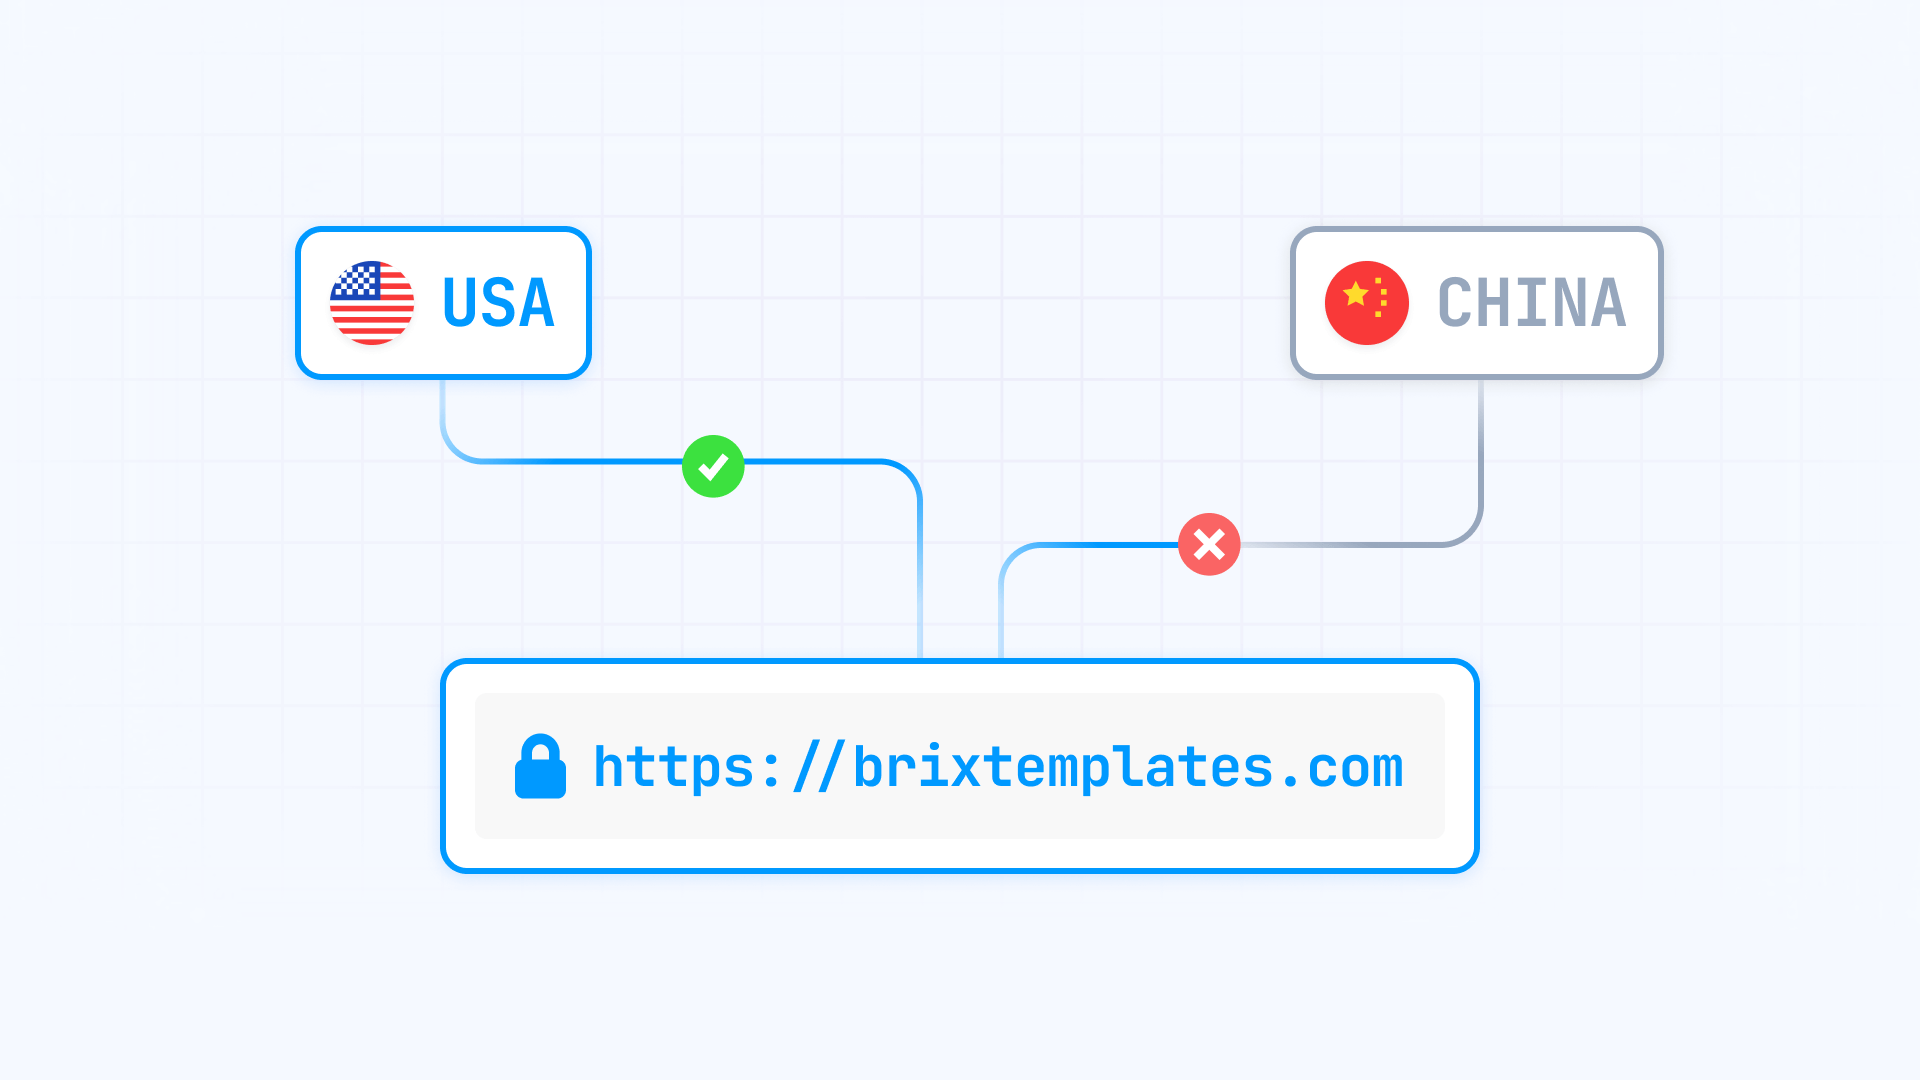
When you connect your Framer domain to Cloudflare and enable Proxied mode, all traffic to your site passes through Cloudflare's network first. Cloudflare identifies each visitor's country using their IP address and checks it against your WAF rules. If the visitor's country is blocked, Cloudflare returns an error page before the request ever reaches your Framer site. If allowed, the request continues to Framer normally.
The key requirement is that your DNS must be in Proxied mode (orange cloud icon in Cloudflare). Without this, traffic goes directly to your Framer site and Cloudflare can't apply WAF rules.
Step 1: Connect your Framer domain to Cloudflare
Before you can use geo-blocking, your Framer domain needs to be connected to Cloudflare with Proxied mode enabled.
1.1. Add your domain to Cloudflare
If you haven't already added your domain to Cloudflare:
- Sign up for a free Cloudflare account at cloudflare.com
- Click Add Site in your Cloudflare dashboard
- Enter your domain name and click Add site
- Select the Free plan and continue
- Cloudflare will scan your existing DNS records
1.2. Update your nameservers
Cloudflare will provide you with two nameservers (they look like kay.ns.cloudflare.com and ron.ns.cloudflare.com):
- Copy both nameserver addresses from Cloudflare
- Go to your domain registrar (where you bought your domain)
- Find the DNS or nameserver settings
- Replace your current nameservers with Cloudflare's nameservers
- Save the changes
This can take anywhere from a few minutes to 24 hours to propagate, but typically happens within 1-2 hours.
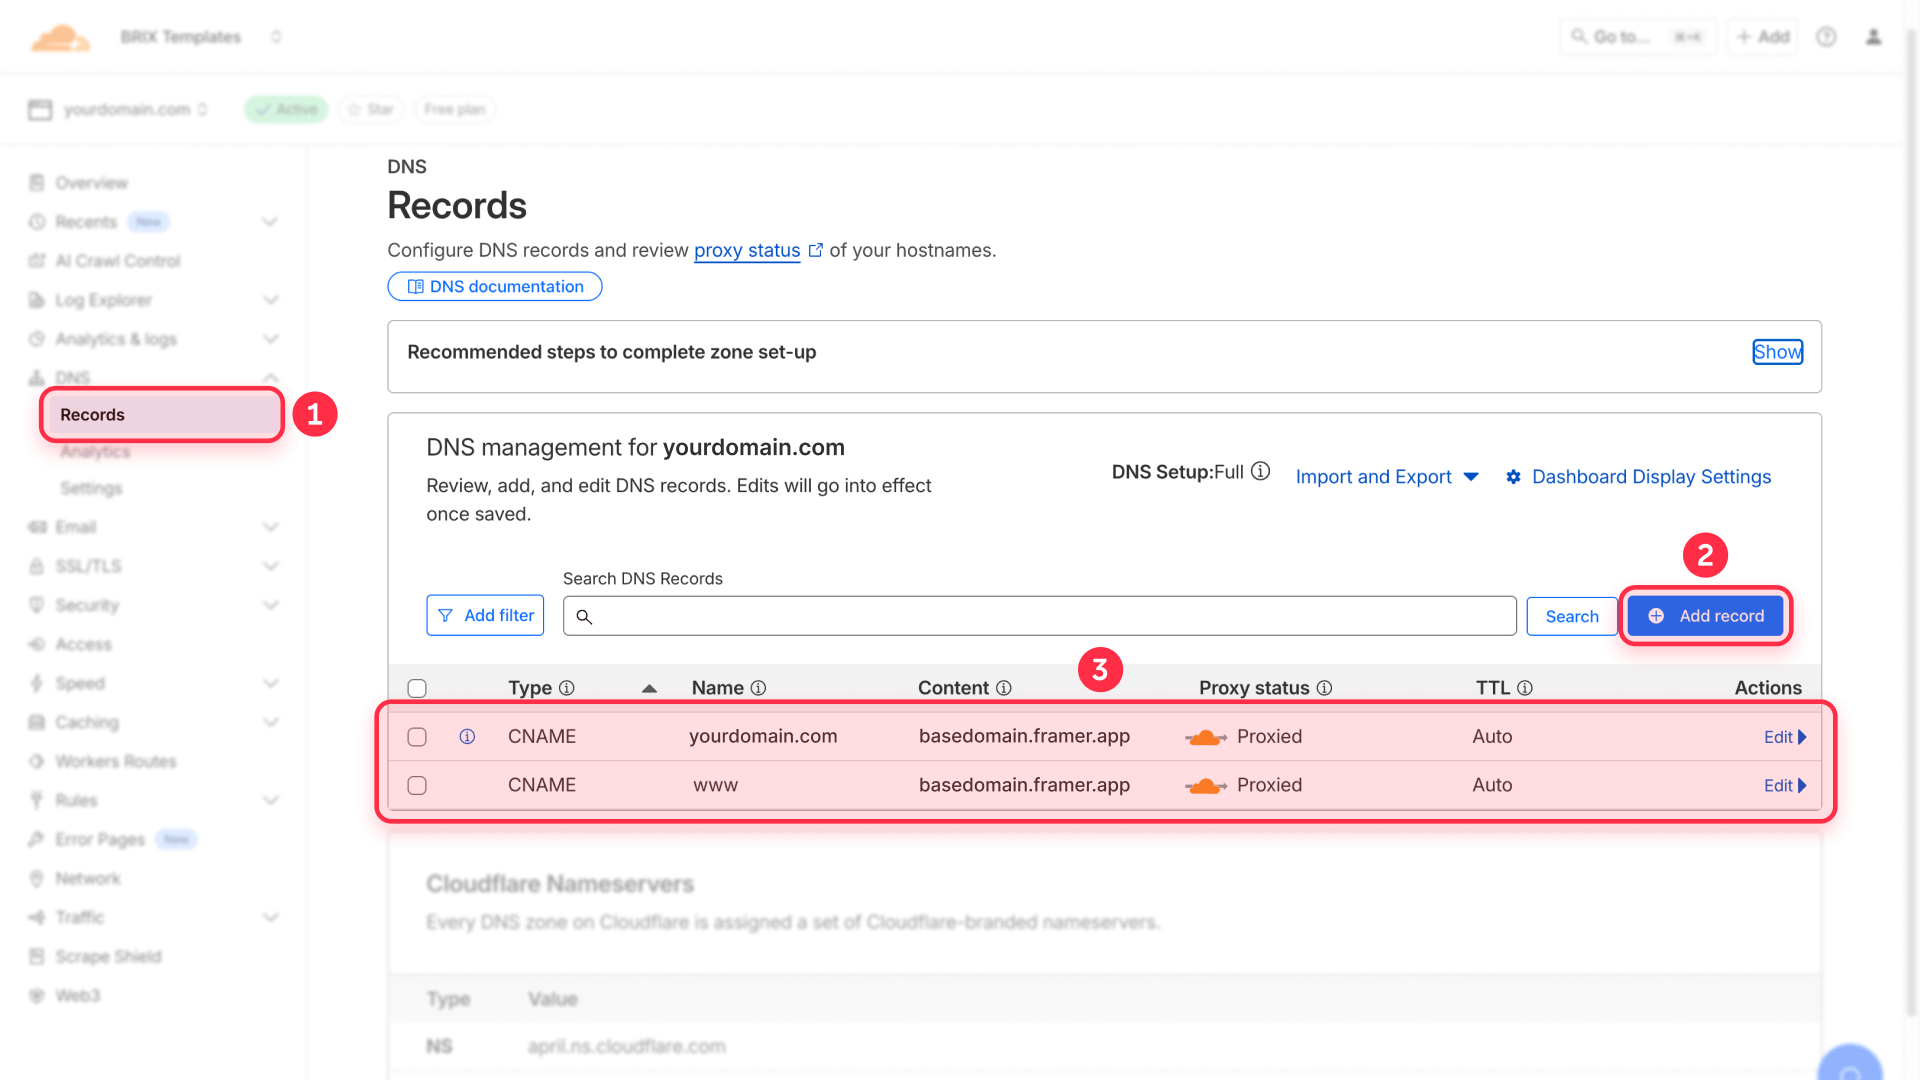
1.3. Configure DNS records for your Framer site
Once Cloudflare confirms your nameservers are active:
- In Cloudflare, go to DNS → Records
- Look for your domain's A or CNAME records
- If you're setting up for the first time, create a CNAME record:
- Name: @ (for root domain) or www (for subdomain)
- Target: your Framer subdomain (like yoursite.framer.website)
- Proxy status: Proxied (orange cloud icon)
- Make sure the cloud icon is orange, not gray
- Click Save
Critical: The orange cloud (Proxied mode) is what enables geo-blocking. Without it, WAF rules won't work.
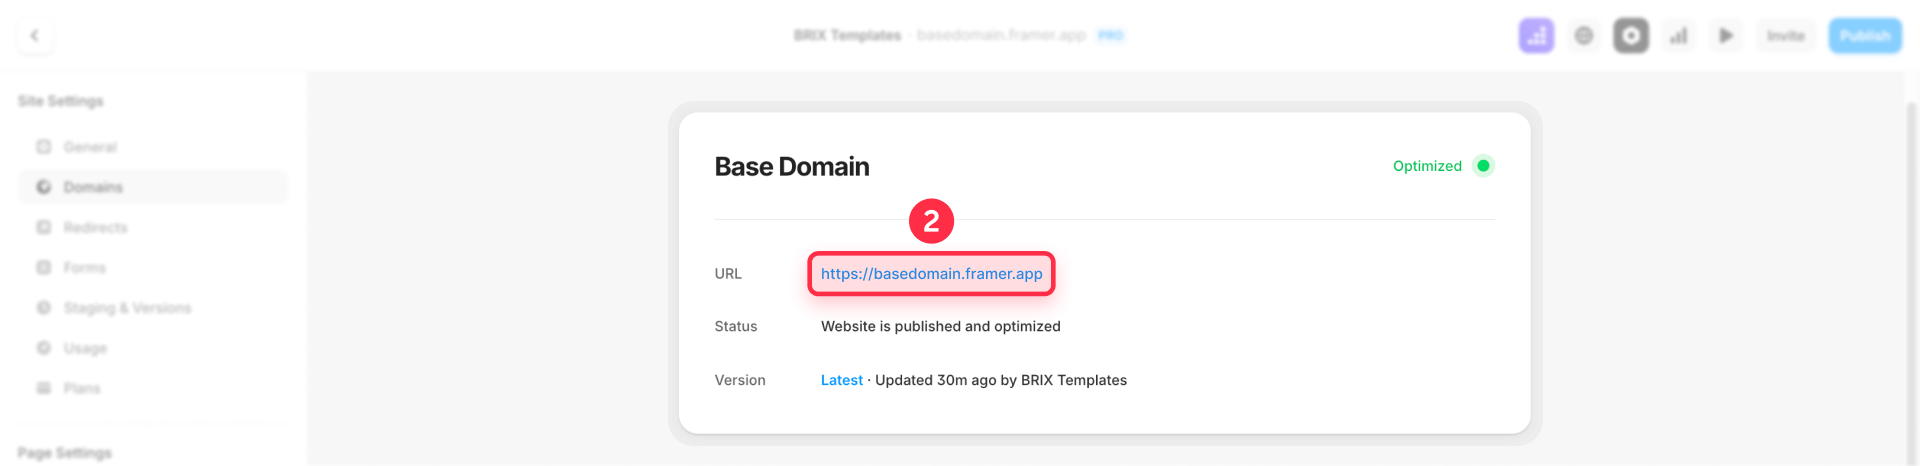
1.4. Connect your custom domain in Framer
Finally, tell Framer about your custom domain:
- Open your Framer project
- Go to Site Settings → Domains
- Click Add Custom Domain
- Enter your domain name
- Framer will verify the connection
- Once verified, test your site loads correctly at your custom domain
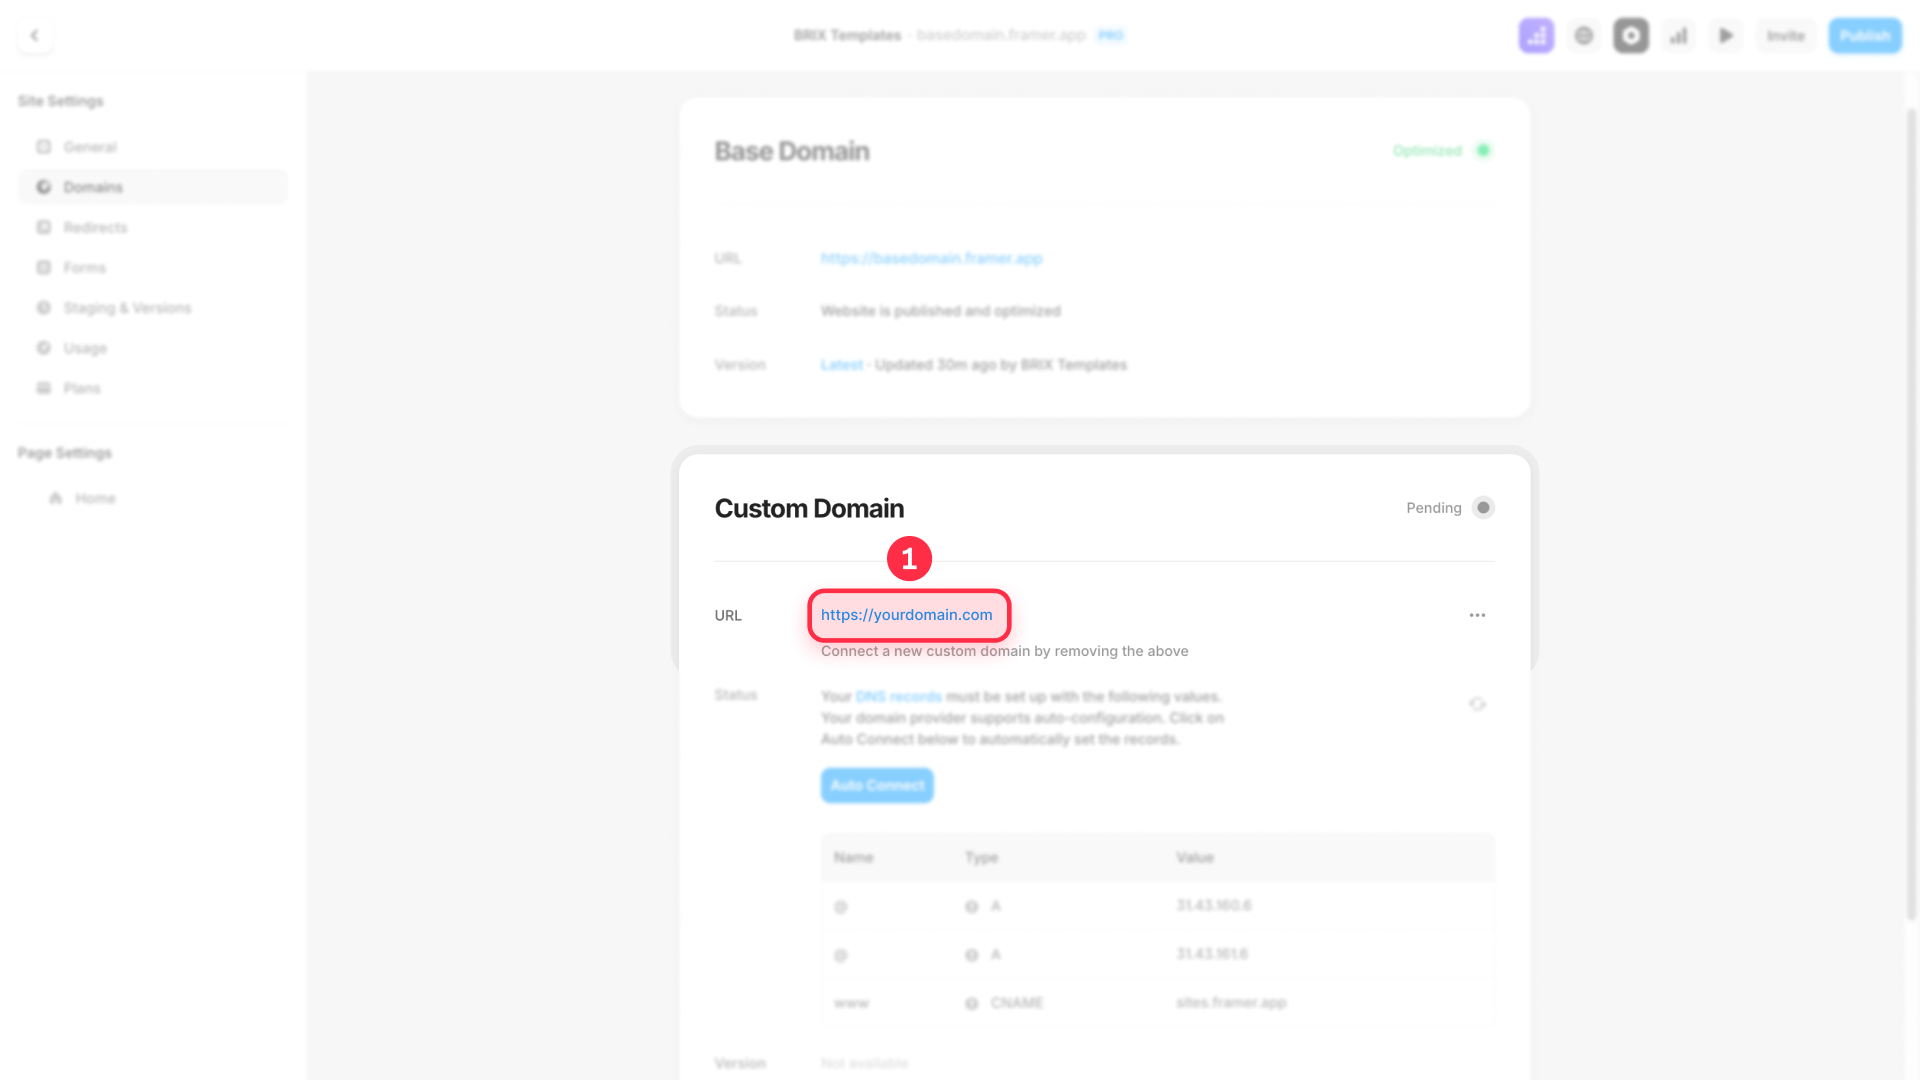
Important note: When using Cloudflare as a proxy (orange cloud) to enable WAF/geo-blocking, don't follow the A records suggested by Framer or use "Auto Connect". In Cloudflare, create only two CNAMEs—@ and www pointing to your-subdomain.framer.app—with Proxy = Proxied. Cloudflare performs CNAME flattening at the apex, so you don't need A records. If you already had A records from a previous setup, delete them: pointing directly bypasses the proxy and breaks WAF functionality.
It's normal for the status in Framer → Domains to remain "Pending" even though the site works perfectly behind Cloudflare. Framer attempts to verify A records or unproxied CNAMEs, which is why it sometimes doesn't "see" the proxied configuration. If your site loads at your-domain.com and www.your-domain.com with the orange cloud, ignore this status: traffic is already passing through Cloudflare and WAF rules are being applied.
Step 2: Create geo-blocking rules in Cloudflare WAF
With your domain connected and proxied through Cloudflare, you can now set up geo-blocking rules.
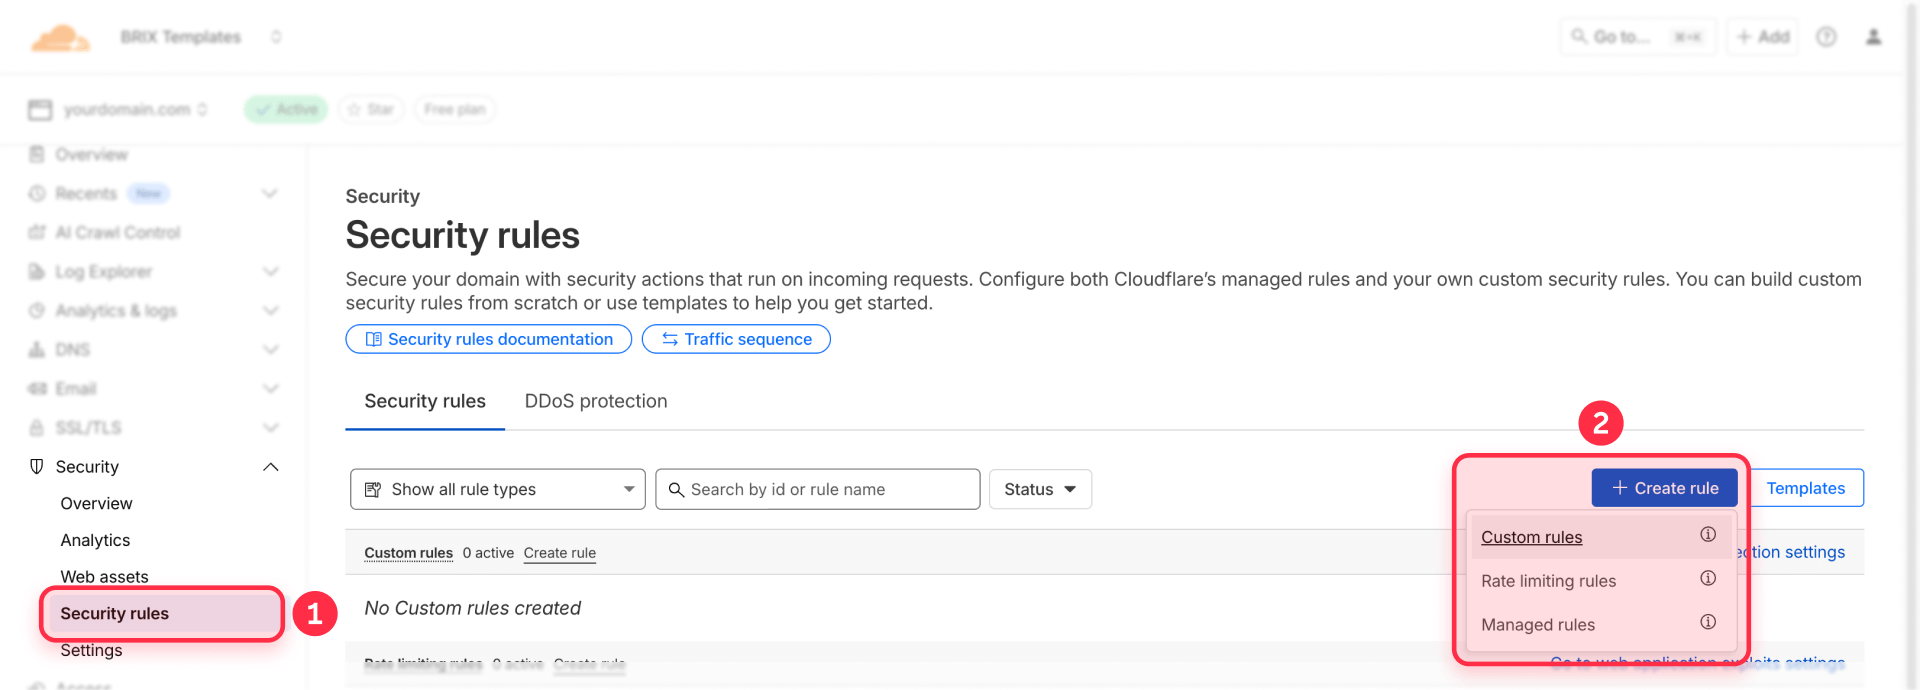
2.1. Access the WAF in Cloudflare
- Go to your Cloudflare dashboard
- Select your domain
- Click Security → Security rules
- Click on the Custom rules tab
- Click Create rule
2.2. Block specific countries from your Framer site
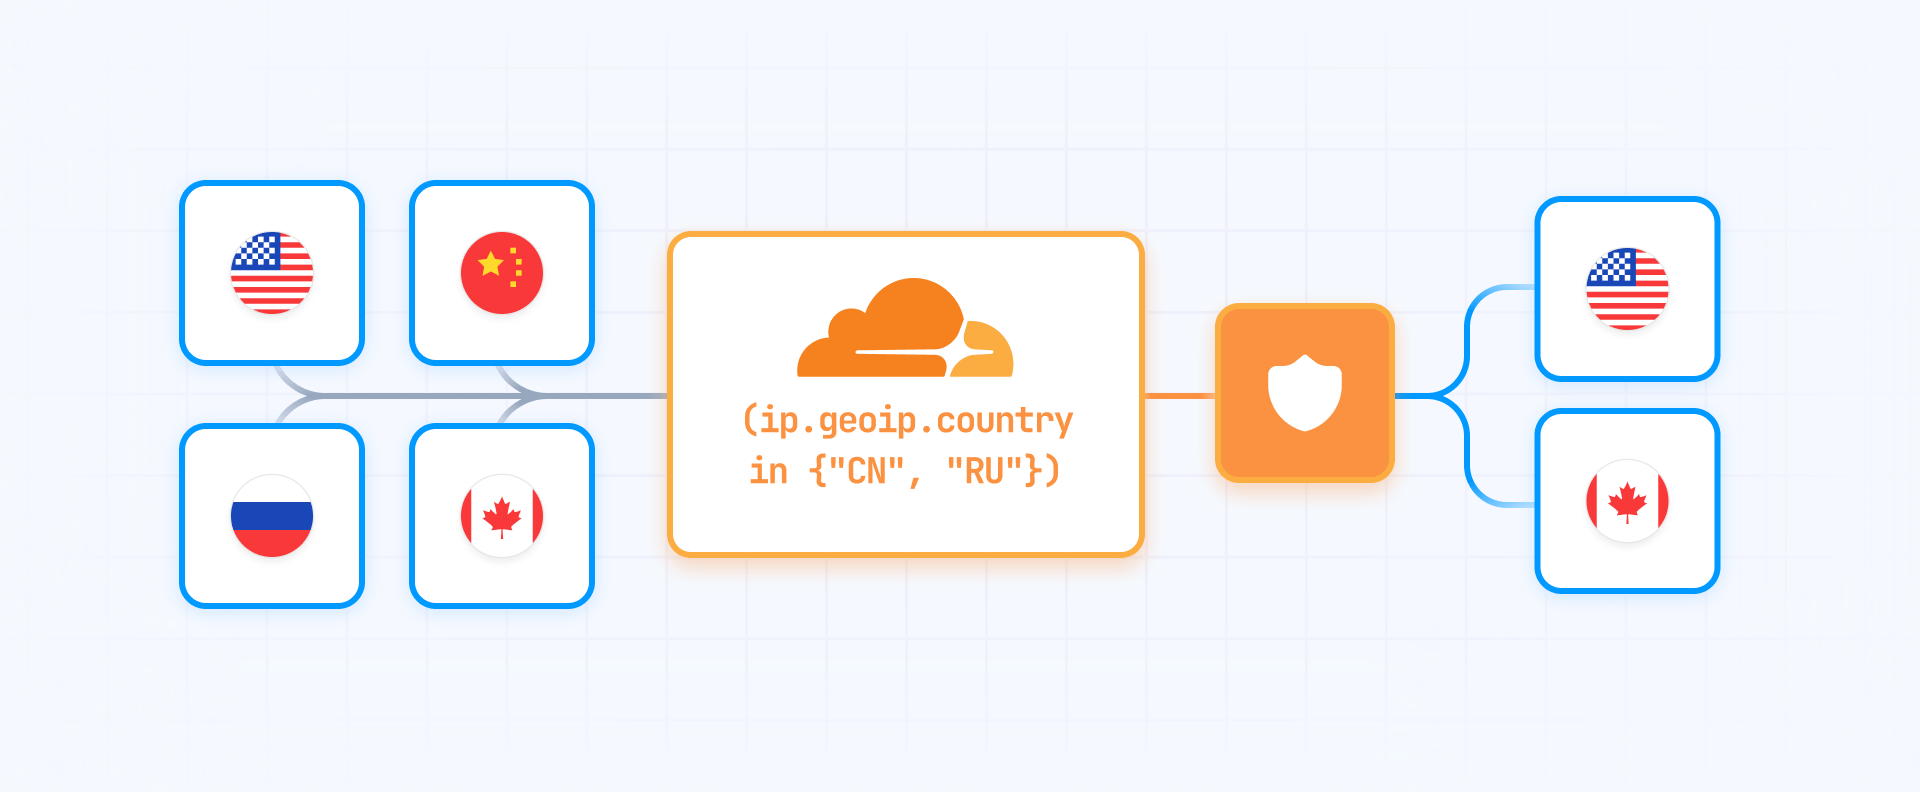
To block specific countries (for example, China, Russia, and Iran):
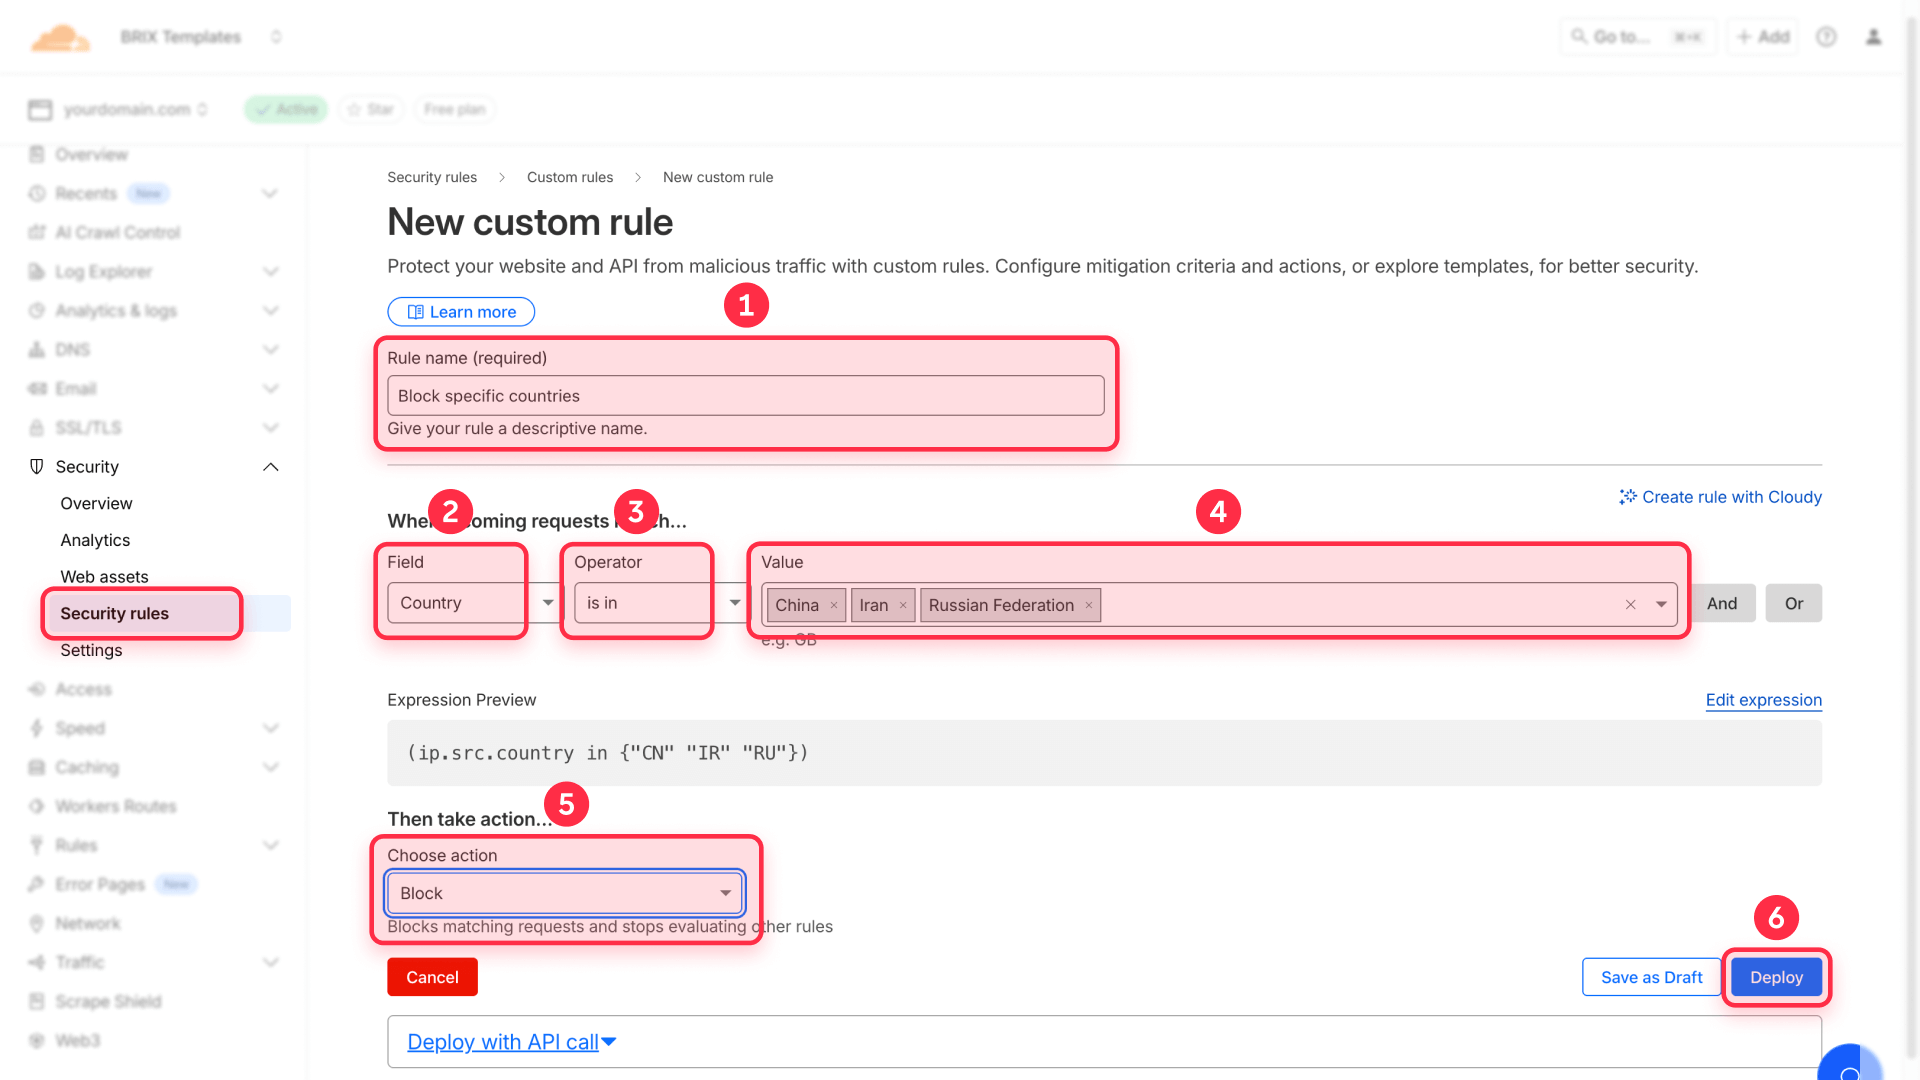
- Rule name: Enter "Block specific countries" or similar
- Field: Select Country from the dropdown
- Operator: Select is in
- Value: Click in the field and select countries from the list (CN, RU, IR)
- To add more countries, they'll appear in the same field
- Then: Select Block from the action dropdown
- Click Deploy
Your rule is now active. Visitors from those countries will see a Cloudflare error page when trying to access your Framer site.
2.3. Allow only specific countries (whitelist approach)
If you want to allow only certain countries and block all others:

- Rule name: Enter "Allow only specific countries"
- Click Edit expression (switch to Expression Editor)
- Enter this expression: (not ip.geoip.country in {"US" "CA" "GB"})
- Replace US, CA, GB with your desired country codes
- Then: Select Block
- Click Deploy
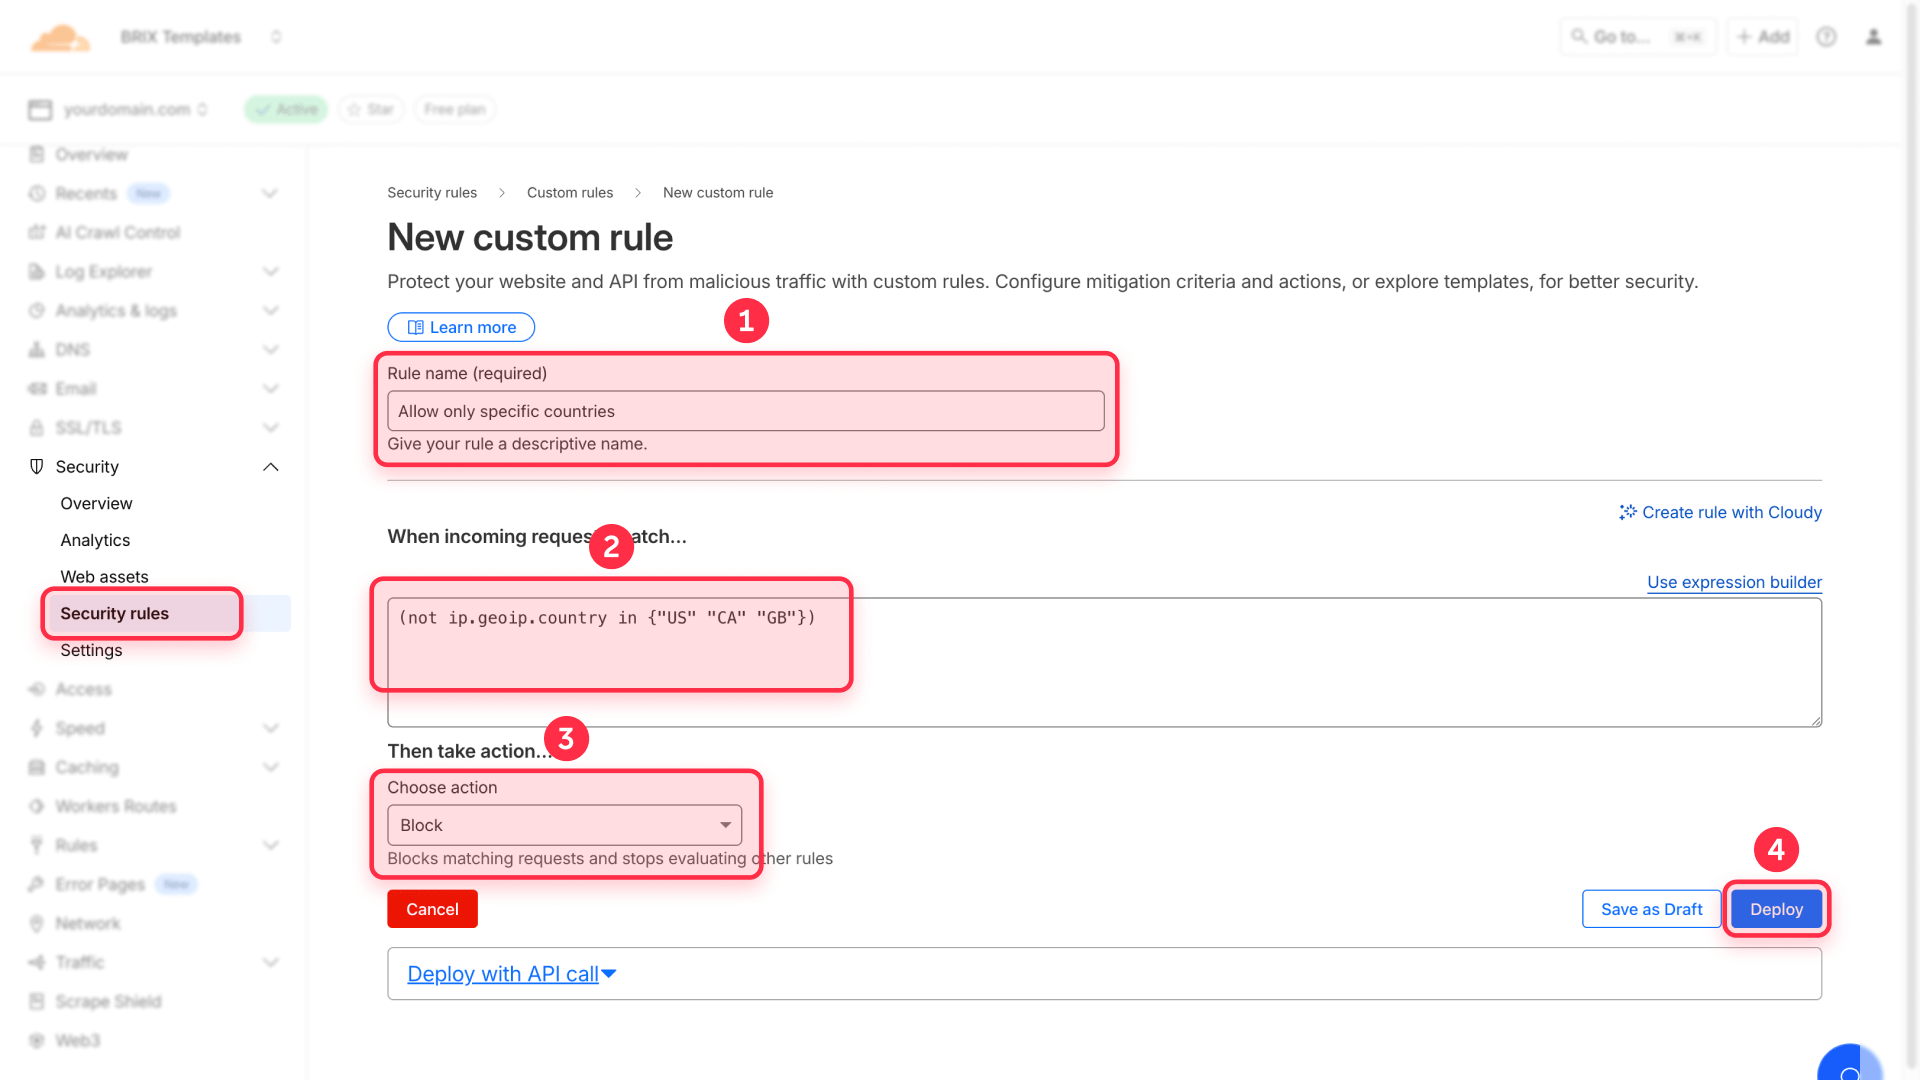
This blocks everything NOT in your list, effectively creating a whitelist.
2.4. Block by continent instead of country
If you want to block entire continents:
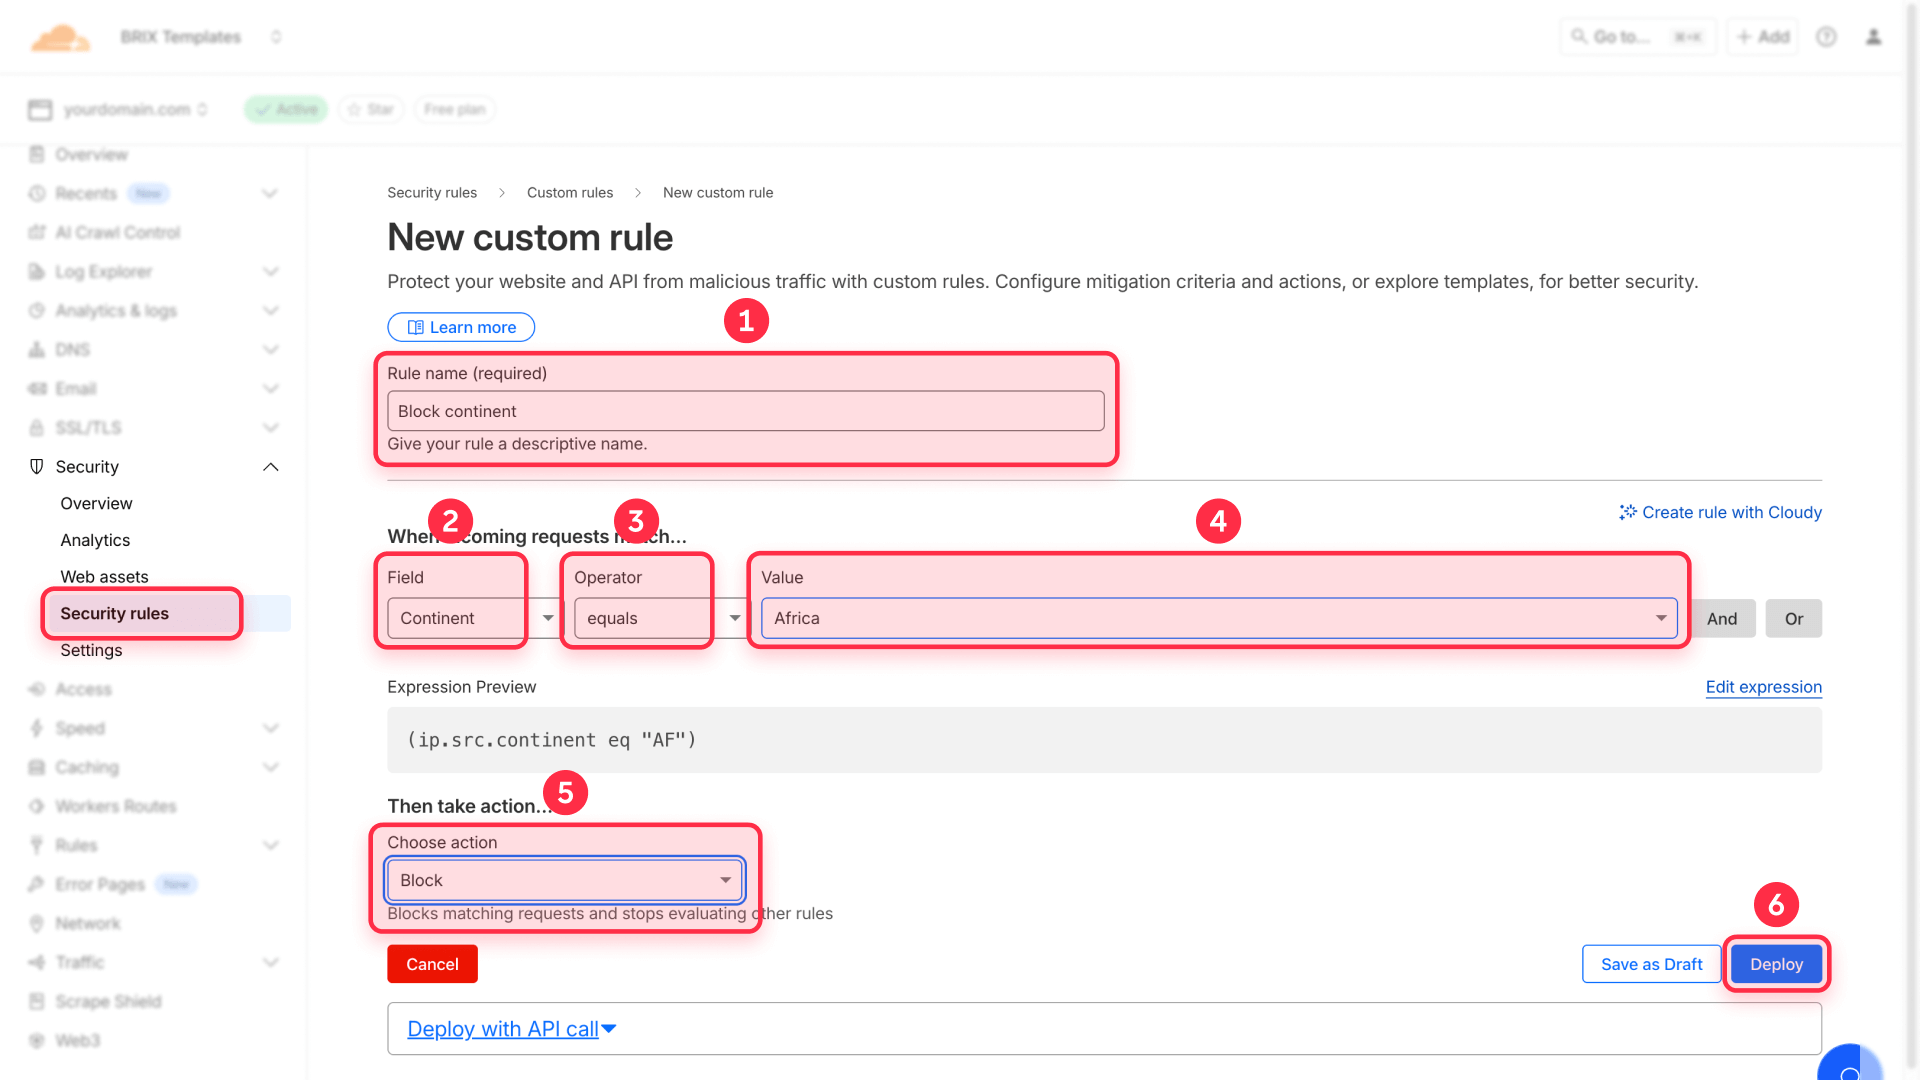
- Rule name: Enter "Block continent"
- Field: Select Continent from the dropdown
- Operator: Select equals
- Value: Select a continent (Africa, Asia, Europe, North America, South America, Oceania, Antarctica)
- Then: Select Block
- Click Deploy
Block multiple continents
The easiest way is to use Field = Continent, Operator = is in, and select multiple continents in the Value field.
Step 3: Test your geo-blocking setup
After deploying your rules, you should verify they're working correctly.
3.1. Test with a VPN
The most reliable way to test:
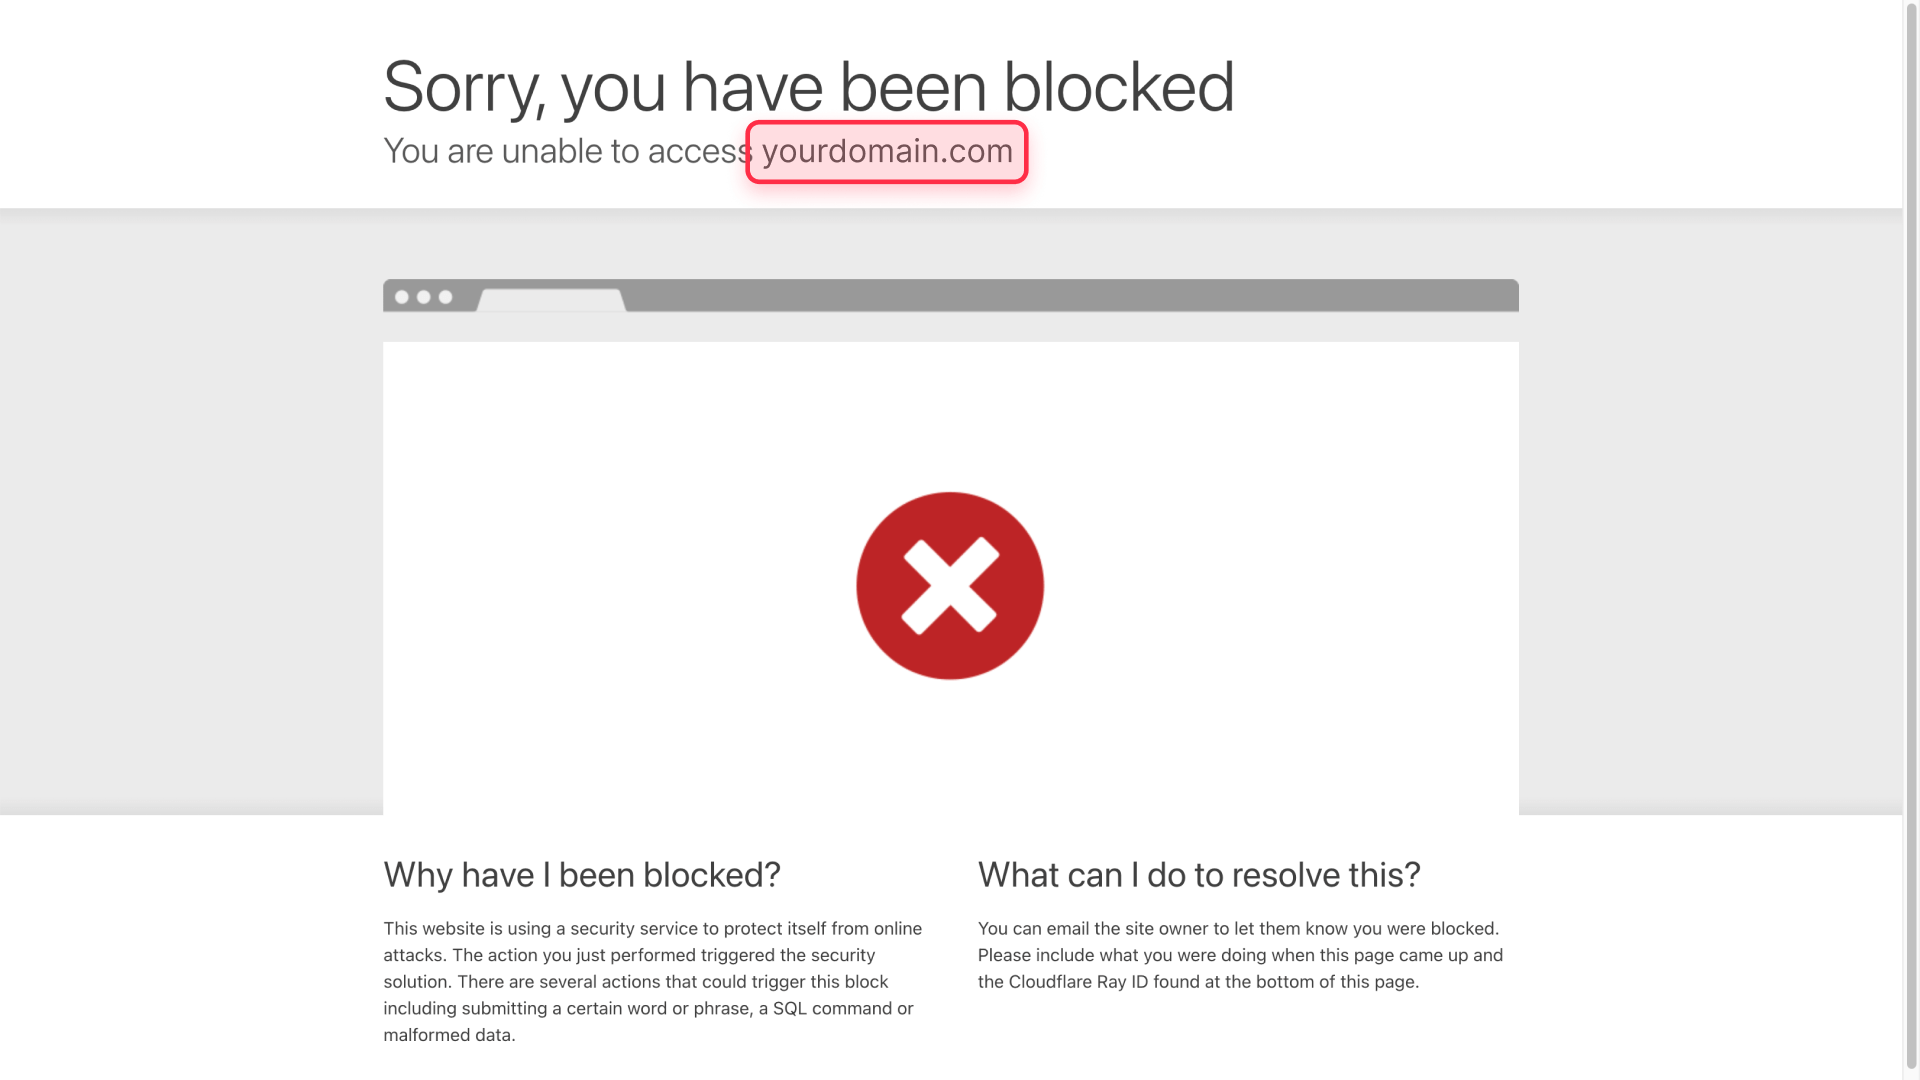
- Get a VPN service (many offer free trials)
- Connect to a server in a country you've blocked
- Open an incognito/private browser window
- Try accessing your Framer site
- You should see a Cloudflare error page (Error 1020)
- Disconnect the VPN and verify you can access normally
3.2. Verify in Cloudflare security events
Cloudflare logs all blocked requests:
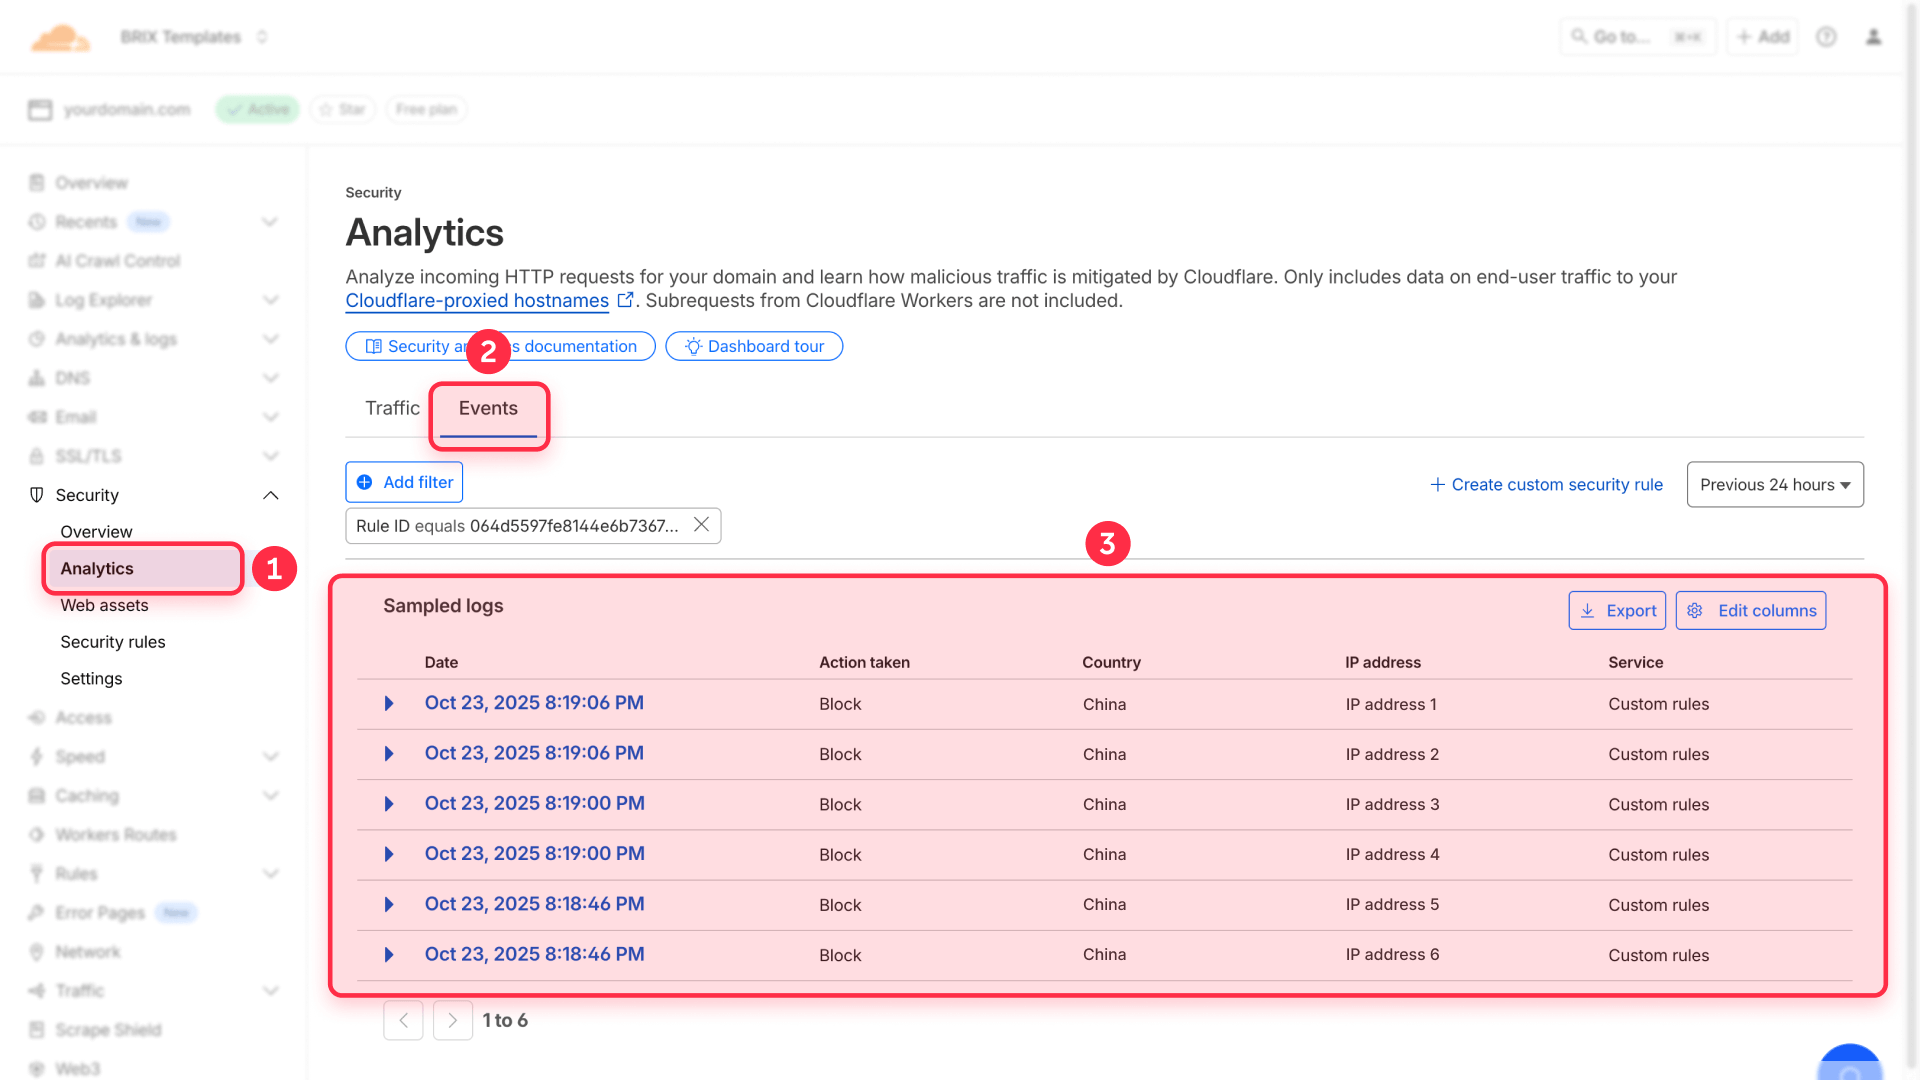
- In Cloudflare, go to Security → Events
- Look for events with your rule name
- You'll see details like:
- Country of origin
- Time of request
- URL requested
- Action taken (Block)
3.3. Use Log mode for testing
If you want to test without actually blocking users:
- Edit your WAF rule
- Change the action from Block to Log
- Wait a few hours
- Check Security → Analytics → Events to see what would have been blocked
- Once satisfied, change the action back to Block
Advanced customization with Cloudflare Workers for Framer
The setup above covers most geo-blocking needs. However, if you need more advanced features like custom error pages, complex routing logic, or want to serve different content based on location, you'll need to set up Cloudflare Workers.
Advanced use cases that require Workers:
- Custom HTML error pages instead of Cloudflare's default error
- Redirect blocked users to a specific page explaining why they're blocked
- Show different content or pricing based on visitor location
- Combine geo-blocking with other complex conditions
- A/B testing based on geography
Setting up Workers requires technical knowledge of JavaScript, DNS configuration, and routing. If your team needs help implementing these advanced features or wants to explore more sophisticated geo-blocking setups, our agency specializes in Framer and Cloudflare implementations and can guide you through the setup process.
Troubleshooting common issues with Framer geo-blocking
Rules aren't working at all
Cause: DNS isn't in Proxied mode (cloud is gray instead of orange).
Solution: Go to DNS → Records in Cloudflare and click the cloud icon to turn it orange (Proxied).
Some visitors from blocked countries can still access the site
Cause: Visitors using VPNs can bypass geo-blocking by appearing to be from a different country.
Solution: This is a limitation of all geo-blocking systems. You can add additional security layers like rate limiting or bot detection, but VPNs will always be able to bypass country-based restrictions.
Site is slow or timing out
Cause: Cloudflare's SSL/TLS settings might be misconfigured.
Solution: Go to SSL/TLS → Overview and ensure it's set to Full or Full (strict).
Frequently asked questions about geo-blocking in Framer
How do I block a country on my Framer site?
To block a country on your Framer site, first connect your domain to Cloudflare with Proxied mode enabled (orange cloud). Then go to Security → WAF → Custom rules in Cloudflare and create a new rule. Select Country as the field, is in as the operator, choose the countries you want to block, and set the action to Block. This works on Cloudflare's free plan and takes about 5 minutes to set up.
Can I block multiple countries from accessing my Framer site?
Yes, you can block multiple countries in a single WAF rule. When creating your rule in Cloudflare, select Country → is in and then click in the value field to select multiple countries from the dropdown list. All selected countries will be blocked by the same rule. You can block as many countries as needed, and the rule applies instantly once deployed.
Does Framer have built-in geo-blocking features?
No, Framer doesn't have built-in geo-blocking features. To block countries from accessing your Framer site, you need to use a third-party service like Cloudflare's WAF. This requires connecting your Framer domain to Cloudflare and configuring WAF Custom Rules. The good news is that Cloudflare's free plan includes geo-blocking capabilities, so you don't need to pay for this feature.
How do I whitelist only certain countries on Framer?
To whitelist specific countries (allowing only them and blocking all others), use Cloudflare's Expression Editor with inverse logic. Create a WAF rule with the expression (not ip.geoip.country in {"US" "CA" "GB"}) and set the action to Block. Replace the country codes with your desired countries. This blocks everything NOT in your list, creating an effective whitelist for your Framer site.
Does geo-blocking affect SEO on Framer sites?
Geo-blocking can affect SEO if you block countries where search engine crawlers operate. Google's main crawlers typically come from the US, but they also crawl from other locations. To prevent SEO issues, modify your WAF rule to exclude verified bots by using the expression (ip.geoip.country in {"CN" "RU"} and not cf.client.bot). This blocks the countries but allows search engines to crawl your Framer site normally.
Can people bypass geo-blocking with a VPN on my Framer site?
Yes, users can bypass geo-blocking by using a VPN to appear as if they're accessing your site from a different country. This is a limitation of all IP-based geo-blocking systems, not just Cloudflare or Framer. If you need stricter access control, consider combining geo-blocking with other security measures like authentication, bot detection, or rate limiting to create multiple layers of protection.
Is geo-blocking free on Cloudflare for Framer sites?
Yes, geo-blocking using WAF Custom Rules is available on Cloudflare's free plan. You can create country-based blocking rules without paying anything. Cloudflare's free plan includes enough WAF rules for most sites. However, some advanced features like custom response codes or Bot Management scores require paid Cloudflare plans (starting at $20/month for Pro).
How do I block an entire continent from my Framer site?
To block an entire continent, create a WAF rule in Cloudflare and select Continent as the field instead of Country. Choose equals as the operator and select the continent you want to block (Africa, Asia, Europe, North America, South America, Oceania, or Antarctica). This blocks all countries within that continent with a single rule, which is more efficient than blocking countries individually.
Can I show a custom error page for blocked countries on Framer?
Yes, but this requires setting up Cloudflare Workers, which is more advanced than basic WAF rules. With Workers, you can detect a visitor's country and return custom HTML content instead of Cloudflare's default error page. This allows you to explain why access is restricted or redirect users to alternative resources. If you need this functionality, it requires JavaScript knowledge or professional implementation assistance.
How long does it take for geo-blocking to work on my Framer site?
Geo-blocking rules in Cloudflare typically take effect within 1-2 minutes after deployment. However, if you just connected your domain to Cloudflare, you may need to wait for DNS propagation (up to 24 hours, though usually 1-2 hours). Once your DNS is pointing to Cloudflare with Proxied mode enabled, any WAF rules you create apply almost immediately to all incoming traffic.
Conclusion
Implementing geo-blocking on your Framer site using Cloudflare WAF provides straightforward control over who can access your content based on geographic location. By connecting your domain to Cloudflare and configuring simple WAF rules, you can block specific countries, create whitelists, or filter traffic by continent—all without writing code or paying for premium features.
The basic setup works for most use cases, from reducing spam to meeting regulatory requirements. Your Framer site remains fast and functional while Cloudflare handles the geographic filtering at the network edge. For businesses needing more advanced features like custom error pages or complex conditional routing, Cloudflare Workers provide additional capabilities.
If your team needs help implementing geo-blocking, evaluating whether it's the right solution for your business, or setting up advanced customization, our agency specializes in Framer and Cloudflare implementations and can guide you through the entire process.


Join readers commenting on this post!