Have you ever filled out a lengthy form online, only to lose your progress when you accidentally closed the tab or refreshed the page? While Webflow doesn't offer native form auto-saving, you can easily implement this functionality by adding our pre-built script to your site — no coding knowledge required.
This step-by-step guide will show you how to add auto-save capabilities to your Webflow forms, from implementing the script to testing the complete setup.
You'll learn how to configure form fields, manage saved data, and verify everything works correctly. The entire process takes just a few minutes and requires only basic Webflow knowledge.
When to use form auto-save in Webflow?
Auto-saving forms can transform your user experience and significantly impact your conversion rates. Before diving into the implementation, let's understand when and why you might want to use this functionality.
Consider these common scenarios where form auto-save can be valuable:
- Complex contact forms
- Customers provide detailed project requirements
- Their input is saved in real-time
- No work is lost if they need to step away
- Result: Better lead quality and user satisfaction
- Long-form job applications
- Users fill out detailed job applications
- Progress is saved automatically as they type
- They can return later to complete the form
- Result: Higher completion rates and better candidate experience
Understanding form auto-save in Webflow
Webflow form auto-save works by storing form data in the user's browser local storage. This creates a reliable way to preserve form progress without requiring server-side storage or user accounts.
This auto-save functionality has many benefits, including:
- Saves data in real-time as user types
- Works entirely in the user's browser
- Requires no external dependencies
- Automatically restores progress when users return
- Expires saved data after 7 days (configurable to any other time length)
Step-by-step implementation of Webflow form auto-save
Let's walk through the process of setting up form auto-save on your Webflow forms.
Step 1: Add the JavaScript code to enable Webflow auto-save feature
First, add this custom script to your Webflow site:
<script>
/**
 * BRIX Templates Auto-Save for Webflow Forms
 * Automatically saves user input in localStorage in real time
 * @version 1.0.0
 */
(function() {
  'use strict';

  // Configuration
  const CONFIG = {
    expiryDays: 7, // Number of days before saved data expires
    saveInterval: 1000 // Save frequency in milliseconds
  };

  function initBrixAutoSaveForms() {
    // Find all forms with our special attribute
    const autoSaveForms = document.querySelectorAll('form[brix-templates-autosave]');

    if (!autoSaveForms.length) {
      console.log('No forms found with the attribute [brix-templates-autosave].');
      return;
    }

    autoSaveForms.forEach((form, index) => {
      // Create unique storage key for each form
      const storageKey = `brixTemplatesAutoSaveForm_${index}`;

      // Restore any saved data immediately
      restoreFormData(form, storageKey);

      // Save data periodically
      setInterval(() => {
        saveFormData(form, storageKey);
      }, CONFIG.saveInterval);
    });
  }

  function saveFormData(form, storageKey) {
    // Get all form fields
    const fields = form.querySelectorAll('input, textarea, select');
    const formData = {
      timestamp: new Date().getTime(), // Add timestamp for expiry checking
      data: {}
    };

    fields.forEach(field => {
      const key = field.name || field.id;
      if (key) {
        formData.data[key] = field.value;
      }
    });

    // Save to local storage
    localStorage.setItem(storageKey, JSON.stringify(formData));
    console.log('Form data saved successfully');
  }

  function restoreFormData(form, storageKey) {
    const savedData = localStorage.getItem(storageKey);
    if (!savedData) return;

    try {
      const parsedData = JSON.parse(savedData);

      // Check if data has expired
      const now = new Date().getTime();
      const expiryTime = parsedData.timestamp + (CONFIG.expiryDays * 24 * 60 * 60 * 1000);

      if (now > expiryTime) {
        localStorage.removeItem(storageKey);
        return;
      }

      const fields = form.querySelectorAll('input, textarea, select');

      fields.forEach(field => {
        const key = field.name || field.id;
        if (key && parsedData.data[key] !== undefined) {
          field.value = parsedData.data[key];
        }
      });

      console.log('Form data restored successfully');
    } catch (error) {
      console.error('Error parsing saved form data:', error);
    }
  }

  // Initialize when DOM is ready
  if (document.readyState === 'loading') {
    document.addEventListener('DOMContentLoaded', initBrixAutoSaveForms);
  } else {
    initBrixAutoSaveForms();
  }
})();
</script>
Let's understand how this code works and how it enables this auto-save feature.
1. Form detection: Automatically finds forms with the brix-templates-autosave attribute.
2. Form data save process: Monitors form fields and saves data every second, storing the information with timestamps in the user browser local storage.
3. Form data restore and cleanup: Checks for and loads previously saved data when the page loads. If the data is older than 7 days (or any other time you prefer — more info below), it removes it automatically.
The auto-save script includes built-in data expiration after 7 days by default. You can adjust this by changing the expiryDays value in the CONFIG variable at the top of the script. For example, to make data expire after 30 days, set expiryDays: 30.
Step 2: Add to Webflow page or project settings
Choose where to implement the functionality based on your needs:
Page-specific implementation: Perfect when you only need auto-save on specific pages. To implement:
- In Webflow Designer, navigate to Pages
- Select the target page
- Click the Settings icon (gear symbol)
- Scroll to "Before </body> tag" section
- Paste the code and click Save

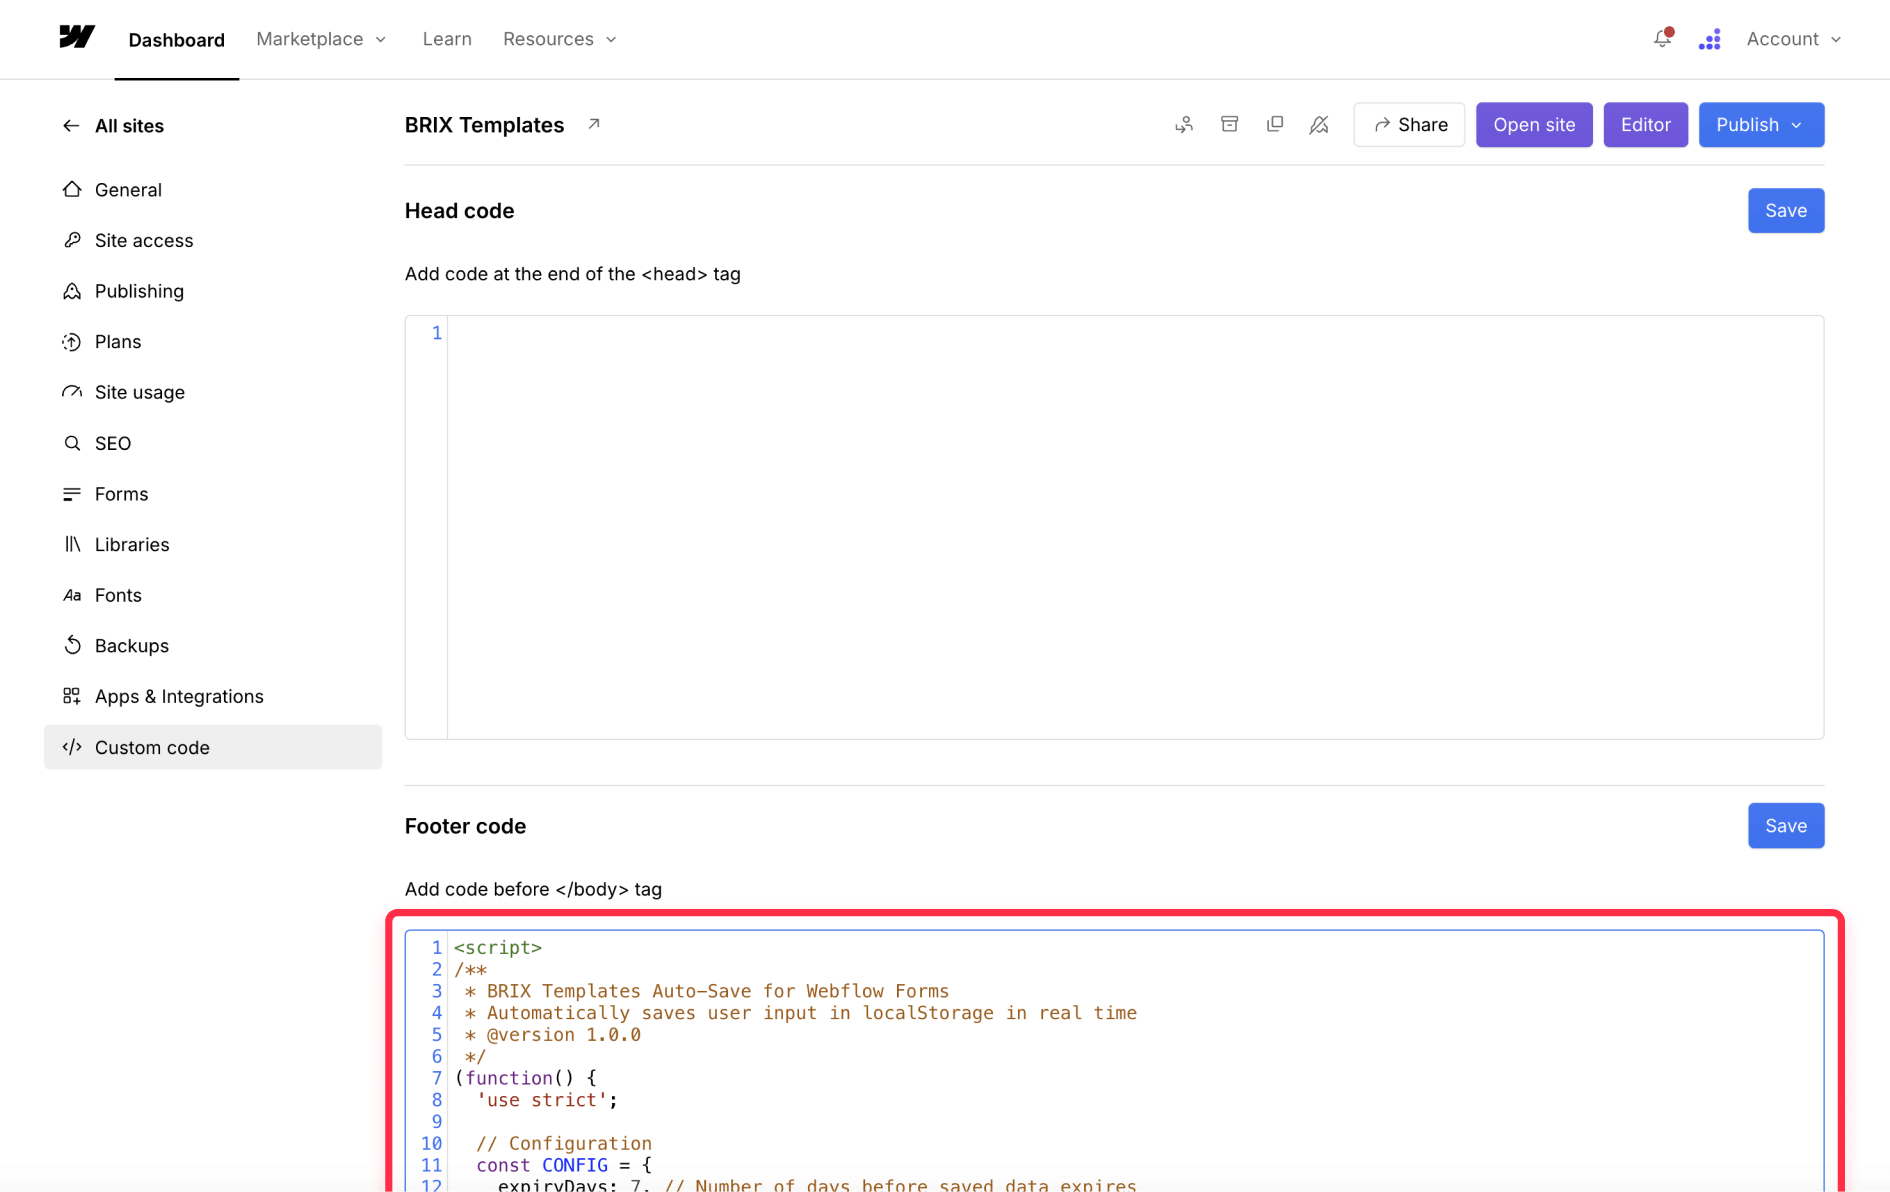
Site-wide implementation: Ideal when you want auto-save across multiple forms that are live on many (or all) pages on your website. To implement:
- In Webflow Designer, open Project Settings
- Select the "Custom Code" tab
- Scroll to the "Footer Code" section
- Paste the code and click Save Changes
Step 2.1 (Optional): Webflow form data cleanup code
If you want to prevent a form from displaying previously submitted data when a user returns to it (i.e., after reaching the thank you page), add this simple cleanup script:
<script>
/**
 * BRIX Templates Form Data Cleanup
 * Clears all saved form data from localStorage
 */
(function() {
  Object.keys(localStorage).forEach(key => {
    if (key.startsWith('brixTemplatesAutoSaveForm_')) {
      localStorage.removeItem(key);
    }
  });
})();
</script>
This script automatically cleans up all auto-saved form data from the browser's local storage. To add it, simply complete the following steps:
1. Open your Thank You page in Webflow Designer
2. Click the settings gear icon
3. Scroll to the "Before </body> tag" section
4. Paste the cleanup code
You can add this code to any page where you want to clear saved form data using the same steps.
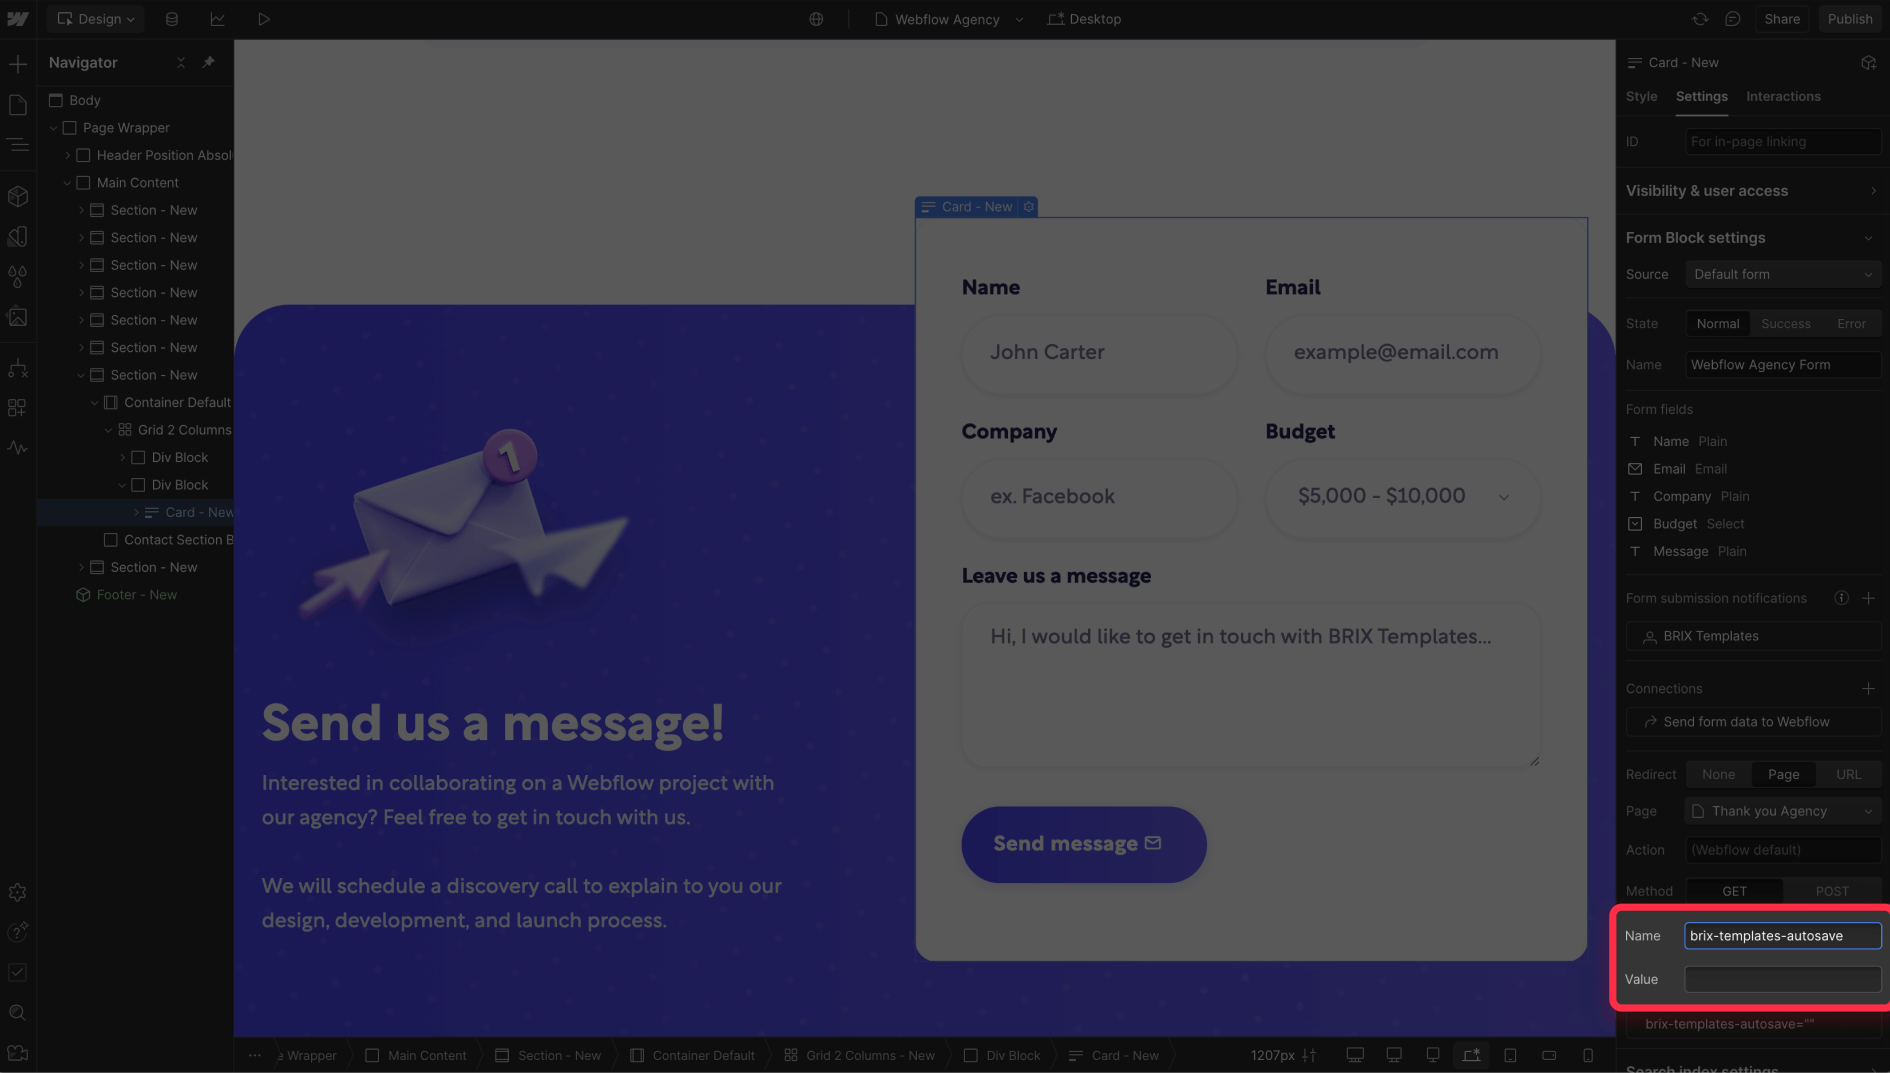
Step 3: Configure your Webflow forms to enable the auto-save
- Select your form in the Webflow Designer
- Open the Settings panel (gear icon)
- Under Custom Attributes, add:
- Name: brix-templates-autosave
- Value: (leave blank)
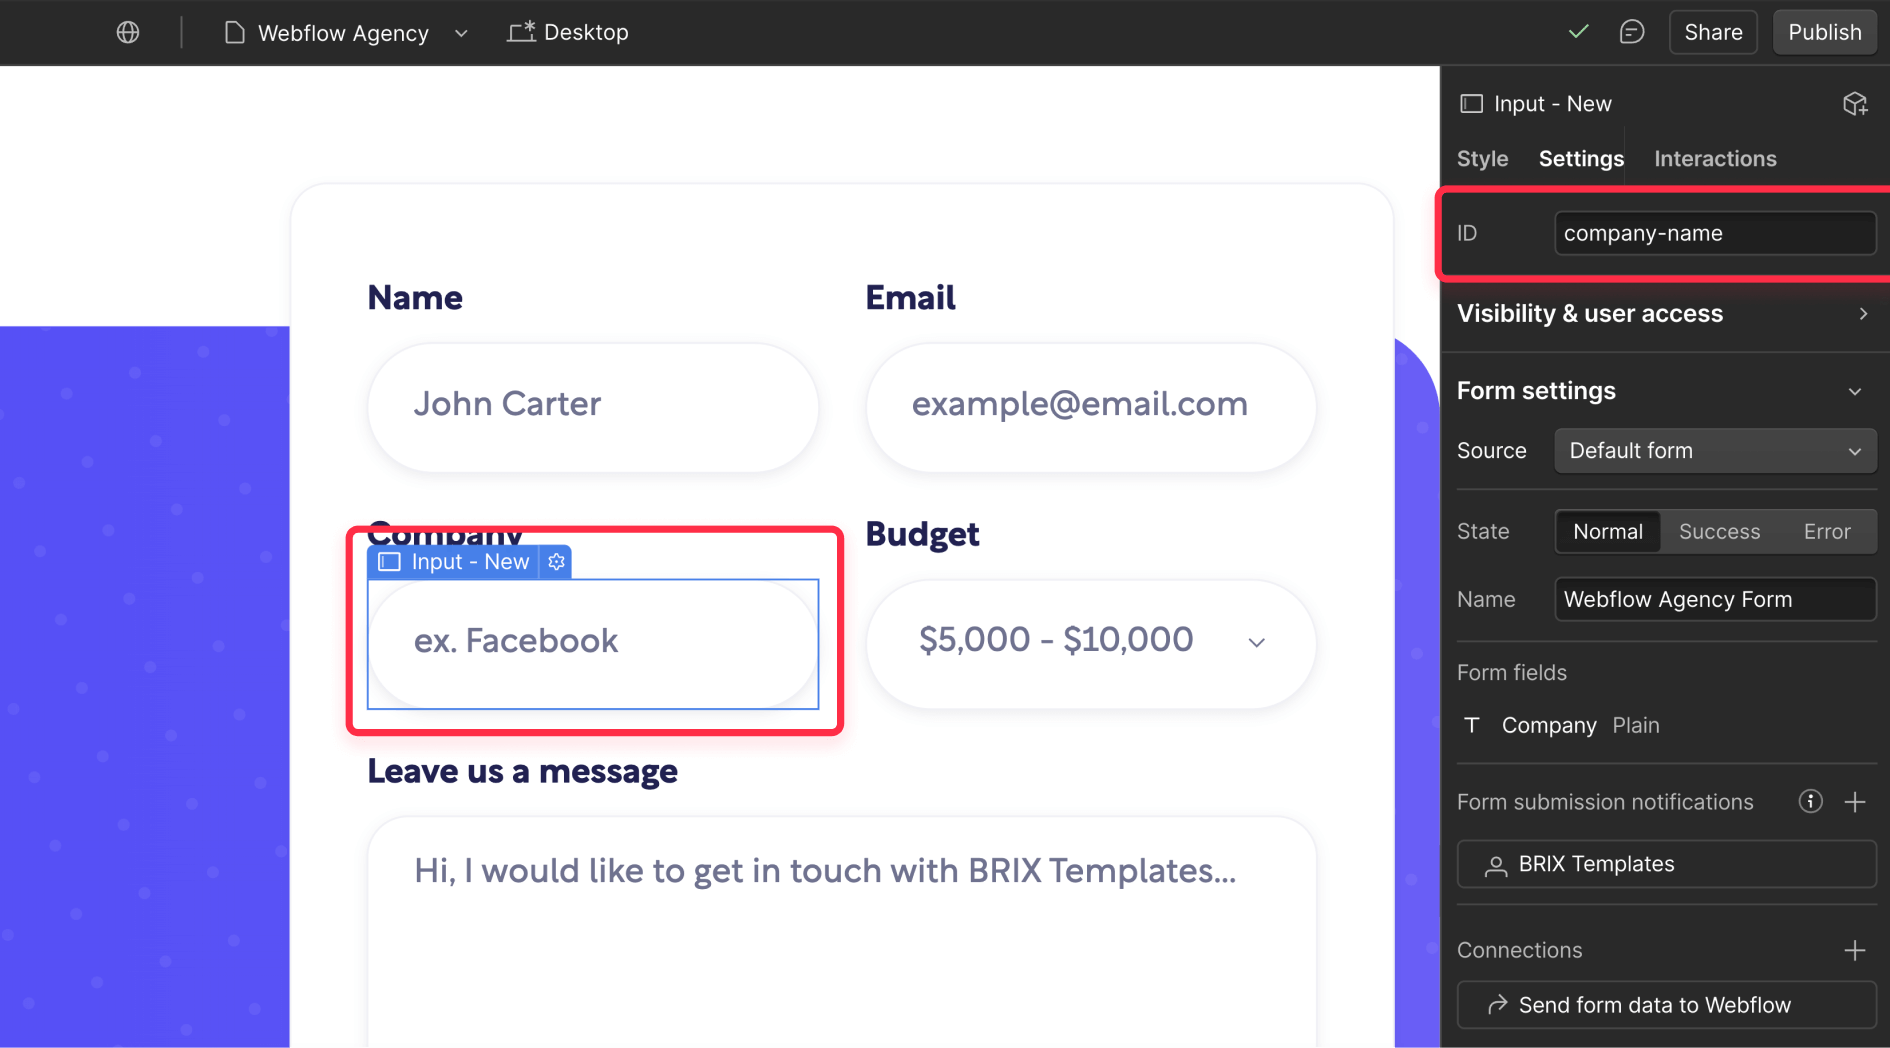
Step 4: Label your Webflow form fields
This step is crucial for the auto-save functionality to work properly. Each field needs a unique identifier so the script can correctly save and restore the data:
- Select each form input, textarea, or select element inside your Webflow form
- In the Settings panel, add a unique ID attribute
- Use descriptive names like "first-name" or "company-size"
Without these unique identifiers, the script won't be able to match saved data with the correct form fields when restoring content. Think of these labels as addresses—they tell the script exactly where to store and retrieve each piece of information.
Step 5: Testing the auto-save feature in your Webflow form
Before going live, we recommend you to publish on your staging (webflow.io) domain and test the implementation:
- Publish your staging Webflow site
- Fill out some form fields
- Check the browser console (open with F12) for save confirmations
- Refresh the page to verify data restoration
- Test across different browsers
Conclusion
You now have the knowledge to implement form auto-save functionality in your Webflow site. This feature can significantly improve user experience and form completion rates by ensuring no progress is lost.
While this implementation works perfectly for basic auto-save needs, there are more advanced scenarios you might encounter:
- Multi-page form persistence: Save progress across multiple pages of a form, like a job application spread over several steps.
- Custom save triggers: Save data at specific moments, like when users click certain buttons or reach the bottom of a section.
- Advanced data validation: Validate and format data before saving, such as checking if an email is valid or a phone number follows the correct pattern.
- Complex form logic: Handle conditional fields or dynamic form sections that appear/disappear based on user input.
For these advanced implementations or custom solutions tailored to your specific needs, feel free to reach out to our dream team at BRIX Templates — we can help create a solution that perfectly matches your requirements.


Join readers commenting on this post!