
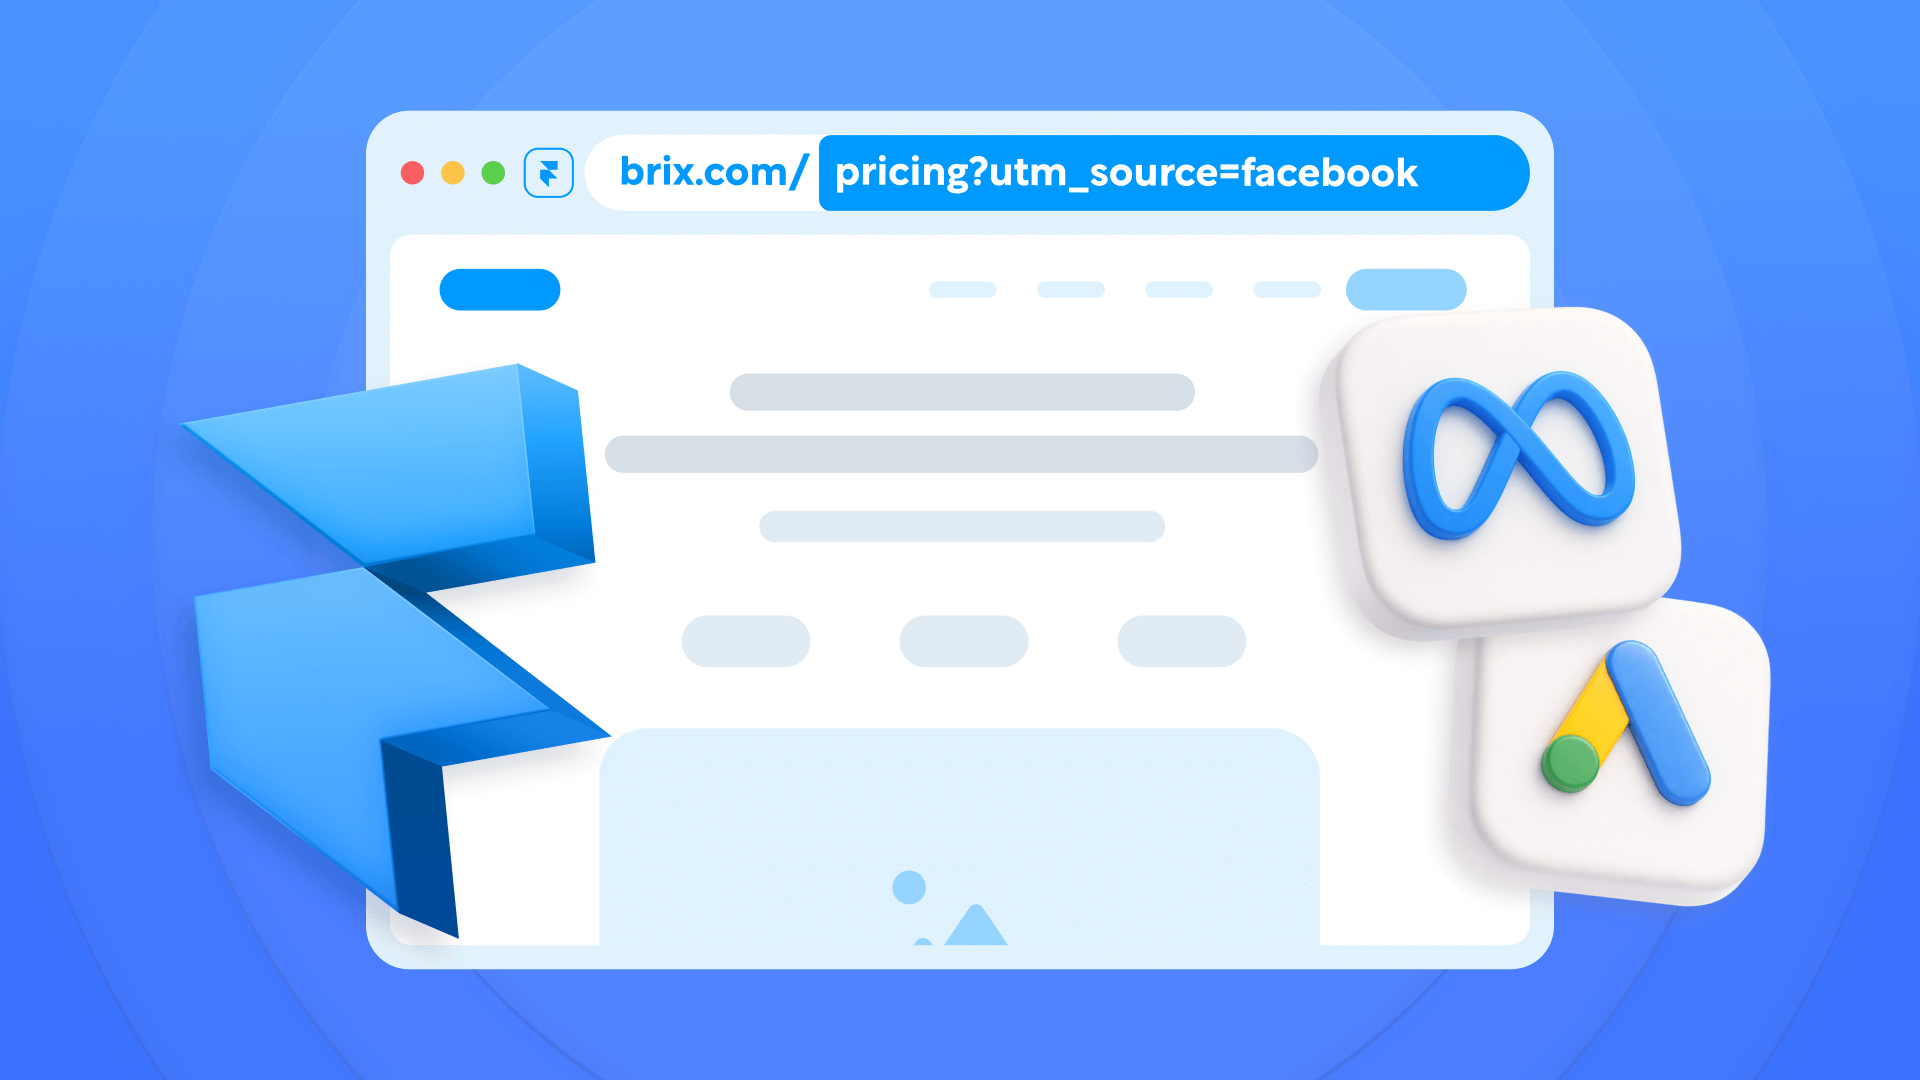
Capturing and displaying dynamic content based on URL parameters transforms static Webflow landing pages into personalized experiences that match your marketing campaigns perfectly.
While traditional approaches require complex backend systems or expensive third-party tools, brix-utm attribute automatic content replacement seamlessly extracts values from UTM parameters and other URL data to personalize your Webflow pages instantly.
This approach enables dynamic headlines, personalized offers, and targeted messaging that matches your PPC campaigns, email marketing, and A/B tests without any server-side code.
Best of all, this Webflow attribute can be implemented for free in 5 minutes (or less!).
Why dynamic URL parameters in Webflow matter for PPC and marketing campaigns
Understanding the strategic value of URL-based personalization helps you implement this feature effectively across different marketing channels:
- PPC campaign optimization with perfect message match: Ensure headlines match exact ad copy to reduce bounce rates ("Webflow Agency in [city]" matches exactly), maintain keyword relevance from search query to landing page, and achieve higher Quality Scores through consistency. Studies show that matching landing page content to ad copy can increase conversions by over 200%
- Email marketing personalization at scale: Display segment-specific offers based on email campaign parameters ("Welcome back, [name]!"), create personalized greetings using subscriber data in URLs, and tailor value propositions to different audience segments without creating multiple pages
- A/B testing without complex tools: Test different headlines and value propositions using URL parameters ("Build Faster" vs "Save Time"), run multivariate tests with simple parameter combinations, and track performance without expensive testing platforms
Understanding how URL parameters enable instant personalization in Webflow
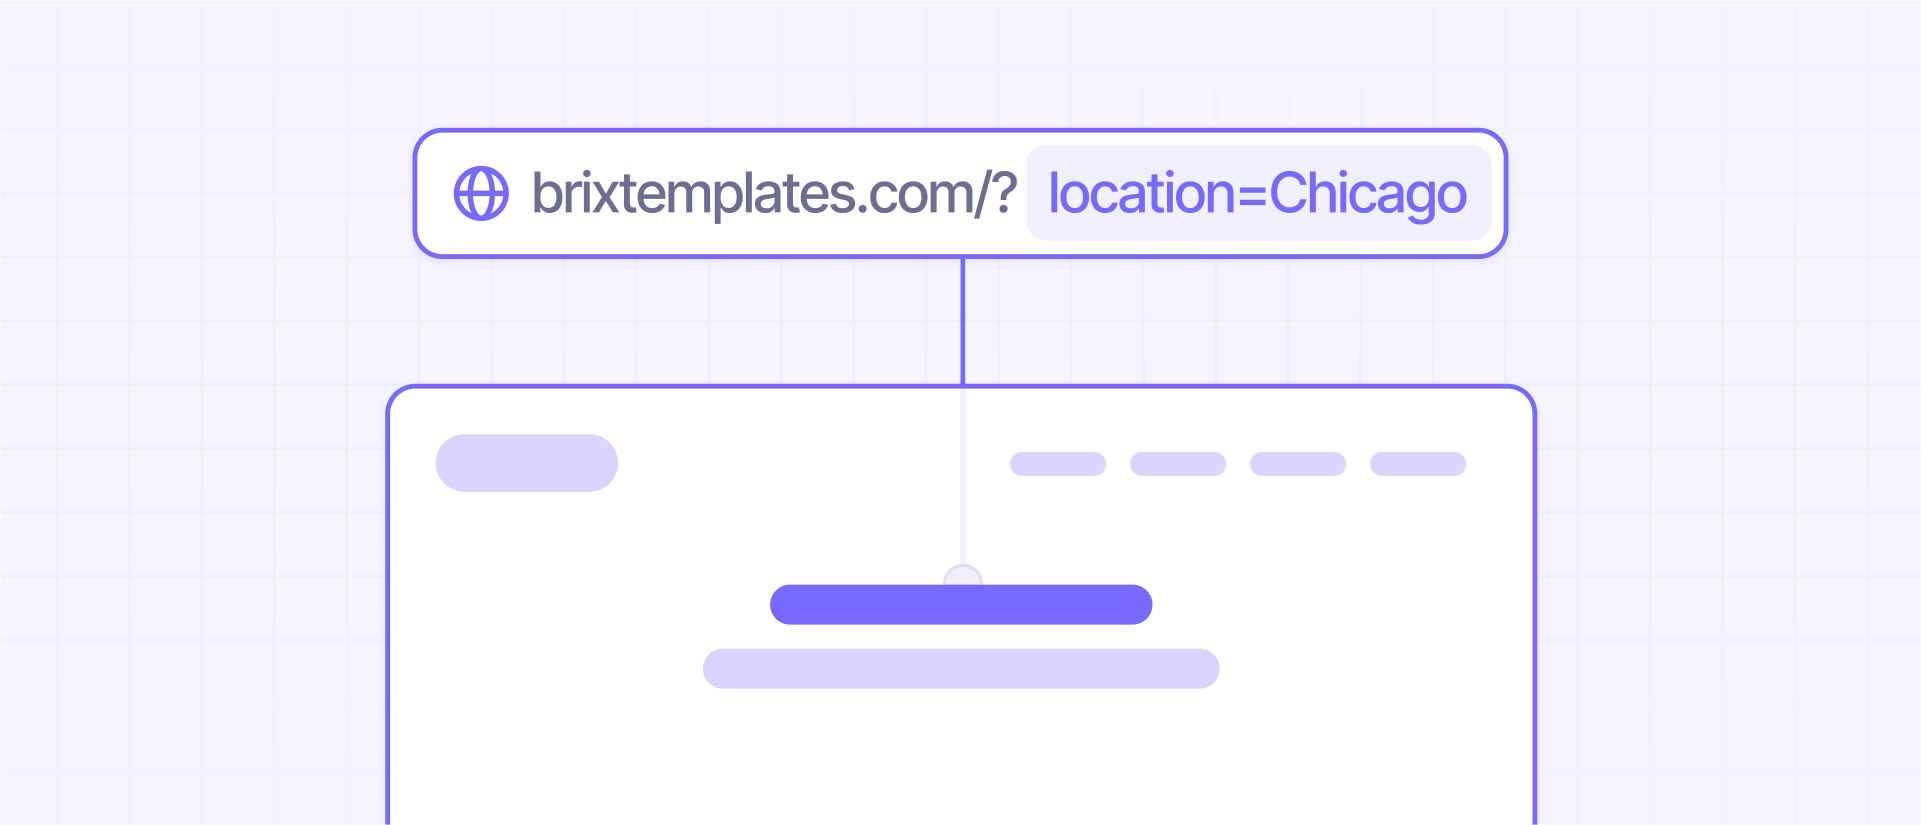
URL parameters are the key to dynamic content without databases or server-side processing. When someone clicks your ad or email link, the URL can carry information that instantly personalizes their Webflow experience.
For example, this URL: yoursite.com/offer?utm_source=google&utm_medium=cpc&utm_term=premium+webflow+templates&location=NYC
Contains four parameters that can instantly customize the page:
- utm_source: Traffic source (google)
- utm_medium: Marketing medium (cpc)
- utm_term: Keywords or targeting (premium webflow templates)
- location: User location (NYC)
1 - Setting up your URL parameter strategy in your Webflow site
Before implementing the technical solution, plan your parameter strategy for maximum impact:
Standard UTM parameters for tracking
UTM parameters are the industry standard for campaign tracking:
- utm_source: Where traffic originates (google, facebook, newsletter)
- utm_medium: Marketing medium (cpc, email, social, banner)
- utm_campaign: Specific campaign name (summer-sale, black-friday)
- utm_term: Keywords for paid search (your targeted keywords)
- utm_content: Differentiate similar content or links (headline-a, cta-blue)
Custom parameters for personalization
Beyond UTM parameters, create custom parameters for deeper personalization:
- headline: Dynamic headline text
- offer: Special offer or discount amount
- audience: Segment identifier (enterprise, startup, agency)
- location: Geographic targeting (NYC, London, Sydney)
- name: Personalize with recipient's name
You can create as many custom parameters as you need, making them as specific as your campaigns require - there's no limit to how granular your personalization can be.
2 - Implementing dynamic content replacement in Webflow
The setup involves adding JavaScript to your Webflow project and configuring elements with the brix-utm attribute.
Adding the brix-utm script to your Webflow project
Here's how to add the URL parameter detection functionality:
1 - Copy the implementation script:
/**
* BRIX Templates URL Parameter Auto-Population
* Automatically fills content in your Webflow site with data from URL parameters
* @version 2.1.0
*/
(function() {
'use strict';
// Configuration
const ALLOWED_PROTOCOLS = {
link: ['http:', 'https:', 'mailto:', 'tel:', 'sms:'],
image: ['http:', 'https:'],
default: ['http:', 'https:']
};
// Optional: Add your domains here to restrict external URLs (only applies to http/https)
const ALLOWED_DOMAINS = []; // e.g., ['example.com', 'www.example.com']
// Cache for URLSearchParams (performance optimization)
let urlParamsCache = null;
// Helper function to get URL parameters
function getUrlParameter(name) {
if (!urlParamsCache) {
urlParamsCache = new URLSearchParams(window.location.search);
}
const value = urlParamsCache.get(name);
// Treat whitespace-only as empty
return value && value.trim() ? value.trim() : null;
}
// Helper function to validate URLs for security
function isValidUrl(url, context = 'default') {
if (!url || !url.trim()) return false;
try {
const parsed = new URL(url, window.location.href);
// Get appropriate protocol list for context
const allowedProtocols = ALLOWED_PROTOCOLS[context] || ALLOWED_PROTOCOLS.default;
// Check protocol
if (!allowedProtocols.includes(parsed.protocol)) {
console.warn(`Blocked URL with disallowed protocol for ${context}:`, parsed.protocol);
return false;
}
// Only check domains for http/https URLs
if (ALLOWED_DOMAINS.length > 0 && (parsed.protocol === 'http:' || parsed.protocol === 'https:')) {
const hostname = parsed.hostname.toLowerCase();
const isAllowed = ALLOWED_DOMAINS.some(domain => {
const normalizedDomain = domain.toLowerCase();
// Exact match or subdomain match
return hostname === normalizedDomain ||
hostname.endsWith('.' + normalizedDomain);
});
if (!isAllowed) {
console.warn('Blocked URL with disallowed domain:', hostname);
return false;
}
}
return true;
} catch (e) {
return false;
}
}
// Helper function to format parameter values
function formatParameterValue(value, format) {
// Preserve "0" and other falsy-but-valid values
if (value == null || value === '') return '';
// Trim whitespace before formatting
value = String(value).trim();
// Apply formatting
switch(format) {
case 'uppercase':
return value.toUpperCase();
case 'lowercase':
return value.toLowerCase();
case 'capitalize':
return value.charAt(0).toUpperCase() + value.slice(1).toLowerCase();
case 'title':
// Note: This is ASCII-centric (English-oriented)
// For full Unicode support, you'd need \p{L} with 'u' flag
return value.toLowerCase().replace(/\b\w/g, l => l.toUpperCase());
default:
return value;
}
}
function initBrixUtm() {
// Reset cache for new run
urlParamsCache = null;
// Find all elements with brix-utm attribute
const elements = document.querySelectorAll('[brix-utm]');
if (elements.length === 0) {
return;
}
// Process each element
elements.forEach(element => {
const paramName = element.getAttribute('brix-utm');
// Skip if attribute is empty
if (!paramName) {
console.warn('Empty brix-utm attribute found, skipping element');
return;
}
const format = element.getAttribute('brix-utm-format');
const fallback = element.getAttribute('brix-utm-fallback');
// Get parameter value from URL (already trimmed)
const rawValue = getUrlParameter(paramName);
// Determine what value to use
let finalValue = null;
if (rawValue !== null) {
// We have a non-empty parameter value
finalValue = rawValue;
} else if (fallback) {
// No parameter or empty parameter, use fallback
finalValue = fallback;
}
// Apply formatting to whatever value we're using (param or fallback)
if (finalValue !== null && format) {
finalValue = formatParameterValue(finalValue, format);
}
// Only update if we have a value to set
if (finalValue !== null) {
// Check if already populated with this value (for idempotence)
const previousValue = element.getAttribute('data-brix-value');
if (previousValue === finalValue) {
return; // Already set to this value, skip
}
// Handle different element types
const tagName = element.tagName.toLowerCase();
let updateSuccess = false;
if (tagName === 'input' || tagName === 'textarea') {
// Form fields
if (element.value !== finalValue) {
element.value = finalValue;
// Fire events in correct order: input then change
element.dispatchEvent(new Event('input', { bubbles: true }));
element.dispatchEvent(new Event('change', { bubbles: true }));
}
updateSuccess = true;
} else if (tagName === 'select') {
// Select elements - verify the value actually took
const oldValue = element.value;
element.value = finalValue;
// Check if the value was actually set
if (element.value === finalValue) {
if (oldValue !== finalValue) {
// Fire events only if value changed
element.dispatchEvent(new Event('input', { bubbles: true }));
element.dispatchEvent(new Event('change', { bubbles: true }));
}
updateSuccess = true;
} else {
console.warn(`Select element could not accept value "${finalValue}"`);
}
} else if (tagName === 'img') {
// Images - only update if valid URL for image context
if (isValidUrl(finalValue, 'image')) {
element.src = finalValue;
// Don't auto-set alt to URL - that's poor accessibility
updateSuccess = true;
} else {
console.warn('Skipping invalid image URL:', finalValue);
}
} else if (tagName === 'a') {
// Links - only update href if explicitly requested and valid
if (element.getAttribute('brix-utm-target') === 'href') {
if (isValidUrl(finalValue, 'link')) {
element.href = finalValue;
updateSuccess = true;
} else {
console.warn('Skipping invalid link URL:', finalValue);
}
} else {
// Update text content
element.textContent = finalValue;
updateSuccess = true;
}
} else {
// All other elements - update text content
element.textContent = finalValue;
updateSuccess = true;
}
// Only mark as populated if update was successful
if (updateSuccess) {
element.classList.add('brix-populated');
element.setAttribute('data-brix-value', finalValue);
}
}
// If no value and no fallback, leave original content unchanged
});
// Clear cache after processing
urlParamsCache = null;
}
// Always initialize Webflow array (fixes brittle hook issue)
window.Webflow = window.Webflow || [];
// Run when DOM is ready
if (document.readyState === 'loading') {
document.addEventListener('DOMContentLoaded', initBrixUtm);
} else {
initBrixUtm();
}
// Re-run on Webflow page changes (for AJAX navigation)
window.Webflow.push(function() {
initBrixUtm();
});
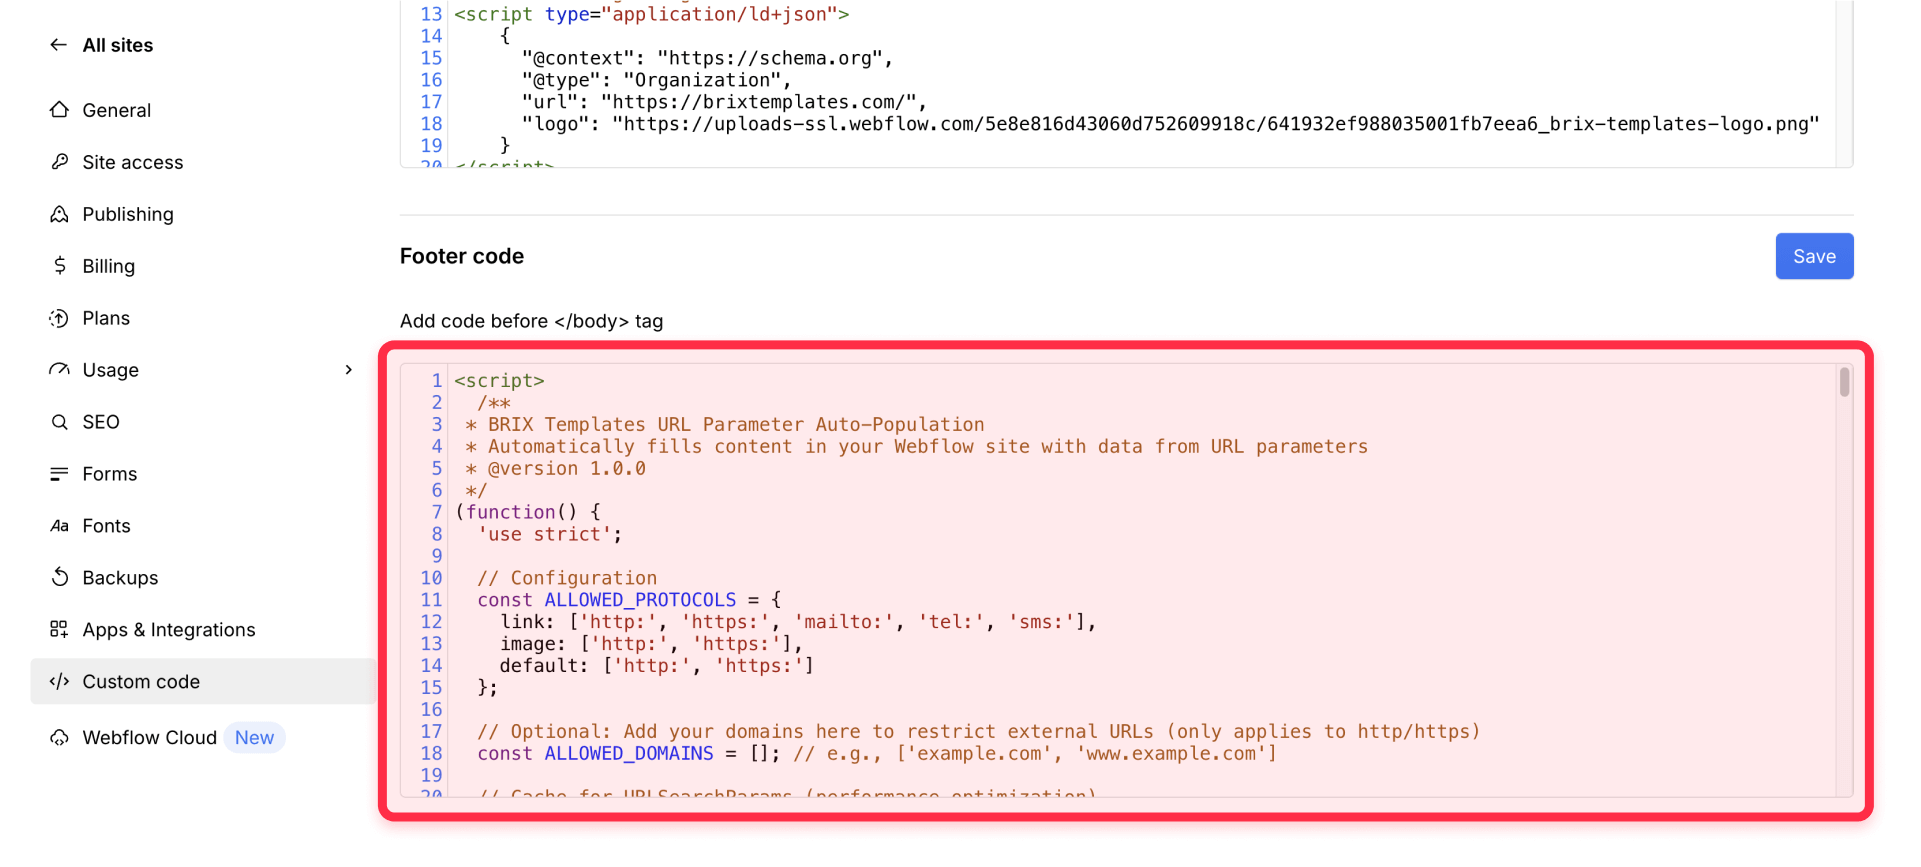
})();2 - Add the script to Webflow:
- For testing on one page: Open Page Settings (gear icon) > Go to Custom Code section > Paste into Before </body> tag > Click Save
- For your entire site: Go to Project Settings > Custom Code > Add to Footer Code section > Click Save Changes
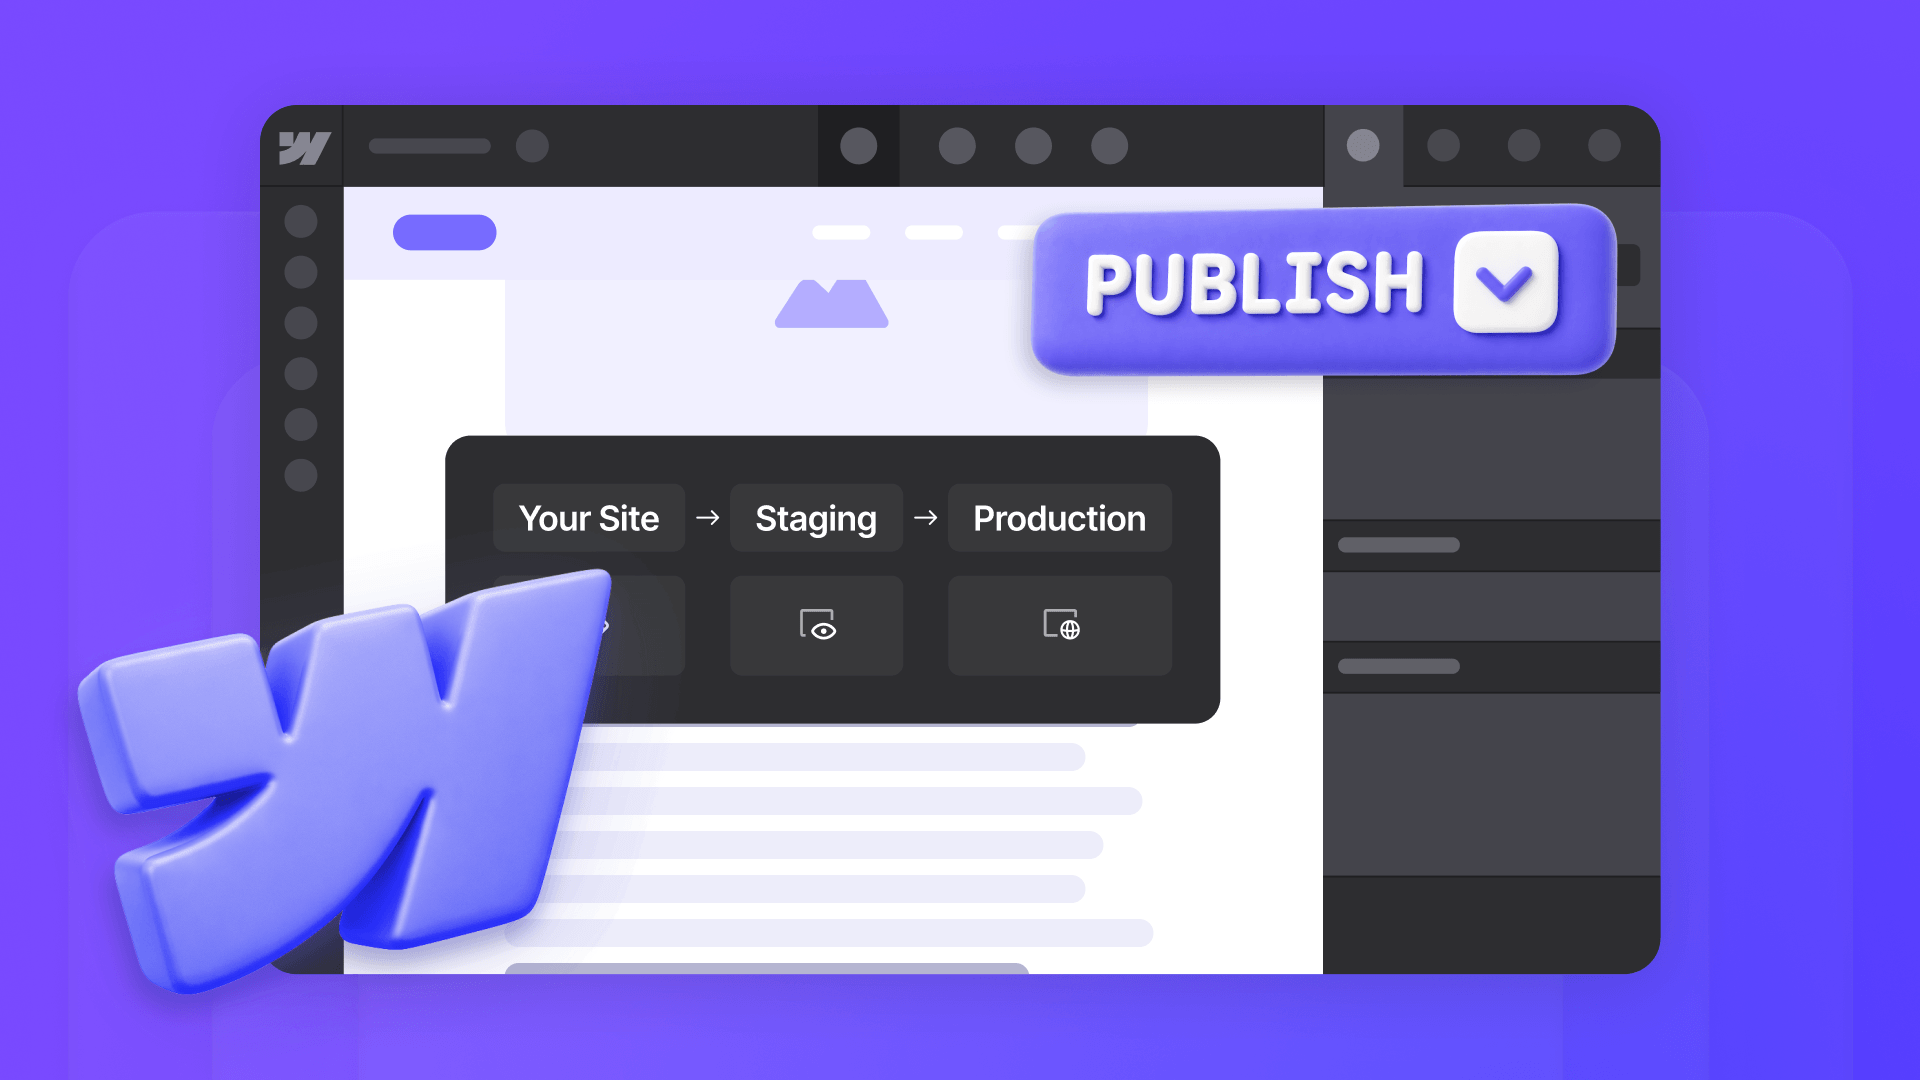
3 - Publish your site: Click Publish in the top-right corner > Select your domains and publish to see changes live
Configuring Webflow elements with brix-utm
Now let's set up your elements to automatically receive URL parameter data:
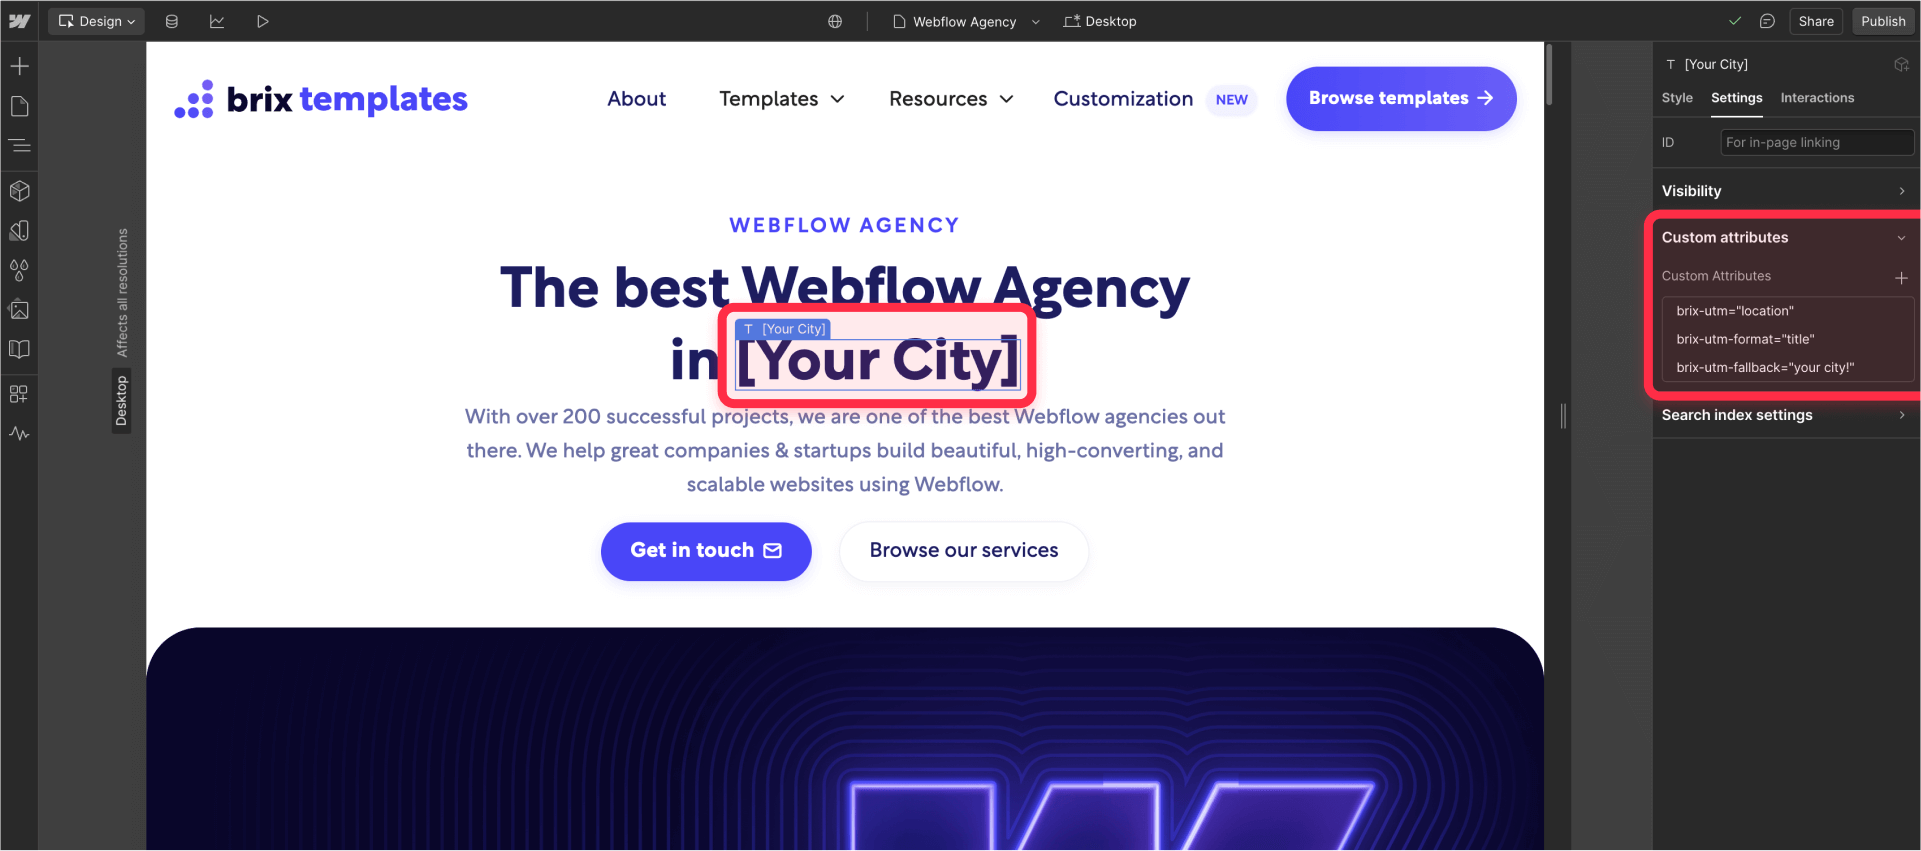
- Select your target element: Open your page in Webflow Designer > Click on any heading, text, button, or element you want to make dynamic
- Add the core attribute: In the Settings panel, scroll to Custom Attributes > Click + to add:
- Name: brix-utm
- Value: The URL parameter name (like utm_term or headline)
- Add optional attributes for enhanced control:
- brix-utm-format: Format the text (uppercase, lowercase, capitalize, title)
- brix-utm-fallback: Default text when no parameter exists
Understanding brix-utm attribute options in Webflow
The brix-utm system uses simple, intuitive attributes:
Core attribute:
- brix-utm: Specifies which URL parameter to extract and display
Formatting options for brix-utm-format:
- uppercase: Convert to ALL CAPS
- lowercase: convert to all lowercase
- capitalize: Capitalize first letter only
- title: Capitalize Each Word
Fallback handling:
- brix-utm-fallback: Text to display when parameter doesn't exist
- Without fallback, original element content remains unchanged
3 - Real-world marketing implementation examples in Webflow
Example 1: Location-based PPC personalization
You're running Google Ads campaigns targeting different cities. Your ads mention specific locations to increase relevance.
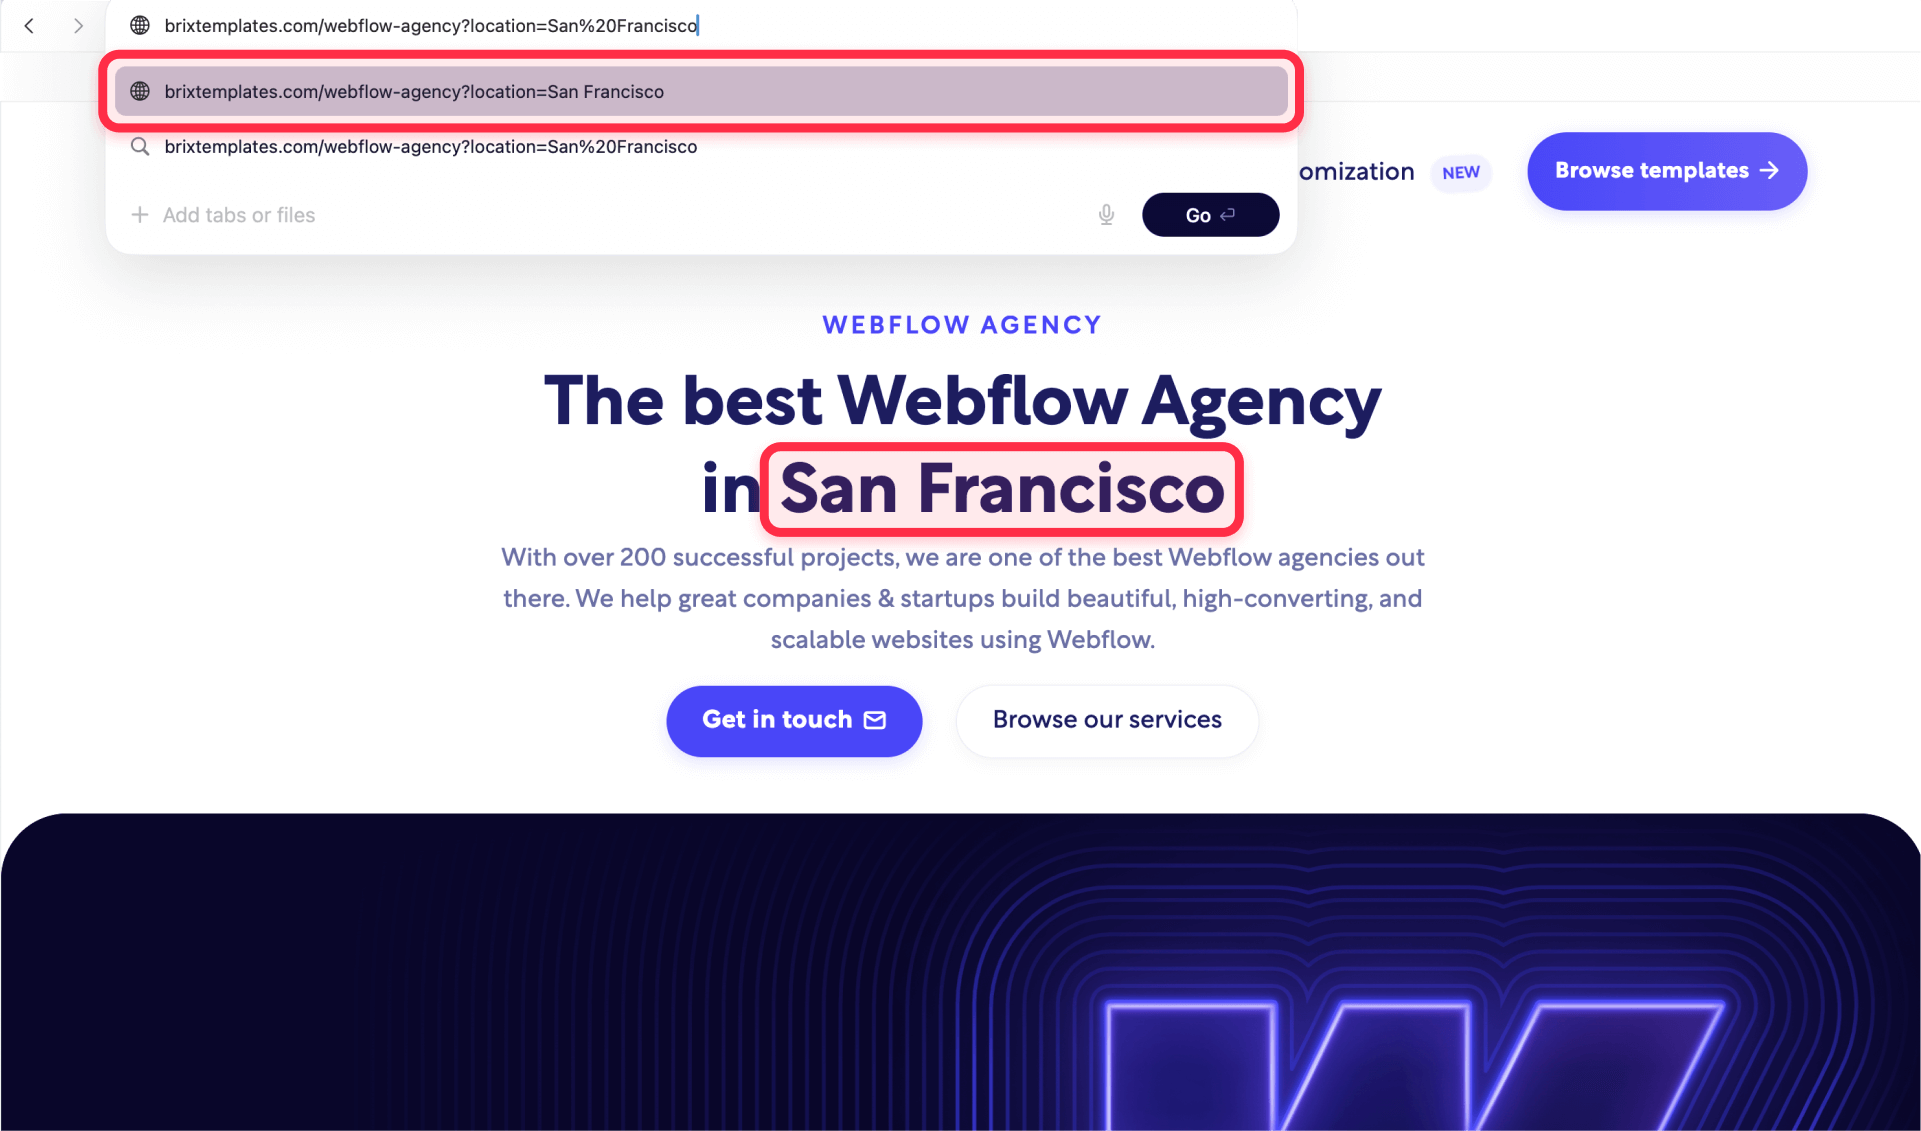
- Google Ad for New York: "Find a Webflow Agency in NYC" Your URL: yoursite.com/agency?location=NYC&utm_source=google
- Google Ad for London: "Find a Webflow Agency in London" Your URL: yoursite.com/agency?location=London&utm_source=google
Webflow setup:
Element: H1 Heading
Attributes:
- brix-utm: location
- brix-utm-fallback: Your City
Content: Find a Webflow Agency in [Your City]
Result: Visitors from NYC see "Find a Webflow Agency in NYC", London visitors see their city, and direct visitors see "Your City"
Example 2: Personalized email campaign greetings
You're sending email campaigns and want to personalize the landing page with the recipient's name.
- Email link for John: yoursite.com/welcome?name=John
- Email link for Sarah: yoursite.com/welcome?name=Sarah
Webflow setup for personalized greeting:
Element: H2 Heading
Element: H2 Heading
Attributes:
- brix-utm: name
- brix-utm-format: capitalize
- brix-utm-fallback: there
Content: Welcome back, [there]!
Result: John sees "Welcome back, John!" and Sarah sees “Welcome back, Sarah!”
Example 3: A/B testing with dynamic variants
Test different value propositions using URL parameters:
- Version A: yoursite.com?test=speed&headline=Build+Websites+10x+Faster
- Version B: yoursite.com?test=easy&headline=No+Code+Required
Webflow setup:
Element: Hero Heading
Attributes:
- brix-utm: headline
- brix-utm-fallback: Build Better Websites
Track conversions by variant in Google Analytics or your tracking platform of preference.
4 - Testing your dynamic content implementation in Webflow
Ensure your personalization works flawlessly across all campaigns:
- Create test URLs with all your parameter combinations
- Visit: yoursite.com/page?utm_term=test&location=NYC
- Verify elements update with parameter values and formatting options
- Check that fallbacks work when parameters are missing
Troubleshooting common Webflow URL parameter issues
Here's how to fix the most common problems:
Content doesn't update with URL parameters:
- Verify parameter names match exactly (they're case-sensitive)
- Ensure you published your site after adding the script
- Check that the URL actually contains the parameters
- Confirm attributes are spelled correctly: brix-utm not brix-url
Formatting doesn't apply:
- Check brix-utm-format is spelled correctly
- Ensure format value is valid (e.g. lowercase)
Elements change content with a delay:
- Consider adding a subtle animation to mask the update
- You can add CSS transitions for smooth appearance: [brix-utm] { transition: opacity 0.3s; }
- This creates a fade-in effect while content populates
Advanced features and security in Webflow
While this implementation focuses primarily on text content, it also supports:
- Form fields: Works with input, textarea, and select elements. For select dropdowns, the option value must exist or it won't populate
- Images: Can update img src attributes (http/https only, with security validation)
- Links: Can update a href attributes using brix-utm-target="href". Supports http, https, mailto, tel, and sms protocols (Includes security validation to prevent javascript: URLs)
For security, the script includes:
- Protocol validation (blocks javascript: and other dangerous protocols)
- Tag-aware validation (images only accept http/https, links accept mailto/tel/sms)
- Optional domain allowlisting for http/https URLs
- Automatic trimming of whitespace parameters
- Special handling for number inputs to prevent invalid values
Frequently asked questions about Webflow URL parameters
How do I update my Webflow website H1 to mirror a URL parameter?
Add brix-utm="parameter-name" as a custom attribute to any heading element in Webflow Designer. When your URL contains ?parameter-name=value, that heading automatically displays the value. Add brix-utm-fallback="default text" for when no parameter exists.
Does this work with Webflow's CMS and dynamic pages?
Yes! The script works on any Webflow page including CMS template pages. You can combine CMS content with URL parameter personalization for powerful dynamic experiences on collection pages.
How many URL parameters can I use on one Webflow page?
There's no technical limit, but for best performance stick to 10-15 dynamic elements per page. Focus on high-impact personalizations like headlines, offers, and CTAs for maximum conversion impact.
Can I personalize images or links in Webflow using URL parameters?
Yes! For images, apply brix-utm to an img element to change its source. For links, add brix-utm-target="href" to an a element to update the destination URL dynamically.
Conclusion
Implementing dynamic content with the brix-utm attribute transforms your Webflow landing pages into intelligent, personalized experiences that adapt to each visitor's journey and campaign source. This solution dramatically improves conversion rates through perfect message match, enables sophisticated campaign tracking without complex tools, and delivers the personalization modern users expect.
Start implementing URL-based personalization today to improve your ads quality scores, increase conversion rates, and deliver experiences that turn paid traffic into customers through intelligent message matching.
For advanced implementations requiring complex conditional logic, multi-step personalization flows, or integration with any marketing automation platforms, our Webflow development agency can help you with your specific marketing requirements.


Join readers commenting on this post!