How to block bots and crawlers from your Webflow site


Over the past few months, many Webflow users have noticed unexpected spikes in their bandwidth usage. The reason? A surge of new AI crawlers like GPTBot, ClaudeBot, and PerplexityBot scraping websites for training data.
These bots can actually drive valuable traffic to your site—many users now rely on AI search tools to find information, making these crawlers increasingly important for content discovery. However, if you're seeing bandwidth overages on your Webflow hosting plan or prefer to control how your content is used, you may want to manage which bots can access your site.
For those who want to block certain bots while keeping others active, this guide shows you exactly how to implement comprehensive bot controls on your Webflow site using a proven two-step approach.

Why blocking certain bots matters for Webflow sites
- Bandwidth optimization: AI training bots can consume gigabytes of bandwidth daily, pushing you into higher hosting tiers
- Content control: Choose whether your content gets used in AI training datasets
- Selective access: Block aggressive scrapers while keeping beneficial SEO bots like Googlebot active
Implementing comprehensive bot controls using both robots.txt and meta tags ensures you achieve all three objectives effectively.
Understanding bot traffic on your Webflow site
Before implementing comprehensive bot controls, it's important to understand which bots visit your site and what they do. Not all bots are problematic—search engine crawlers like Googlebot and Bingbot are essential for SEO, while social media bots enable link previews when your content is shared.
The new wave of AI bots operates differently. Bots like GPTBot (OpenAI), ClaudeBot (Anthropic), and PerplexityBot crawl sites to build training data or provide real-time search results. These bots help users discover your content through AI assistants but also consume significantly more bandwidth than traditional search crawlers.
To effectively control these bots, you need a comprehensive defense strategy: robots.txt as your primary barrier that prevents crawling (saving bandwidth immediately), and meta tags as backup protection for bots that might bypass your first line of defense through external links or direct access.
Bot blocking code generator tool for Webflow
To simplify implementation, we've created a tool that generates the complete code package you need for comprehensive bot protection. The generator produces both robots.txt rules and HTML meta tags that work together as a layered defense system.
Using the code generator
The tool presents a list of common bots with checkboxes:
- Search engine bots: Googlebot, bingbot, DuckDuckBot (usually keep enabled)
- Social media bots: facebookexternalhit, Twitterbot, LinkedInBot
- AI training bots: GPTBot, ClaudeBot, CCBot, Bytespider
- AI search bots: PerplexityBot, OAI-SearchBot, Claude-User
- SEO analysis bots: AhrefsBot, SemrushBot, MJ12bot
Simply check the boxes for bots you want to block, leave unchecked the ones you want to allow, and click Generate Code. The tool produces your complete protection package:
- Robots.txt rules for Step 1 (primary defense)
- HTML meta tags for Step 2 (backup protection)
Copy both generated codes and implement them following the two-step comprehensive process above. The generator ensures proper syntax and includes bot-specific "noindex, nofollow" directives in the meta tags to prevent both indexing and internal link crawling for blocked bots.
Comprehensive bot blocking implementation for Webflow
Effective bot blocking requires a dual-layer approach using both robots.txt and meta tags together.
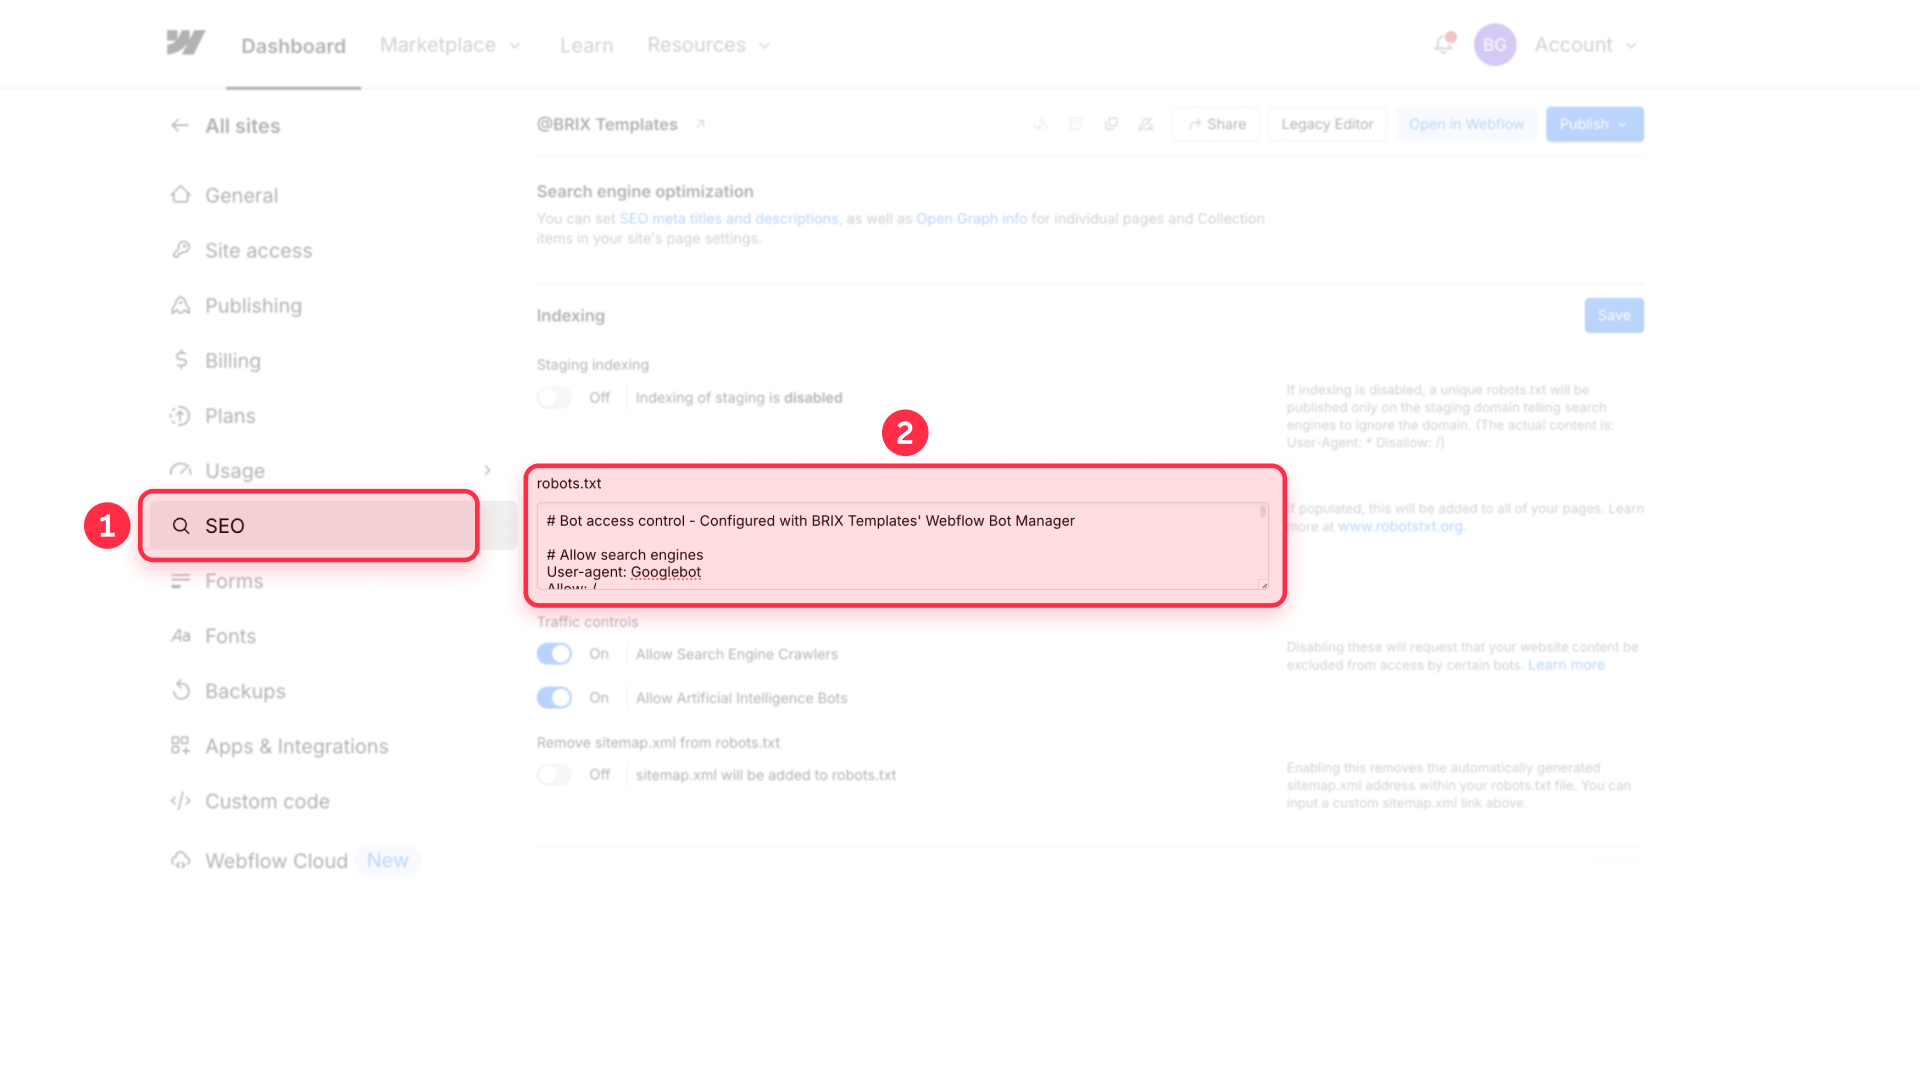
Step 1: Configure robots.txt to prevent crawling
The robots.txt file is your primary defense that prevents bots from crawling your site in the first place, immediately saving bandwidth.
Navigate to your Webflow project settings to set up robots.txt:
- Open your Project Settings in Webflow
- Click on the SEO tab
- Scroll down to find the Robots.txt section
- Click Edit robots.txt to modify the file
- Add your blocking rules from the code generator
- Click Save Changes


Step 2: Add site-wide meta tags as backup protection
Meta tags with bot-specific "noindex, nofollow" directives serve as your backup defense for bots that might bypass robots.txt through external links or direct access. The "nofollow" directive is crucial—it prevents blocked bots from continuing to crawl internal links after landing on your site.
Complete your protection with site-wide meta tags:
- Stay in Project Settings
- Navigate to the Custom Code tab
- Add your meta tags to the Head Code section
- Click Save Changes
- Publish your site to activate both protection layers

Why both protection layers are essential
This dual-layer approach works because each method addresses different scenarios:
- Robots.txt blocks most bot crawling upfront, providing immediate bandwidth savings by preventing bots from accessing your pages
- Meta tags catch any bots that bypass robots.txt (through external links, cached URLs, or direct access). When blocked bots encounter their specific 'noindex, nofollow' tags, they stop indexing content and stop following internal links, preventing further crawling through your site
Neither method alone provides complete coverage—you need both working together for comprehensive protection that legitimate bots will respect.
Verifying your bot blocking setup in Webflow
After implementing bot blocking, verify everything works correctly. For robots.txt implementation, visit yourdomain.com/robots.txt to confirm the rules appear exactly as configured.
For page-level blocking, check the page's HTML source code to ensure the meta tags are present in the head section. To do this, right-click on your published page and select View Page Source (or press Ctrl+U on Windows or Cmd+Option+U on Mac). Look for your meta tags within the <head> section of the HTML.
Remember that bot blocking rules are suggestions that legitimate crawlers follow voluntarily. Compliant bots will respect your preferences within 24-48 hours.
Advanced bot blocking with Cloudflare and WAFs
For enterprise-level protection that blocks bots before they consume any bandwidth, you need server-level blocking through a Web Application Firewall (WAF).
Services like Cloudflare can identify and block bots at the network edge, preventing them from ever reaching your Webflow site. This approach offers several advantages:
- Higher bandwidth savings: Bots are blocked before they even reach your site
- Protection from malicious scrapers: Blocks bots that ignore robots.txt
- Granular control: Block by IP ranges, user agents, or behavior patterns
- Real-time updates: Automatically blocks newly identified bot threats
Setting up Cloudflare or similar WAF protection requires DNS configuration and technical expertise beyond Webflow's built-in tools. If you need help implementing advanced bot protection or optimizing your Webflow site's performance, our Webflow agency specializes in technical implementations including custom Cloudflare setups and comprehensive bot management strategies.
Frequently asked questions about blocking bots in Webflow
What are the most common bots affecting Webflow bandwidth usage?
The biggest bandwidth consumers on Webflow sites are typically AI training bots like GPTBot (OpenAI), ClaudeBot (Anthropic), CCBot (Common Crawl), and Bytespider (ByteDance). These bots crawl extensively to gather training data for language models. While search engine bots like Googlebot also crawl sites, they're generally more efficient and essential for SEO, so blocking them would harm your search visibility.
How do I block AI bots without affecting Google SEO in Webflow?
To preserve SEO while blocking AI bots, implement both layers of protection correctly. In your robots.txt, add disallow rules for GPTBot, ClaudeBot, and similar AI bots while keeping Googlebot, Bingbot, and other search engines allowed. In your meta tags, specify "noindex, nofollow" directives only for the AI bots you want to block, while explicitly allowing search engines with "index, follow" directives. This comprehensive approach maintains your search rankings while reducing bandwidth consumption from AI training activities.
Can I completely prevent all bots from accessing my Webflow site?
The dual-layer approach of robots.txt plus meta tags will stop all legitimate bots that follow web standards. However, malicious scrapers and bots that ignore these protocols will still access your site. For complete protection against even non-compliant bots, you need server-level blocking through a Web Application Firewall (WAF) service like Cloudflare, which can enforce access rules before bots reach your site.
Does blocking bots affect my Webflow site's discoverability?
Blocking AI search bots like PerplexityBot or OAI-SearchBot through your comprehensive bot controls will reduce your content's visibility in AI-powered search tools that many users now rely on. However, blocking AI training bots like GPTBot or CCBot generally doesn't affect discoverability since they're gathering data for model training, not search results.
How can I monitor which bots are visiting my Webflow site?
Webflow's built-in analytics show overall traffic but don't distinguish bot visits. For detailed bot monitoring, integrate Google Analytics 4 or use server log analysis tools if you have access through Enterprise hosting. Cloudflare's free plan provides basic bot analytics if you route your Webflow site through their service.
Conclusion
Managing bot traffic on your Webflow site requires a comprehensive dual-layer approach to be truly effective. AI bots help users discover your content through new search interfaces, but they also consume bandwidth that impacts your hosting costs.
The comprehensive protection method outlined here—combining robots.txt with site-wide meta tags—gives you robust control over which bots can access your site. If bot traffic continues to strain your resources despite this comprehensive approach, consider implementing server-level protection through a WAF service.
Need help implementing advanced bot protection or optimizing your Webflow site's performance? Our expert Webflow agency specializes in technical implementations that go beyond standard configurations, including custom Cloudflare setups and comprehensive bot management strategies.

How to embed unique HTML on each Webflow CMS page
Learn three options to embed unique HTML on every Webflow CMS page using Dynamic Embeds, Page Custom Code, and Rich Text blocks.

How to lazy load external videos in Framer for faster page speed
Learn two ways to lazy load YouTube and Vimeo in Framer: a quick Code Override tweak plus a click-to-load pattern to boost performance.

How to lazy load external videos in Webflow for faster page speed
Learn two ways to lazy load YouTube and Vimeo in Webflow: quick native fix plus click-to-load pattern for better performance.


