
Your blog visitors finish reading an article, and then what? If you're relying on generic "Latest Posts" or auto-generated category lists, you're letting an algorithm dictate your user's journey instead of strategically guiding them. That indecision is a silent leak costing you session time, pageviews, and ultimately, conversions.
This guide shows you how to take control using Webflow's Multi-Reference field to create a 100% curated content journey.
Why curated related articles matter for Webflow sites
Replacing automatic recommendations with hand-picked related articles is a strategic decision with measurable impact on your growth metrics. For search engines, your site's internal linking structure is a map indicating which pages matter most. By controlling this map, you transform each article from a dead-end into a gateway to deeper content engagement.
Direct engagement boost: Curated recommendations dramatically increase the likelihood of users clicking through to a second or third article. This drives up pages per session and time on site—metrics that search engines love.
Sculpt the customer journey: Guide readers toward your most important articles, compelling case studies, or posts with the highest conversion rates. Your blog becomes a sales funnel, not just a content library.
Curated competitive advantage: While most blogs use automatic systems, offering a manually curated experience sets you apart. It projects authority and attention to detail, creating a premium experience competitors can't easily replicate.
Understanding the key component: Multi-Reference fields in Webflow
The Multi-Reference field lets you create a personalized article list for each blog post. Instead of showing generic "Latest Posts" you can hand-select the exact articles that complement what the user is currently reading.
Technically, it's a CMS field that transforms your collection from a simple post list into a hand-picked content network. Rather than just storing text or images, this field stores connections between articles. It's a native, visual Webflow feature that gives you the power of a relational database without writing a single line of code.
Step-by-step guide: implementing related articles in Webflow
The beauty of Webflow is that this advanced functionality doesn't require plugins or complex code—it's built directly into the CMS. We'll walk through the complete process, from initial collection setup to final section design.
Step 1: Configure the Multi-Reference field in your Webflow CMS
First, we need to give your "Blog" collection the ability to link articles to each other. We'll follow a precise sequence to ensure accurate configuration.
Navigate to your Webflow project and access the CMS settings to begin the setup process.
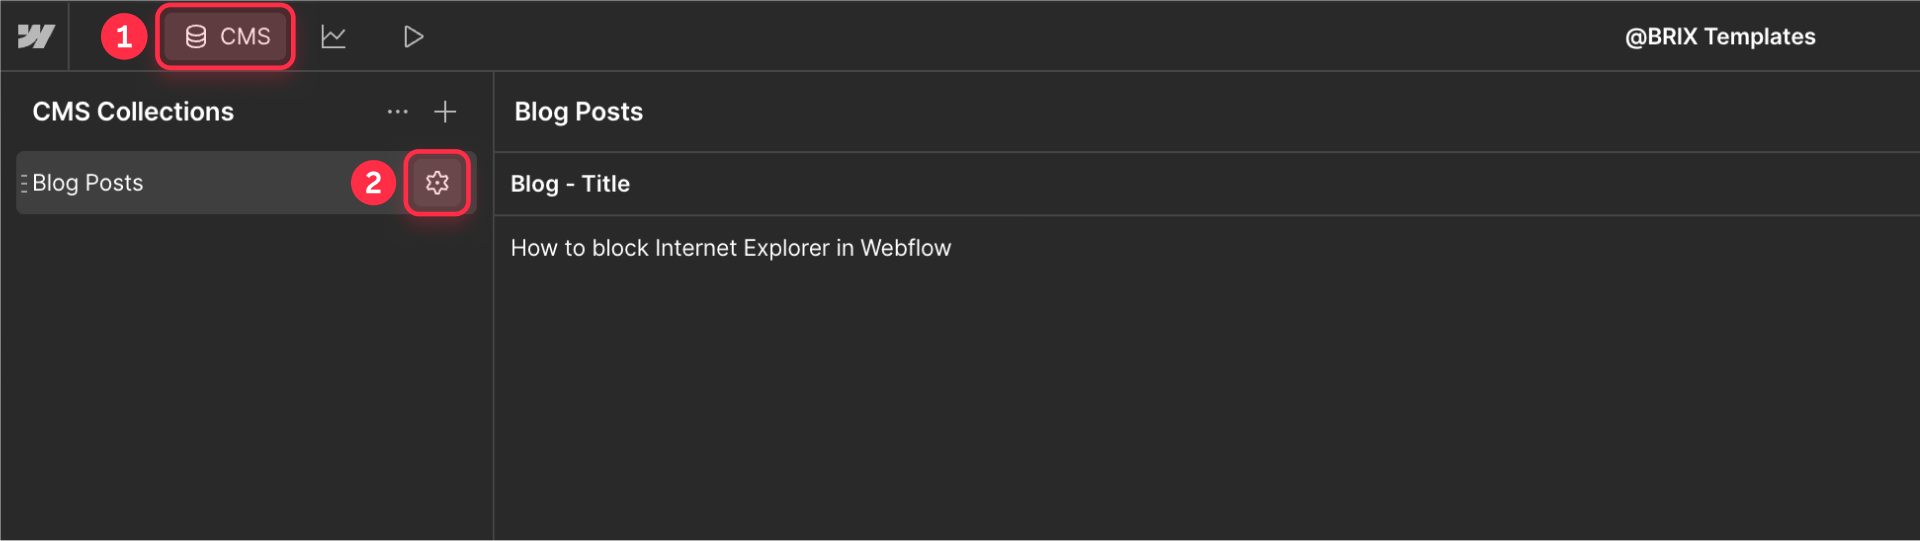
- In the left panel, click the CMS icon
- Hover over your Blog Posts collection and click the Settings (gear) icon to open the collection configuration
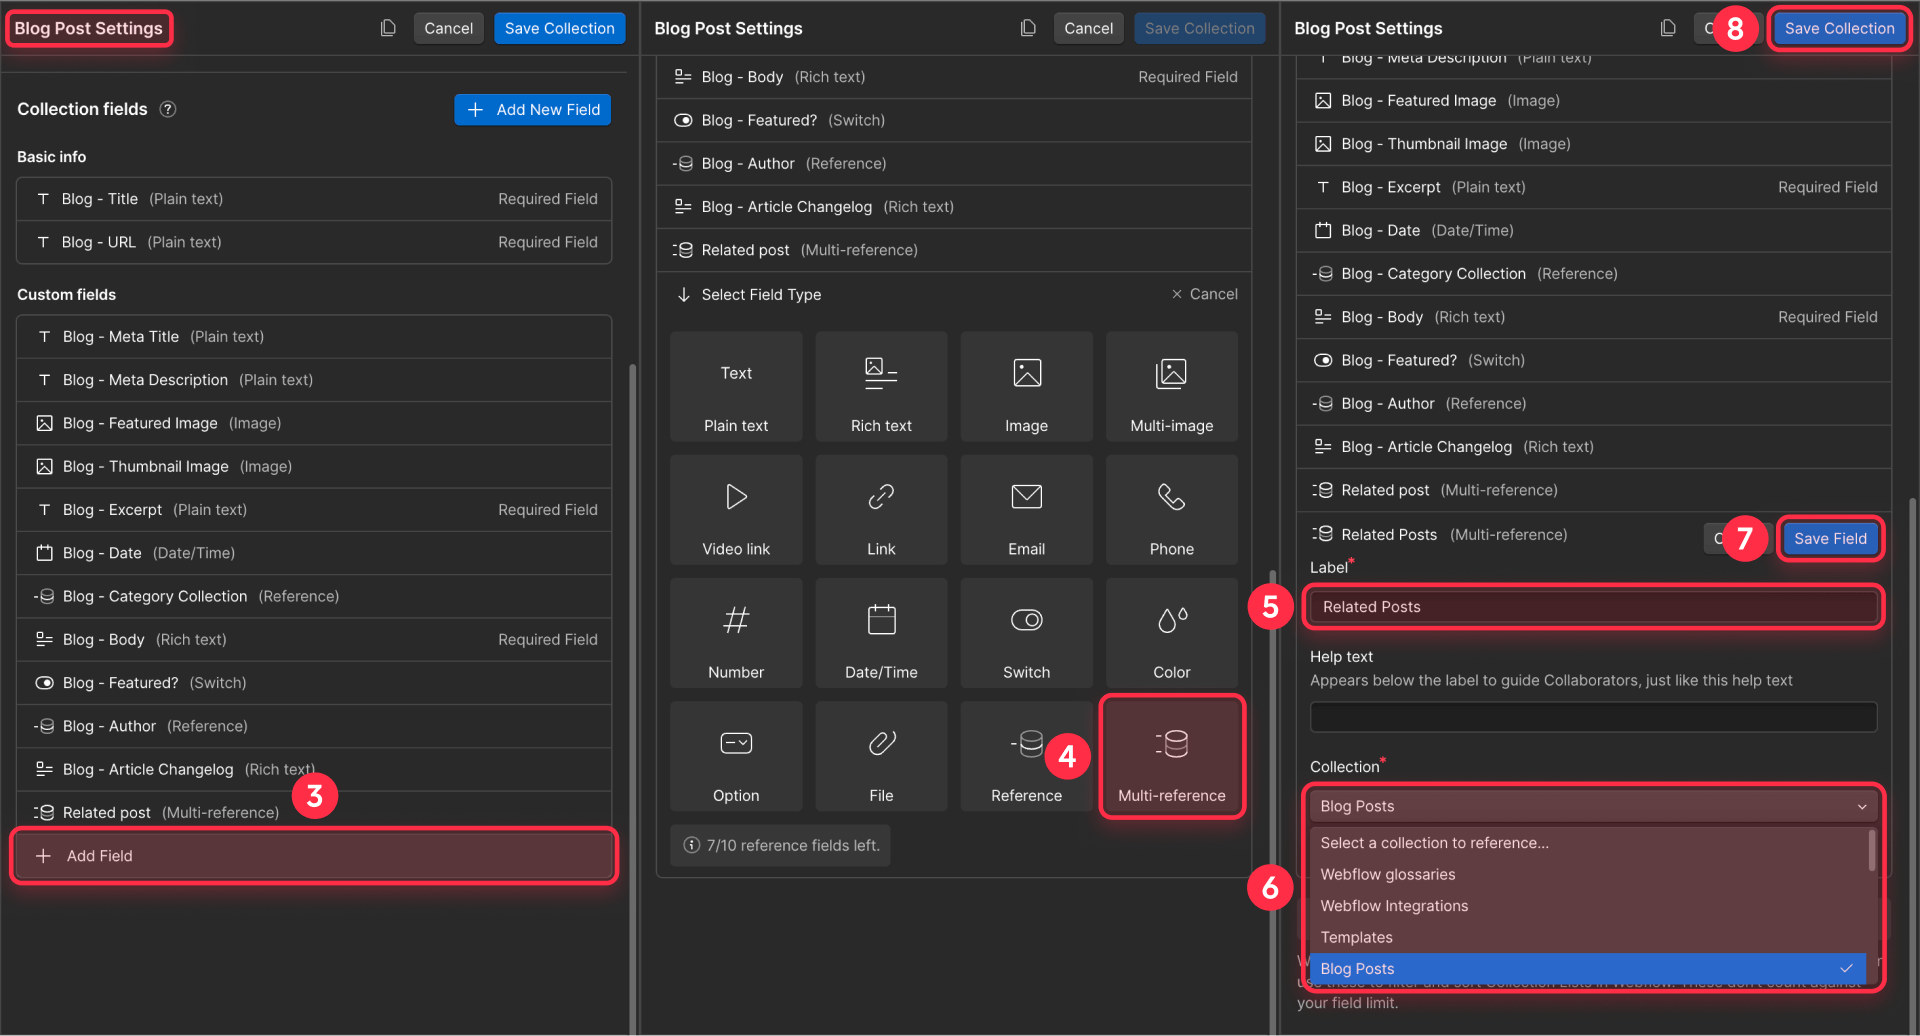
- Inside the collection settings, click the + Add Field button
- In the field types window, select Multi-reference
- Enter a descriptive name in the Label field, such as "Related Posts"
- In the Collection dropdown, select the same Blog Posts collection—this crucial step enables articles to reference each other
- Click Save Field to save your new field configuration
- Finally, click Save Collection in the top-right corner to apply all changes
Step 2: Connect your articles in Webflow CMS
With the CMS structure ready, it's time for the strategic manual work. Follow these steps to connect your articles effectively.
This is where your content strategy comes into play—think carefully about which articles complement each other and create logical content pathways for your readers.
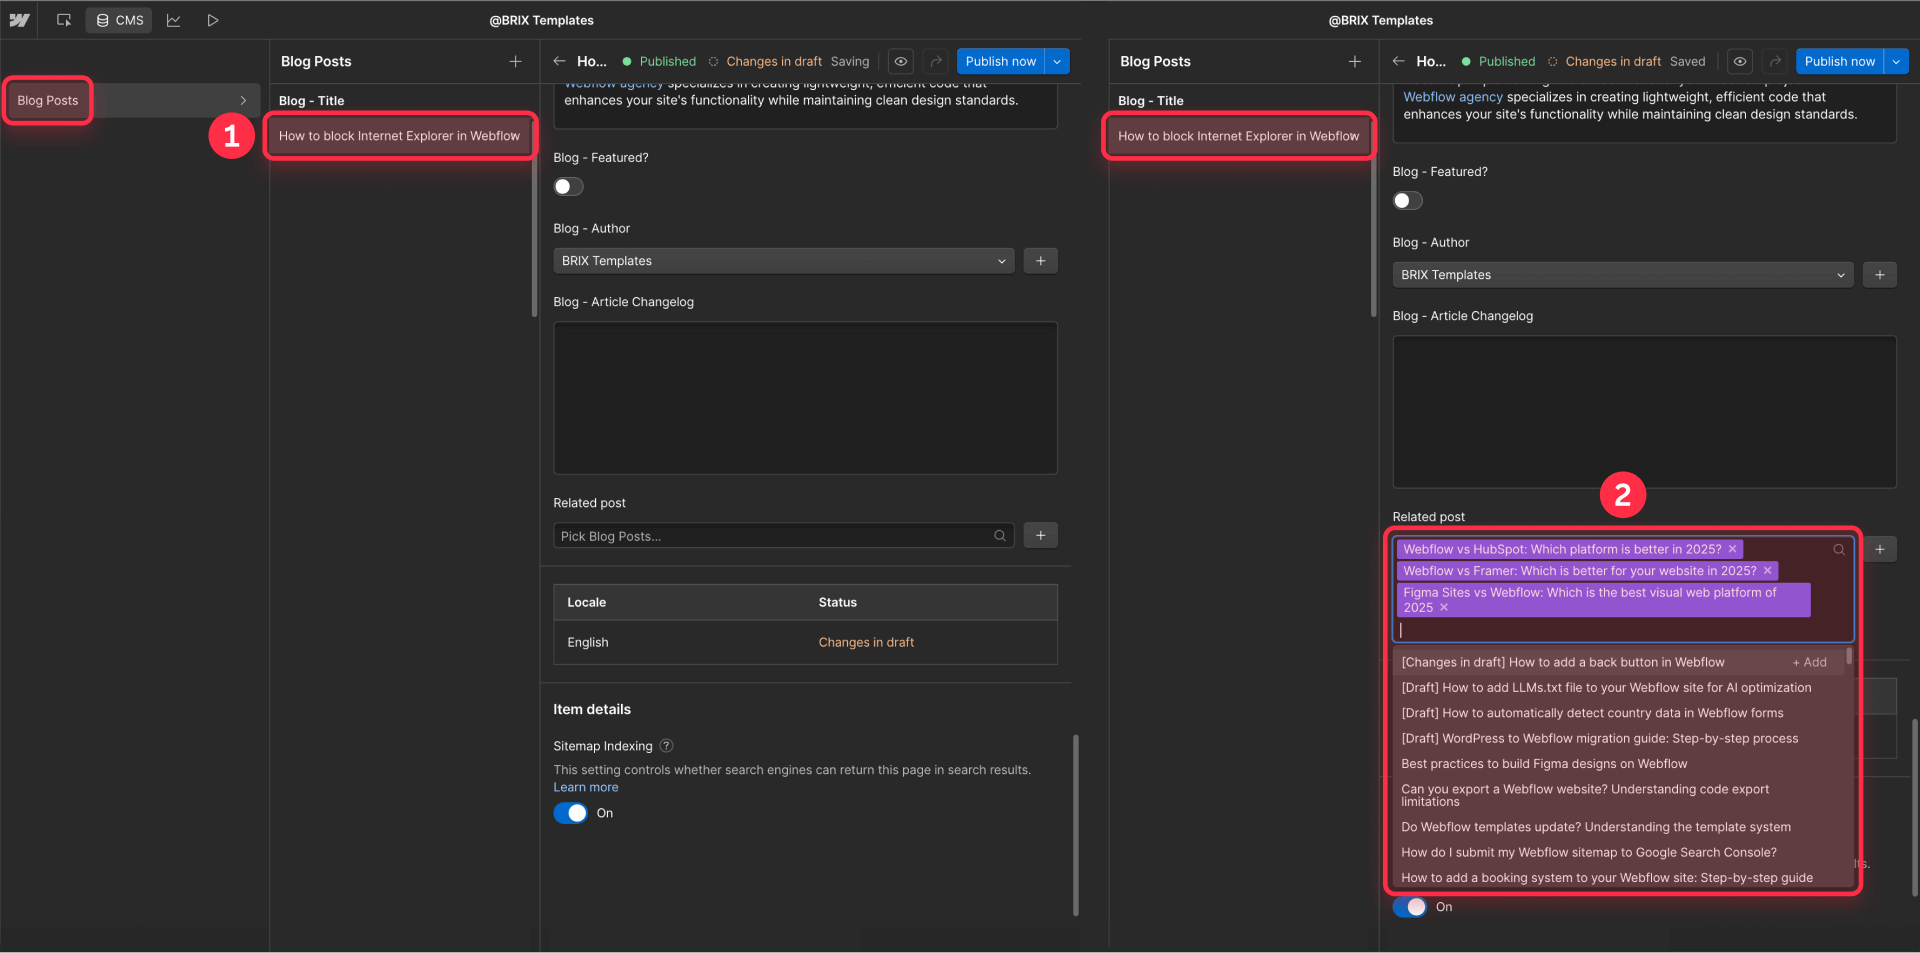
- From the CMS panel, open the article you want to edit
- Scroll down to find your new Related Posts field and click it to open the selector
- Choose 3-5 articles from the list that are logical continuations of the current topic or that you want to boost for SEO purposes
- Save the changes to your article
- Repeat this process for your key posts, prioritizing high-traffic content
Be strategic with your selections: choose articles that either deepen the current topic, offer a natural next step in the user journey, or highlight content you want to promote for business reasons.
Step 3: Connect your design to the new data source in Webflow
Now we'll modify your existing Related Posts section in the Webflow Designer to pull data from our new field. The process of connecting and disconnecting properties is fundamental to making this work properly.
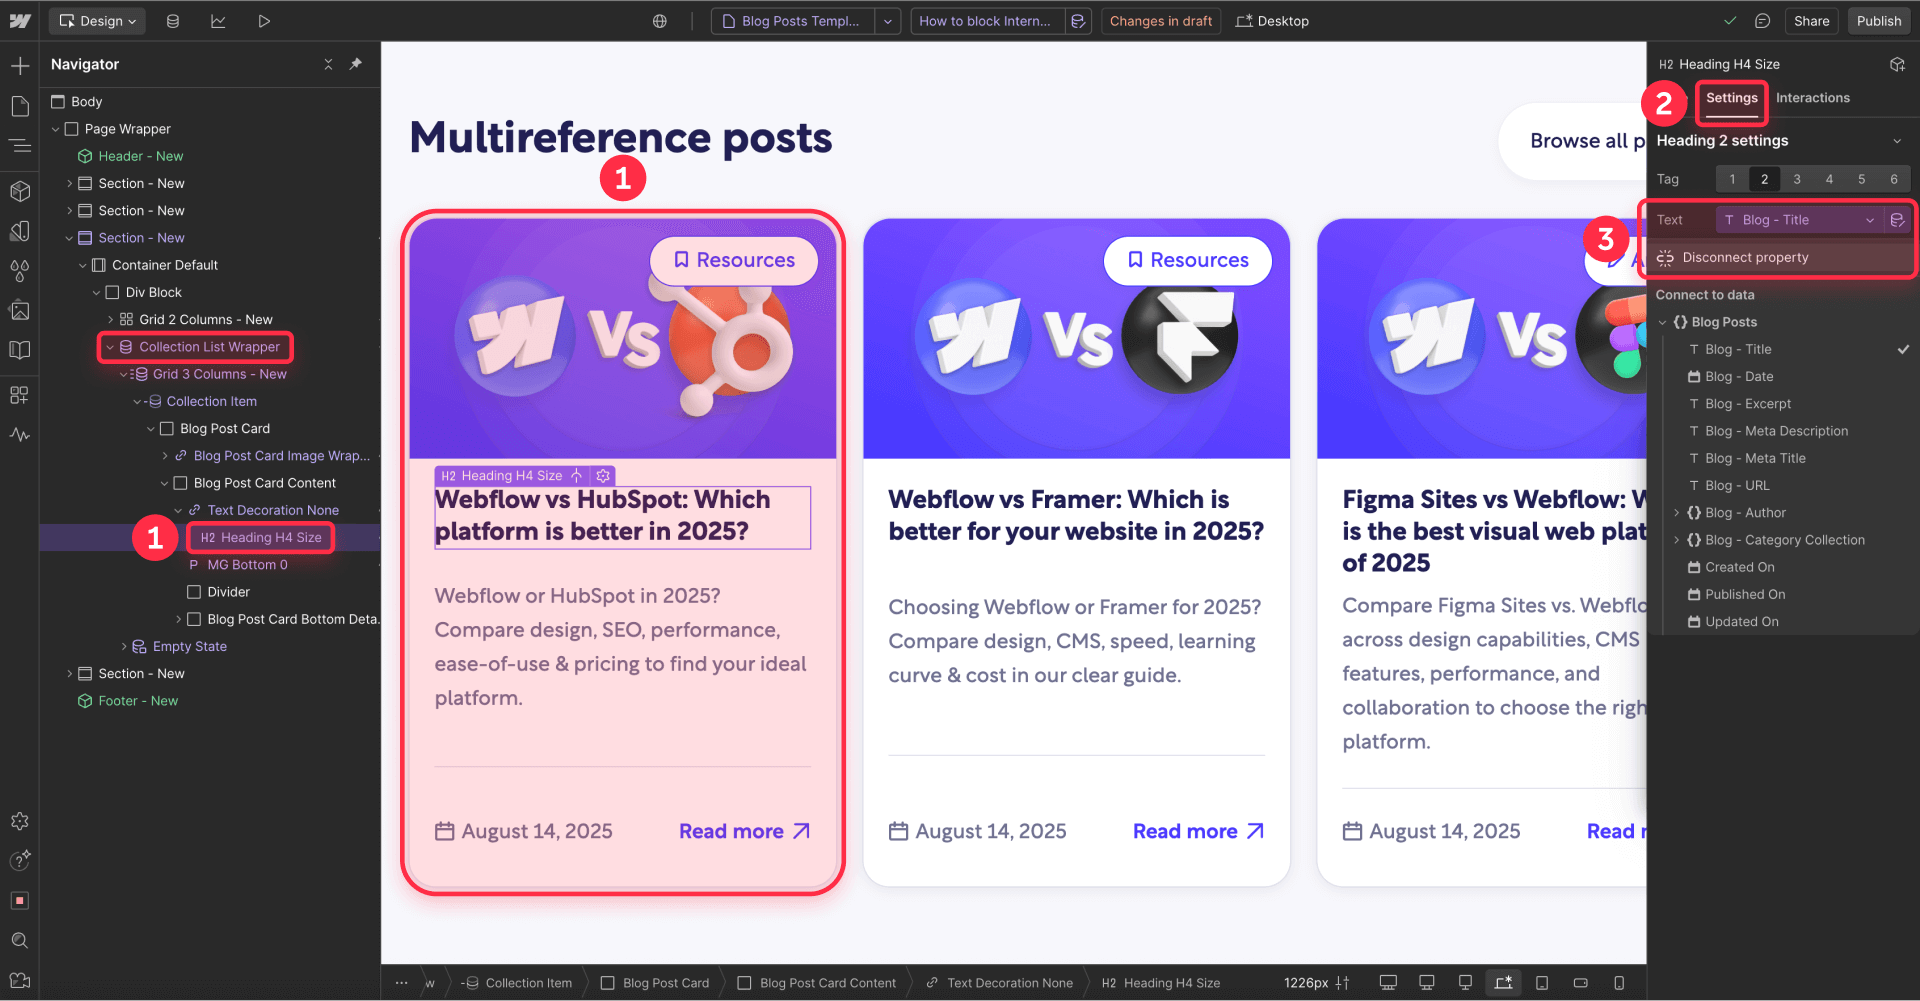
3.1 Disconnect existing properties
To change a Collection List's data source, you must first disconnect all internally linked elements.
Understanding this disconnection process is crucial because Webflow locks the data source when elements are connected to prevent accidental data loss.
- Inside your Collection List Wrapper, select an element connected to data, such as the post title (you'll see it highlighted in purple)
- Navigate to the Settings panel on the right
- Next to the connected property (shown in purple), click and select Disconnect property
- Repeat this process for EVERY connected element (images, text, links) until no purple properties remain
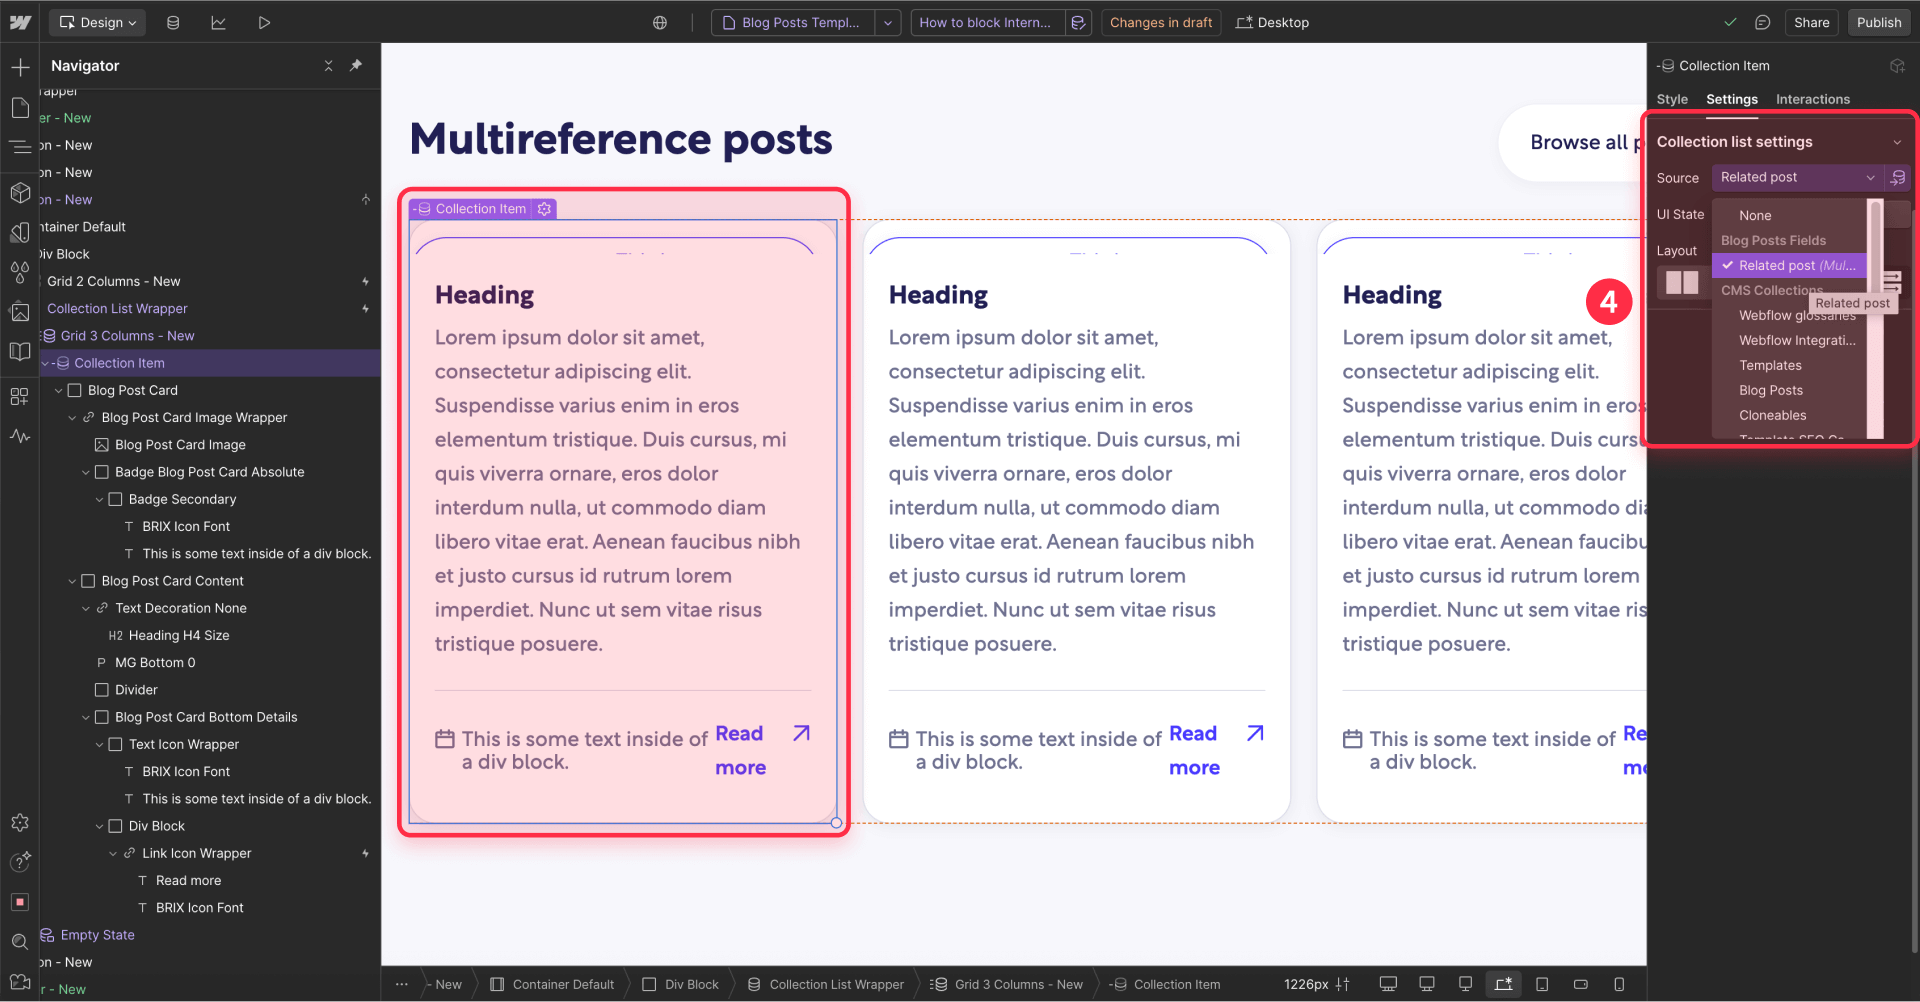
3.2 Change the data source
Once everything is disconnected, the lock on the Source field will disappear.
- Select the main Collection List element
- In the Settings panel, click the Source dropdown and choose your Multi-Reference field: Related Posts
- The Collection List will now pull articles from your manually selected related posts
3.3 Reconnect the properties
Now reverse the process: select each element (title, image, etc.) and reconnect it to the corresponding fields from the new "Related Posts" data source.
- Select each element within the Collection List
- In the Settings panel, reconnect to the appropriate field
- Verify all elements display correctly with the new data source
Step 4: Set up conditional visibility for your Related Articles section in Webflow
This final step is crucial—it hides the entire section if you forget to add related articles to a post, preventing empty spaces or titles without content from appearing.
Setting up conditional visibility ensures your design remains professional even when some posts don't have related articles assigned yet.
- In the Navigator, select the main Section containing both the title and the Collection List
- In the Settings panel, navigate to Conditional Visibility and add a condition where the Related Posts field Is Set
- Click Save to apply the visibility condition
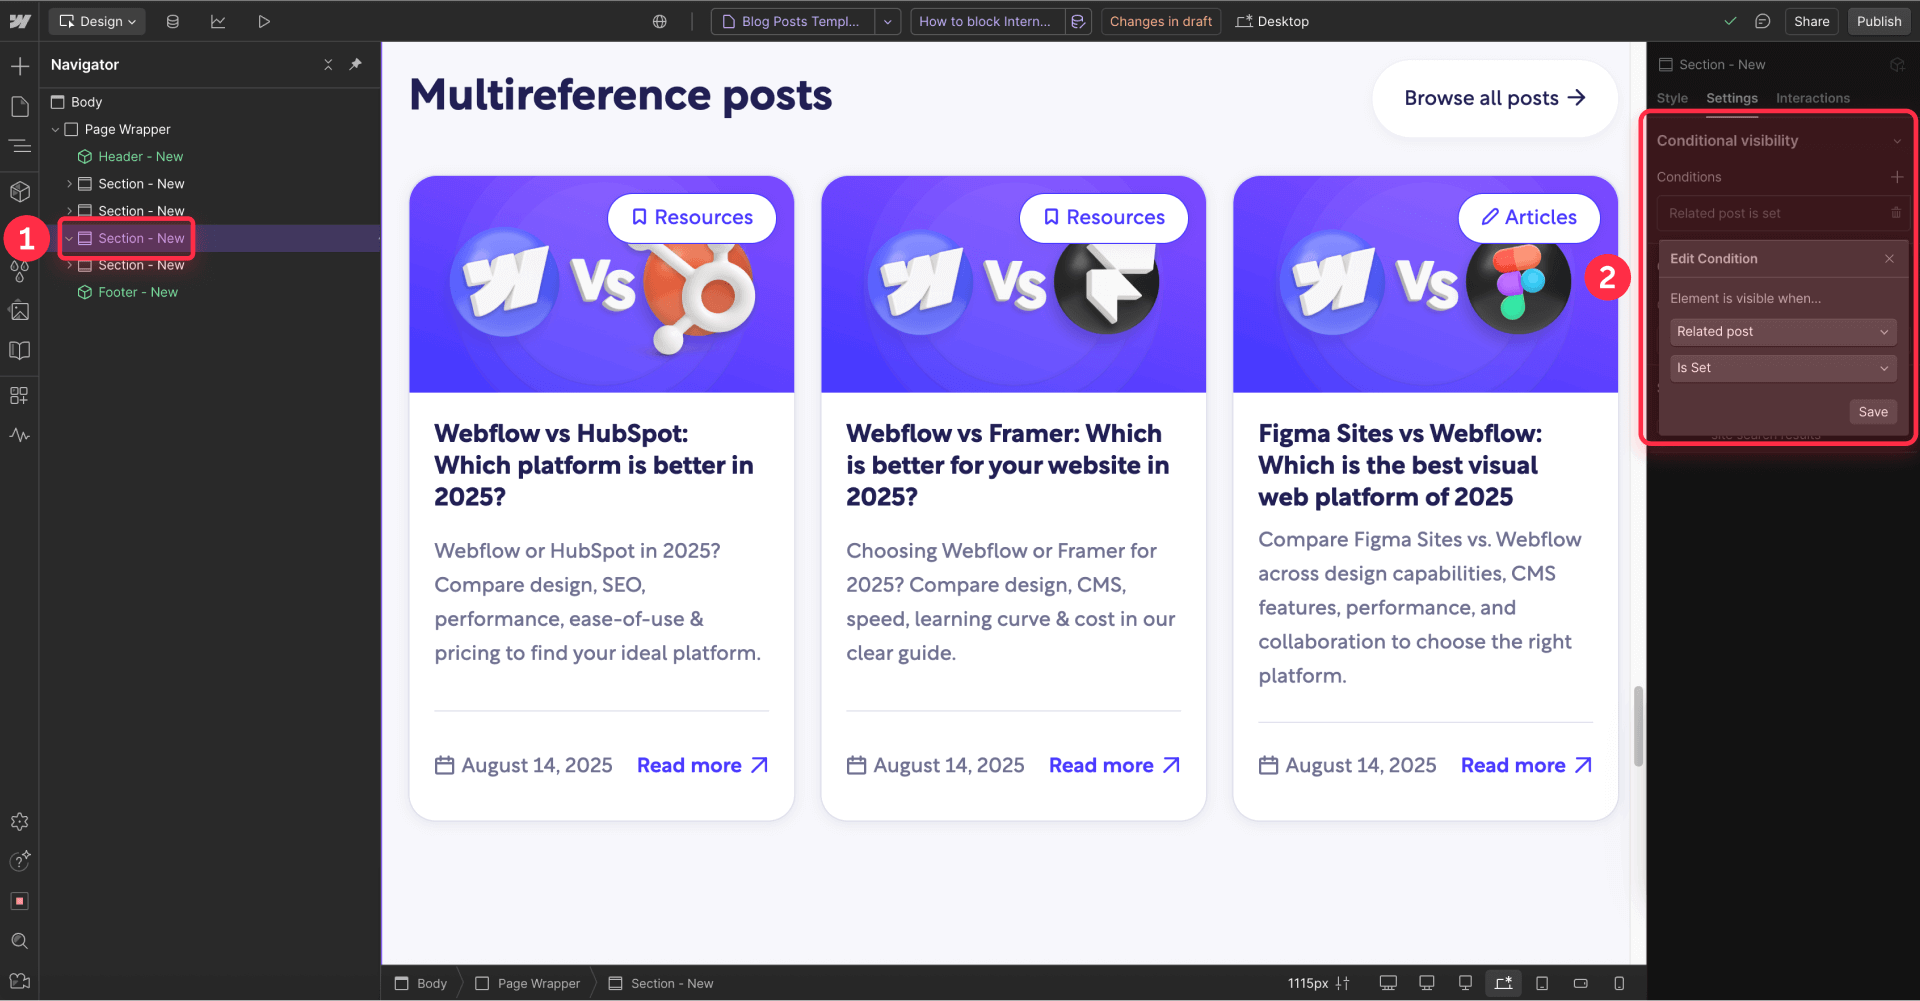
Your related articles section will now only appear on blog post pages where you've actually selected related content, ensuring a clean, professional design throughout your blog.
Troubleshooting common issues in Webflow related articles setup
The "Source" field of my Collection List is locked: This is the most common issue. Webflow locks the source when internal elements (titles, images, links) are connected to the original collection. You must disconnect EVERY one of those properties first. Once no purple connections remain, the lock will disappear.
I see the same related articles on all my posts: You've connected the Collection List to the main "Blog Posts" collection instead of the Multi-Reference field. Ensure that in the Collection List Settings, the Source is your Related Posts field, not the general collection.
I want to show only 3 articles, though I've selected 5 in the CMS: You can control this directly in the Designer. Select the Collection List and, in the Settings panel, find the Limit items section. Enable it and enter the number of articles you want to display.
Frequently Asked Questions about related articles in Webflow
How do I create a related articles section in Webflow?
To create a related articles section in Webflow, you need to use a Multi-Reference field in your CMS collection. First, add this field to your "Blog Posts" collection and configure it to reference the same collection. Then, manually select which posts to show in each article. Finally, in the Designer, add a Collection List to your blog template page and set its source to your Multi-Reference field. This gives you complete control over which articles appear as related content, unlike automatic systems that might show irrelevant posts.
What is a Multi-Reference field in Webflow?
A Multi-Reference field is a CMS field type in Webflow that lets you create connections between one collection item and multiple items from another collection (or the same collection). Unlike a simple Reference field that only allows one connection, Multi-Reference is ideal for creating "one-to-many" relationships, such as a blog post linking to several related articles or a product belonging to multiple categories. This field type is essential for building sophisticated content relationships without custom code.
How can I limit the number of posts shown in a collection list in Webflow?
You can easily limit the number of items appearing in your related articles section directly from the Webflow Designer. Select your Collection List element and navigate to the Settings panel. There you'll find a Limit items option. Enable the checkbox and set the maximum number of articles to display, such as 3 or 4, to maintain a clean, focused design. This limit applies regardless of how many articles you've selected in the CMS.
What's the difference between a Reference and a Multi-Reference field in Webflow?
The main difference lies in the number of connections they allow. A Reference field creates a "one-to-one" relationship (one item can only connect to one other item), ideal for cases like assigning a single author to a post. In contrast, a Multi-Reference field creates a "one-to-many" relationship (one item can connect to multiple items), perfect for selecting multiple related articles, categories, or tags for a single blog post. Multi-Reference fields are essential for complex content architectures.
How do I hide the related articles section when no articles are selected in Webflow?
Use Webflow's Conditional Visibility feature to hide empty sections automatically. Select the Section or Div Block containing your entire related articles area (including the heading), then in the Settings panel, add a Conditional Visibility rule where your Multi-Reference field Is Set. This ensures the section only appears when you've actually selected related articles, preventing empty spaces or orphaned headings from appearing on posts without related content.
Can I reorder related articles after selecting them in Webflow CMS?
Yes, you have complete control over the display order of related articles in Webflow. The articles appear on your published site in the exact order you arrange them in the CMS. To reorder, simply open the blog post in the CMS editor, navigate to your Multi-Reference field, and drag the selected articles into your preferred sequence. The changes will reflect immediately on your published site after saving.
Conclusion
Implementing hand-picked related articles transforms your Webflow blog from a simple collection of posts into a curated content network. The Multi-Reference field method provides a robust, professional solution for increasing user engagement, strengthening internal SEO, and strategically guiding readers through your curated content journey. While it requires manual curation, the long-term benefits in engagement metrics and conversion rates make this investment worthwhile for any serious Webflow site owner.
The strategic control you gain over content flow directly impacts your bottom line—turning casual readers into engaged visitors who explore multiple pages and are more likely to convert. If you need help implementing advanced CMS strategies or want to explore other optimizations for your Webflow site, our agency can help you unlock the platform's full potential and ensure your site is as competitive and effective as possible.


Join readers commenting on this post!