
Your Webflow form collects submissions, but the email experience after someone fills it out can still feel limited for client projects. Native email notifications work for simple alerts, but they are not built for sending a branded confirmation email back to the person who submitted the form.
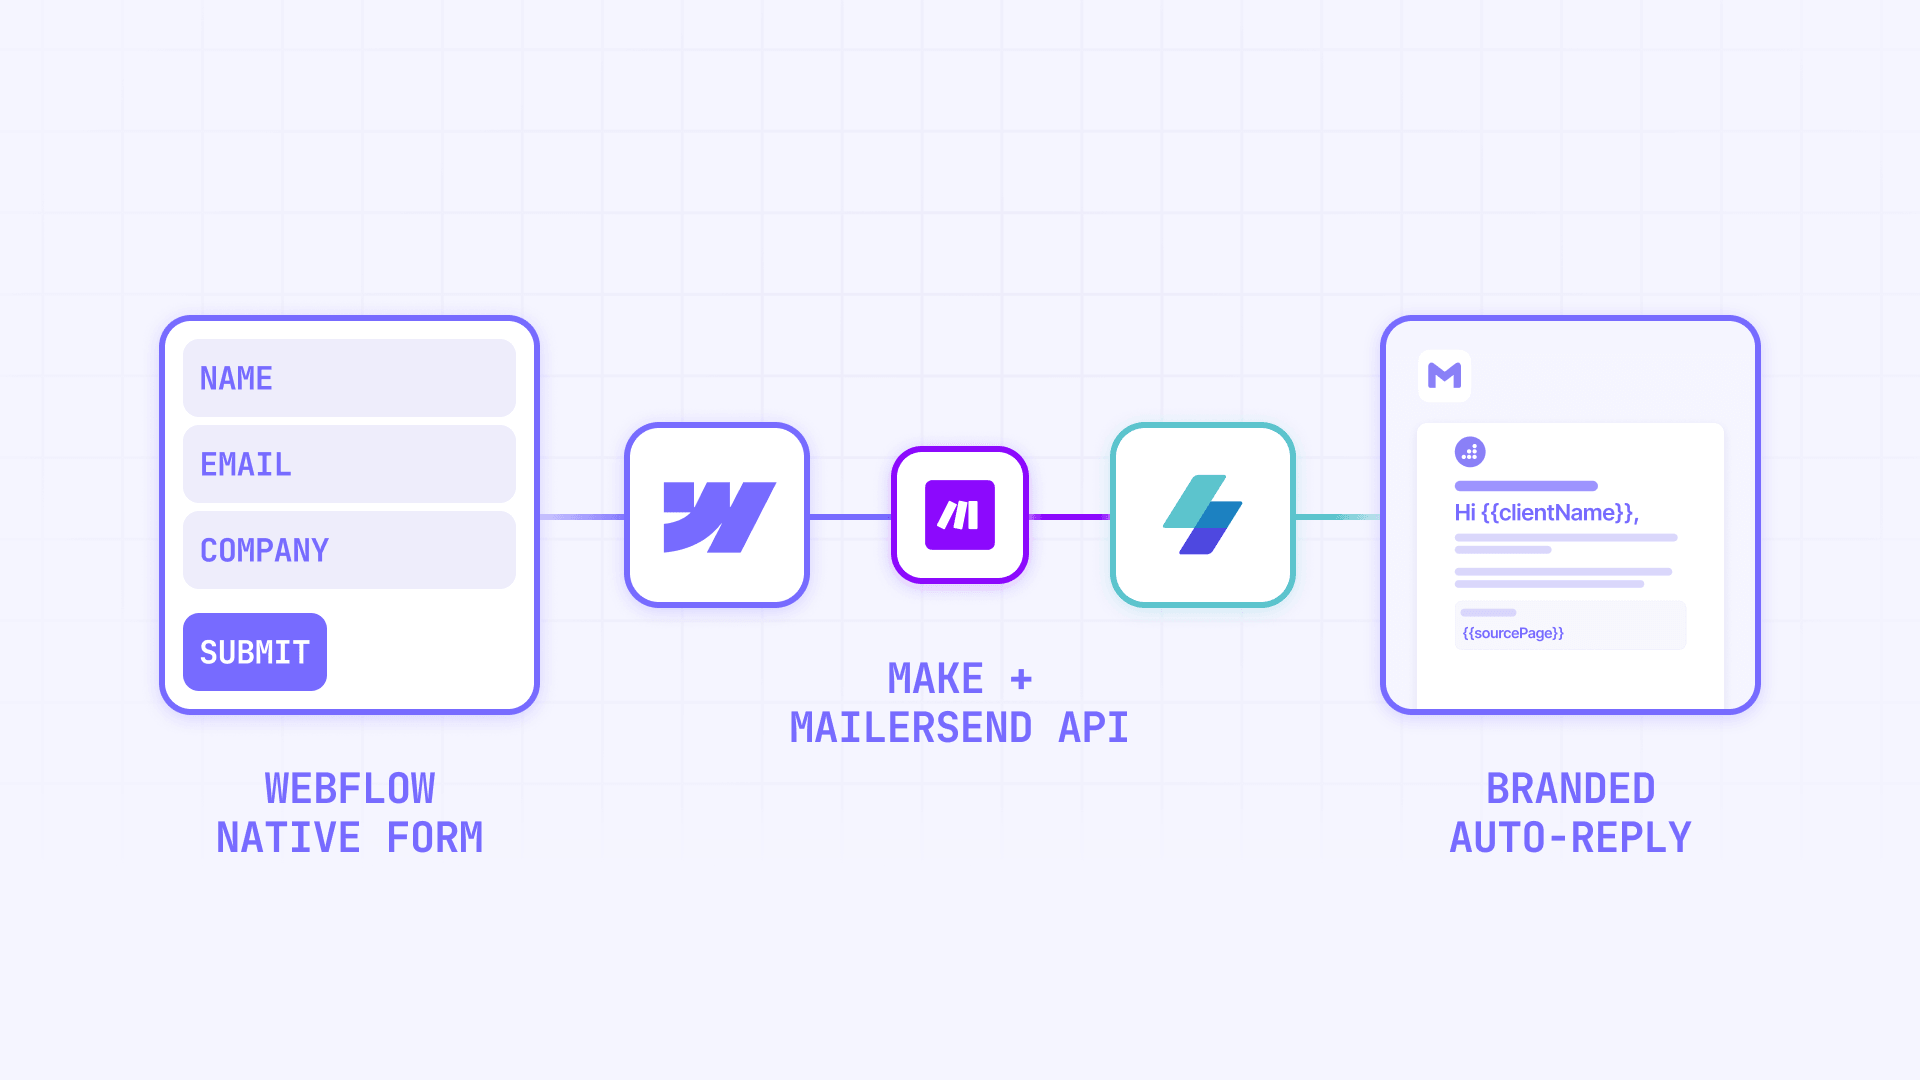
The solution is to connect Webflow to Make, then trigger a branded auto-reply confirmation email to the submitter through the MailerSend API. Webflow captures the data; Make and your email tool handle the professional confirmation workflow.
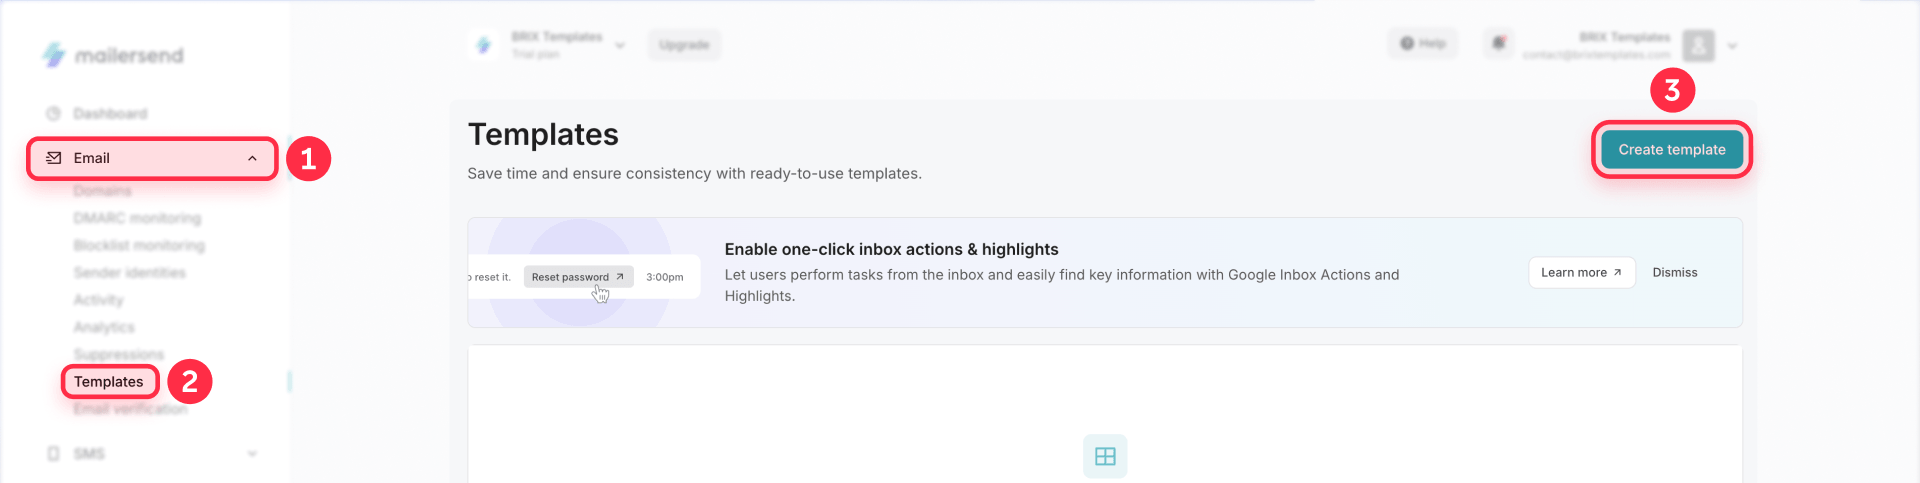
In this tutorial, you'll learn how to connect a Webflow form to Make, send the data through the MailerSend API, and deliver a branded "thanks, we received your message" email to the submitter.
Why professional Webflow form emails matter
When someone submits a form on your site, they want to know their message arrived. A branded confirmation email sent right after submission does that — and it reinforces your brand at the same time.
- Better user experience. The person who submits the form gets immediate confirmation that their message was received.
- Branded confirmation. The email matches your site and brand, not a generic system notification.
- Clear expectations. The confirmation email can tell the submitter when to expect a response, reducing follow-up anxiety.
- Less uncertainty. Users know their message went through — no second guesses or duplicate submissions.
- Optional backup. The same workflow can store submissions in Google Sheets, Airtable, Notion, or a CRM so nothing gets lost.
What Webflow forms can do with email
Webflow’s built-in form handling works well for simple use cases. Understanding what it does well — and where it falls short — helps you decide whether to stick with native email notifications or move to a Make workflow.
What Webflow form email handles well
Native Webflow form notifications are useful when you need a basic alert that someone submitted a form. You can store submissions in Webflow, send email notifications to your team, customize the recipient, subject line, reply-to value, and message content, and redirect users to a thank-you page after submission.
For simple contact forms, portfolios, or internal projects, this may be enough.
Note: Webflow Logic, which previously offered some automation features for forms, was discontinued on June 27, 2025. Do not build new workflows with it.
When Webflow form email is not enough
Native notifications are useful for basic form alerts, but they are not a full transactional email workflow. If you want to send a branded confirmation email to the person who submitted the form, use a verified sending domain, design a reusable HTML template, pass dynamic variables into that template, or sync submissions into a CRM, you need a workflow with Make and an email service like MailerSend. For a walkthrough of Webflow's built-in email notification features, see our guide on sending automated emails after form submissions.
This is where Make comes in. Webflow captures the form submission, Make receives the data through its Webflow integration, and MailerSend sends the branded confirmation email with your template, variables, sender domain, and reply-to settings.
Which Webflow form email setup do you need?
Before following the steps, decide what your project actually requires.
- Basic contact form. Use Webflow's native email notification if you only need a simple alert when someone submits a form.
- Branded auto-reply confirmation. Use Webflow → Make → MailerSend to send a branded confirmation email to the person who submitted the form.
- Backup or CRM workflow. Optionally save the submission to Google Sheets, Airtable, Notion, or a CRM after the confirmation email sends.
- Advanced setup. If your workflow needs CRM sync, conditional logic, multiple templates, or production-ready error handling, our Webflow development team can help design and implement the setup.
The simple Webflow form email workflow
The entire process follows five steps:
- Webflow captures the form submission from the site visitor.
- Make receives the form data through Webflow's native integration.
- Webflow forwards the form data to Make through the webhook URL registered in site settings.
- Make maps the data into variables and calls the MailerSend API.
- MailerSend sends the branded auto-reply confirmation email to the submitter.
You build this once, and it runs automatically for every submission.
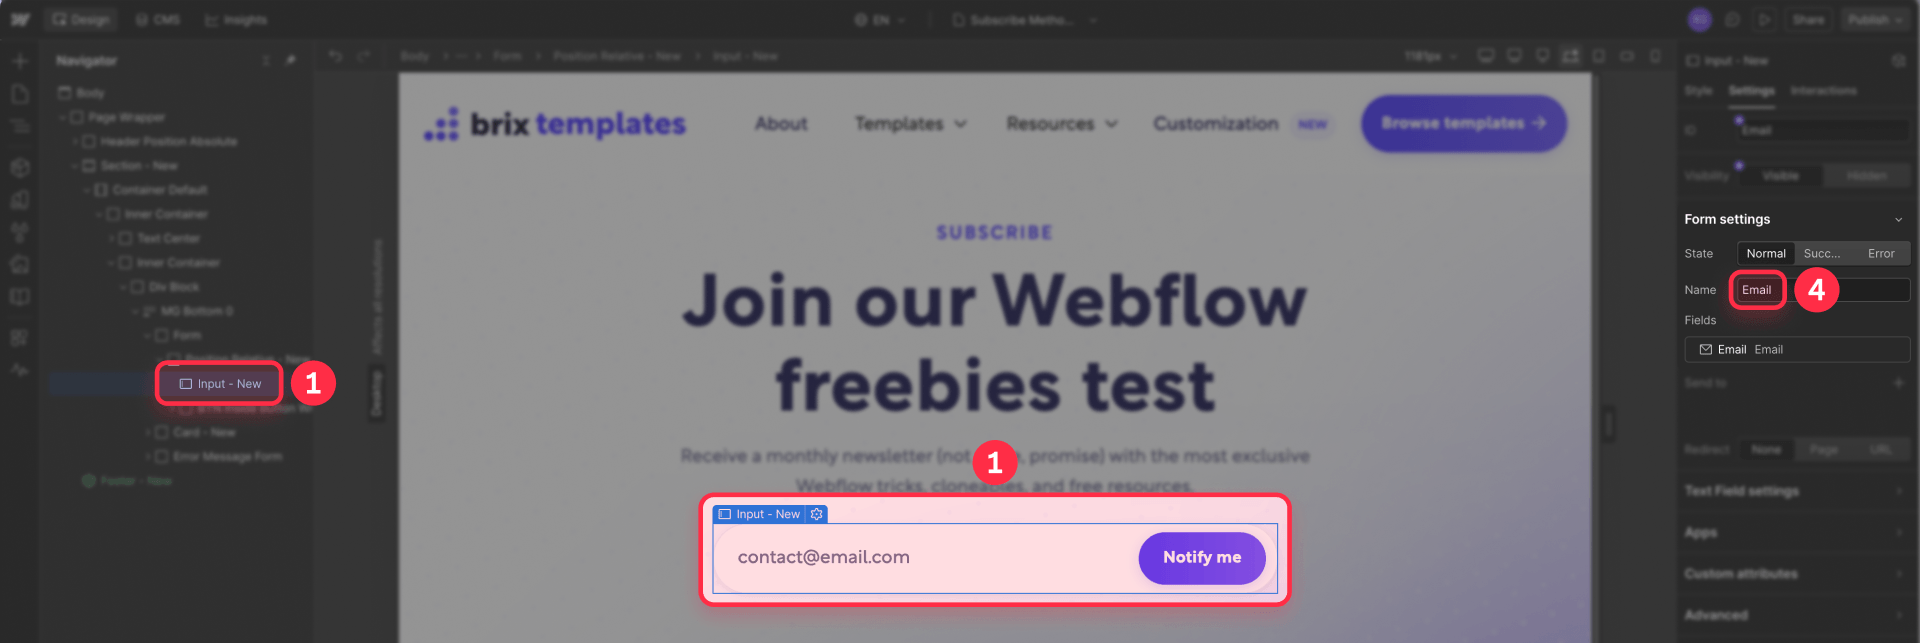
Step 1 — Prepare your Webflow form
Your Webflow form field names become the data keys that Make receives. Use clear, descriptive names for a clean integration:
- Name — full name
- Email — email address (required for sending the confirmation)
- Phone — phone number (optional)
- Company — company name (optional)
- Message — the free-text message body
To set up the form:
- In the Webflow Designer, add or open your Form element.
- Click each form field and set a clear Name in the field settings. This name is what appears in Make when mapping data.
- Under the form's settings (gear icon), set a clear Form Name so you can identify it in Make when you have multiple forms.
- Configure your success and error messages.
- Publish your site. Make can only detect forms on published Webflow sites.
Step 2 — Create the Make automation and connect Webflow
Make connects to Webflow through a native integration using OAuth, so Make authenticates directly with your Webflow account.
- Create a free Make account if you do not already have one.
- From the Make dashboard, click Create a new scenario.
- Give your scenario a descriptive name, such as "Webflow Form Confirmation Email."
- Click the + icon to add your first module.
- Search for and select Webflow.
- For the trigger, select Watch Events.
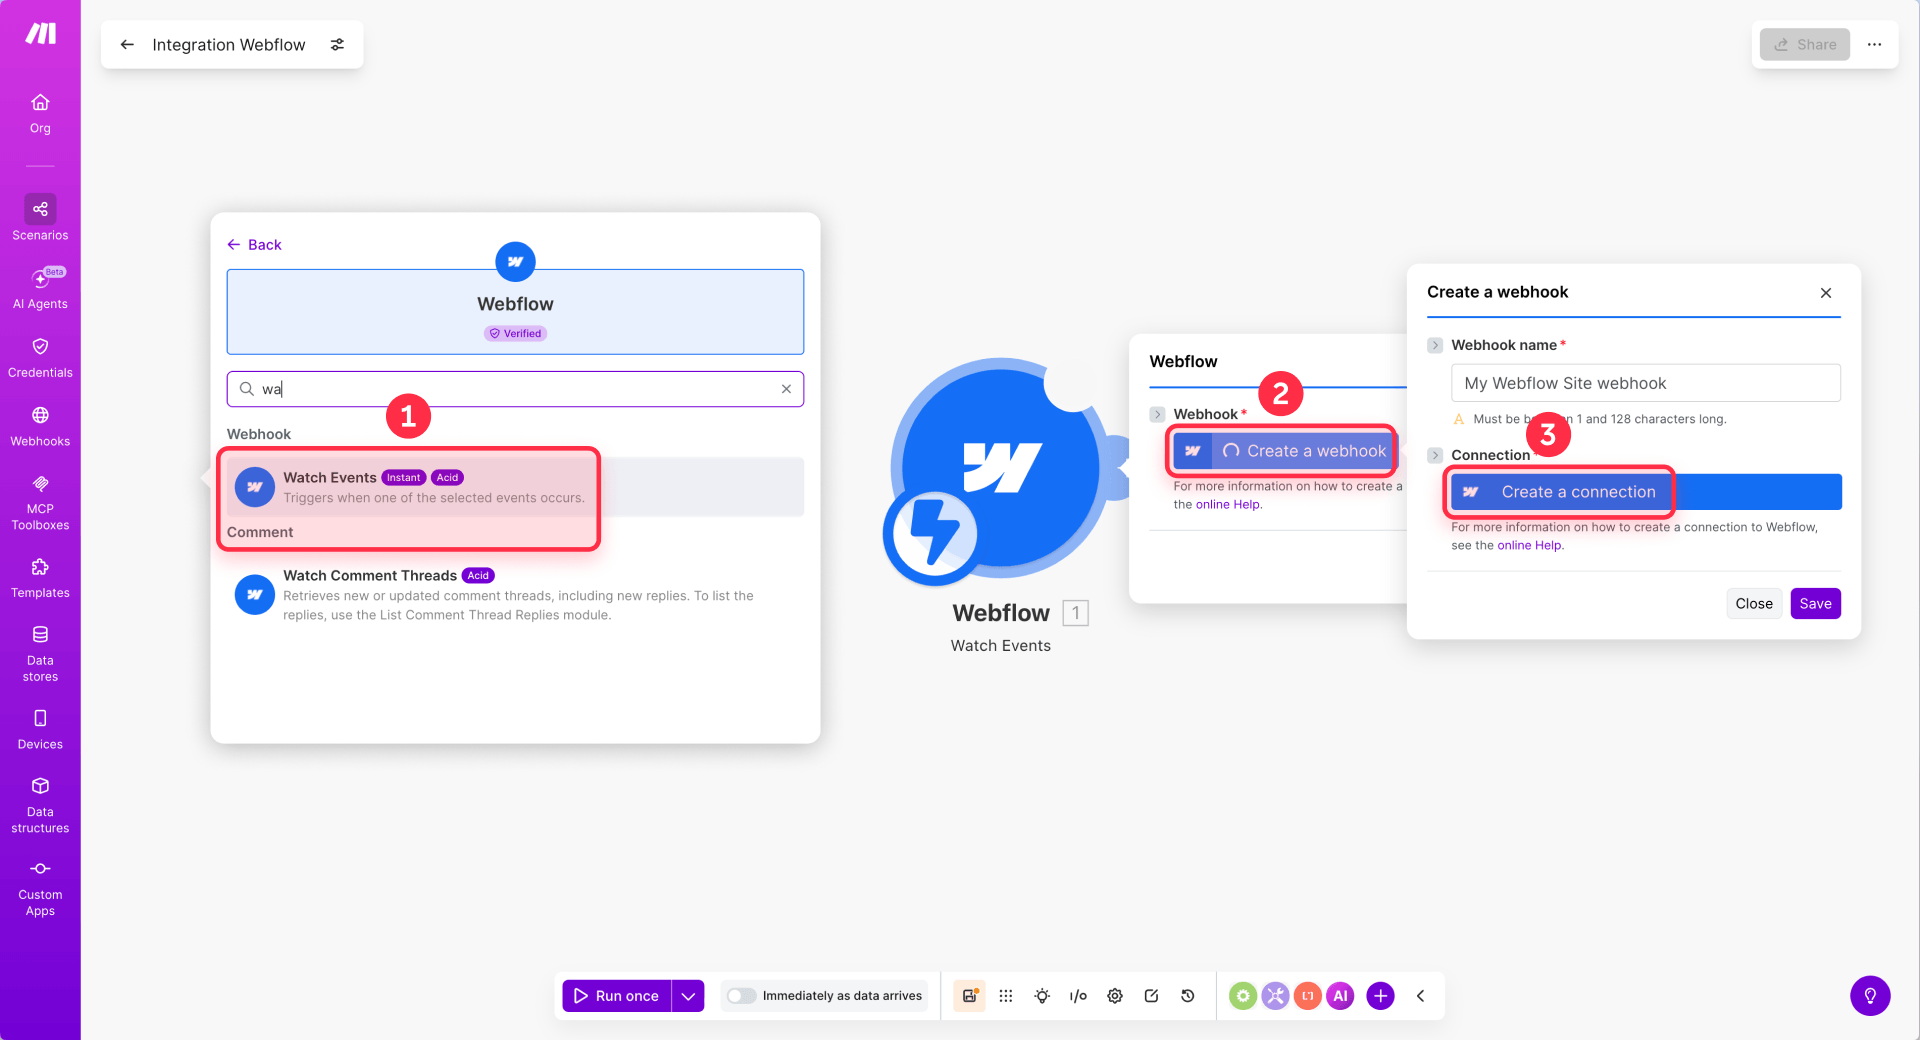
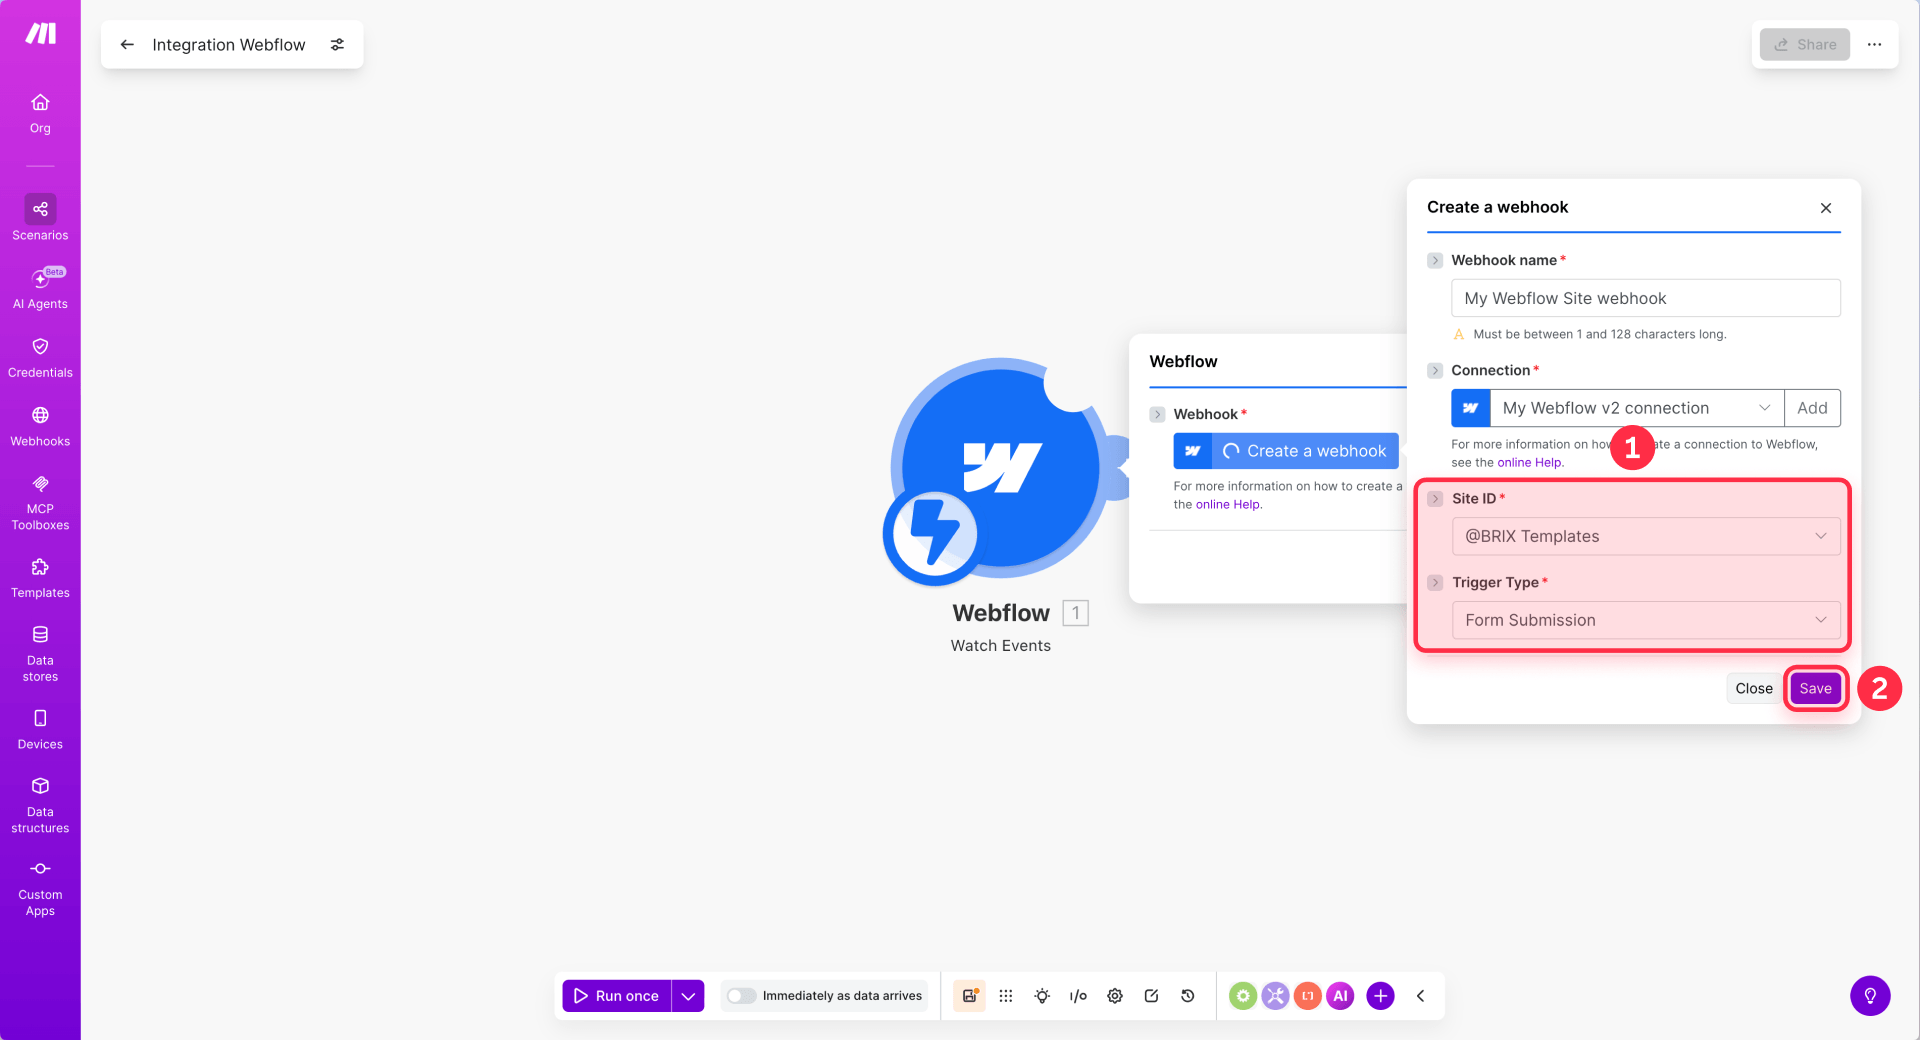
Connect your Webflow account to Make
- Click + Add next to the Webhook dropdown to create a new webhook. Enter a descriptive name like "Webflow Contact Form."
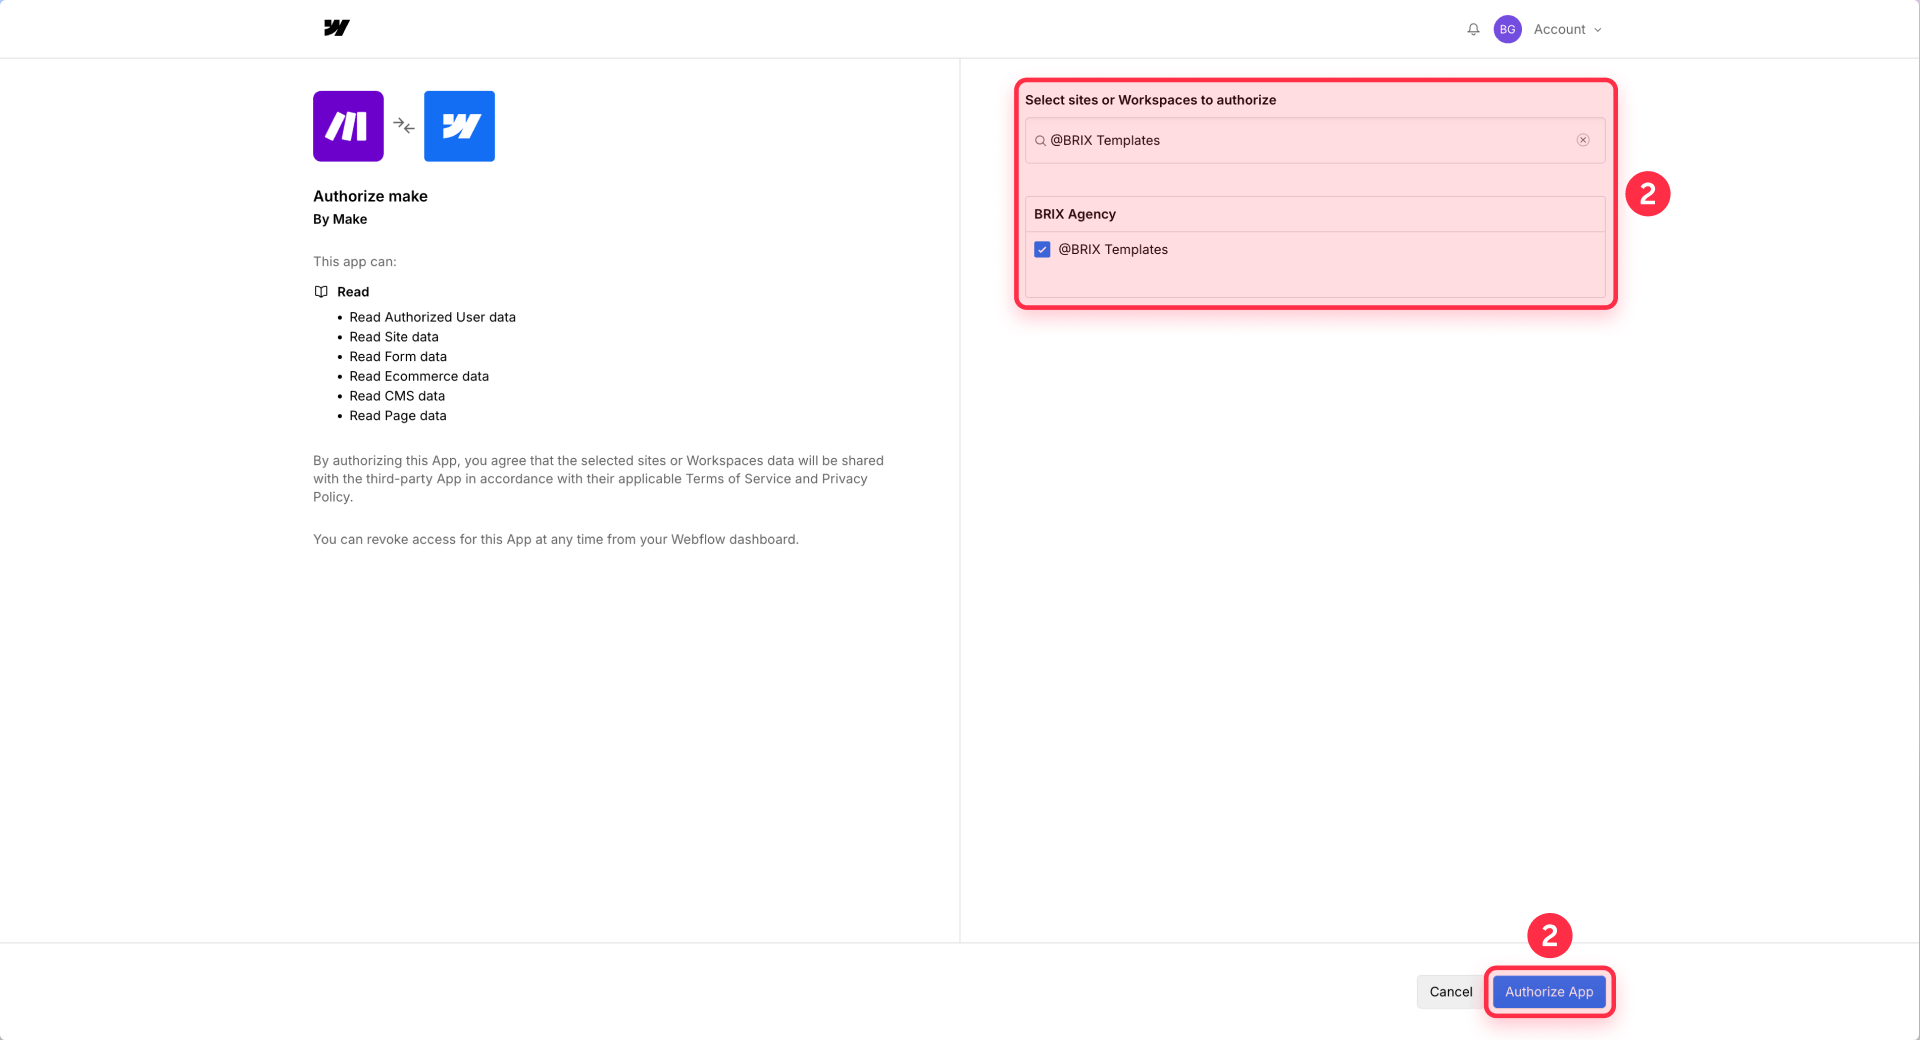
- Next to Connection, click + Add to connect your Webflow account.
- Make will redirect you to Webflow. Authorize Make to access your account and select the specific site.
- Back in Make, the Site ID dropdown should populate. Select your site.
- For Trigger Type, select Form Submission.
- Click Save.
Step 3 — Add the Make webhook URL in Webflow site settings
After creating the Webflow trigger in Make, register the Make webhook URL inside Webflow so form submissions can reach your scenario.
In Make, open the Webflow Watch Events module and copy the webhook URL. It should look like https://hook.us1.make.com/....
Then go to your Webflow site dashboard and open:
Site settings → Apps & Integrations → Webhooks
Click Add webhook and configure it like this:
- Trigger type — Form Submission
- API version — API V2
- Webhook URL — paste the Make webhook URL
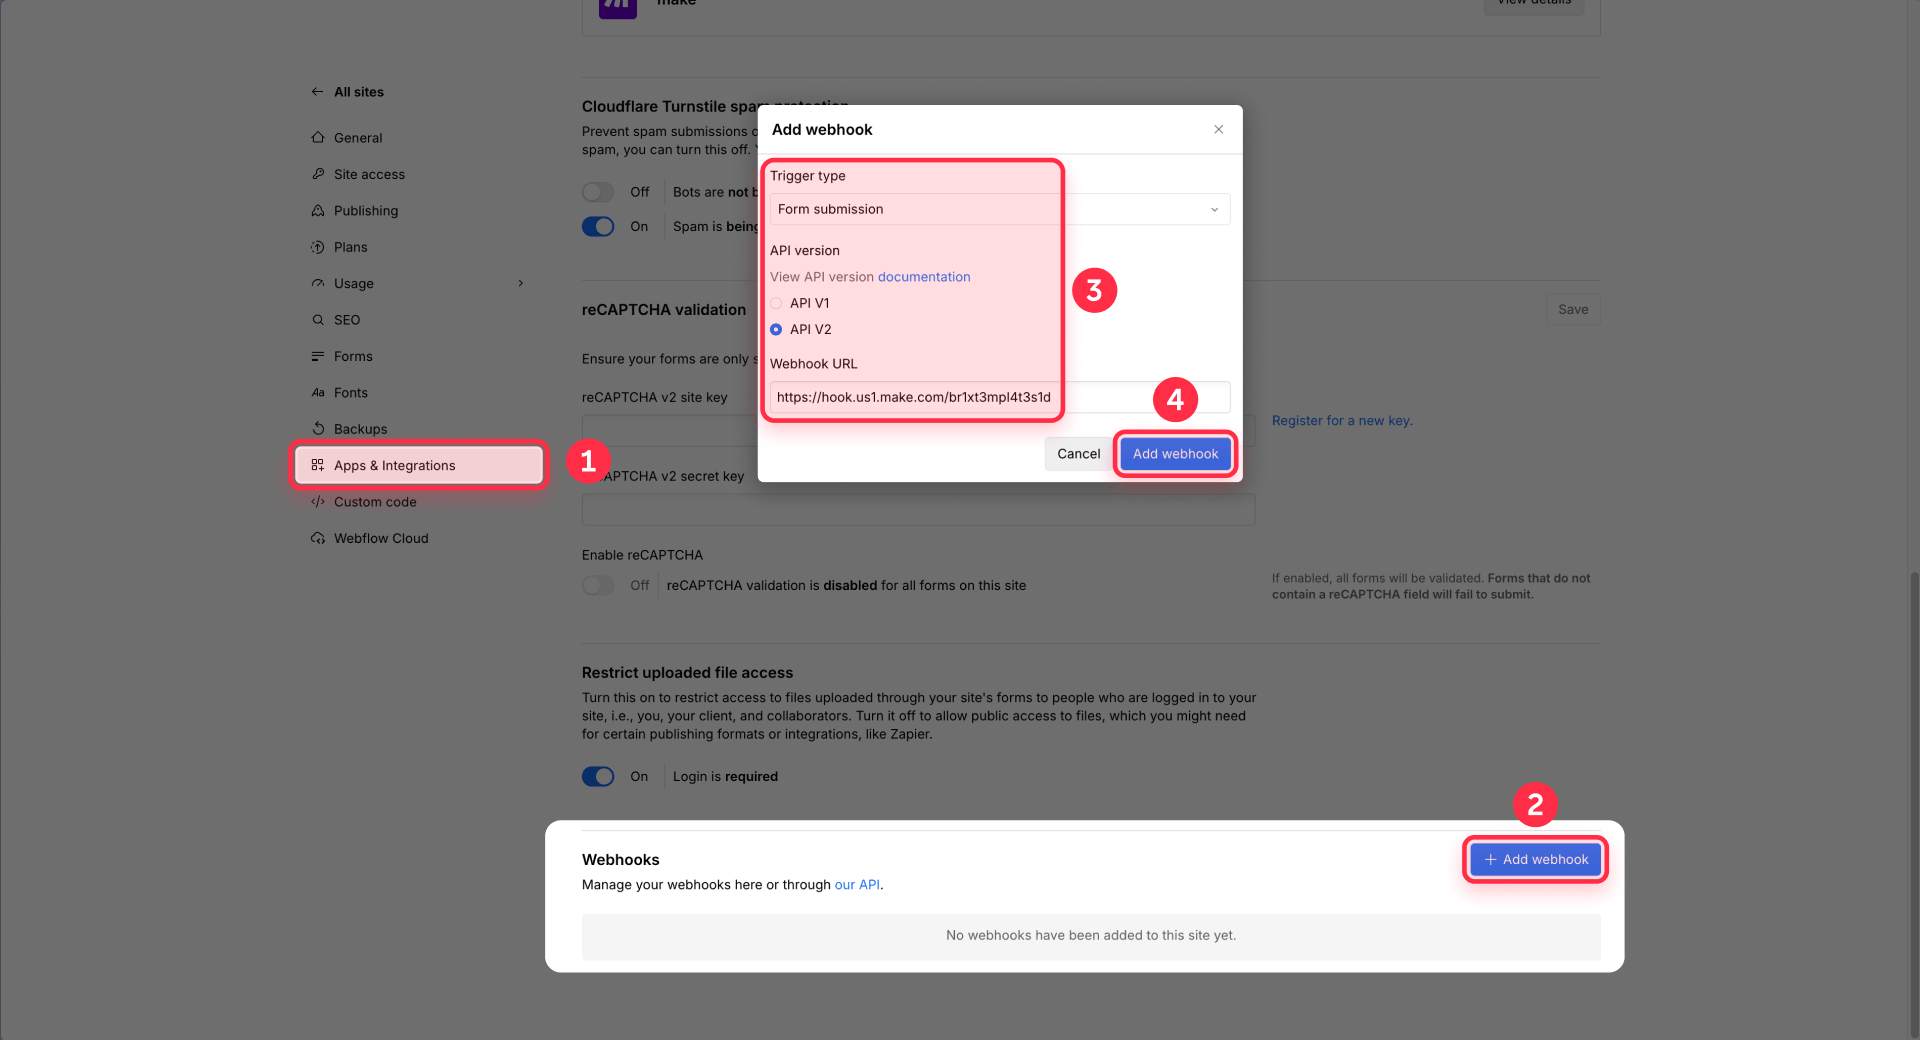
Click Add webhook. Webflow may show a secret key for authenticating webhook messages. You do not need to use that key for this basic Make workflow, but do not share it publicly.
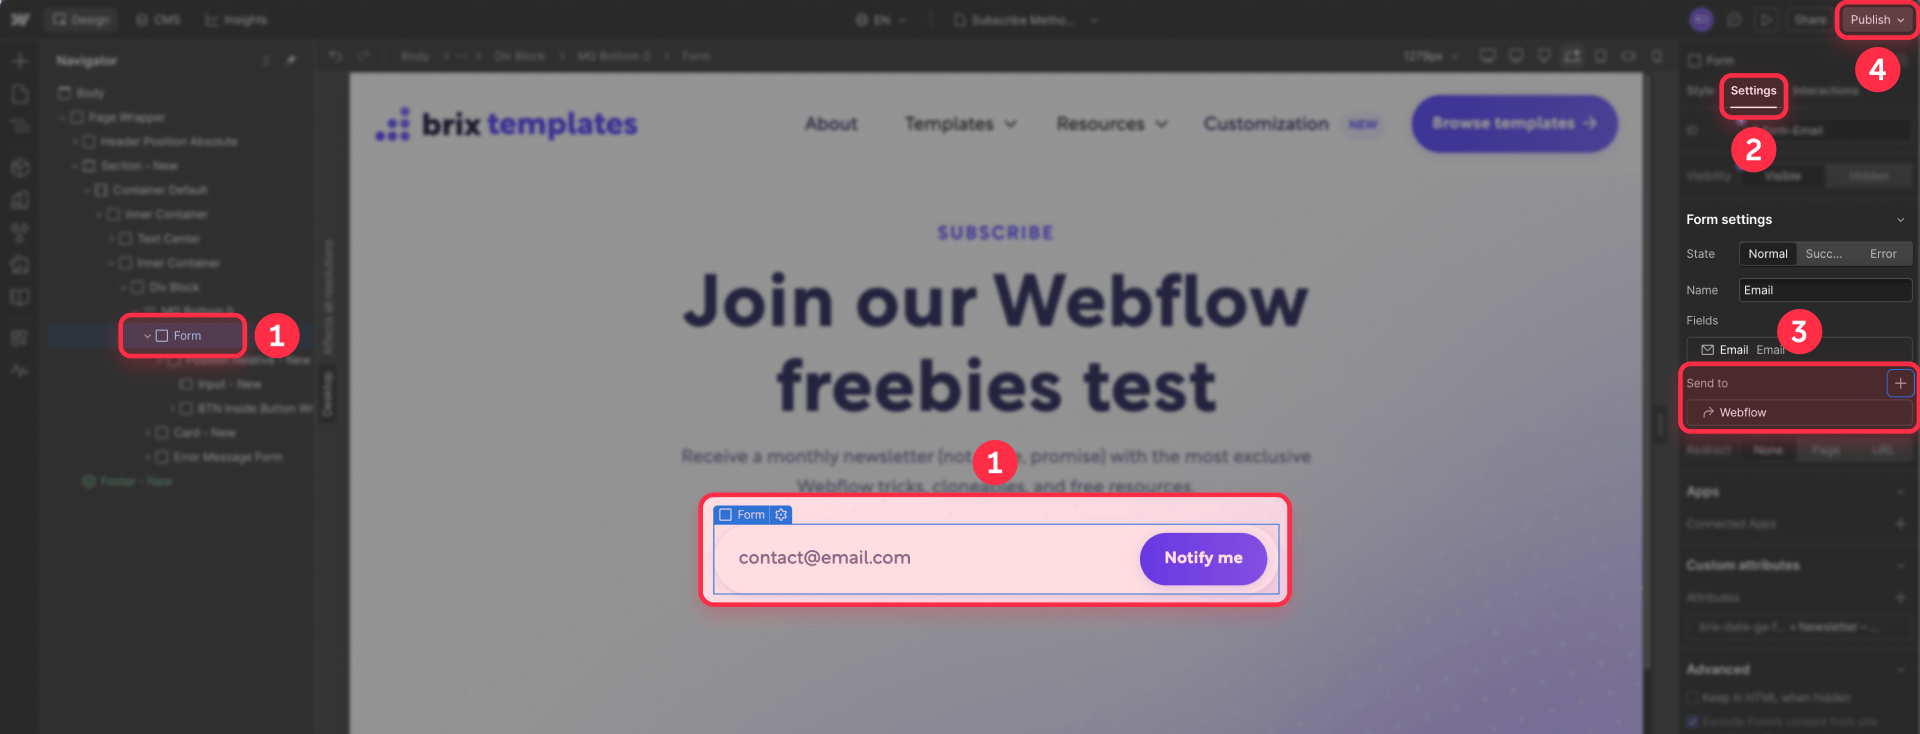
Keep your Webflow form set to:
Form settings → Send to → Webflow
Do not paste the Make URL into the form action. The Make URL belongs in Webflow's site-level webhook settings, not inside the form itself.
After adding the webhook, publish the site again before testing.
Step 4 — Test the Webflow form payload in Make
Before building the email workflow, confirm that Make receives data correctly from your Webflow form.
- Make sure your Webflow site is published with the form active.
- In Make, click Run Once at the bottom left to start listening.
- Open your published Webflow site and submit the form with test data. Use a real email address so you can verify the confirmation email later.
- Return to Make. A green bubble with "1" should appear above the Webflow module. Click the magnifying glass to inspect the data.
Make captures the payload and displays the detected fields. Each field matches the names you set in your Webflow form. Make creates mapped variables you can reference in subsequent modules — for example, the email field appears as a mapped value you can click to insert.

Step 5 — Set up your sending domain and create the MailerSend template
Create a free account at MailerSend. Before building the template, set up the domain you want to send from. This is what lets the confirmation email come from a professional address like [email protected] instead of a temporary test domain.
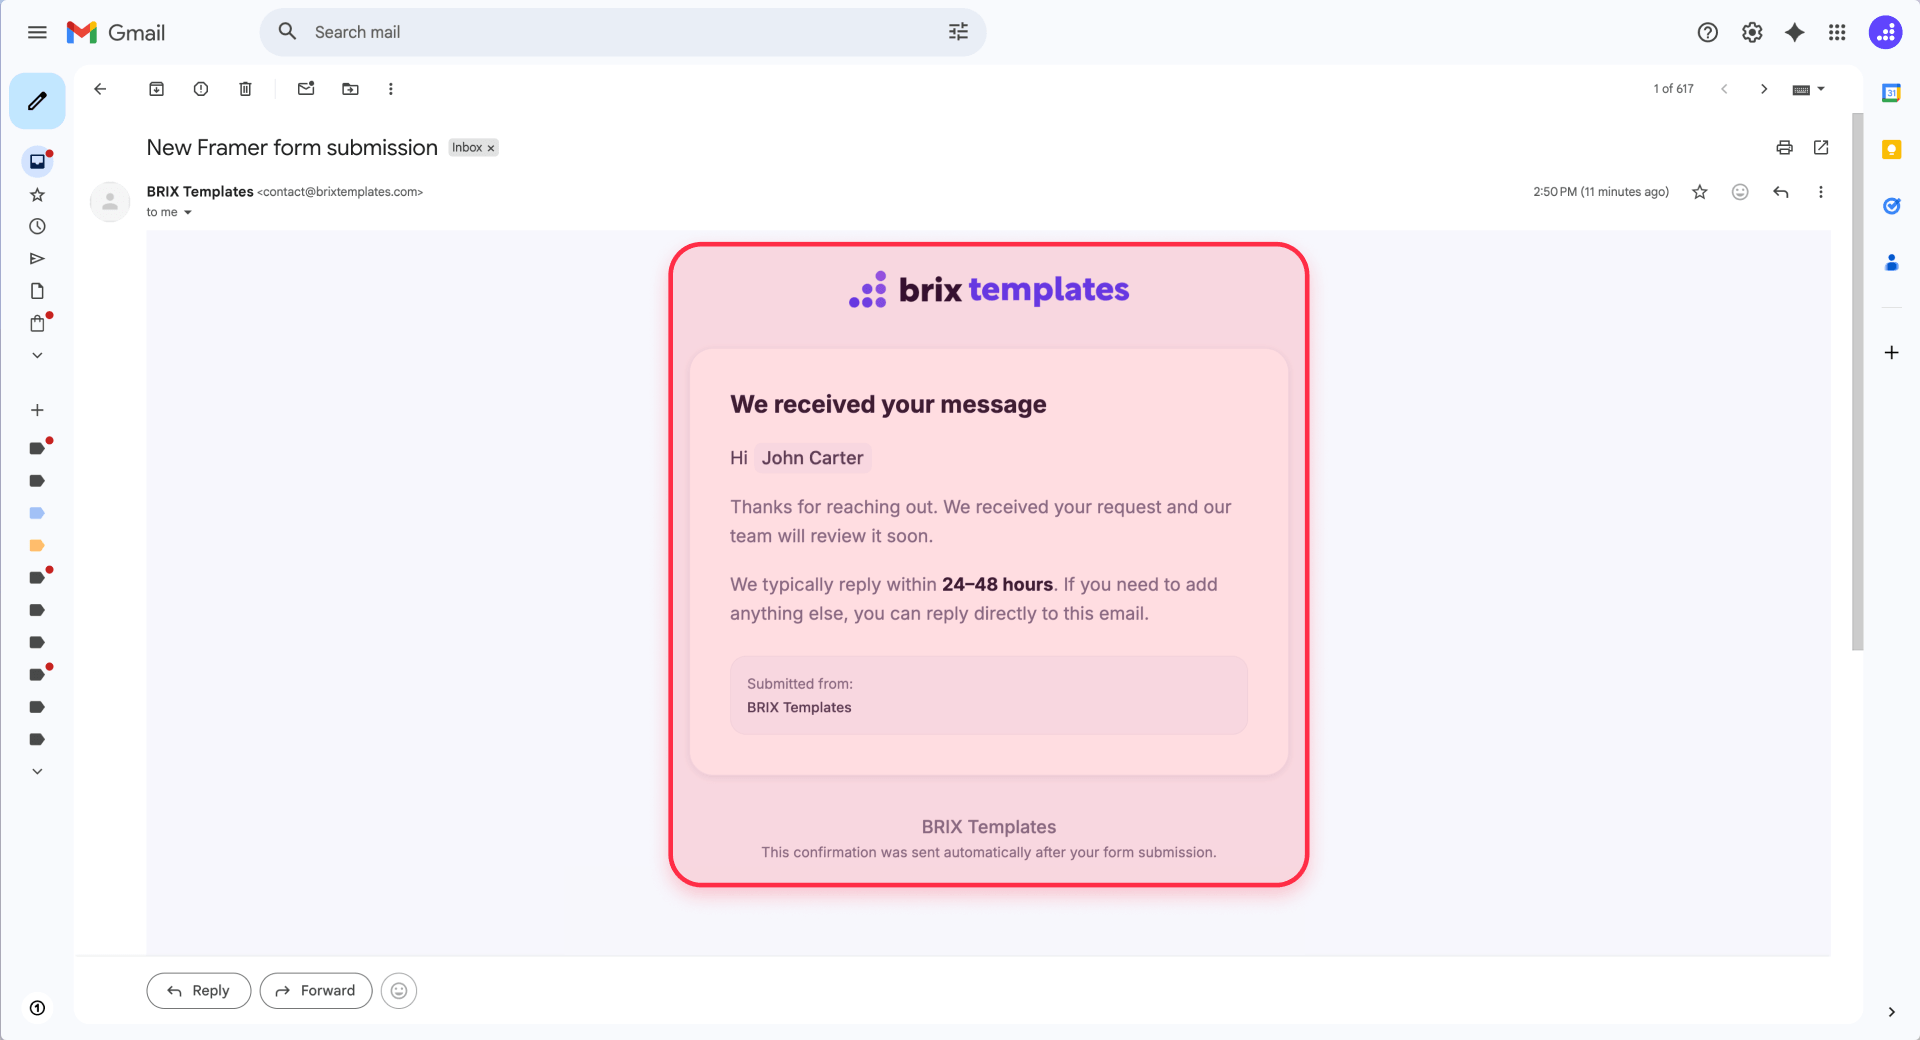
The confirmation email should include: logo or brand name, greeting with the submitter's name, short confirmation that the message was received, expected response time, company name and signature, and a reply-to set to your team's email. Do not include the full form data — the submitter already knows what they sent.
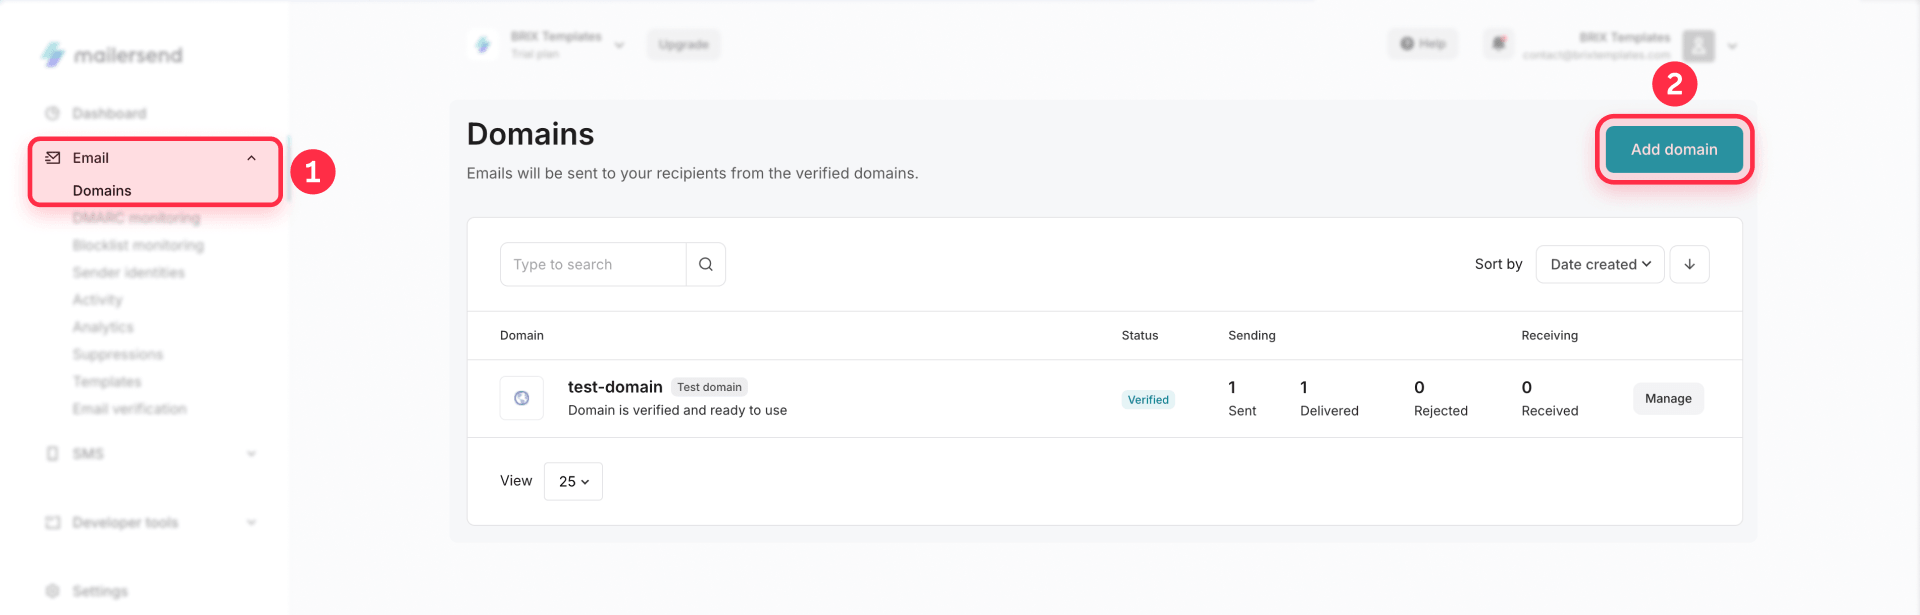
Add your sending domain in MailerSend
- In MailerSend, go to Email → Domains.
- Click Add domain.
- Enter the domain you want to send from, such as yourdomain.com.
- MailerSend will generate DNS records for that domain.
- Add those DNS records in your domain provider, such as Cloudflare, GoDaddy, Namecheap, or your hosting provider.
- Return to MailerSend and complete the domain verification.
MailerSend usually asks you to add records for SPF, DKIM, and Return-Path. These records prove that MailerSend is allowed to send email for your domain and help improve deliverability.
Tip: For quick testing, you can use MailerSend's trial domain. For a real client project, use a verified custom domain before sending production emails.
Create the auto-reply confirmation template
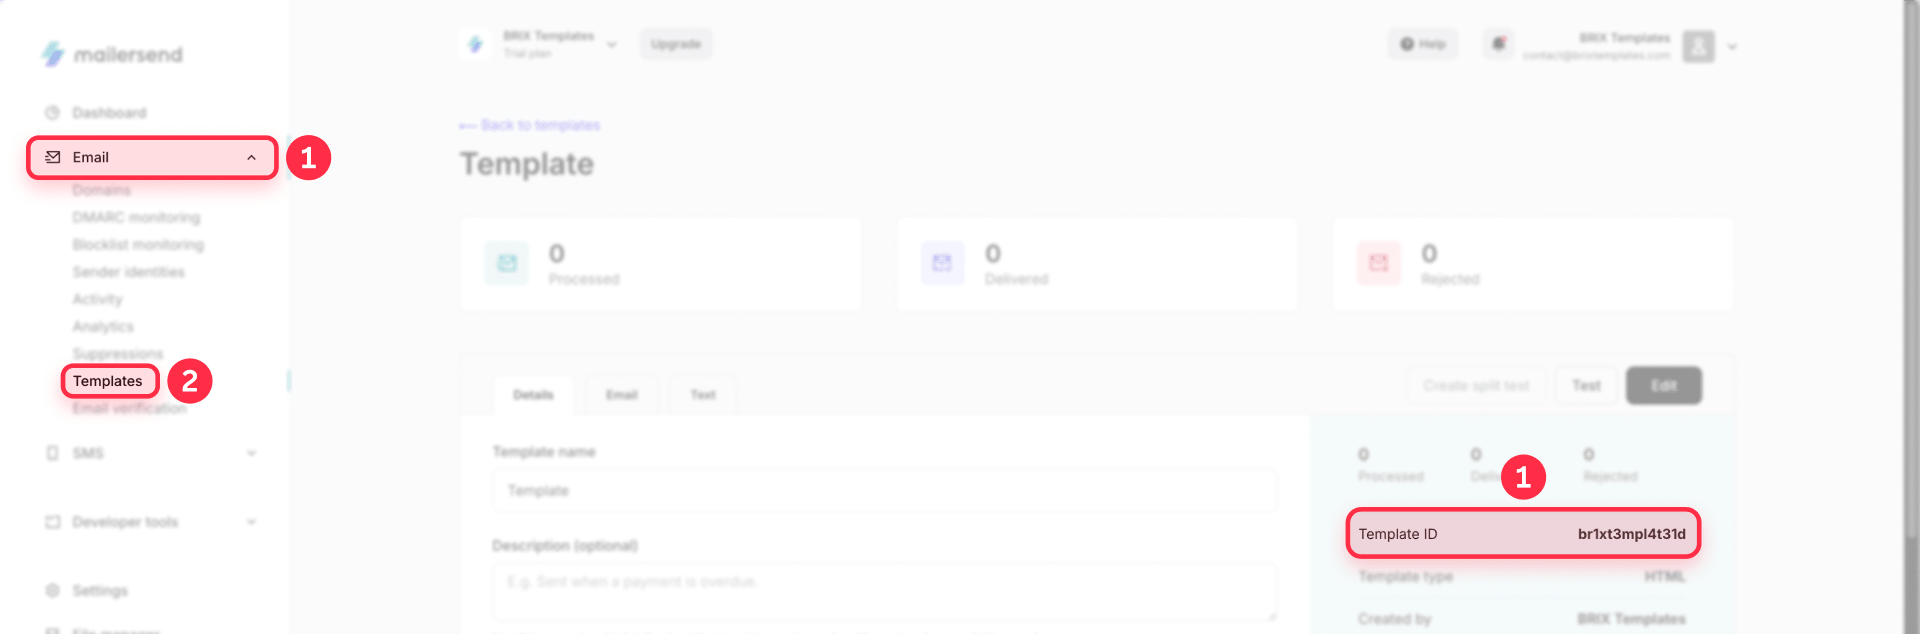
Build one auto-reply confirmation template in MailerSend's visual editor or with custom HTML.
The template gets a unique template ID you reference in Make.
Add Webflow form variables to the template
Use the {{var_name}} syntax for dynamic placeholders:
- {{clientName}} — the submitter's name
- {{leadCompany}} — the submitter's company (optional)
- {{formName}} — the name of the form (optional)
- {{sourcePage}} — the page the form was submitted from (optional)
You typically only need {{clientName}} for the greeting. The optional variables let you add context like "You submitted the Contact Form from our Services page" without hardcoding those details into the template.
If you want to show a short summary of what the submitter sent, you can also add {{clientEmail}}, {{clientPhone}}, or {{clientMessage}} — but keep the first version simple.
Tip: MailerSend's Free plan currently allows 500 emails per month after approval, with a daily limit of 100 emails. Brevo offers 300 emails per day on its free plan.
Step 6 — Send the auto-reply email from Make
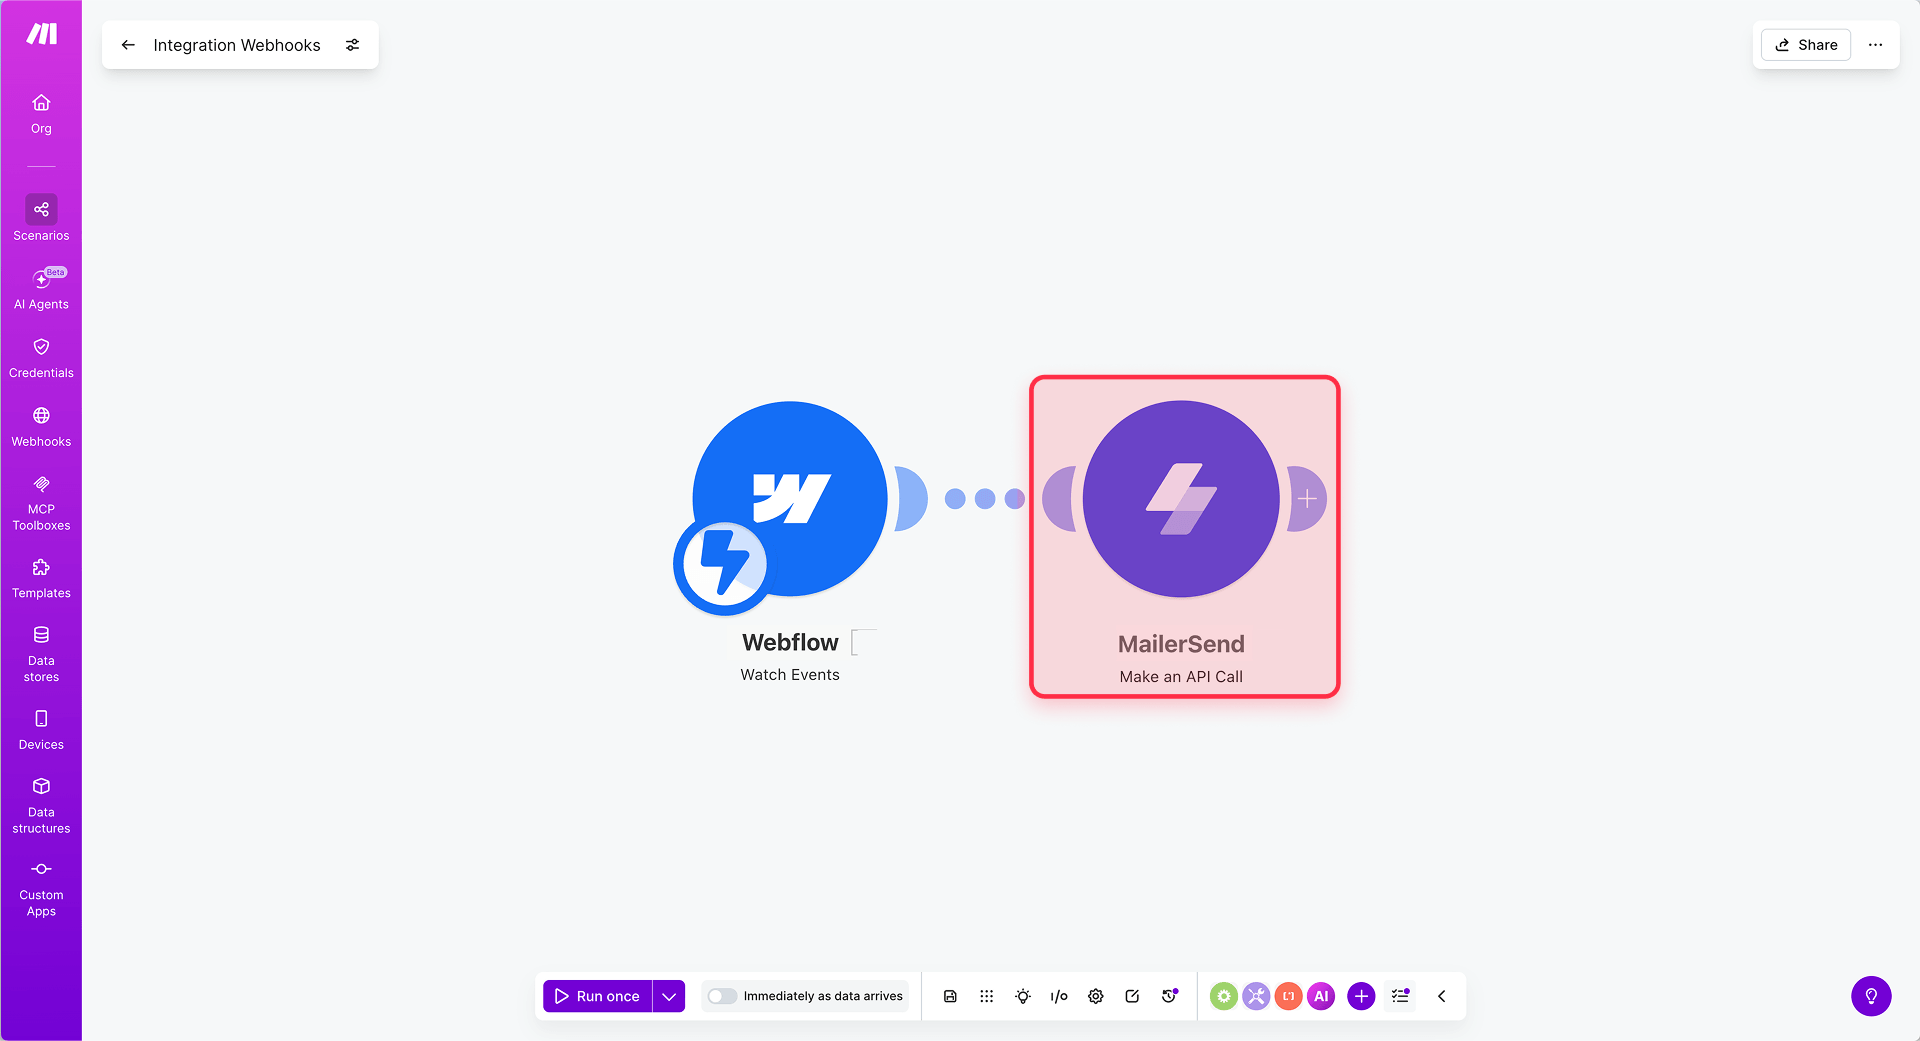
Now that Make is receiving the Webflow form submission, add MailerSend to send the confirmation email.
In Make, click the + icon to the right of the Webflow module.
Search for MailerSend and select Make an API Call.
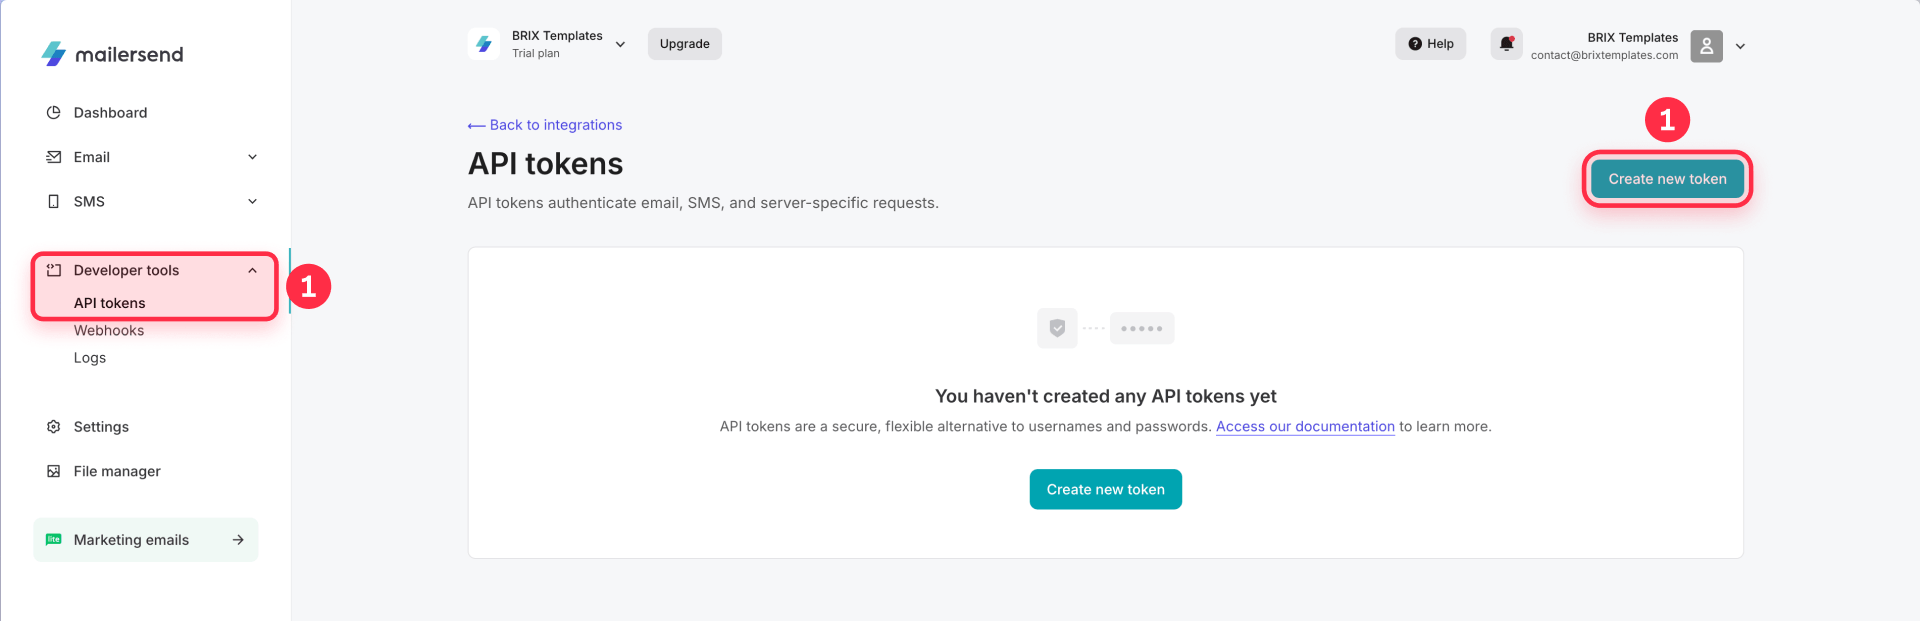
Connect your MailerSend account using the API token you created in Step 5. If you have not created one yet, go to MailerSend → Developer tools → API tokens → Create new token, then paste it into Make.
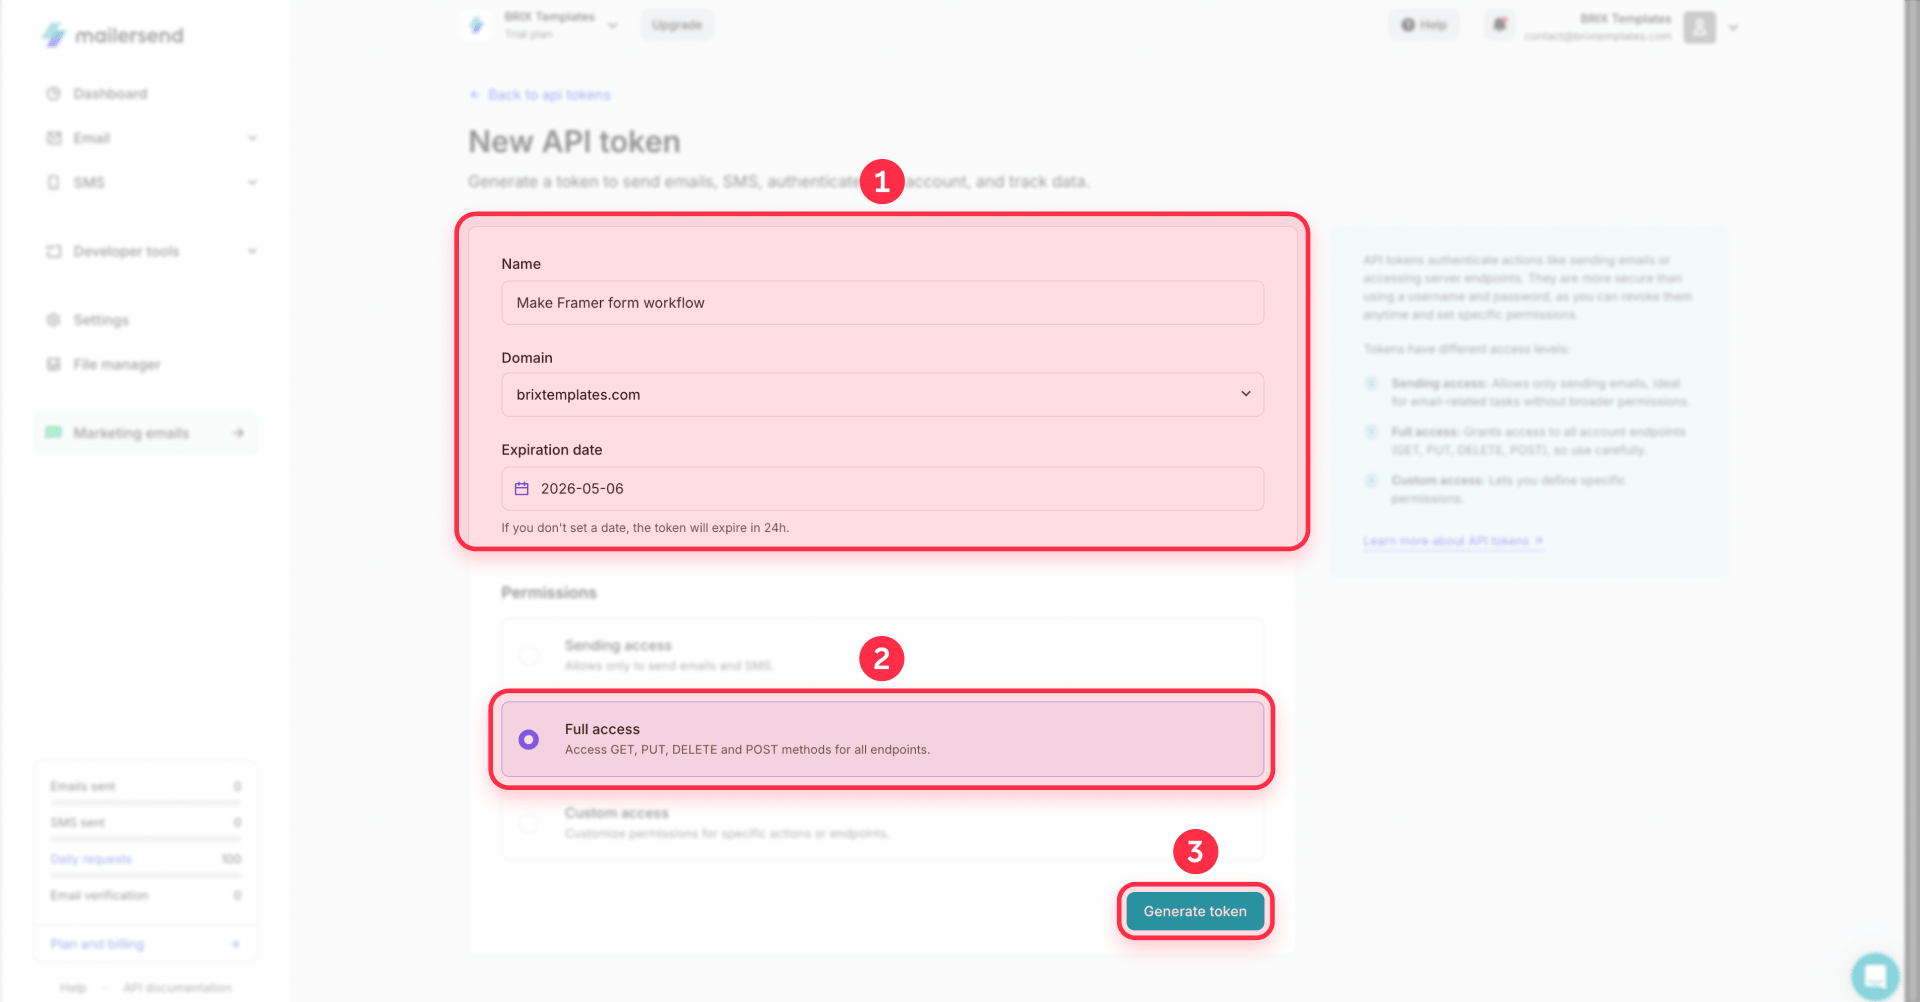
Configure the API call like this:
HTTP Method — POST URL — /v1/email Headers — addontent-Type: application/json
Paste this JSON body into the Body field, replacing the placeholder values with your own:
{
  "from": {
    "email": "[email protected]",
    "name": "Your Brand Name"
  },
  "to": [
    {
      "email": "[Map: Email field from Webflow]",
      "name": "[Map: Name field from Webflow]"
    }
  ],
  "subject": "We received your message",
  "template_id": "AUTO_REPLY_TEMPLATE_ID",
  "reply_to": {
    "email": "[email protected]",
    "name": "Your Brand Name"
  },
  "personalization": [
    {
      "email": "[Map: Email field from Webflow]",
      "data": {
        "clientName": "[Map: Name field from Webflow]",
        "leadCompany": "[Map: Company field from Webflow]",
        "formName": "[Map: Form Name from Webflow]",
        "sourcePage": "[Map: Source Page from Webflow]"
      }
    }
  ]
}
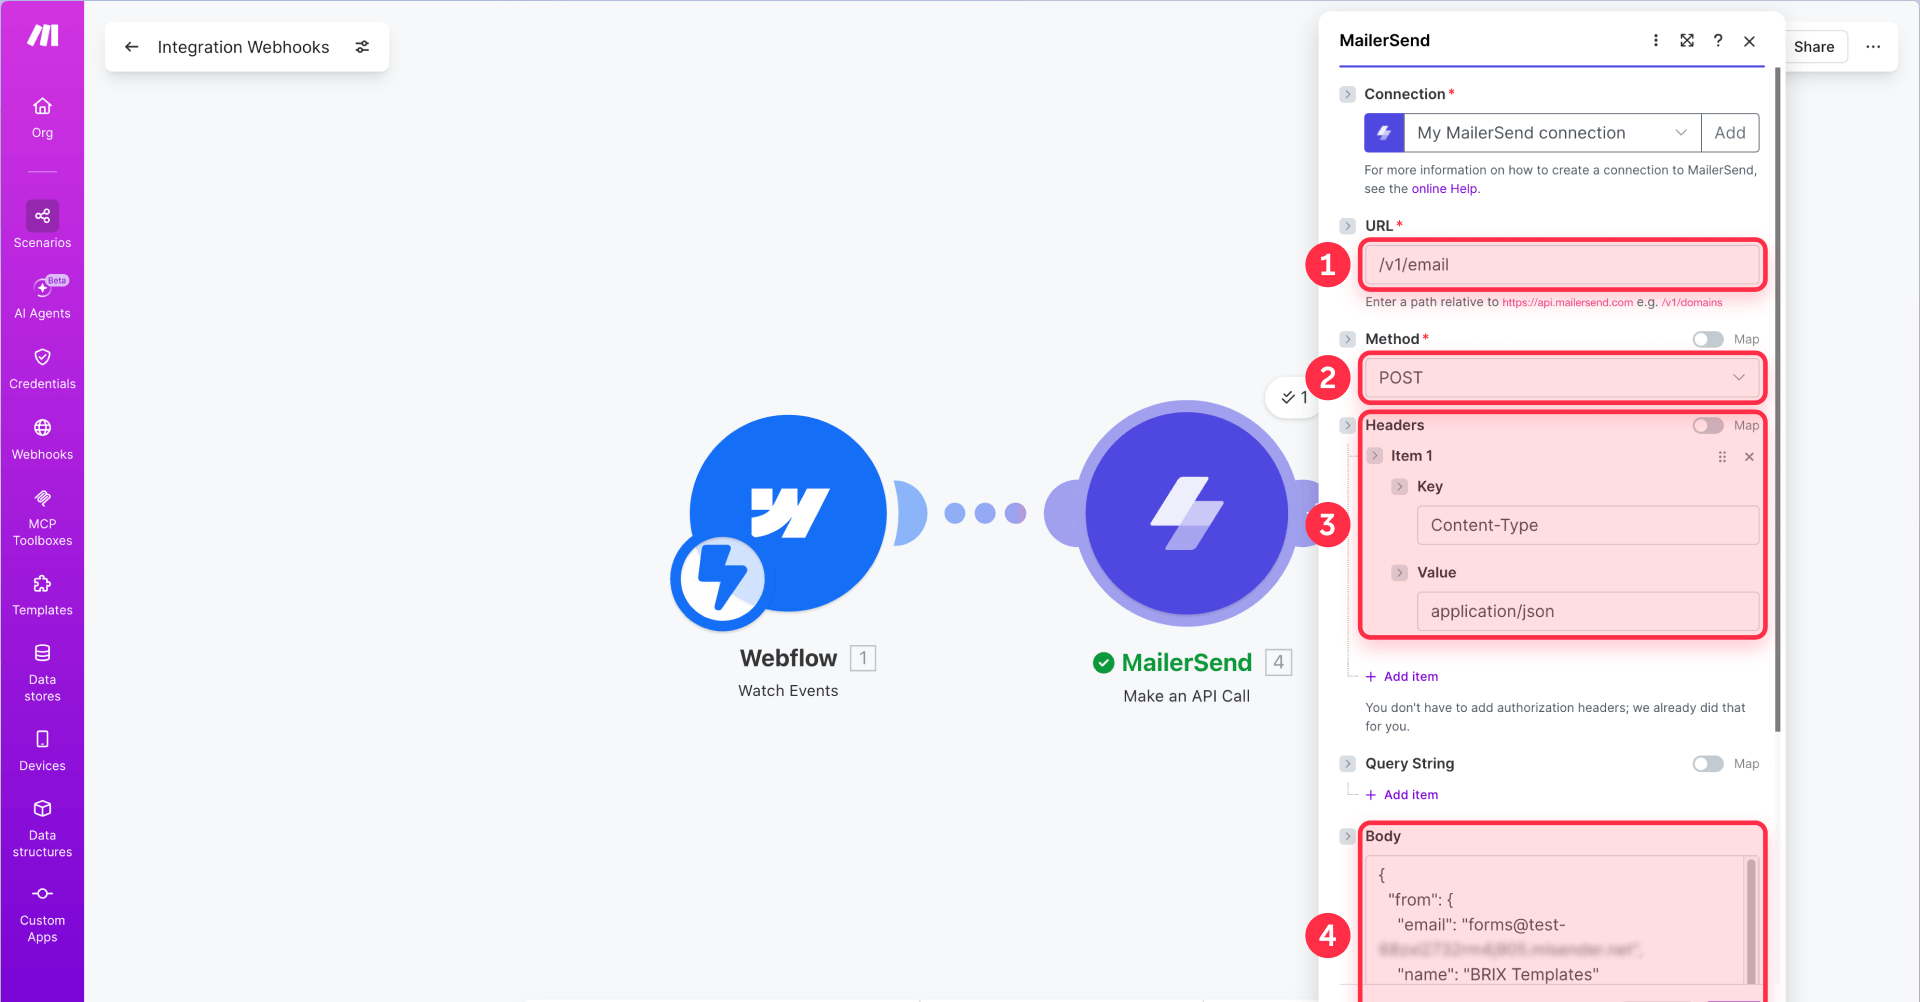
Do not type the values manually. Click inside each JSON value and select the matching field from Make’s mapping panel — for example, click where it says [Map: Email field from Webflow] and select the email field from your Webflow module output.
Replace these values with your actual data:
- from.email — your verified MailerSend sender address from Step 5
- from.name — your brand or company name
- template_id — the template ID from Step 5
- reply_to.email — your team’s email address so the submitter can reply
Only include fields that your Webflow form actually collects. If your form does not ask for a company name, remove leadCompany from the personalization data.
Click Save, then click Run once and submit a new test form from your published Webflow site.
If the MailerSend module runs successfully, check the submitter’s inbox and confirm that the branded confirmation email arrived.
Step 7 — Add optional backup or CRM steps
Once the confirmation email flow works, you can extend it:
- Backup. Add a Google Sheets, Airtable, Notion, or CRM module after the MailerSend step and map the same fields to store every submission. For step-by-step instructions, see our tutorial on connecting Webflow forms to Google Sheets.
- CRM sync. Push leads into HubSpot, Airtable, or another sales tool. For a complete walkthrough, see our guide on connecting Webflow forms to HubSpot CRM.
- Form analytics. Track Webflow form submissions with GTM and GA4 to monitor completion rates and identify drop-off points. Our tutorial on tracking Webflow form submissions with GTM and GA4 covers the full setup.
If your workflow needs advanced routing, CRM sync, or production-ready error handling, BRIX Templates' Webflow team can help design and implement the setup correctly.
Step 8 — Test the full Webflow email workflow
Submit the form from your published Webflow site and verify:
- Make receives the payload with all fields populated
- The auto-reply confirmation email arrives in the test submitter's inbox
- The email shows the correct sender name, subject, and branded layout
- Template variables like the submitter's name are filled in correctly
- Reply-to is set to your team's email — click Reply and confirm it goes to the right address
- The backup step saves the data, if enabled
Test in at least two email clients (Gmail and Outlook) to confirm the layout renders correctly. If the layout breaks in Outlook, the issue is usually unsupported CSS like flexbox or border-radius.
Optional — Use Brevo instead of MailerSend
The same workflow works with Brevo (formerly Sendinblue). Brevo is a good alternative if you already use it for marketing emails or want its free plan.
The key difference is variable syntax. Brevo templates use {{params.variable_name}}, and values are passed through a params object in the send request. In Make, use the Sendinblue (Brevo) integration with the Send a Transactional Email module and map Webflow form fields into the params object.
The workflow structure is the same: Webflow → Make → email template. Switching from MailerSend to Brevo is a module swap, not a workflow redesign.
Common mistakes when sending professional emails from Webflow forms
- Make does not see your form submission. Make sure your Webflow site is published after making any form changes. The Make integration can only detect forms on published sites. Also check that you selected the correct site and form in the Make Webflow module.
- The sender domain is not verified. Add and verify your domain in MailerSend before sending production emails. For testing, the trial domain can work, but client workflows should use a verified custom domain.
- Variables appear empty in the email. Check that your Webflow form field names match exactly what you mapped in Make and that the template variable names in MailerSend match the personalization keys in the API call.
- The email still looks plain. Make sure you are passing a template_id in the API call body, not sending plain text. Without a template ID, MailerSend sends a basic text email.
- Reply-to does not work. Check that the reply_to object in the JSON body has your team's email address set correctly.
- No backup exists. Add a simple Google Sheets, Airtable, Notion, or CRM step after the MailerSend module.
- The Webflow form field names have changed. If you renamed fields in Webflow after setting up the Make scenario, re-run "Run Once" with a new test submission so Make picks up the updated field structure.
- The workflow is getting too complex. Keep the base workflow simple. Get help for advanced routing, CRM sync, or production-ready error handling.
Frequently asked questions about professional emails from Webflow forms
Can Webflow forms send professional emails?
Webflow's native notifications work for basic alerts — you can set the recipient and subject line. For branded HTML confirmation emails sent to the submitter, custom sending domains, template variables, and submission backups, route submissions through Make and use a transactional email service like MailerSend or Brevo.
How do I connect Webflow forms to Make?
Make has a native Webflow integration. Add a Webflow module to your scenario, select Watch Events as the trigger, authorize Make to access your Webflow account, select your site, and set the trigger type to Form Submission. No custom webhook URLs are needed — the connection uses OAuth.
Can I send an auto-reply from a Webflow form?
Not natively. But by connecting Webflow to Make through the native integration, you can call the MailerSend API and send a templated confirmation email to the submitter's address right after they submit the form.
Can I customize the email layout from a Webflow form?
Yes — through a Make workflow. Use MailerSend or Brevo to create an HTML template with your logo, colors, and branded layout. Make passes form data as variables that the email service injects into the template at send time.
What is the best way to send branded emails from Webflow forms?
The most flexible approach is Webflow → Make → MailerSend (or Brevo). This gives you full control over sender address, templates, reply-to, confirmation emails, and backups. Setup takes 30–60 minutes and runs automatically after that.
Can I also notify my team after sending the auto-reply?
Yes. After the auto-reply works, you can add another Make step to notify your team or save the submission to a CRM. Keep the first version focused on the confirmation email, then add team notifications only if your workflow needs them.
How do I set reply-to for Webflow form emails?
In the Make API call, set the reply_to field in the JSON body to your team's email address. This way, if the submitter replies to the confirmation email, the reply goes to your team. Webflow's native form notifications support basic reply-to customization with form variables. However, for a branded confirmation email sent to the submitter with a custom sending domain, template variables, and MailerSend personalization, use the Make workflow shown in this tutorial.
What about Webflow Logic for form emails?
Webflow Logic was discontinued on June 27, 2025. Do not use it for new form email workflows. Make is the recommended alternative for connecting Webflow forms to email services.
Conclusion
Sending a branded confirmation email from a Webflow form follows a straightforward pattern: Webflow captures the submission, Make receives the data through its native integration, Make calls the MailerSend API, and MailerSend delivers a branded confirmation email to the submitter.
You now have a workflow that sends a professional "we received your message" email to every person who submits your form — with branded templates, dynamic variables, and optional submission backups — all running automatically, no custom code required.
If you need a more advanced setup with CRM sync, conditional routing, custom templates, or production-ready error handling, BRIX Templates' Webflow team can help.


Join readers commenting on this post!