
Webflow offers powerful form design flexibility, but connecting its forms to ActiveCampaign isn’t a built-in option. Don’t worry—we’ll walk you through three straightforward ways to connect them, whether you want a quick plug-and-play option or full creative control.
Here’s what we’ll cover:
- Embedding ActiveCampaign’s form code directly into Webflow—quickly set up using ActiveCampaign’s built-in forms, but with limited design options.
- Zapier integration to connect Webflow form submissions to ActiveCampaign—easily create a no-code connection, though it requires ongoing costs.
- Custom JavaScript code to connect Webflow forms with ActiveCampaign—A free and flexible method to integrate your forms using JavaScript, though it requires some technical configuration.
Whether you need a quick setup, workflow automation, or full design flexibility, this guide has the right method for your needs. Let’s dive into each option in detail!
Method 1: Embedding ActiveCampaign’s form code directly into Webflow
This method is super easy! Just embed your ActiveCampaign forms into Webflow using either a one-line JavaScript snippet (Simple Embed) or a combination of HTML/JavaScript (Full Embed).
You have two ways to embed your forms:
- Simple Embed: Add the form to your site quickly with just one line of code. Customization is limited to ActiveCampaign’s built-in design options.
- Full Embed: Gain more flexibility with both HTML and JavaScript code. Customize further with your own CSS or adjust the HTML to perfectly match your website’s design—all while keeping the form fully functional.
When you create your ActiveCampaign form, you’ll have these two embedding options to choose from. Don’t worry—we’ll guide you step by step to help you set it up easily, no matter which option you pick!
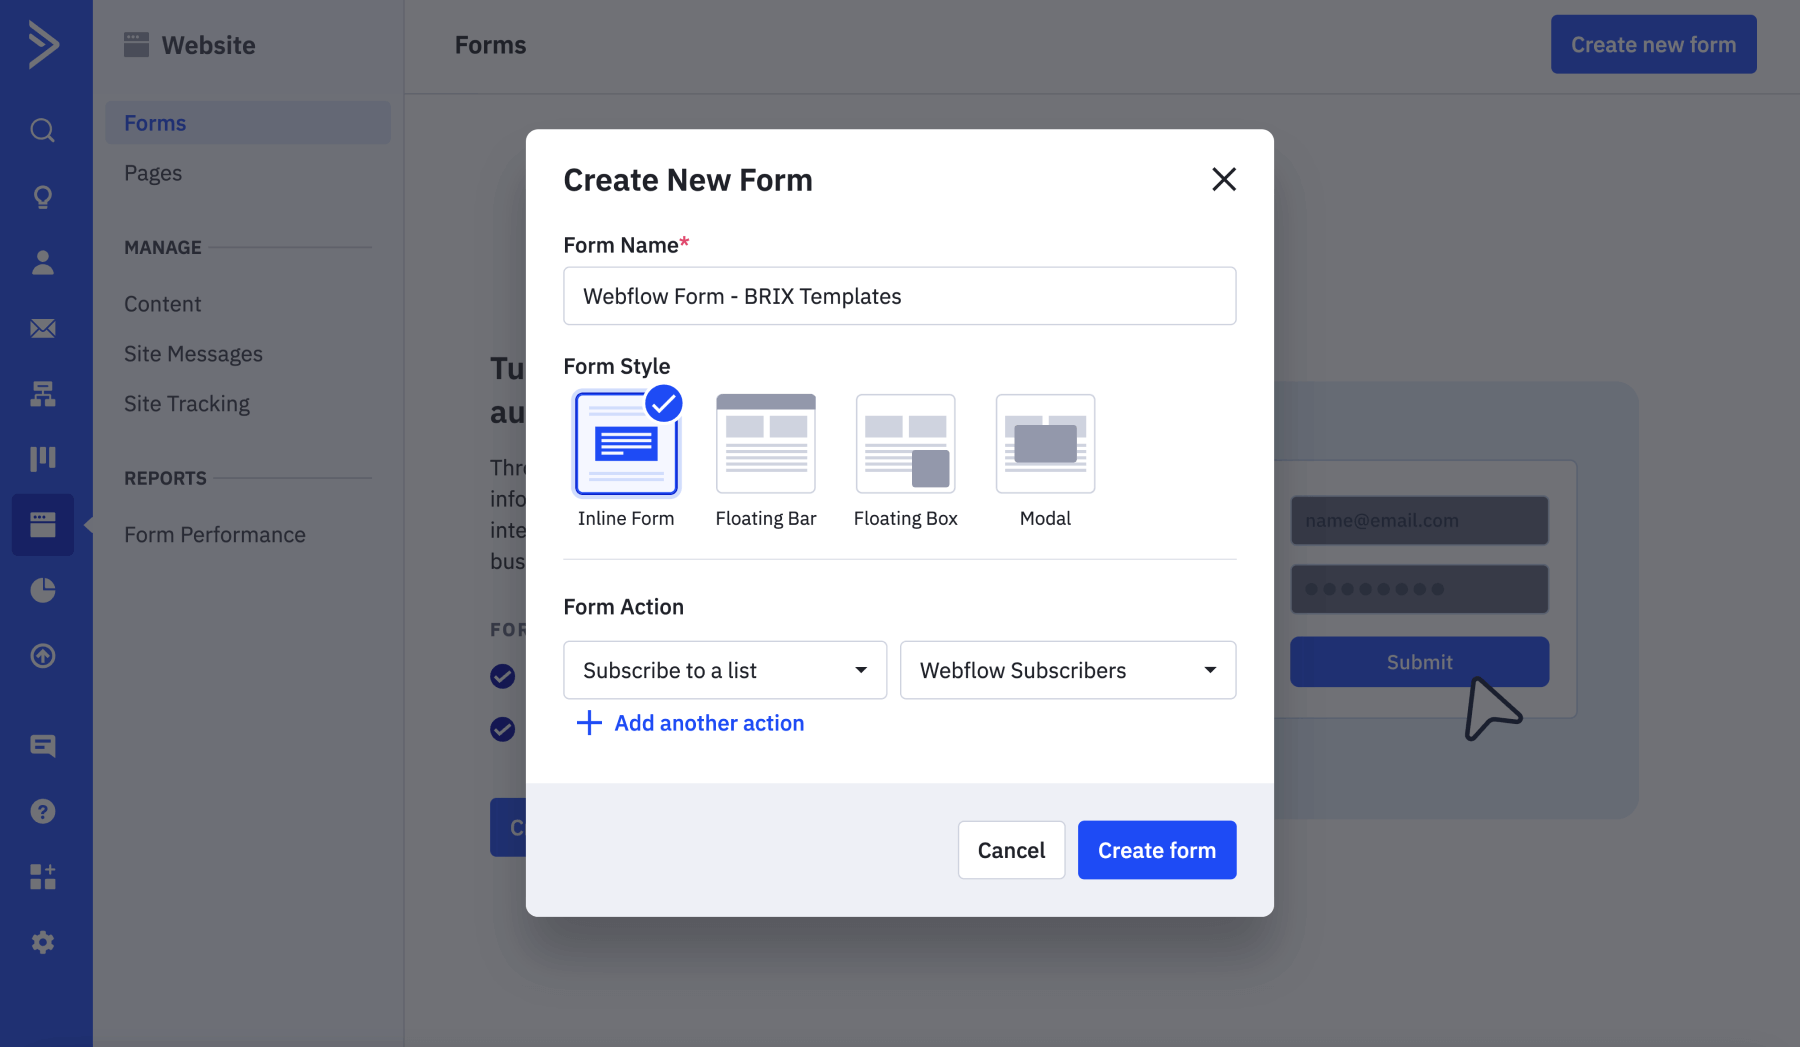
Step 1: Create your ActiveCampaign form
- Log in to your ActiveCampaign account.
- Navigate to the "Website" section and click on "Forms".
- Click "Create new form" to start a new form.
- Choose a name for your form.
- Select the "Inline Form" option under Form Style.
- Select "Subscribe to List" as the Form Action, or choose any other action that suits your needs.
- Click "Create form" to proceed.
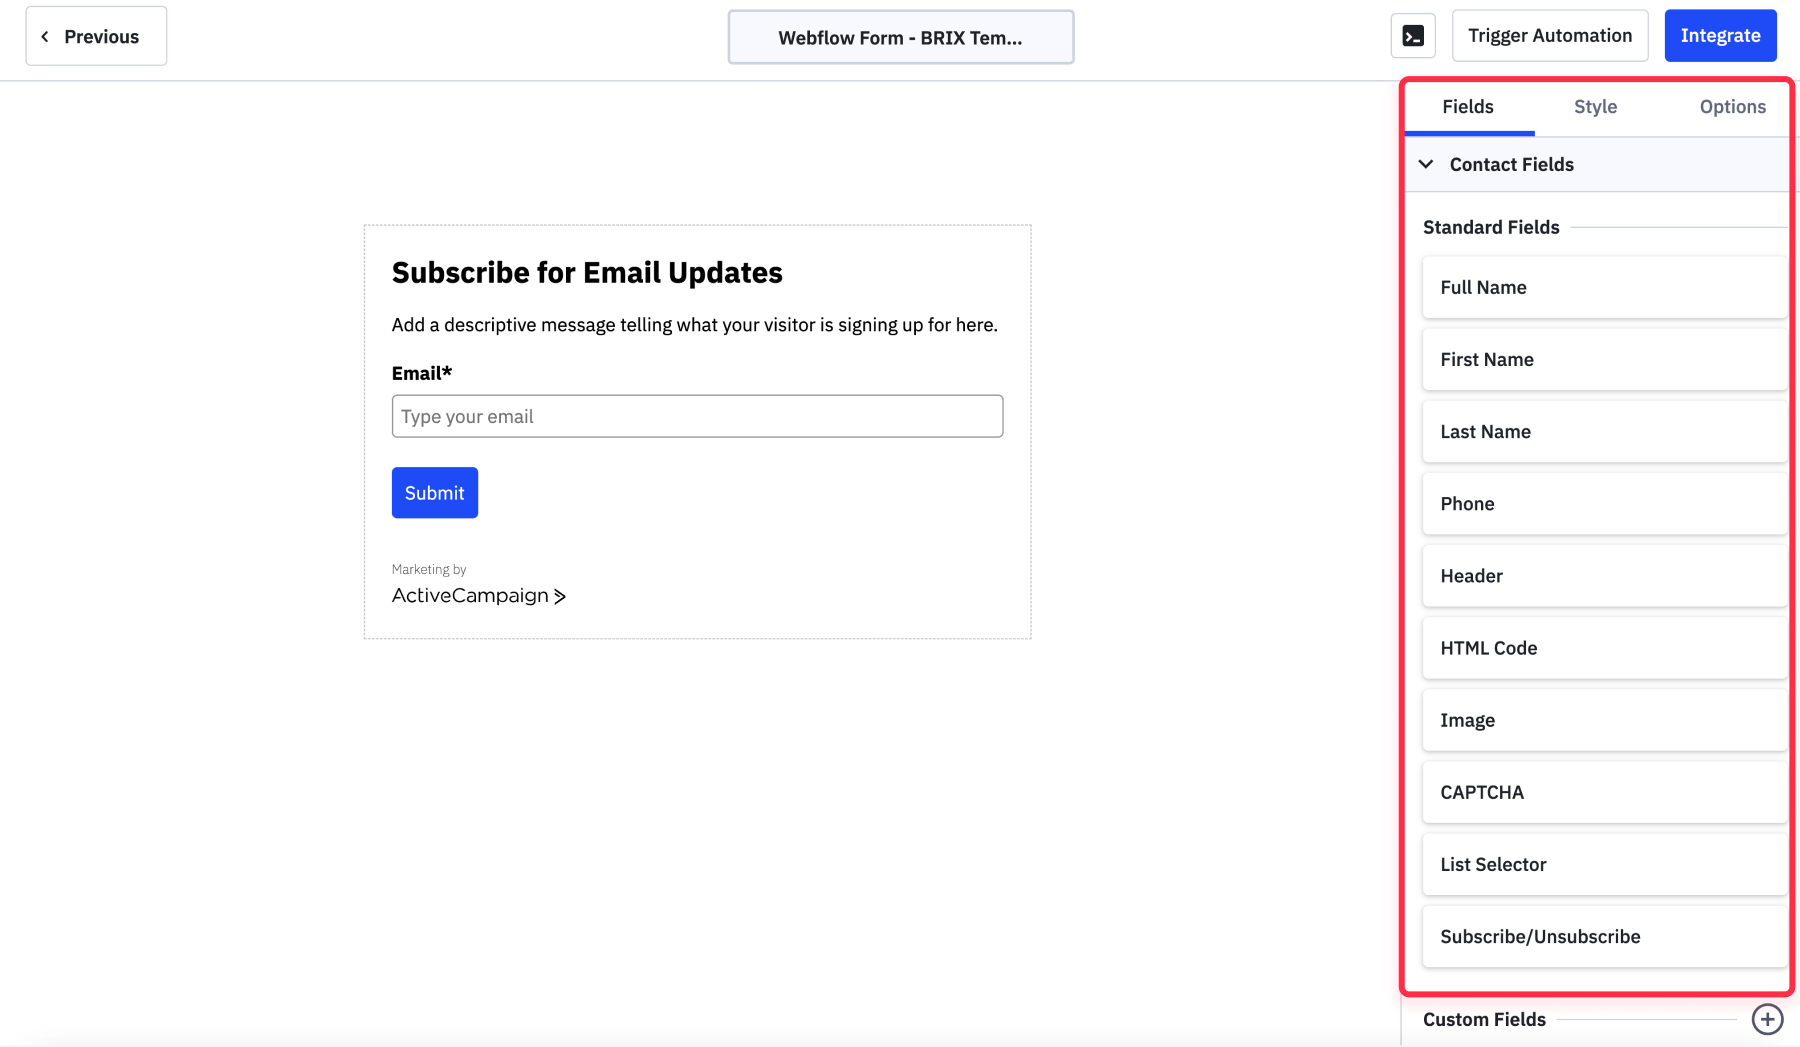
Step 2: Customize your form
- Add your fields: Go to the "Fields" tab to add fields such as First Name, Last Name, etc. Customize these based on your requirements.
- Adjust the styling: In the "Style" tab, you can configure settings like layout (Vertical fields or Horizontal fields), form width, background colors, padding, and borders.
- Configure options: Under the "Options" tab, set actions for form submission, such as "Show thank you" or redirecting users to a specific URL. Additionally, set the "Form Action" (e.g., "Subscribe to List") and toggle the "Allow Blank Fields" option if necessary.
- Set automation rules: You can set rules to trigger specific actions, like sending follow-up emails, etc. Under "Trigger Automation" button.
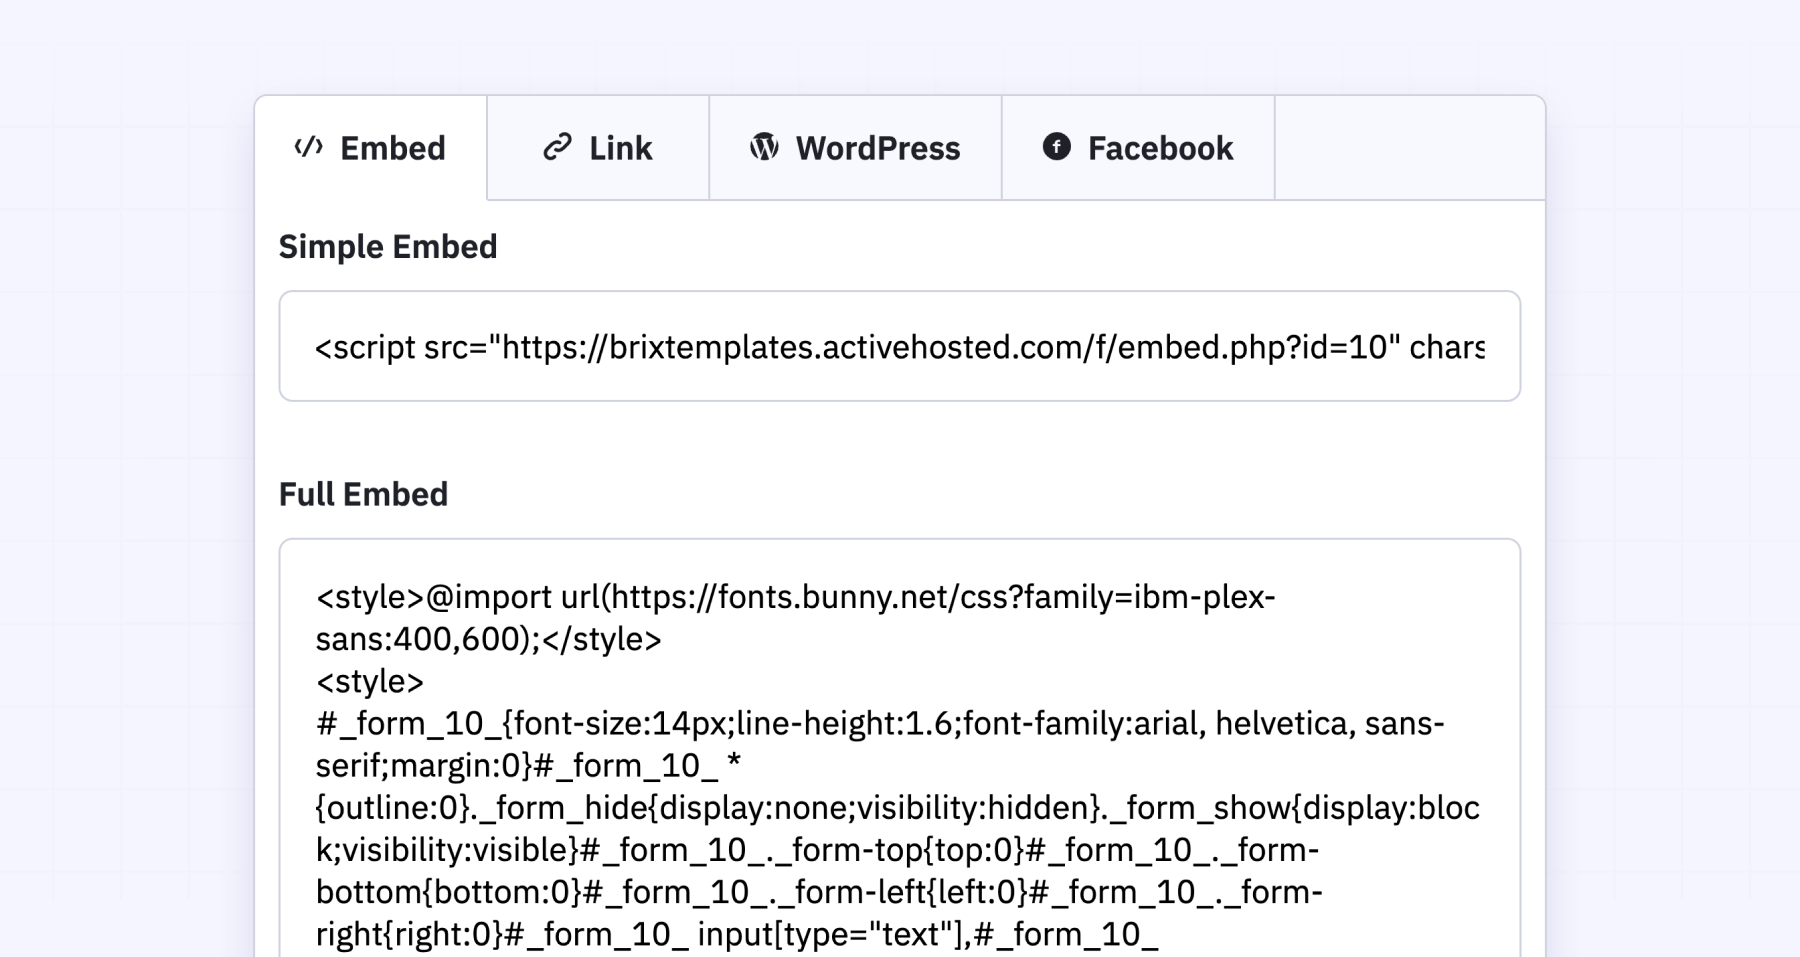
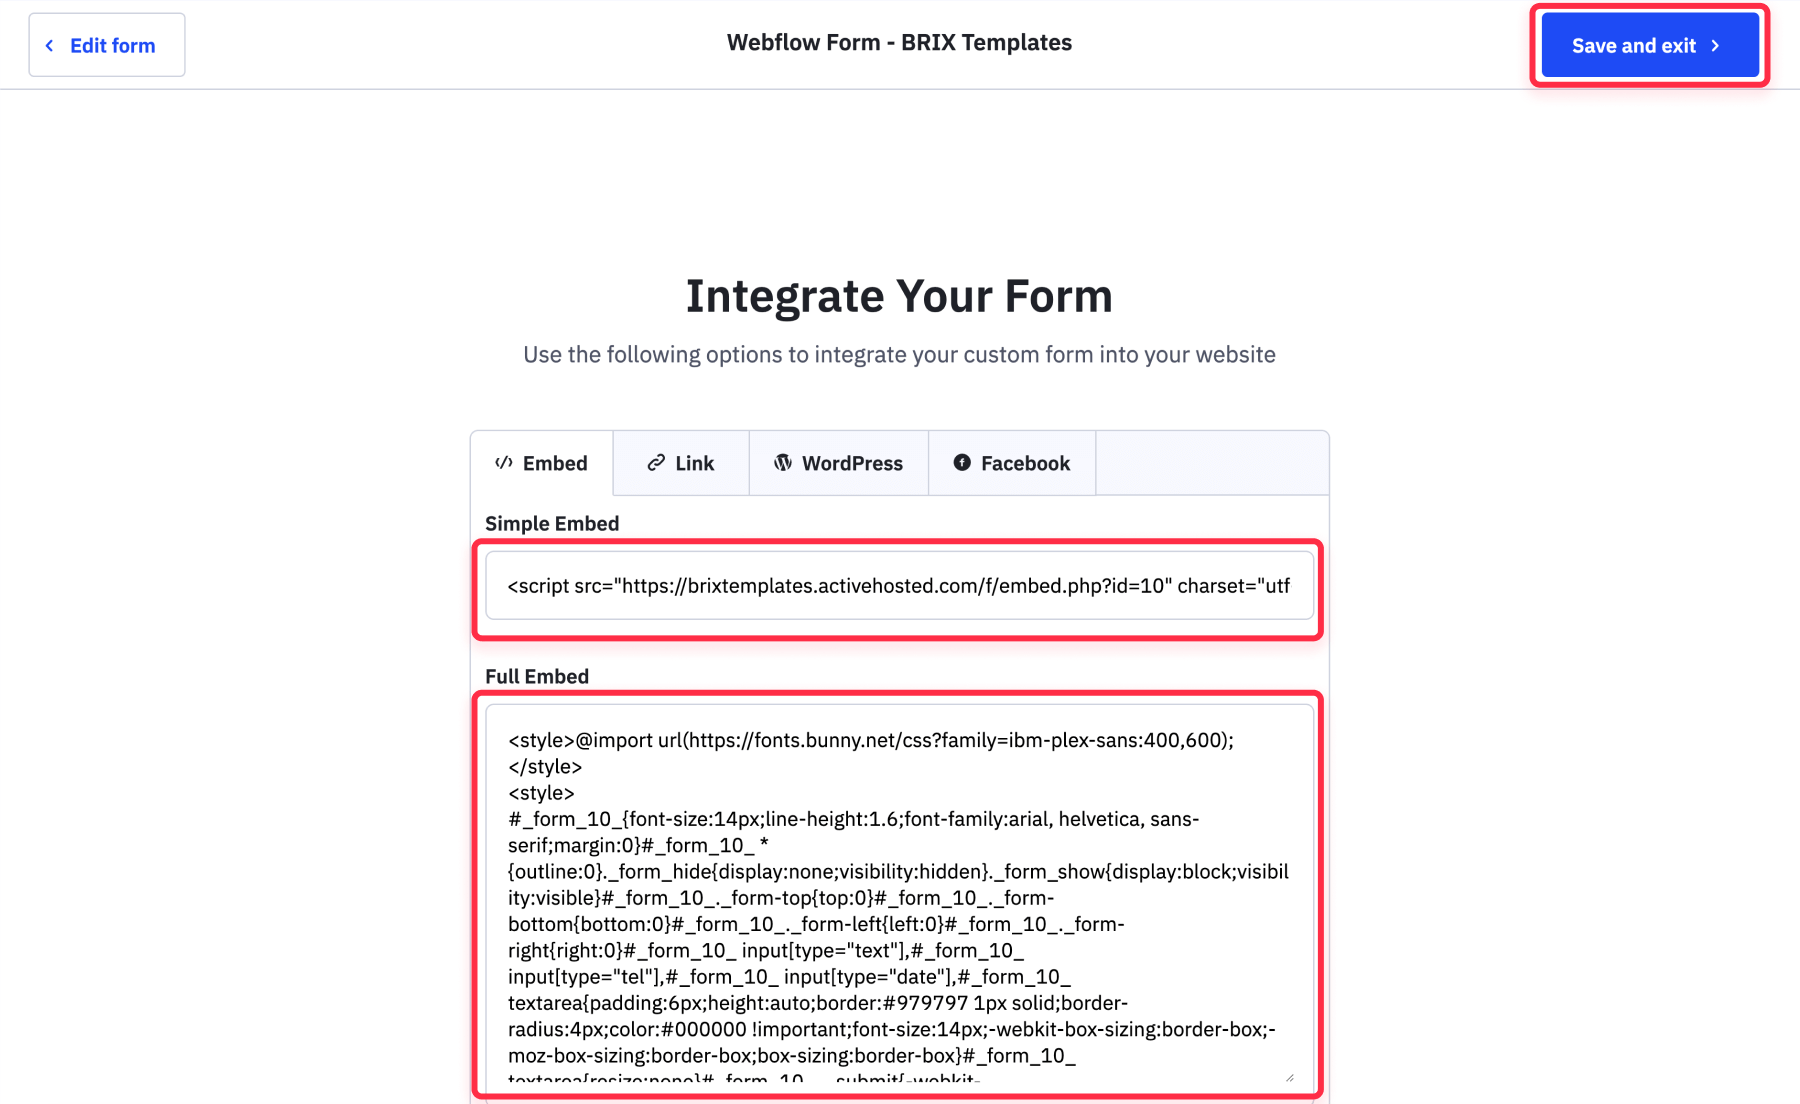
Step 3: Get the embed code
- Click on "Integrate" button in the form editor.
- Choose between Simple Embed and Full Embed (as explained above). Simple Embed is quick and easy, while Full Embed offers advanced styling options.
- Once you've copied the code, click the "Save and Exit" button.
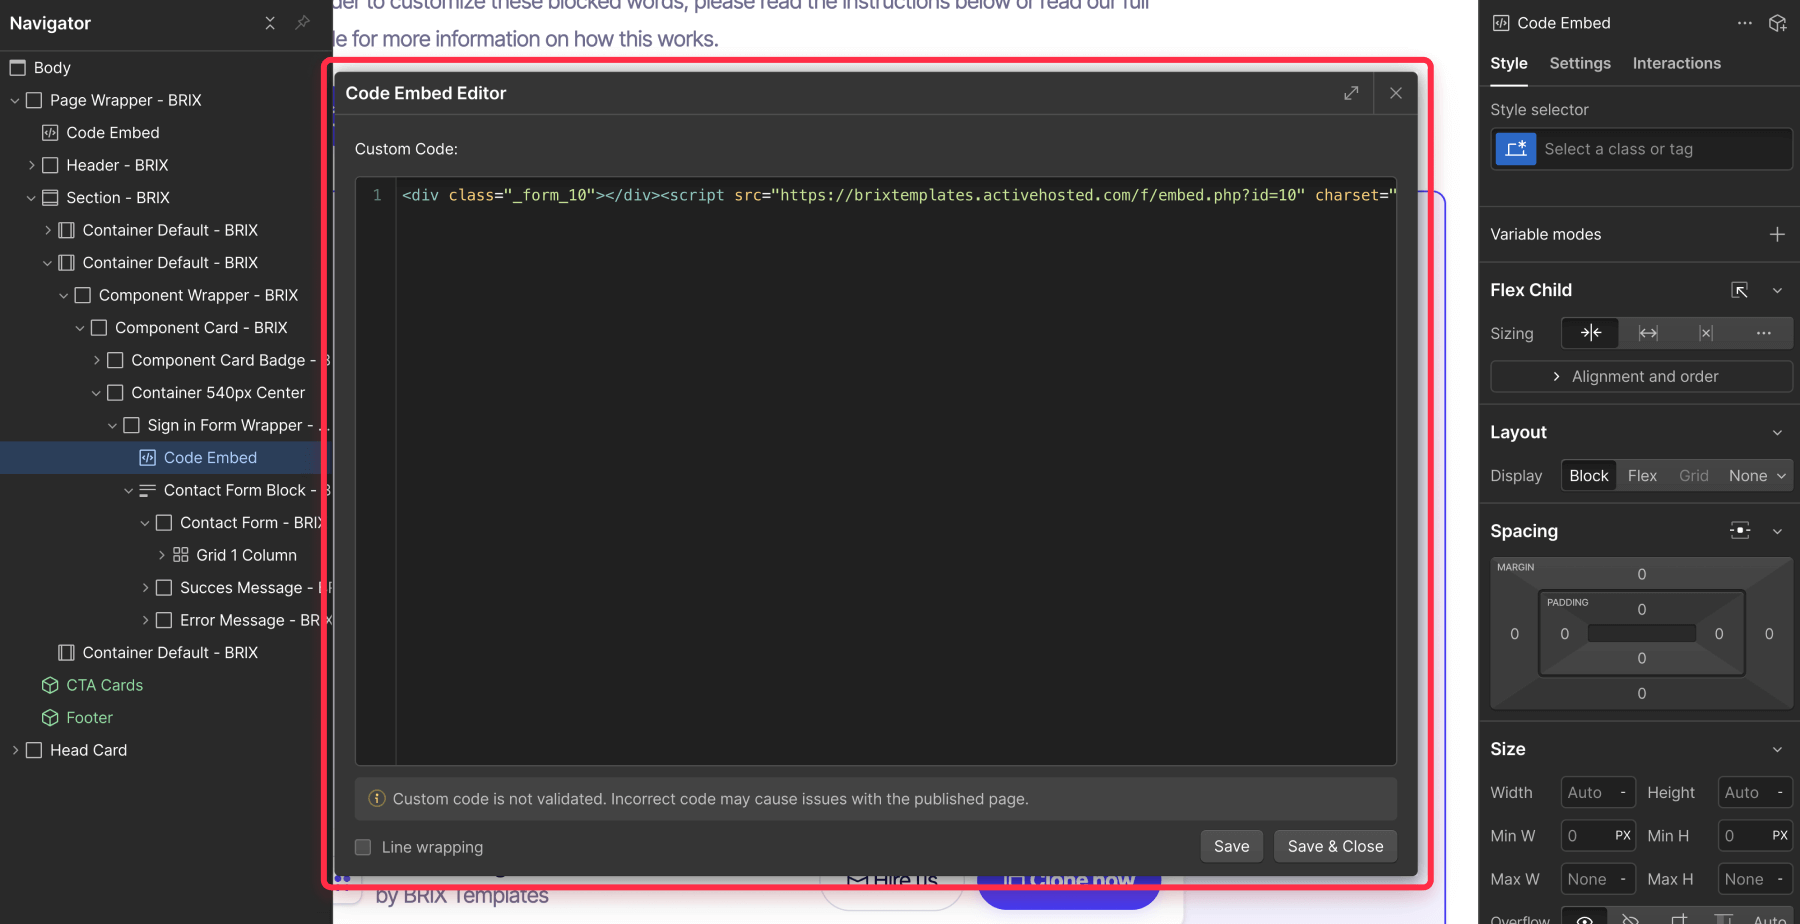
Step 4: Add the code to Webflow
- In Webflow’s Designer, drag a “Embed Code” element where you want the form.
- Paste the code you copied from ActiveCampaign.
- Publish your site to see the changes live.
This method is ideal if you want a fast setup with minimal effort. ActiveCampaign’s form editor includes styling tools for colors, fonts, and layouts, letting you design a polished form that blends seamlessly into your Webflow site—no advanced customization needed.
Want to take your form design even further? BRIX Templates can help you style your ActiveCampaign Full Embed with custom CSS to perfectly match your branding.
Method 2: Zapier integration to connect Webflow form submissions to ActiveCampaign
Zapier is a no-code automation tool that connects your Webflow forms to ActiveCampaign. This method preserves your custom Webflow form design while automating contact data transfers.
If you need more advanced integrations—like syncing multiple task between different apps, connecting with or more advanced No-Code workflows—Zapier is a powerful option to extend Webflow’s capabilities. Need complex automations? BRIX Templates can build custom Zapier workflows tailored to your business needs.
⚠️ Note: Zapier charges monthly based on task volume. For example, 2,000 tasks (e.g., form submissions) cost $48.19/month (as of this writing) on the Business Plan.
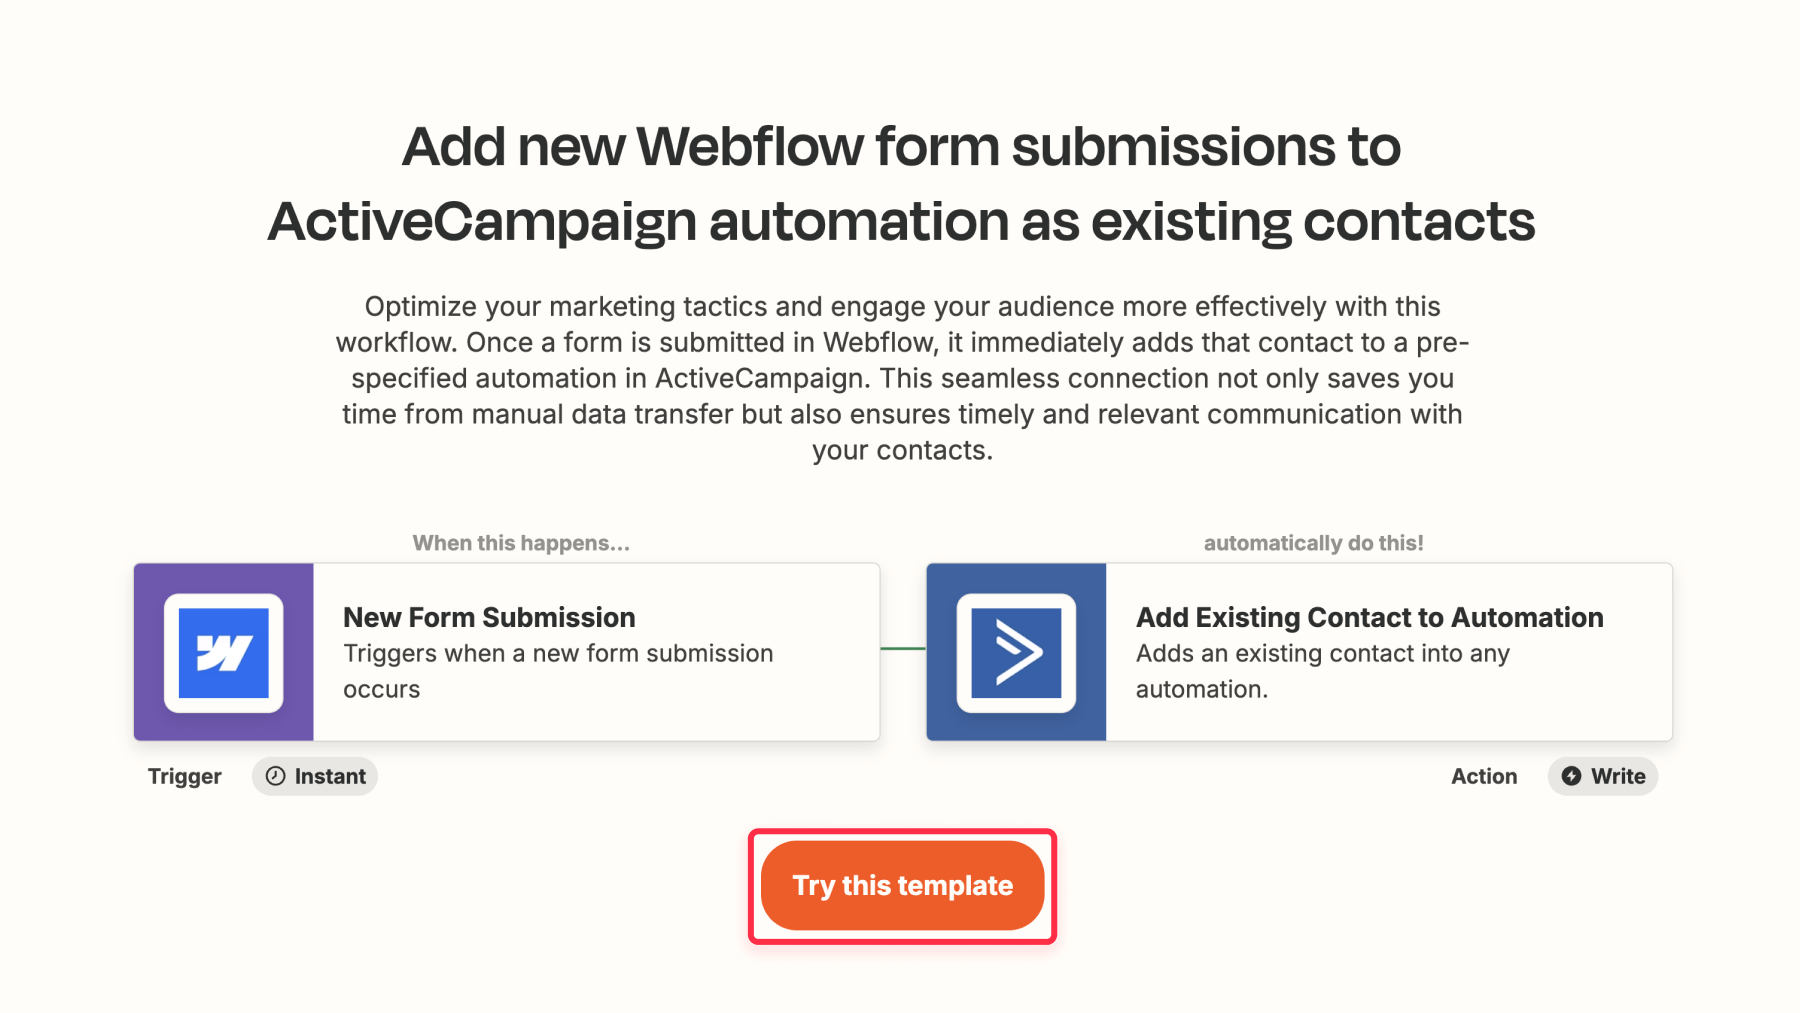
Step 1: Start with a pre-configured Zap
- Sign in to Zapier or create an account if you don’t already have one.
- Open the pre-configured Zap template called "Add new Webflow form submissions to ActiveCampaign automation as existing contacts" to save time.
- Click the "Try this template" button to begin the setup process.
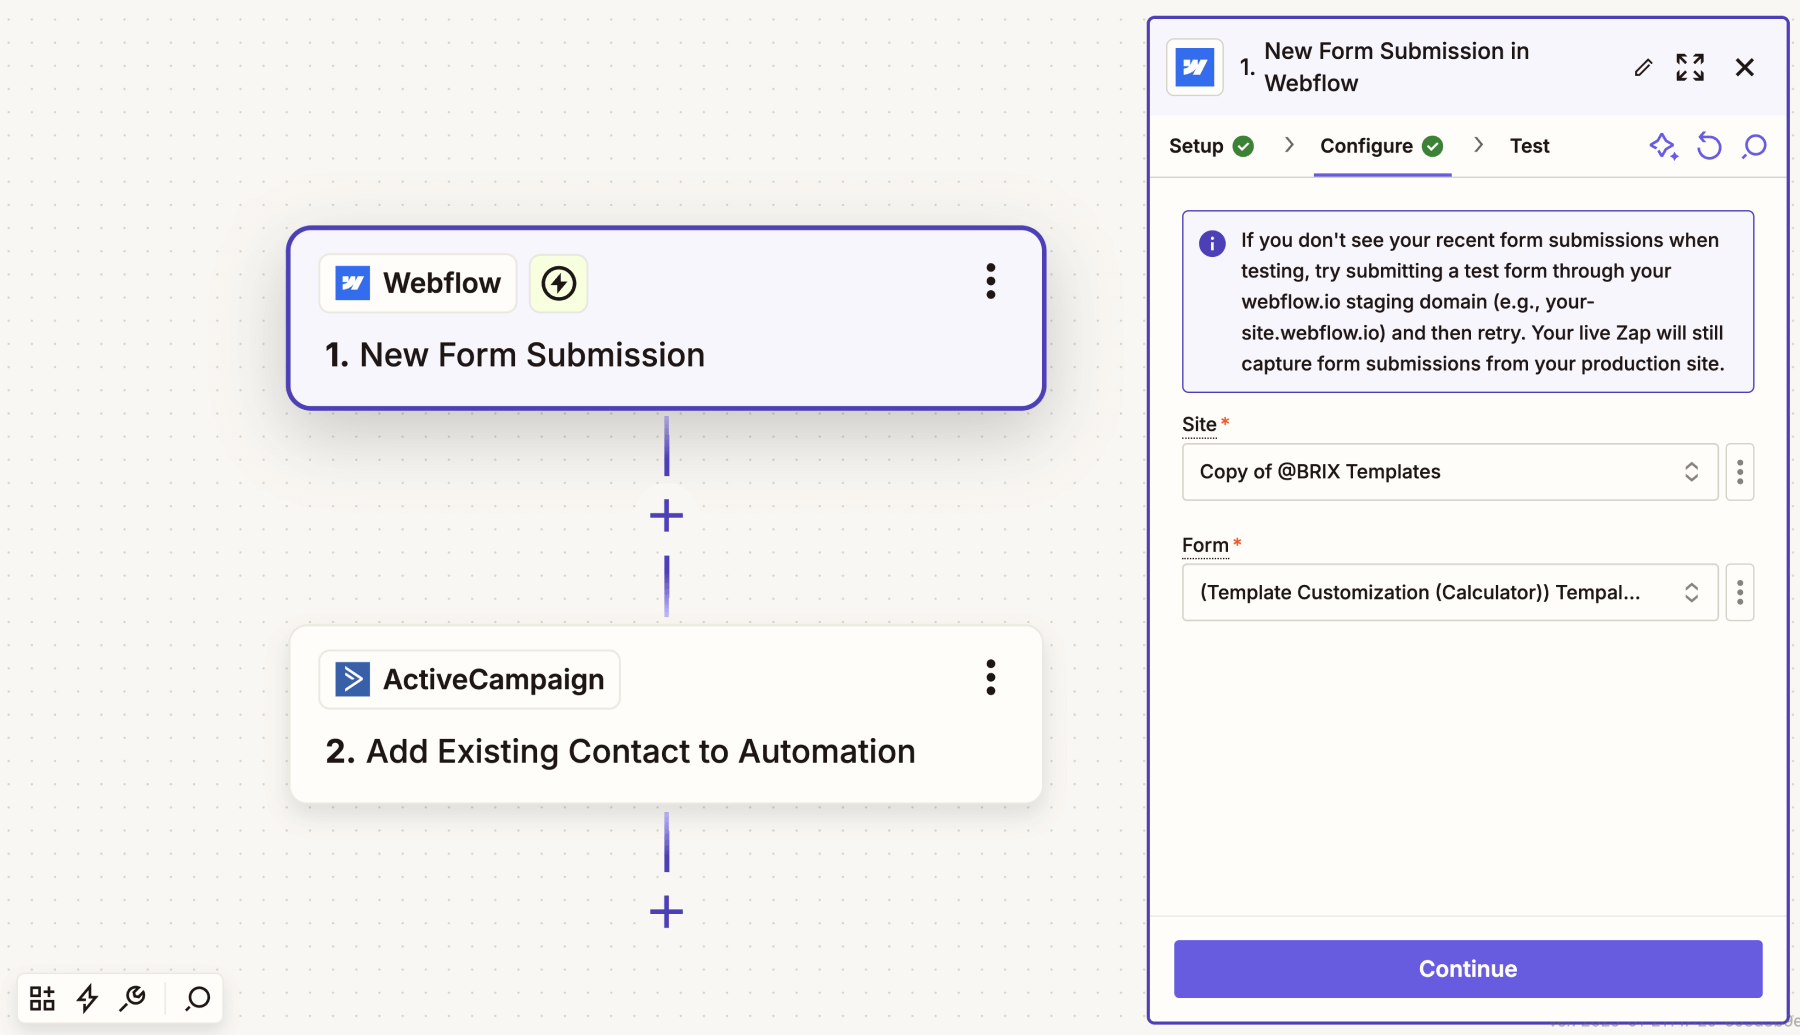
Step 2: Configure Webflow connection
- Follow the prompts to connect your Webflow account to Zapier by authorizing the connection.
- Ensure your Webflow site is published so Zapier can detect your forms.
- Select the Webflow site and the specific form you want to connect.
- Run a test submission. If Zapier doesn’t detect your form, republish your Webflow site and retry.
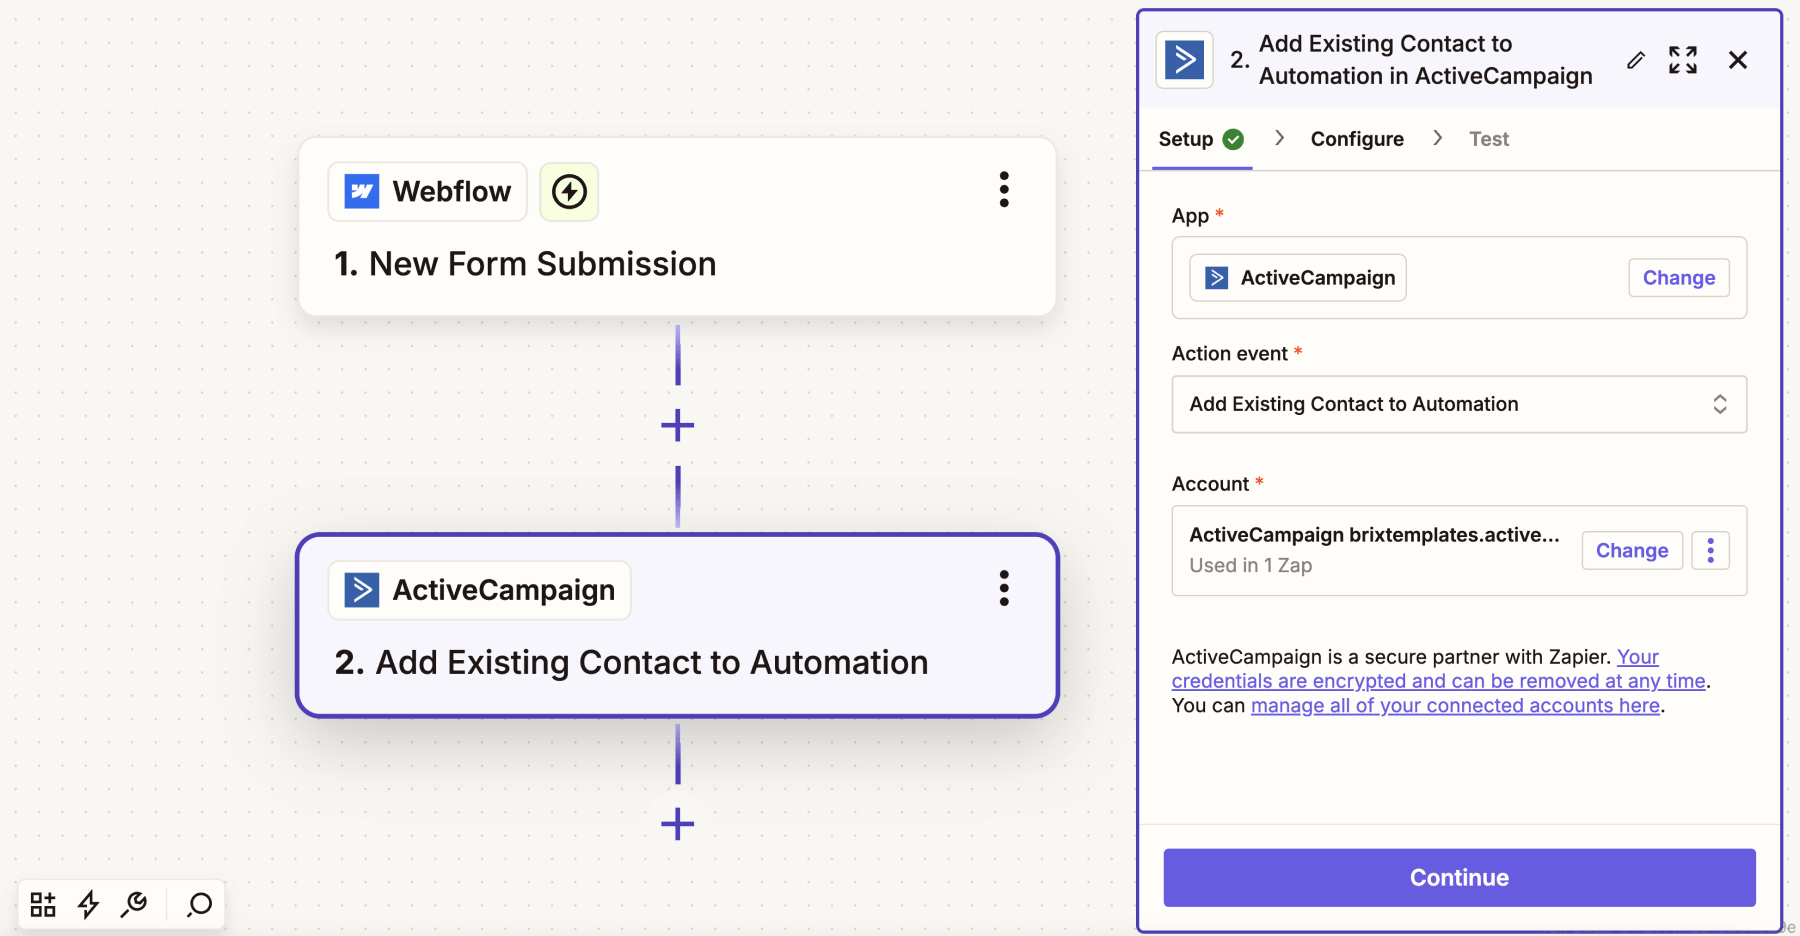
Step 3: Set up ActiveCampaign action
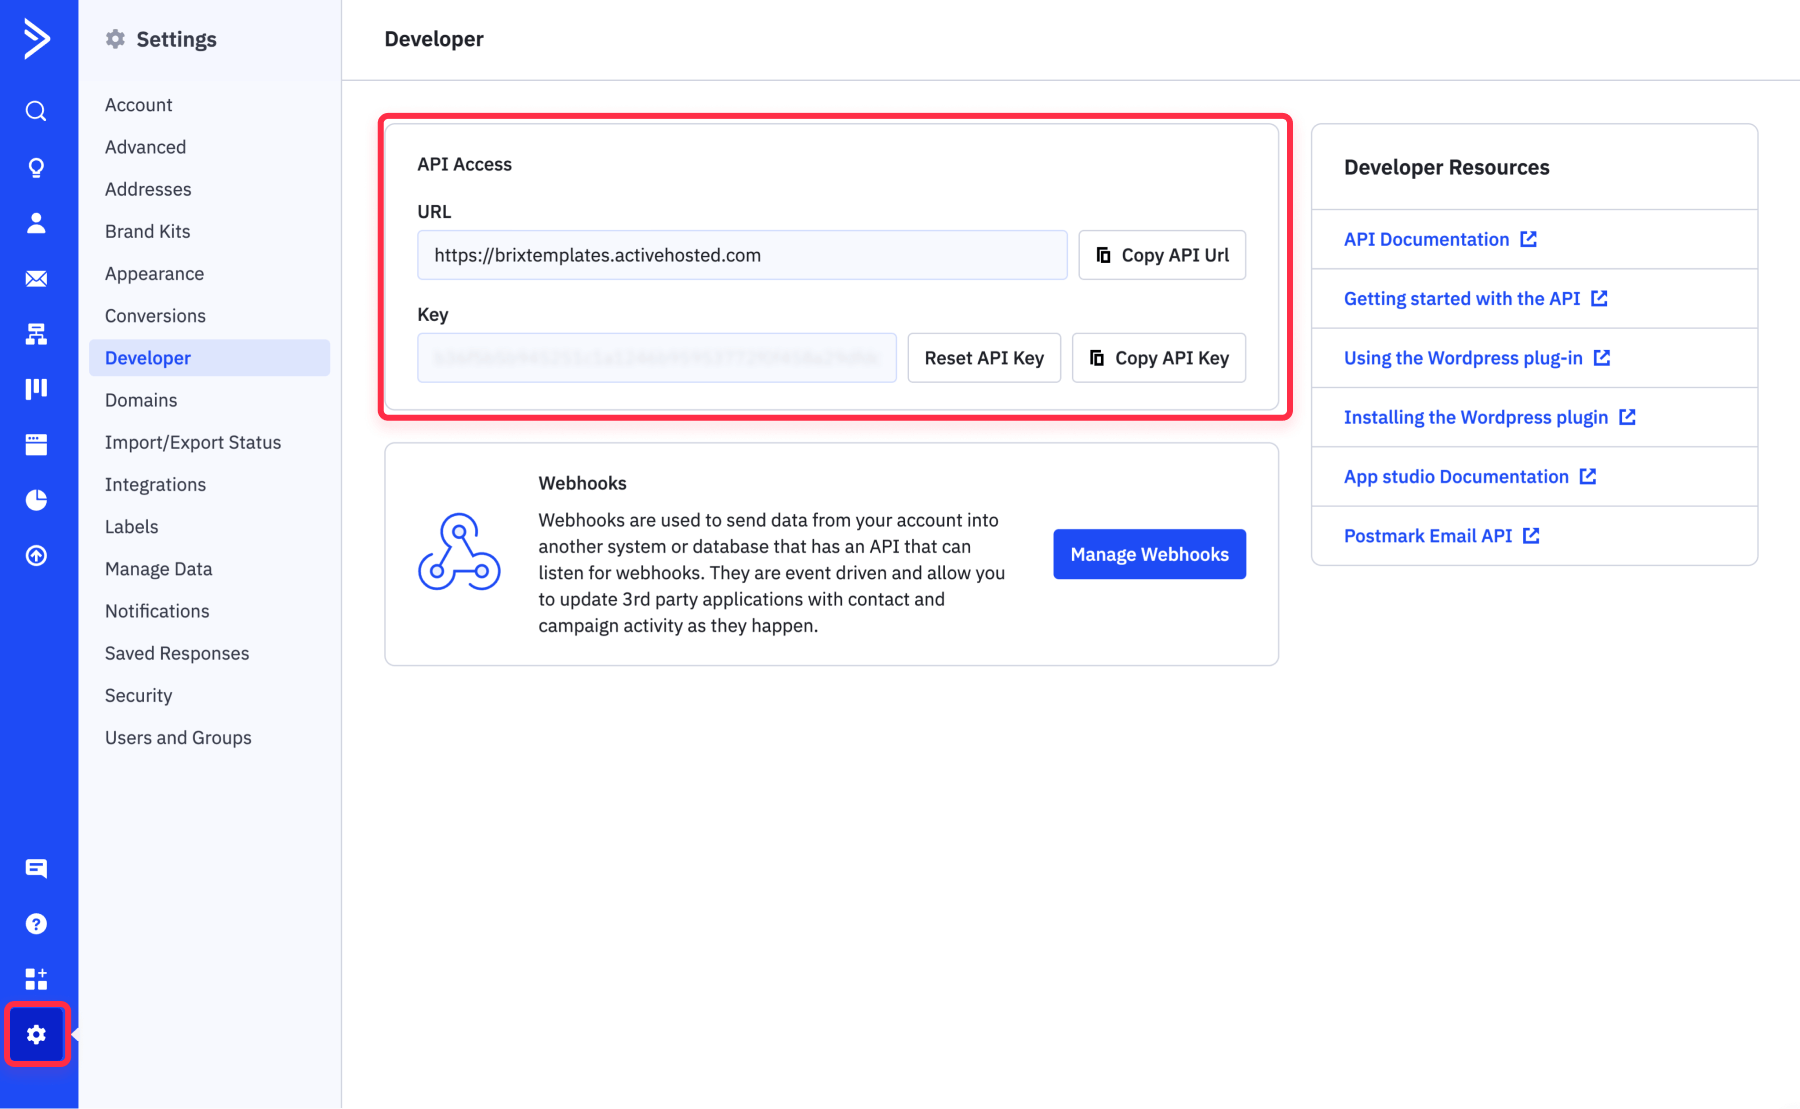
- Retrieve your ActiveCampaign API URL and Key by logging into your ActiveCampaign account. Go to “Settings”, navigate to the “Developer" section, and copy your API URL and Key.
- Confirm that ActiveCampaign is set as the action app in the pre-configured Zap and ready to receive data.
- Verify the action event is set to "Add Existing Contact to Automation" to correctly integrate the workflow.
- Connect your ActiveCampaign account using the API URL and Key you copied earlier. This step ensures a secure connection between Zapier and ActiveCampaign.
- Select the target automation in ActiveCampaign where the contact should be added.
- Map Webflow fields (e.g., Email) to ActiveCampaign fields. Ensure names match exactly (case-sensitive) to avoid data loss.
- Test the integration by running a test to confirm that data flows correctly between Webflow and ActiveCampaign.
Method 3: Custom JavaScript code to connect Webflow forms with ActiveCampaign
As we’ve seen above, the first two methods offer convenient solutions: Embedding ActiveCampaign’s form code directly into Webflow provides an easy setup with ActiveCampaign’s native forms, though it’s design-limited. Zapier integration to connect Webflow form submissions to ActiveCampaign allows for no-code workflows while keeping your Webflow form design intact, but its recurring costs can quickly add up—especially for high-volume sites, making it less ideal for businesses handling large amounts of data.
To overcome these challenges, we’ve developed a custom JavaScript code designed to run on a Cloudflare Worker. This method leverages the ActiveCampaign API to connect your Webflow forms seamlessly while preserving your current design. We’ll guide you through setting up your own Cloudflare Worker, which allows you to handle up to 100,000 requests daily for free and scale to 10 million requests a day for just $5.
Here’s why this custom integration is a great choice:
- Keep your Webflow form design exactly as it is, with no changes to its appearance or functionality.
- Establish a direct, secure connection to ActiveCampaign using lightweight JavaScript and their API.
- Enjoy minimal ongoing costs, as Cloudflare’s free tier and ActiveCampaign cover most needs for small-to-medium businesses.
For businesses seeking a cost-effective and scalable solution without sacrificing design flexibility, this custom JavaScript code to connect Webflow forms with the ActiveCampaign API is the ideal option.
Step 1: Setup your Cloudflare account create your worker
Cloudflare Worker is a serverless platform that runs code on Cloudflare’s global network without requiring a traditional server. For example, it can process tasks like form submissions quickly and reliably, minimizing both costs and complexity.
- Sign up for a free Cloudflare account or log in to an existing one.
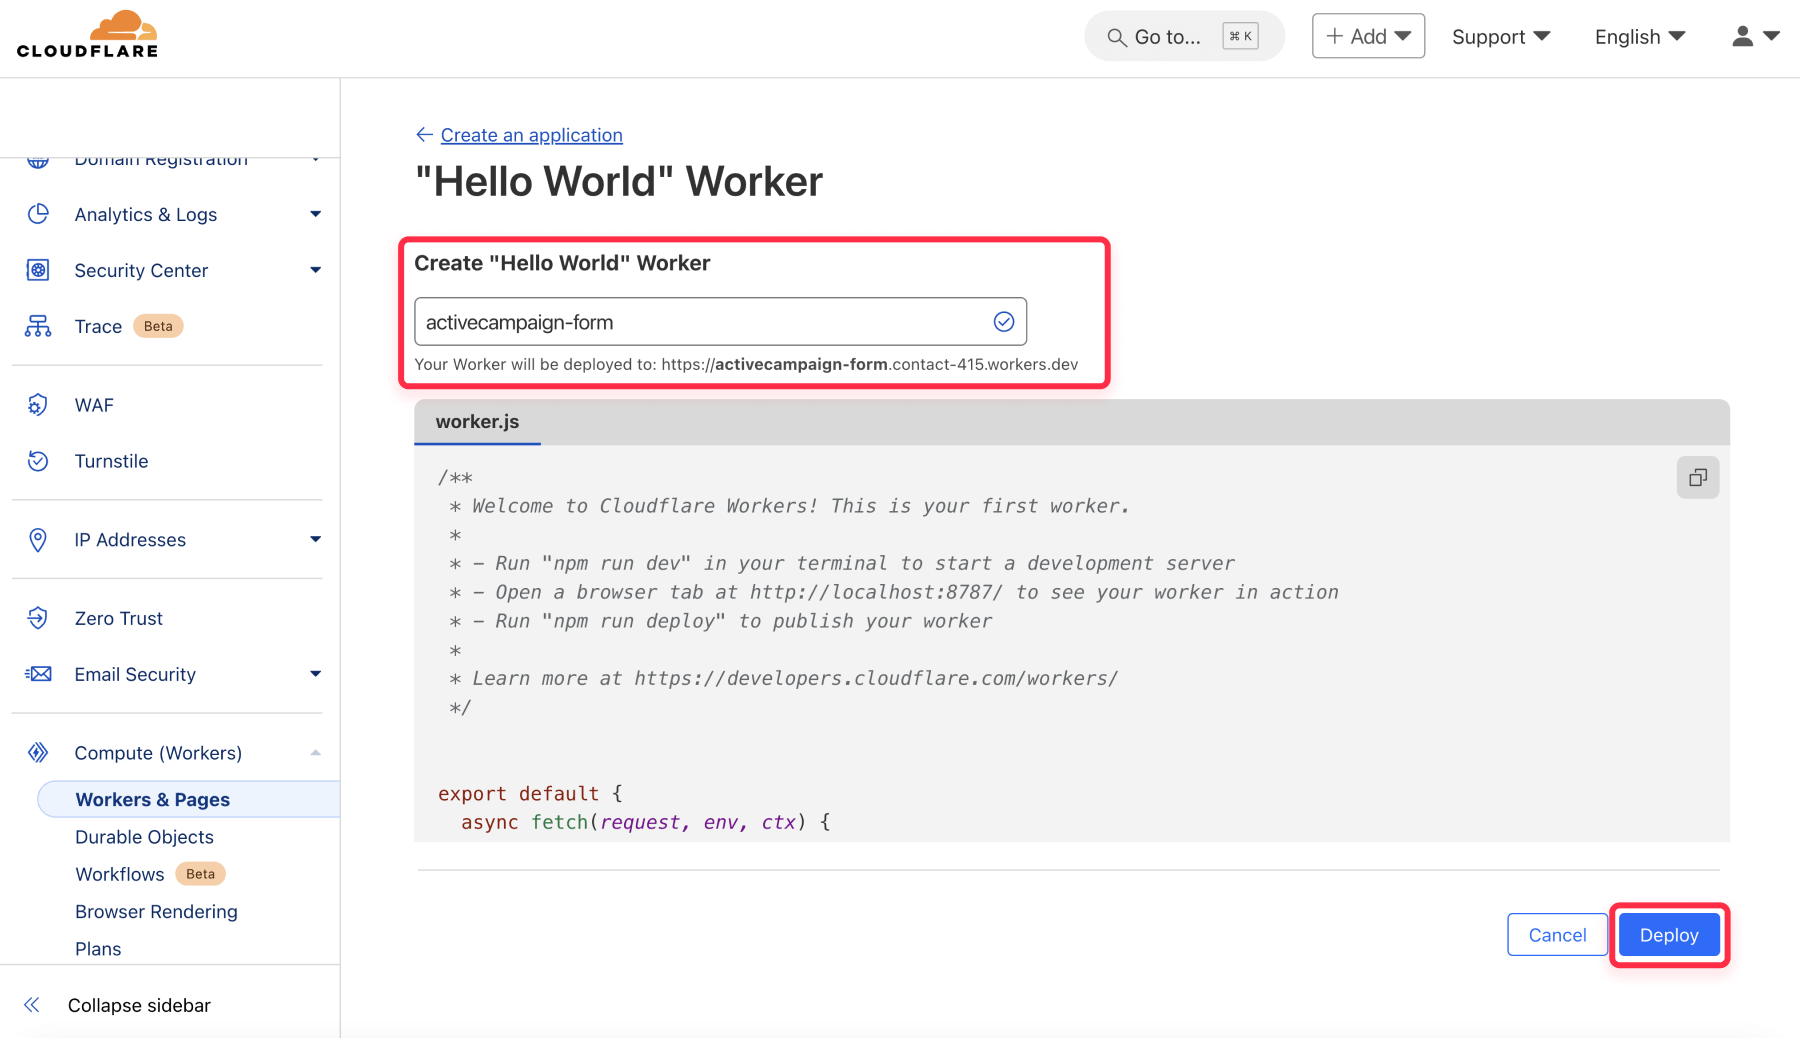
- Navigate to the "Workers & Pages" section under the "Compute" menu in your dashboard.
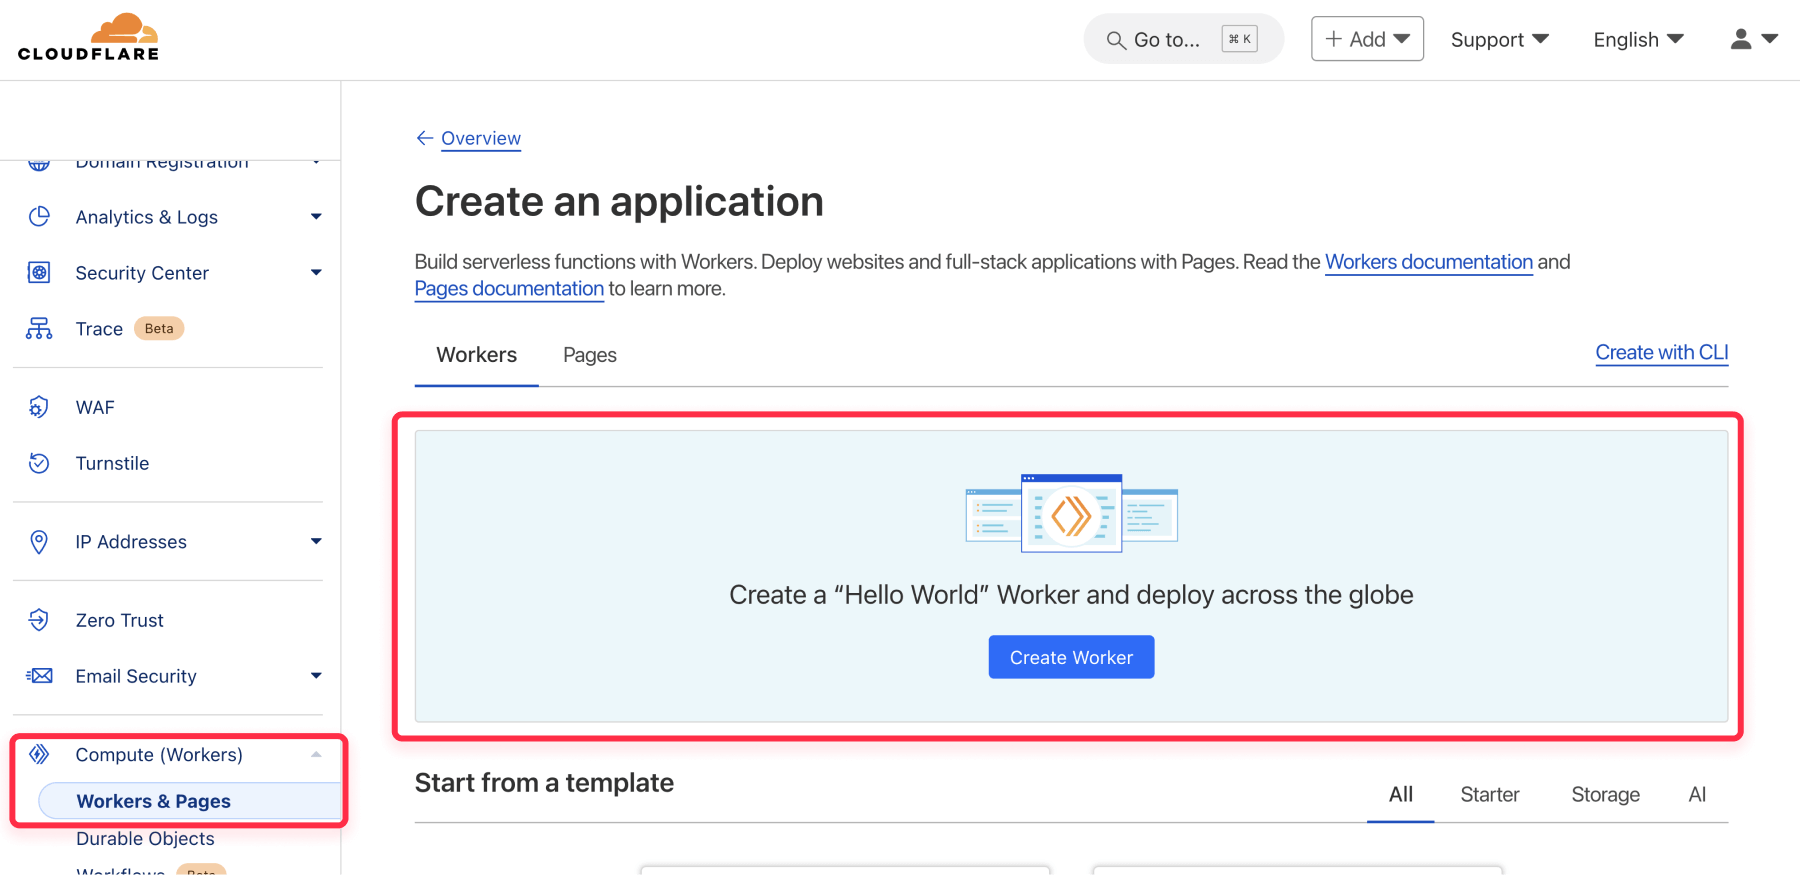
- Click Create > Create Worker to set up a new Worker. Give it a descriptive name, such as "activecampaign-form", to easily identify it later.
- Deploy your Worker by clicking "Deploy" after naming it. Once deployed, Cloudflare will generate a unique Worker URL. Copy and save this URL for later.
- After deployment, test the Worker URL by opening it in a browser—it should display a default ‘Hello World’ message.
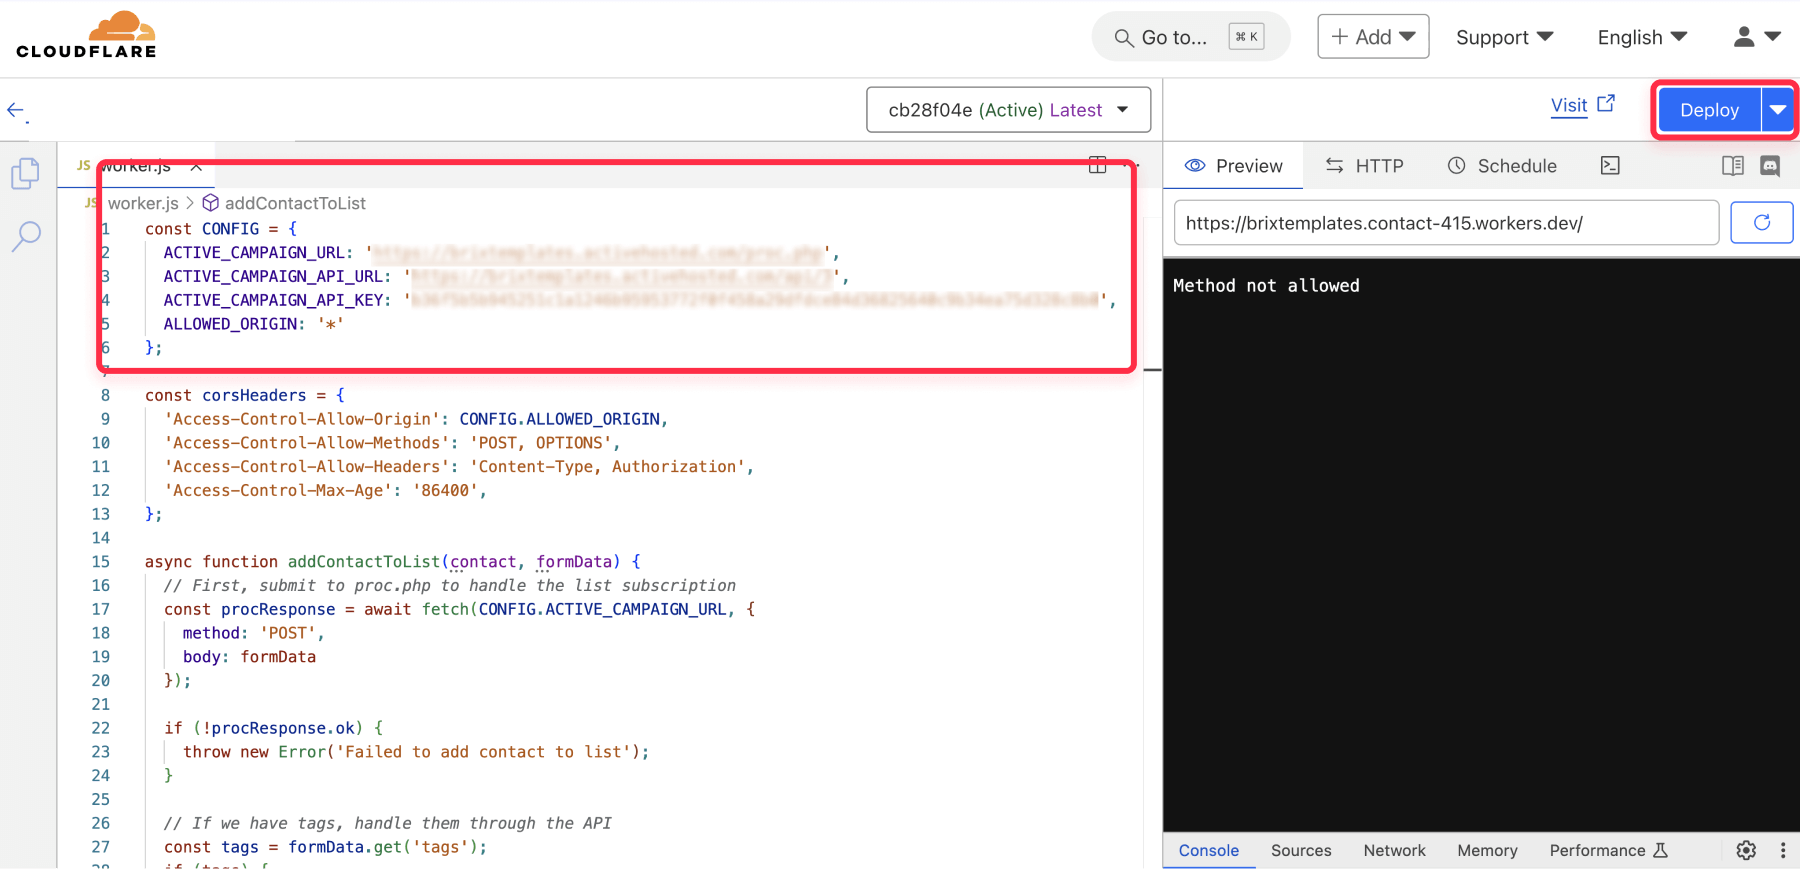
Step 2: Add the custom JavaScript code to the Cloudflare Worker
This custom script links your Webflow forms to ActiveCampaign, processing form submissions and automating tasks like subscriptions and tag management.
- Open the Worker editor after deploying your Worker to begin editing.
- Paste the pre-built code into the editor. Ensure it’s formatted correctly.
const CONFIG = {
  ACTIVE_CAMPAIGN_URL: '',
  ACTIVE_CAMPAIGN_API_URL: '',
  ACTIVE_CAMPAIGN_API_KEY: '',
  ALLOWED_ORIGIN: '*'
};

const corsHeaders = {
  'Access-Control-Allow-Origin': CONFIG.ALLOWED_ORIGIN,
  'Access-Control-Allow-Methods': 'POST, OPTIONS',
  'Access-Control-Allow-Headers': 'Content-Type, Authorization',
  'Access-Control-Max-Age': '86400',
};

async function addContactToList(contact, formData) {
  // First, submit to proc.php to handle the list subscription
  const procResponse = await fetch(CONFIG.ACTIVE_CAMPAIGN_URL, {
    method: 'POST',
    body: formData
  });

  if (!procResponse.ok) {
    throw new Error('Failed to add contact to list');
  }

  // If we have tags, handle them through the API
  const tags = formData.get('tags');
  if (tags) {
    try {
      // Get contact by email to get their ID
      const contactResponse = await fetch(`${CONFIG.ACTIVE_CAMPAIGN_API_URL}/contacts?email=${encodeURIComponent(contact.email)}`, {
        headers: {
          'Api-Token': CONFIG.ACTIVE_CAMPAIGN_API_KEY,
          'Content-Type': 'application/json'
        }
      });

      const contactResult = await contactResponse.json();
      if (contactResult.contacts && contactResult.contacts.length > 0) {
        const contactId = contactResult.contacts[0].id;

        // Improved tag splitting
        const tagArray = tags.split(/\s*,\s*/).filter(tag => tag.trim());
        console.log('Processing tags:', tagArray);

        // Add each tag
        for (const tagName of tagArray) {
          try {
            // First try to find existing tag
            const searchResponse = await fetch(`${CONFIG.ACTIVE_CAMPAIGN_API_URL}/tags?search=${encodeURIComponent(tagName)}`, {
              headers: {
                'Api-Token': CONFIG.ACTIVE_CAMPAIGN_API_KEY,
                'Content-Type': 'application/json'
              }
            });

            const searchResult = await searchResponse.json();
            let tagId = null;

            // Check if tag exists
            if (searchResult.tags) {
              const existingTag = searchResult.tags.find(t =>
                t.tag.toLowerCase() === tagName.toLowerCase()
              );
              if (existingTag) {
                tagId = existingTag.id;
              }
            }

            // If tag doesn't exist, create it
            if (!tagId) {
              const createResponse = await fetch(`${CONFIG.ACTIVE_CAMPAIGN_API_URL}/tags`, {
                method: 'POST',
                headers: {
                  'Api-Token': CONFIG.ACTIVE_CAMPAIGN_API_KEY,
                  'Content-Type': 'application/json'
                },
                body: JSON.stringify({
                  tag: {
                    tag: tagName,
                    tagType: 'contact',
                    description: `Tag created for ${contact.email}`
                  }
                })
              });

              const createResult = await createResponse.json();
              tagId = createResult.tag?.id;
            }

            if (tagId) {
              // Add tag to contact
              await fetch(`${CONFIG.ACTIVE_CAMPAIGN_API_URL}/contactTags`, {
                method: 'POST',
                headers: {
                  'Api-Token': CONFIG.ACTIVE_CAMPAIGN_API_KEY,
                  'Content-Type': 'application/json'
                },
                body: JSON.stringify({
                  contactTag: {
                    contact: contactId,
                    tag: tagId
                  }
                })
              });
              console.log(`Successfully added tag: ${tagName}`);
            }
          } catch (tagError) {
            console.error(`Error processing tag ${tagName}:`, tagError);
          }
        }
      }
    } catch (tagError) {
      console.error('Error handling tags:', tagError);
      // Don't throw error here - we still want to count the submission as successful
    }
  }

  return true;
}

function handleOptions(request) {
  return new Response(null, { headers: corsHeaders });
}

addEventListener('fetch', event => {
  event.respondWith(handleRequest(event.request));
});

async function handleRequest(request) {
  if (request.method === 'OPTIONS') {
    return handleOptions(request);
  }

  if (request.method !== 'POST') {
    return new Response('Method not allowed', { status: 405 });
  }

  try {
    const formData = await request.formData();
    const contact = {
      email: formData.get('email'),
      firstname: formData.get('firstname') || '',
      lastname: formData.get('lastname') || ''
    };

    const result = await addContactToList(contact, formData);

    return new Response(JSON.stringify({
      success: true,
      data: result
    }), {
      headers: {
        ...corsHeaders,
        'Content-Type': 'application/json'
      }
    });

  } catch (error) {
    return new Response(JSON.stringify({
      success: false,
      error: error.message
    }), {
      status: 500,
      headers: {
        ...corsHeaders,
        'Content-Type': 'application/json'
      }
    });
  }
}- Update the following placeholders in the code with your ActiveCampaign details:
- ACTIVE_CAMPAIGN_API_URL: Enter your API URL from Settings > Developer in your ActiveCampaign account (e.g., https://[yoururl].activehosted.com/api/3).
- ACTIVE_CAMPAIGN_API_KEY: Add your unique API Key, also found in Settings > Developer.
- ALLOWED_ORIGIN: Set this to '*' to allow requests from any origin, or replace '*' with your website URL (e.g., https://example.com) for better security.
- ACTIVE_CAMPAIGN_URL: Use the campaign URL format from ActiveCampaign, such as https://[yoururl].activehosted.com/proc.php.
- Save your changes and redeploy the Worker by clicking Save and then Deploy. Cloudflare will update the Worker with the new configuration.
Step 3: Add the JavaScript code to your Webflow project
This custom JavaScript script connects your Webflow form to the Cloudflare Worker and ActiveCampaign, handling form submissions, validation, and feedback messages.
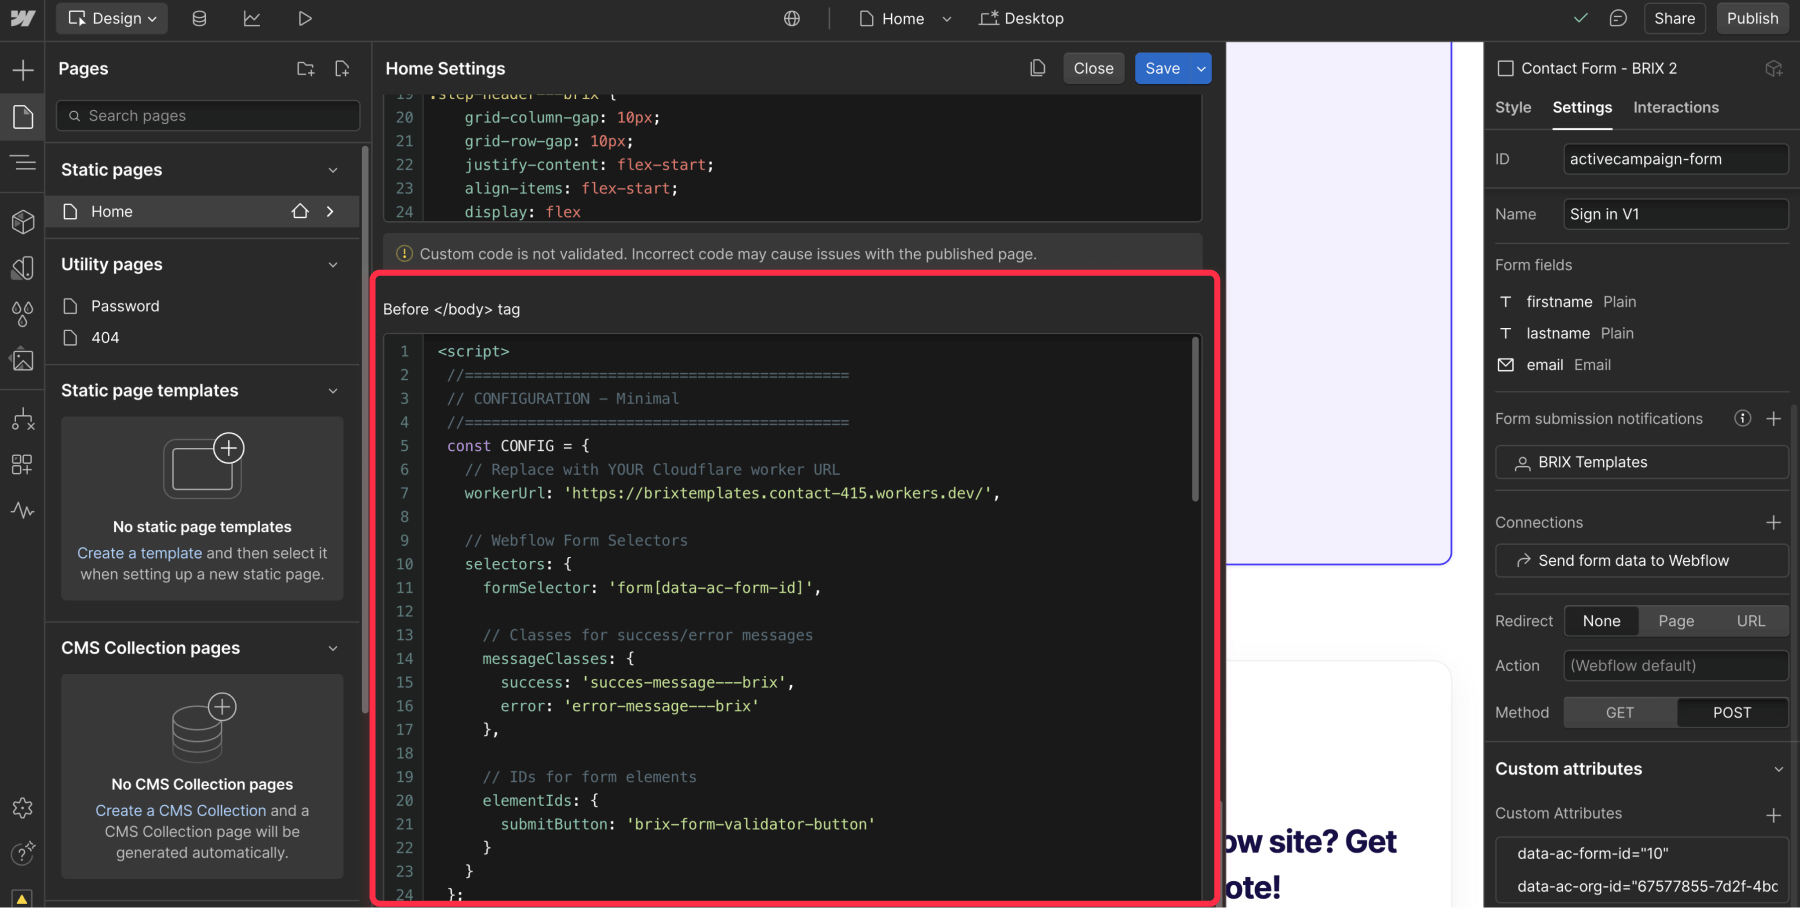
- Open your Webflow project and navigate to the page containing your form. Click the Page Settings (gear icon) to access the settings.
- Scroll to the Custom Code tab and locate the Before </body> section. Paste the provided JavaScript code into this section
 <script>
  //===========================================
  // CONFIGURATION - Minimal
  //===========================================
  const CONFIG = {
    // Replace with YOUR Cloudflare worker URL
    workerUrl: '',

    // Webflow Form Selectors
    selectors: {
      formSelector: 'form[data-ac-form-id]',

      // Classes for success/error messages
      messageClasses: {
        success: '',
        error: ''
      },

      // IDs for form elements
      elementIds: {
        submitButton: ''
      }
    }
  };

  //===========================================
  // Form Handler
  //===========================================
  document.addEventListener('DOMContentLoaded', function() {
    // Find the form by data-ac-form-id
    const forms = document.querySelectorAll(CONFIG.selectors.formSelector);

    forms.forEach(form => {
      // Grab the submit button
      const submitButton = form.querySelector(`#${CONFIG.selectors.elementIds.submitButton}`);
      // Grab success and error message divs
      const successMessage = document.querySelector(`.${CONFIG.selectors.messageClasses.success}`);
      const errorMessage   = document.querySelector(`.${CONFIG.selectors.messageClasses.error}`);

      form.addEventListener('submit', async function(e) {
        e.preventDefault();

        // Hide any existing messages
        if (successMessage) successMessage.style.display = 'none';
        if (errorMessage)   errorMessage.style.display   = 'none';

        try {
          // Gather form data
          const formData = new FormData(form);

          // ActiveCampaign required fields
          formData.append('u', form.getAttribute('data-ac-form-id'));
          formData.append('f', form.getAttribute('data-ac-form-id'));
          formData.append('s', '');
          formData.append('c', '0');
          formData.append('m', '0');
          formData.append('act', 'sub');
          formData.append('v', '2');
          formData.append('or', form.getAttribute('data-ac-org-id'));

          // Send data to your Cloudflare Worker
          const response = await fetch(CONFIG.workerUrl, {
            method: 'POST',
            body: formData
          });

          const result = await response.json();
          console.log('Server response:', result);

          if (result.success) {
            // Success: Hide form, show success
            form.style.display = 'none';
            if (successMessage) successMessage.style.display = 'block';
          } else {
            // Error response from server
            if (errorMessage) errorMessage.style.display = 'block';
          }
        } catch (err) {
          console.error('Form submission error:', err);
          // Network or unexpected error
          if (errorMessage) errorMessage.style.display = 'block';
        }
      });
    });
  });
  </script>
Configurethe CONFIG object in the script with the following details:
- workerUrl: Replace this with your Cloudflare Worker URL
- selectors:
These define how the script interacts with your Webflow form and its states:- formSelector: A custom attribute (data-ac-form-id) that identifies your form. You’ll add this attribute to your Webflow form later to connect it to ActiveCampaign.
- messageClasses:
Customize these with the CSS classes used for feedback messages in your Webflow project:- success: Class for success messages displayed after a successful submission.
- error: Class for general error messages shown when a submission fails.
- elementIds:
The script interacts with the following element in your Webflow form:- submitButton: The ID of the submit button, ensuring the script can validate and process form submissions effectively.
Save your changes and publish the page in Webflow to activate the integration.
Step 4: Configure your ActiveCampaign form in Webflow
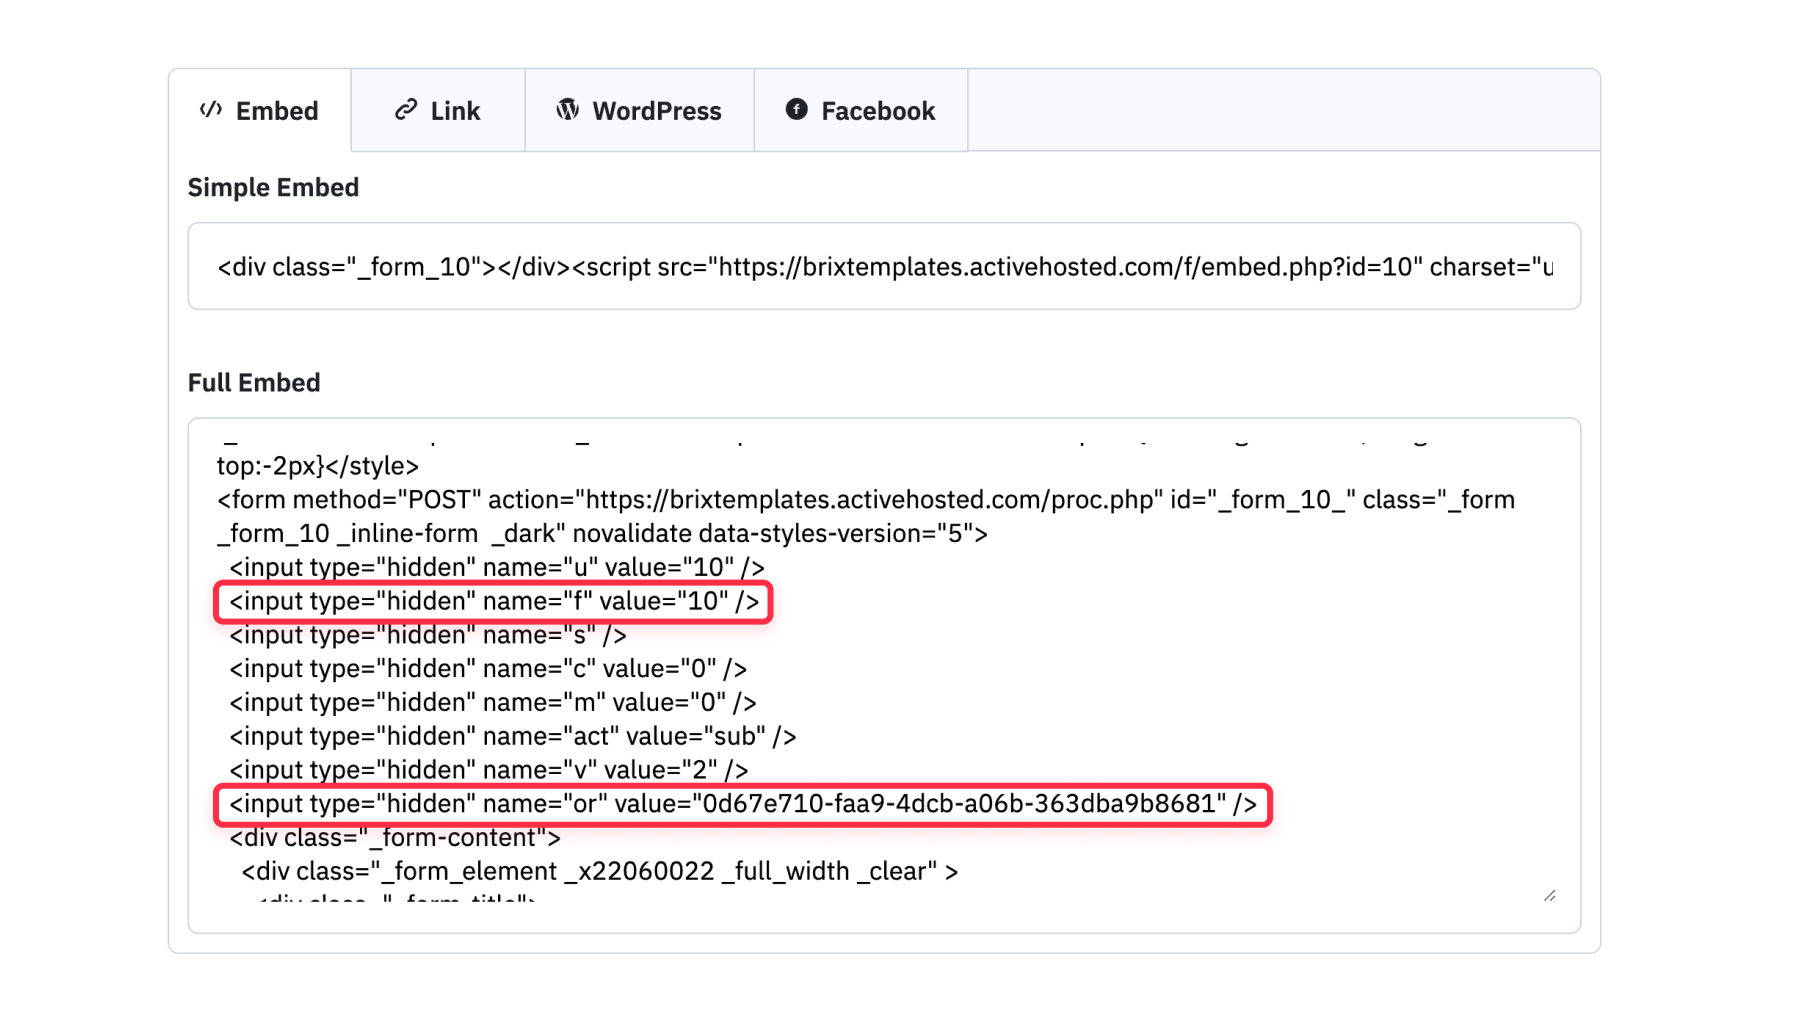
Get your ActiveCampaign form identifiers
- Log in to ActiveCampaign and go to the Forms section.
- Select the form you want to integrate, then click Embed Form > Full Embed.
- Copy the u (Form ID) and or (Organization ID) values from the generated embed code.
- For convenience, use the tool below to extract these values more easily by pasting the Full Embed code:
Update your Webflow form
- Add the following attributes to your Webflow form element in the Designer:
- data-ac-form-id: Your ActiveCampaign Form ID (e.g., 10).
- data-ac-org-id: Your Organization ID (e.g., 'Od67e710-faa9-4dcb-a06b-363dba9b8681').
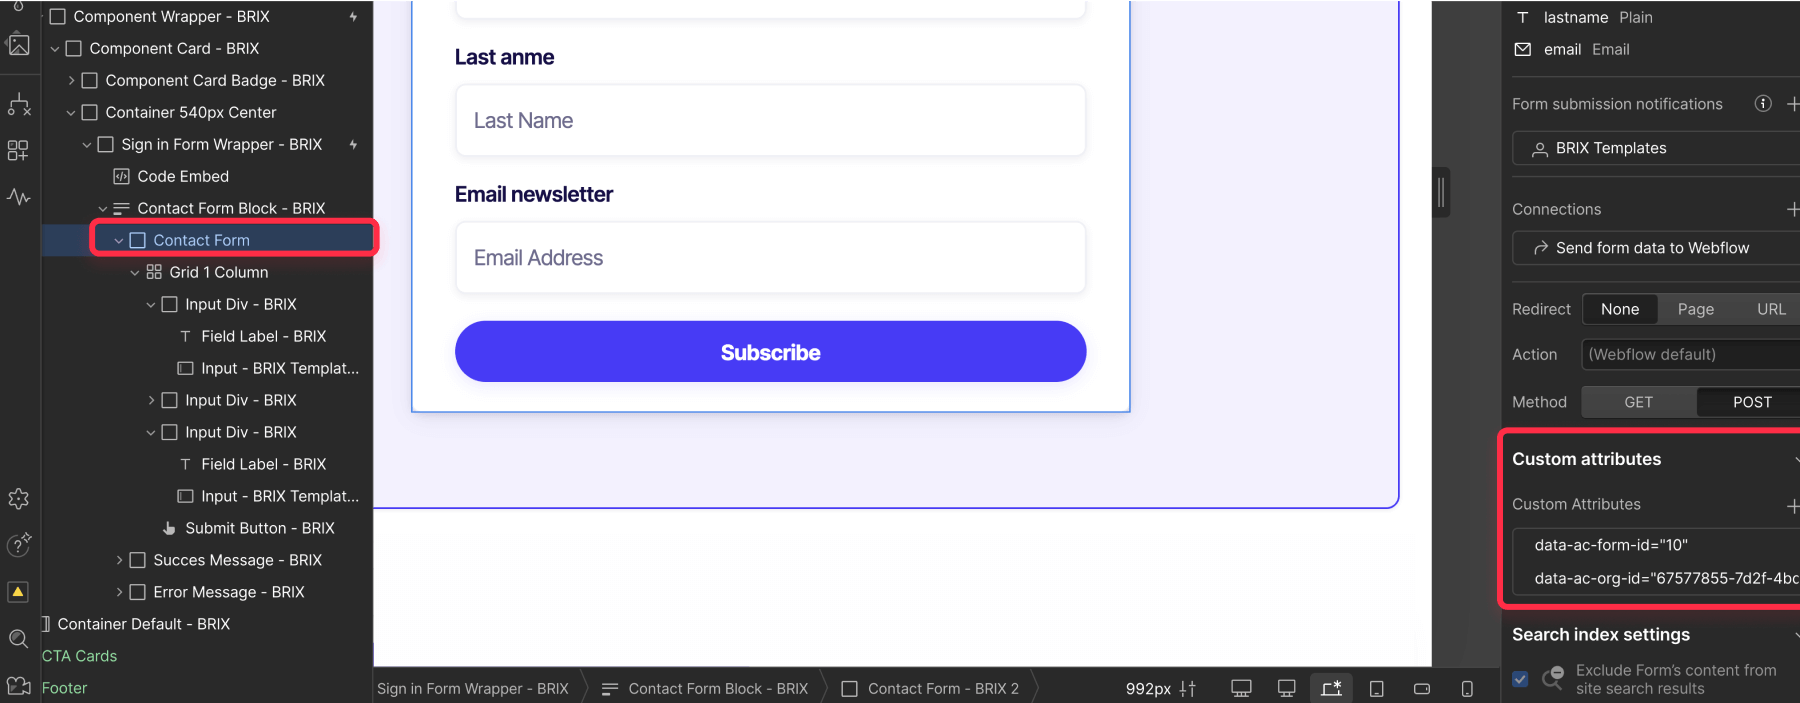
- Map form fields correctly in your Webflow form: Use the exact "Field Name" values that match ActiveCampaign’s field names. Below are examples of common fields:
- Email Address: Use email.
- First Name: Use firstname.
- Last Name: Use lastname.
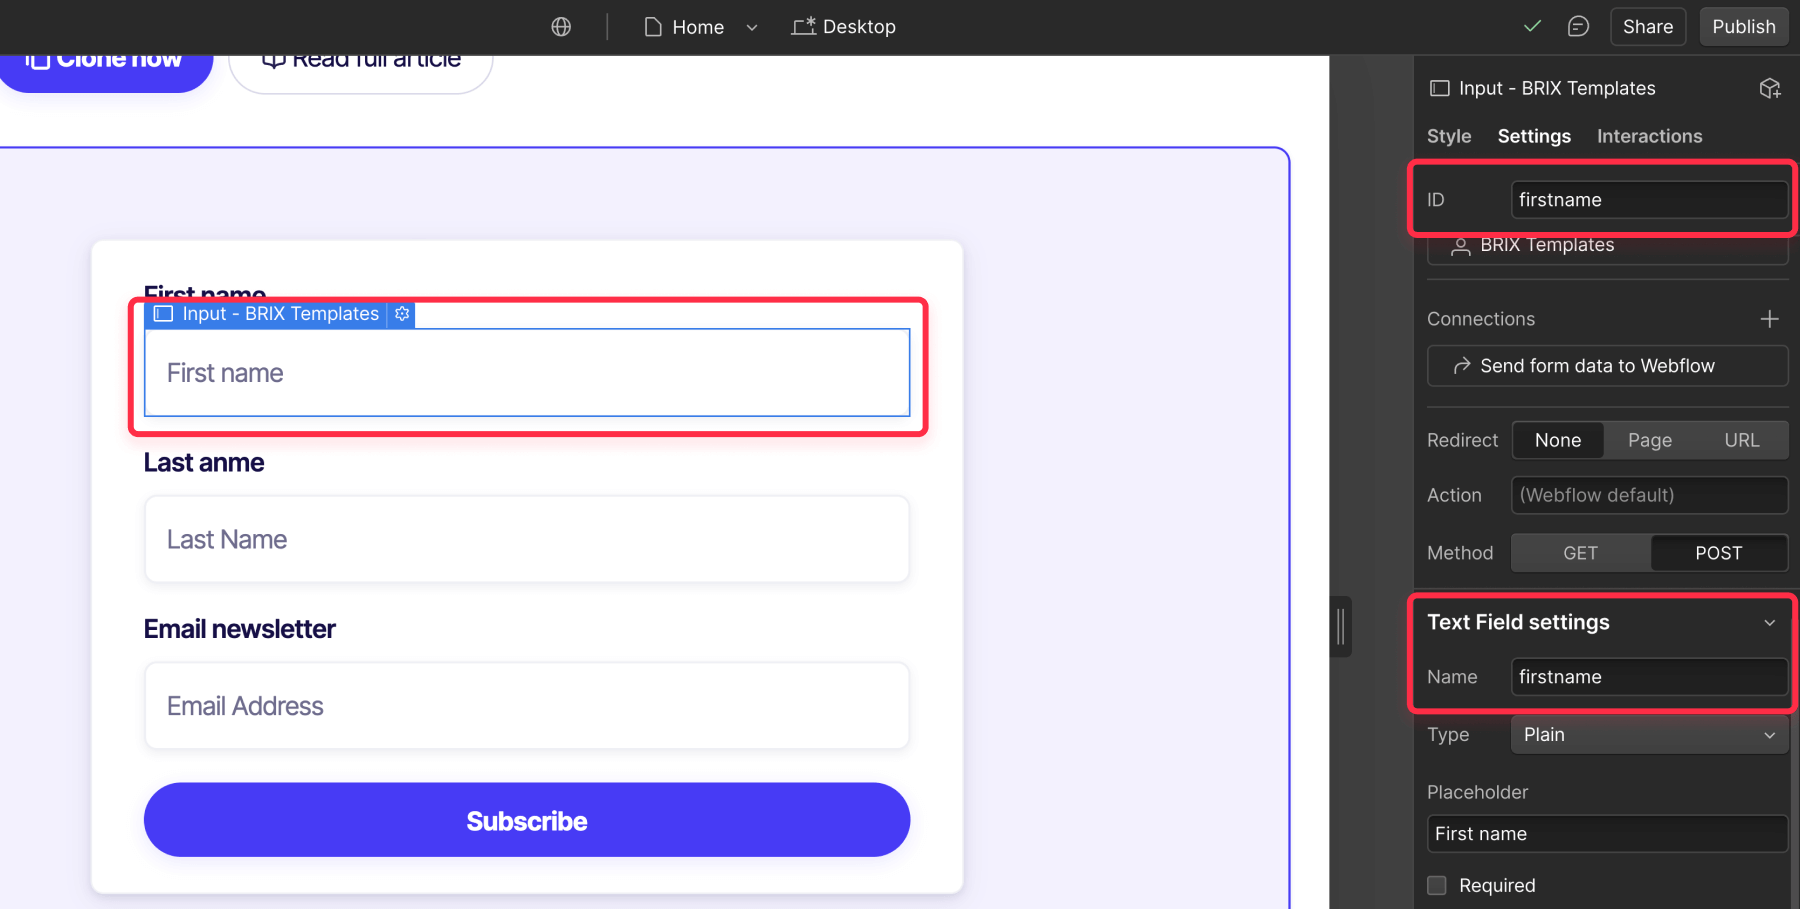
- ⚠️ Important: Field names are case-sensitive. For example, use firstname instead of FirstName.
Key requirements
- Form method: Ensure your form uses method="POST".
- Success/Error messages: The JavaScript relies on specific CSS classes and IDs to display success and error messages. If your Webflow project uses different classes, ensure you update them in the JavaScript configuration. Here are the default examples:
- Success message: .success-message---brix
- Error message: .error-message---brix
- Submit button: The submit button must have the ID #brix-form-validator-button. If your button uses a different ID, update the JavaScript code accordingly.
Which method should you choose?
Choosing the right integration method depends on your specific needs and resources. Here's a quick overview to help you decide:
Embedding ActiveCampaign’s form code directly into Webflow
- Best for: Quick and simple setup.
- Pros:
- Fast implementation with minimal effort.
- No additional tools required.
- Cons:
- Limited design customization.
- Ideal If: You need to get forms up and running quickly and are comfortable with ActiveCampaign’s default styling.
Zapier integration to connect Webflow form submissions to ActiveCampaign
- Best for: Creating complex and more automated workflows.
- Pros:
- No coding required.
- Connects with thousands of other apps for extensive automation.
- Cons:
- Monthly costs scale with submission volume (Zapier’s paid tiers).
- Data syncs may take 1–15 minutes, depending on Zapier’s queue.
- Ideal if: You use Zapier for other workflows and have budget for recurring fees.
Custom JavaScript code to connect Webflow forms with ActiveCampaign
- Best for: Full design control, scalability, and cost efficiency.
- Pros:
- Full customization to match your website’s design.
- No monthly fees (free Cloudflare Worker tier covers most needs).
- Real-time submissions with no third-party delays."
- Cons:
- Requires basic JavaScript/API knowledge to set up and maintain.
- Ideal if: You need unlimited customization, scalability for high traffic, and minimal long-term costs.
By evaluating your priorities—whether it's speed, automation complexity, or design flexibility—you can select the integration method that best aligns with your goals.
Conclusion
All three methods can successfully link your Webflow forms with ActiveCampaign. However, Method 3 (Custom JavaScript) stands out for flexibility, scalability, and cost efficiency, making it ideal for most users.
Need Assistance? Our team specializes in Webflow integrations and is ready to help you implement any of these methods. We can also develop custom solutions tailored to your unique needs. Contact us today to get started!


Join readers commenting on this post!